Fedders MEP09D2BC0M Installation & Operation Manual
- Category
- Split-system air conditioners
- Type
- Installation & Operation Manual
This manual is also suitable for

® Installation & Operation Manual
Manual de instalacion y funcionamiento
Manuel d'installation et d'utilisation
Room Air Conditioner •
Dehumidifier
Please read the operating instructions and safety
precautions carefully and thoroughly before
installing and operating your air conditioner.
Acondicionador de aire •
Deshumidificador
Por favor lea las instrucciones de funcionamiento y
las precauciones de seguridad cuidadosa y
totalmente antes de instalar y operar su
acondicionador de aire.
Climatiseur autonome •
D_shumidificateur
Veuillez lire attentivement et en entier ce guide
d'utilisation et les mesures de s_curit_ ci-incluses
avant de proc_der _ I'installation et _ I'utilisation de
votre climatiseur.
Write down the model and serial
numbers
Use these numbers in any correspondence or service calls
concerning your air conditioner. Keep your store receipt.
Escriba los nt_meros de modelo y de
serie
Utilice estos nOmeros en cualquier correspondencia o Ilamada
de servicio referente a su acondicionador de aire. Guarde el
recibo de la tienda.
Inscrivez les num6ros de module et
de s6rie
Utilisez ces num6ros clans toute correspondance ou Iors d'un
appe[ pour une intervention concernant le climatiseur.
Conservez le recu du magasin.
ENGLISH Page
Important Safety Instructions .......................................
Installation
Introduction ................................... 3
Window Mstallation .................................................. 4
Control Panel ................... 6
Operation ...................................................... 7
Maintenance ................................................................
Service & Warranty ................................................... 9
ESPAI_IOL
Instrucciones importantes de seguridad ................... 10
Instalaci6n
Introducci6n ............................................................ 11
Instalaci6n en ta ventana ....................................... 12
Panel de control ........................................................ 14
Funcionamiento ........................................................ 15
Mantenimiento ................................................. 16
Servicio y garantia .................................................... 17
FRANGAIS
Directives de s_curit_ importantes ............................ 18
Installation
Introduction ............................................................ 19
Installation - fen6tre ............................................... 20
Tableau de commande .............................................. 22
Utilisation ................................................................ 23
Entretien .................................................................. 24
Service apr_s-vente et garantie .................................. 25
Keep these instructions for future reference
Guarde estas instrucciones para referencia futura
Gardez ces instructions pour les consulter ulterieurement
For questions about installation, operation, or
service please call - 1-217-347-6459
Si tiene preguntas sobre la instalacion,
funcionamiento o servicio, Ilame al - 1-217-347-6459
Model No., No. de modelo, N° de modele
Serial No., No. de serie, N° de serie
Date of Purchase, Fecha de compra, Date d'achat
Si vous avez des questions sur I'installation,
I'utilisation ou le service apres-vente,
composez le- 1-217-347-6459
ou envoyez un courriel a -

Important safety instructions ooo°°oo°°oo°°oo°°oo°°oo°°oo°°oo°°°
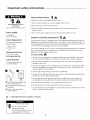
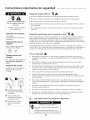
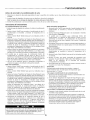
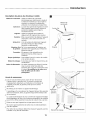
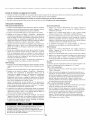
RECOMMENDED CIRCUIT
WIRE SIZES
(As installed per building code):
Power Supply:
115V, 60HZ
AC Only 1-Phase
Outlet Requirement:
3-Prong Grounding Type
125 V, 15 Amp
_ 25V
15A
Minimum Wire Size:
#14 (A.W.G.) 3-Wire
Use Copper Wire Only
Circuit Protector:
15 Amp Time Delay Fuse
or Circuit Breaker
I!
C)Three-prong grounding plug.
Do not alter plug end.
C) Grounded three-prong wall
receptacle
(_Single outlet grounding
wall receptacle
Electrical Shock Hazard _
Plug unit only into grounded electrical outlet.
Do not use an extension cord or plug adapter with this unit.
,'i'_Do not operate unit with filter removed.
Failure to follow these precautions could result in electrical shock, fire or
personal injury.
'!'Do not alter cord or plug end. Do not remove warning label on cord.
Important Grounding Requirements _
For your safety, this unit is equipped with a 3-pronged, grounding plug and must be
plugged into a properly grounded outlet. If your outlet is not of the proper type, it is
your responsibility to have the outlet and wiring changed to the correct type. Do not
cut off the third (grounding) prong. Do not use an adapter.
Your unit will operate on any 115 volt, 3-pronged (grounded) 60 Hz circuit. A separate
line is not required, but it is advisable not to overload the circuit with heavy duty
appliances such as washing machines, etc.
For Your Safety _J_
Do not store or use gasoline or other flammable vapors and liquids in the vicinity
of this or any other appliance. The fumes can create a fire hazard or explosion.
Do not introduce objects in the air discharge area. This could cause permanent
damage to your unit.
Do not pour liquids on the air conditioner as this could cause a malfunction. With
the unit unplugged, use a clamp cloth for cleaning your unit. This unit does not
require water or ice to be added.
Avoid using strong solvents to clean the air conditioner.
C ean the air conditioner filter every two weeks to avoid overheating caused by air
obstruction. Do not operate without filter.
Do not obstruct the air intake area of your air conditioner, as this could cause
overheating, thus activating the unit's security switch and shutting off the unit.
::!_ Do not block air circulation to air exchange tubes when in use.
::!_ Do not block air flow inside with blinds, curtains, or furniture.
Do not leave this unit unattended in a space where people or animals who cannot
react to a failed unit are located.
This symbol denotes a caution or warning
Electric Shock Hazard
Do not cut off the third
(grounding) prong.
Do not use an extension cord or
plug adapter with this unit.
2

oooooooooooooooooooooooooooooooooooooooooooooooooooIntroduction
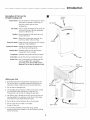
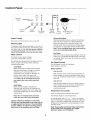
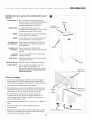
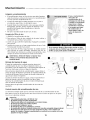
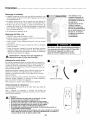
Description of Parts on the
Portable Cooling Unit
Control Panel
Air Outlet
Handles
Casters
Room Air Intake
System Air Intake
Exhaust Port
Serial Plate
Drain Valve
Power Cord
Use the electronic control panel to select
the mode, fan speed, set the timer, or
view the current and set room
temperature.
The air outlet discharges the air from the
unit into the room. Use the adjustable
louvers to direct the air.
Use the handles to help move the unit
around the room
Allow you to move the unit from one
room to another without lifting
Brings room air into the unit for cooling,
heating, or dehumidifying
Outside air is brought into the unit to
cool the internal components.
Exhausts warm air from the internal
components to the outside.
Identifies unit model and serial number
Drains the internal condensation tank
Uses a 3-pronged, grounding plug and
must be plugged into a properly
grounded outlet. Do not alter cord or
plug end. Do not use an extension cord.
Before you start
Read the instruction manual before operating the unit
for the first time. It contains important information on
operation, safety, maintenance, service and warranty.
.......Do not start a damaged unit.
......._, The assembly and connection of the unit must be carried
out according to the instructions. If they are not
followed you run the risk of voiding the warranty.
The power cord is located in the rear of the unit. Do not
use plug adapters or extension cords. Do not alter plug
end. Only use a grounded electrical outlet.
Do not allow contact between the unit and water.
.......Do not cover the air outlet or air intake
louvers of the unit.
To avoid the possibility of personal injury, always
disconnect the power supply to the unit before installing
and/or servicing.
u
Control
Panel
Air Outlet
J
i
/
System
Air Intake
Drain
Power Cord
Room
Air Intake
Exhaust Port
Plate
3

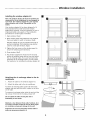
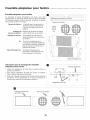
Window adapter kit ooooooooooooooooooooooooooooooooooooooooooo
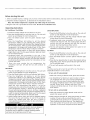
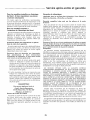
Window adapter kit
An installation parts kit is packed with your unit in a separate
carton. Before you discard the packaging that your unit came
in, please locate the carton that contains these parts and
ensure that all parts are present.
Window panel Attaches to window opening to
allow air exchange for system air
transfer.
Window panel extensions Extends window panel to fit
windows of various dimensions.
Tube adapters
Screws
Air exchange tubes
Connect Air exchange tubes to
window panel.
12 screws are included for
assembling the window adapter
kit. Some screws may be partially
assembled onto window panel.
Exchanges air between the unit
and outdoors.
Window panel extensions
Window panel
Screws
@@
Tube Adapters
Air Exchange Tubes
[] Back of
window panel
Instructions for assembling the window adapter kit
1. Insert tube adapters through the back of the window panel.
2. Secure each tube adapter with four screws through the
front of the window panel.
3. Insert window panel extensions into window panel. Lightly
tighten the screws in the window panel to hold the
extensions in place.
Tube Adapters
!1
Window Panel
Extension Window Panel
Window Panel
Extension screws ._ .[
@ ......
4

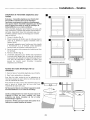
ooooooooooooooooooooooooooooooooooooooooooooWindow installation
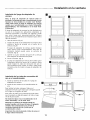
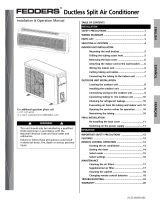
Installing the window adapter kit
Note: The window adapter kit must be installed and
connected for the air conditioner to work properly in
Cool mode. The window adapter kit is not required
when using the unit in Heat, Dehumidify, or Fan
modes.
Your window adapter kit has been designed to fit
most standard vertical and horizontal window
applications. However, it may be necessary for you to
improvise/modify some aspects of the installation
procedures for certain types of windows.
1. Open window. (fig.A)
2. Place window panel with extensions into window
frame and adjust to width of window. (fig.B)
Window adapter kit may be installed vertically as
well as horizontally. This installaton may also be
used for crank style windows. (fig.E)
3. Tighten the four screws on the window panel to
secure the window panel extensions.
4. Close window. (fig.C)
5. The window adapter kit should now fit securely
within the window frame and you can now attach
the air exchange tubes. If you are having trouble
attaching the air exchange tubes, you may attach
the tubes prior to installing the window adapter kit.
Attaching the air exchange tubes to the air
conditioner
1. Attach the tubes to the window adapter kit.
2. Attach the other end to the air conditioner.
To attach air exchange tubes: push tube onto tube
adapter and twist until the tab is in place in the hole
on the tube.
To remove air exchange tubes: twist the end until the
tab is clear of the hole in the tube and pull off.
Do not attach the tubes if using the unit in
dehumidify or heat mode.
Maintain a clear distance (from walls, furniture, etc.)
of at least 10 inches around the unit to allow proper
air circulation and prevent damage to the unit.
Important: Do not over-stretch the exhaust tube or
make any unnecessary bends in it.
m
i
i.i
_1 I"_I
i
I I
! Vertical installation
l
IU[ 1l 1
_11
5

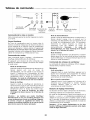
Control Panel oooooooooooooooooooooooooooooooooooooooooooooooooooo
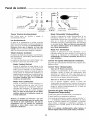
Warning
Light
qlP
COOL HEAT HiGH
9D
rAN lOW
@©®
Power JMII"_ re°DE FaNS,EED
Control Control Fan Speed
Control
_ MAYFP
Display
Mode
Indicators
O
TIMER
SET
Q
TIMER
Timer Timer/Tern p Set
Control Controls
Power Control
The power control turns the unit on and off.
Warning Light
Condensed water may accumulate in the unit. If
the internal tank becomes full, the Warning Light
will shine and the unit will not operate until the
unit has been drained. See Draining Excess Water
section for instructions on how to drain the water.
Mode Control
The Mode Control has 4 settings:
Cool, Heat, Dehumidify and Fan.
The settings are adjusted with the Mode Control
button. A light will indicate which setting is
currently being used.
Cool Mode
When Cool mode is selected, the indicator
light will shine green. During the cooling
mode the air is cooled and hot air is
exhausted to the outside air through the
exhaust tube. Adjust fan speed and
temperature to suit your desired comfort
level. Note: The air exchange hoses must
vent outside the room when using Cool
Mode.
Heat Mode
When the Heat mode is selected the
indicator light will shine red. Heated air is
circulated throughout the room. Adjust fan
speed and temperature to suit your desired
comfort level.
Note: The air exchange hoses must vent
inside the room when using Heat Mode.
Caution: Heat/Cool models or units with
electric heat are designed to be used only as
a supplemental heat source. They should be
used in addition to regular heating systems
and never as the primary source of heat.
Dehumidify Mode
When Dehumidify mode is selected, the indicator
light will shine orange. Air is dehumidified as it
passes through the unit, without being in full
cooling mode. The fan will operate in Med speed.
Fan speed is not adjustable in Dehumidify mode.
Note: The air exchange hoses must vent inside the
room when using Dehumidify Mode.
Fan Mode
When Fan mode is selected the LED light will shine
yellow. Air is circulated throughout the room with
no cooling. (Note: unit does not need to be vented
in Fan mode.)
Fan Speed Control
The Fan Speed Control has 3 settings:
High, Medium, and Low.
Timer Control
Auto turn off:
With machine in fan mode, press timer button to
select number of hours you would like the unit to
run in air conditioning mode until it automatically
shuts off.
Auto turn on:
With machine powered off, press timer button to
select number of hours until you would like the
unit to automatically start running in air
conditioning mode.
Temp/Timer Set Controls
Used for adjusting the timer and thermostat.
The default display is room temperature.
In cooling mode, when "+" or "-" button is pressed
the set temperature is displayed and may be adjusted.
After 15 seconds the display will revert back to room
temperature. Temperature is only adjustable in Cool
and Heat mode.
Note: By pressing both Temp/Timer Set buttons
at the same time, the display will toggle
between Celsius and Fahrenheit.
6

ooooooooooooooooooooooooooooooooooooooooooooooooooooooo°Operation
Before starting this unit
1. Select a suitable location, making sure you have a level surface with no obstructions, and easy access to an electrical outlet.
2. install the window adapter kit, as described in the installation section.
Note: The window adapter kit is required only while using the Cool mode.
3. Plug the unit into a grounded electrical outlet. Do not use an extension cord.
Operating Instructions
Air Conditioner/Cool Mode
1. install the widow adapter kit and hoses to the unit.
2. Press the On/Off button to turn the unit on. The unit will
power up and display the room temperature.
3. Press the Mode button until the green indicator light
shines.
4. Press the Temp/Timer Set buttons to set the desired
temperature. While you are adjusting the setting, the Set
Temperature indicator will shine and the display will show
the set temperature. After you have finished adjusting the
temperature, the display will default back to the room
temperature and the "Room Temp" indicator will shine.
5. Press the Fan Speed button to select the desired setting
(High, Med, Low). The fan speed indicator light will shine
for the selected speed.
6. Condensed water may accumulate in the unit. if the
internal tank becomes full, the warning light will shine and
the unit will not operate until the unit has been drained.
See Draining Excess Water section for instructions on how
to drain the water.
7. Once the room reaches the set temperature, the
compressor will turn off and the fan will continue to
operate.
Heat Mode
1. Press the On/Off button to turn the unit on. The unit will
power up and display the room temperature.
2. Press the Mode button until the red indicator light shines.
3. Press the Temp/Timer Set buttons to set the desired
temperature. While you are adjusting the setting, the Set
Temperature indicator will shine and the display will show
the set temperature. After you have finished adjusting the
temperature, the display will default back to the room
temperature and the "Room Temp" indicator will shine.
When the room temperature falls below 1° of the set
temperature, the unit will start heating the room. Whe the
room temperature reaches 1° above the set temperature
the unit will stop heating the room. 4. Air flow is adjusted
using the Fan Speed Control. Press the Fan Speed button to
select the desired setting (High, Med, Low). The fan speed
indicator light will shine for the selected speed.
5. Heater Safety feature: After the unit has stopped heating
the room, the fan will continue to run for 5 seconds to
remove any residual heat from the unit. If power is
interrupted during heating mode, the fan will continue to
run for 5 seconds.
Heat/Cool models or units with electric heat are designed
to be used only as a supplemental heat source. They
should be used in addition to regular heating systems
and never as the primary source of heat.
Dehumidify Mode
1. Pressthe On/Off button to turn the unit on. The unit will
power up and display the room temperature.
2. Press the Mode button until the orange indicator light
shines above the word Dehumidify.
3. Condensed water may accumulate in the unit. If the
internal tank becomes full, the warning light will shine
and the unit will not operate until the unit has been
drained. See Draining Excess Water section.
4. The fan will operate in Med speed. Fan speed is not
adjustable in Dehumidify mode.
Fan Mode
1. Pressthe On/Off button to turn the unit on. The unit will
power up and display the room temperature.
2. Press the Mode button until the yellow indicator light
shines.
3. Press the Fan Speed button to select the desired setting
(High, Med, Low). The fan speed indicator light will shine
for the selected speed.
4. The unit will operate continuously in Fan mode.
Timer
The timer can be set to turn the unit off or on. The timer is
adjustable between 1 and 12 hours.
To turn unit off automatically:
1. With unit running in desired mode, press timer button.
2.
Use TempiTimer Set buttons to select number of hours
you would like the unit to run until it automatically
shuts off. After you have finished adjusting the timer,
the display will default back to the room temperature
and the "Room Temp" indicator will shine. Timer
indicator will blink when set. To turn timer off press the
timer button.
To
1.
2.
turn unit on automatically:
With unit powered on select desired mode and fan
speed, then power unit off.
With machine powered off, press timer button to select
number of hours until you would like the unit to
automatically start running in air conditioning mode.
Timer indicator will blink when set. The display will
show the number of hours the unit is set until it begins
operation. To turn timer off press the timer button.
7

Maintenance °°°°°°°°ooooooooooooo°°o°°°°°°°°ooooooooooooo°°o°°°°o
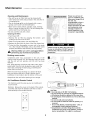
Cleaning and Maintenance
• The unit has an air filter that must be cleaned with
water every two weeks and put back in the unit after it
is completely dry.
• The air discharge grille can be cleaned with a rag or
sponge, warm water and mild detergent.
• Never use hot water, bleach, gasoline, acids, cleaning
fluid or a brush to clean the unit. This will damage the
cabinet and the air discharge area.
• Do not wash the unit with a hose.
Cleaning the filter.
1. Turn Power OFF.
2. Remove the air filter by grasping the bottom and
pulling it up and out of the unit.
3. Wash in hot soapy water, rinse and shake dry.
4. Replace the filter with the front of the filter toward you.
5. To dry the filter thoroughly, run your unit in fan mode
for a few minutes. Remember, only a clean filter works
properly and delivers top efficiency at every setting.
41_ Warning: Make sure unit is unplugged before
performing any maintenance procedure.
Draining excess water
Condensed water may accumulate in the unit. If the
internal tank becomes full, the Warning Light will shine
and the unit will not operate until the unit has been
drained.
First, uplug electrical cord from wall outlet. Then, drain
excess water from the tank by placing a pan under the
drain valve, removing the drain plug, and letting the
water drain into the pan.
When the water stops draining out, replace the drain
plug, and remove the pan of water. Operate the air
conditioner in fan mode to dry the interior of the unit.
Always drain the unit before putting it into storage.
Air Conditioner Remote Control
The functions work the same as your air conditioner's
touch controls.
Batteries: Remove the cover on the back of the remote
controller and insert the batteries with the (+) and (-)
poles pointing in the proper direction.
Proper use and care of
your air conditioner will
help ensure longer life of
the unit. It is
recommended to have a
professional annually
inspect and clean the coils
and condensate water
passages. Expense of
annual inspection is the
consumer's responsibility.
Failure to keep air filter clean will result
in poor air circulation. DO NOT operate
without filter. This can render the unit
inoperative.
.... J Drain Valve
/
_ AUTION:
• Use only AAA or IEC R03 1.5V batteries.
• Do not attempt to recharge the supplied batteries
• All batteries should be replaced at the same time.
• Do not dispose of the batteries in a fire as they may
explode.
• Do not mix old and new batteries.
• Do not install the batteries with the polarity (+/-)
reversed.
• Do not mix alkaline, standard (carbon - zinc), or
rechargeable (nickel-cadmium) batteries.
• Keep batteries and other things that could be
swallowed away from young children. Contact a
doctor immediately if an object is swallowed.
8

oooooooooo°oo°oo°ooo°oo°o°o°oo°o°o°oo°oo°ooo Service & warranty
Service instructions
Full (Five Year) Parts and Labor Warranty
Read carefully before calling for service
If the unit fails to start
• Make sure the unit is plugged into an outlet.
Make sure the unit is not in the off position.
Make sure the circuit breaker has not been tripped.
if the unit does not cool sufficiently
During the five years after the date of original purchase,
Fedders North America will, through its authorized
servicers and free of charge to the owner or any
subsequent user, repair or replace any parts which are
defective in material or workmanship due to normal use
when the unit is delivered by the owner to and picked up
from one of our authorized servicers. If requested, in-
home service, pick-up, redelivery and reinstallation will be
provided, but are the owner's responsibility.
Make sure the exhaust tube and nozzle fit correctly to each
other and to the window adapter.
Make sure the exhaust tube is not bent.
Note: In the event of any required parts replacement within the
period of this warranty, Fedder° North America replacement parts
shall he used and will he warranted only for the period remaining
on the original warranty,
Adjust the thermostat to a lower temperature. Exceptions
Make sure there are no objects inside the exhaust tube.
If the unit istoo loud
Make sure the exhaust tube and nozzle fit correctly to each
other and to the window mount.
Make sure the exhaust tube and nozzle are unobstructed.
How to Obtain Warranty Service or Parts
Note: Before calling for service, carefully read this Installation
and Operations manual.
For Models Installed in North America : Make the
recommended checks in the Troubleshooting guide on page 8.
1. Call a CareCo authorized servicer and advise them of model
number, serial number, date of purchase and nature of
complaint. Service will be provided during normal working
hours. Contact your dealer for the name of an authorized
servicer, if unknown to you.
2. If your dealer is unable to give you the name of a servicer
or if you need other assistance, contact CareCo for the
name of an authorized servicer.
You may contact CareCoby email:
by calling the following toll-free number:
1-800-332-6658
or you may write:
CareCo, Service Department
415 W. Wabash Ave., RO. Box 200
Effingham, IL 62401
The above warranty does not cover failure to function
caused by damage to the unit while in your possession
(other than damage caused by defect or malfunction), or
by its improper installation, or by unreasonable use of the
unit, including without limitation, failure to provide
reasonable and necessary maintenance or to follow the
written Installation and Operating Instructions. If the unit
is put to commercial, business, rental, or other use or
application other than for consumer use, we make no
warranties, express or implied, including but not limited
to, any implied warranty of merchantability or fitness for
particular use or purpose.
THE REMEDIES PROVIDED FOR IN THE ABOVE EXPRESS
WARRANTY ARE THE SOLE AND EXCLUSIVE REMEDIES
AND NO OTHER EXPRESSWARRANTIES ARE MADE. ALL
IMPLIED WARRANTIES, INCLUDING BUT NOT LIMITED TO
ANY IMPLIED WARRANTY OF MERCHANTABILITY OR
FITNESS FOR A PARTICULAR USEOR PURPOSE, ARE
LIMITED IN DURATION TO FIVE YEARS FROM THE DATE OF
ORIGINAL PURCHASE. IN NO EVENT SHALL FEDDERS
NORTH AMERICA BE LIABLE FOR INDIRECT, INCIDENTAL,
OR CONSEQUENTIAL DAMAGES, EVEN IF ADVISED IN
ADVANCE OF THE POSSIBILITY OF SUCH DAMAGES. NO
WARRANTIES, EXPRESSOR IMPLIED, ARE MADE TO ANY
BUYER UPON RESALE.
Some states do not allow limitations on how long an
implied warranty lasts or do not allow the exclusion or
limitation of incidental or consequential damages, so the
above limitations or exclusions may not apply to you. This
warranty gives you specific legal rights, and you may also
have other rights which may vary from state to state.
No warranties are made for units sold outside of the
above stated areas. Your distributor or final seller may
provide a warranty on units sold outside of these areas.
For Models Installed Outside North America For room air
conditioners purchased for use outside North America, the
manufacturer does not extend any warranty either expressed
or implied. Consult your local dealer for any warranty terms
extended by the importer in your country.
Proof of Purchase Date
It is the responsibility of the consumer to establish the original
purchase date for warranty purposes. We recommend that a bill
of sale, cancelled check, or some other appropriate payment
record be kept for that purpose.
9

Instrucciones importantes de seguridad oooooooooooooooooooooooo
TAMANOS RECOMENDADOS
DE LOS CONDUCTORES DEL
CIRCUITO
(Instalados seg0n el cbdigo
de construccibn):
Suministro de corriente:
115V, 60HZ
Corriente alterna monof_sica
solamente
Tomacorriente que se
requiere:
De 3 alv_olos, tipo conexibn
a tierra, 125V, 15Amp
125V
15A
Tama_o minimo del
alambre:
No. 14 (A.W.G.) de 3 alambres
Use solamente alambre de
cobre
Protector del circuito:
Fusible de accibn retardada o
disyuntor de circuito de
15 Amp
C) Enchufe de tres clavijas
con puesta a tierra. No Io
modifique.
C) Tomacorriente para
enchufe de tres clavijas
con puesta a tierra.
(_) Tomacorriente mural
sencillo con puesta a
tierra.
Riesgo de choque electrico _
,.i_', Enchufe el aparato solamente en un tomacorriente el_ctrico puesto a tierra.
No use un cord6n de extensi6n ni un adaptador de enchufe con este aparato.
No haga funcionar el acondicionador de aire sin el filtro.
El incumplimiento de estas precaudones puede causar un choque el_ctrico, incendio o
lesi6n personal.
..........No modifique el cord6n ni el enchufe del extremo. No quite la etiqueta del cord6n
el_ctrico.
/%
Requisitos importantes para la conexi6n a tierra _ _J_
Para su seguridad, esta unidad est_ equipada con un enchufe de 3 clavijas con puesta a
tierra y debe enchufarse en un tomacorriente con la debida conexibn a tierra. Si su
tomacorriente no es del tipo adecuado, usted tiene la responsabilidad de hater que se
cambien tanto el tomacorriente como los alambres al tipo adecuado. No corte la tercera
clavija de conexibn a tierra. No use un adaptador.
Su unidad funcionar_ en cualquier circuito de 115 voltios, 3 alv_olos (con conexi6n a
tierra) y 60 Hz. No se requiere una linea separada, pero es aconsejable no sobrecargar el
circuito con artefactos que usan mucha corriente como m_quinas de lavar ropa, etc.
A
Para su seguridad
No guarde ni use gasolina u otros vapores y liquidos inflamables cerca de este o
cualquier otto artefacto. Los vapores emitidos pueden crear un riesgo de incendio o
explosi6n.
_/!' No introduzca objetos en el _rea de descarga del aire. Esto puede causar da_o
irreparable a su acondidonador de aire.
No vierta liquidos de limpieza en el acondidonador de aire pues esto puede causar
una averia. Use un paso h0medo para limpiarlo cuando est_ desconectado. Esta
unidad no requiere agua o hielo adicional.
'i' Evite usar solventes fuertes para limpiar el acondidonador de aire.
Limpie el filtro del acondicionador de aire cada dos semanas para evitar
sobrecalentamiento causado por obstrucci6n del aire. No use el acondicionador de
aire sin el filtro.
No obstruya el _rea de entrada del aire de su acondicionador, pues esto puede
causar sobrecalentamiento, Io cual activar_ el interruptor de seguridad y apagar_ el
aparato.
No bloquee la drculati6n del aire hacia el conducto de ventilaci6n cuando el
acondicionador est6 en uso.
No obstruya el flujo del aire hada el interior con persianas, cortinas o muebles.
No deje esta unidad desatendida en un lugar en donde se encuentren personas o
animales que no puedan reaccionar a una unidad defectuosa.
_IL Este simbolo indica una precaucion o advertencia
Peligro de choque el_ctrico
No corte la tercera clavija (de puesta a
tierra).
No use un cord6n de extensi6n ni un
adaptador de enchufe con este aparato.
10

ooooooooooooooooooooooooooooooooooooooooooooooooooooooIntroduccion
Identificacion de
portfitil
Panel de control:
Salida del aire:
Manijas:
Ruedas:
Entrada de aire
de la habitation:
Entrada de aire
del sistema:
Puerto de
evacuation:
Placa de serie:
Valvula de drenaje:
Cordon electrico:
las piezas del acondicionador de aire
Use el panel de control electr6nico para
ajustar la funci6n, la velocidad del ventilador o
el temporizador o para very ajustar la
temperatura actual de la habitaci6n.
La salida del aire libera el aire del
acondicionador a la habitaci6n. Use las rejillas
ajustables para dirigir el flujo de aire.
Use las manijas para mover el acondicionador
de aire dentro de la habitaci6n.
Le permiten mover el acondicionador de aire
de una habitaci6n a otra sin levantarlo.
Lleva el aire de la habitaci6n al interior del
acondicionador para enfriarlo, calentarlo o
deshumidificarlo.
Lleva el aire exterior al interior del
acondicionador para enfriar los componentes
internos.
Ventila el aire caliente de los componentes
internos al exterior.
Identifica el modelo y el nOmero de serie del
acondicionador de aire.
Drena el tanque de condensaci6n interna.
Usa un enchufe de 3 clavijas con puesta a
tierra y debe ser enchufado en un
tomacorriente debidamente puesto a tierra.
No altere el cordon o el enchufe. No use un
cordon de extension.
Antes de comenzar
Antes de usar la unidad por la primera vez, lea el manual de
instrucciones que contiene informaci6n importante sobre su
funcionamiento, seguridad, mantenimiento, servicio y garantia.
No encienda un acondicionador de aire da_ado.
El ensamblaje y la conexi6n del acondicionador de aire deben
realizarse de acuerdo con las instrucciones. Si no se siguen las
instrucciones, se corre el riesgo de invalidar la garantia.
El cord6n el6ctrico est_ ubicado en la parte trasera del
acondicionador de aire. No use un chup6n adaptador o un
cord6n de extensi6n. No altere el enchufe. Use solamente un
tomacorriente puesto a tierra.
No permita que el acondicionador de aire entre en contacto con
agua.
No cubra las rejillas de la salida o entrada de aire del
acondicionador.
Para evitar la posibilidad de sufrir lesiones personales, siempre
desconecte el suministro el6ctrico del acondicionador de aire
antes de hacer la instalaci6n o servicio.
11
m
Manija
Entrada
del
sistema
Panel de
control
J
J
Rejillas de
toma de aire
Puerto de
evacuaci6n
Placa
de serie
drenaje
Cord6n el6ctrico

Juego de adaptador de ventana ooooooooooooooooooooooooooooooooo
Juego de adaptador de ventana
Con su acondicionador de aire se incluye, en una caja separada,
un juego de piezas de instalaci6n. Antes de deshacerse del
material de empaque de su acondicionador, ubique la caja que
contiene estas piezas y aseg0rese de que no falte ninguna.
Panel de ventana:
Se fija a la abertura de la
ventana para permitir la
renovaci6n del aire para la
transferencia de aire del
sistema.
Extensiones del Extienden el panel de ventana
panel de la ventana: para ajustarlo a ventanas de
varias dimensiones.
Adaptadores de tubo:
Tornillos:
Conecta los tubos de renovaci6n
del aire al panel de ventana.
Se incluyen 12 tornillos para
instalar el juego de adaptador
de ventana. Algunos tornillos
pueden estar parcialmente
instalados en el panel de la
ventana.
Tubos de renovacion Circula el aire entre el
del aire: acondicionador y el exterior.
U
Extensiones del panel de la ventana
Panel de la ventana
Tornillos
Adaptadores de tubo
Tubos de renovaci6n del aire
I_ Parte trasera del
panel de la ventana
Instrucciones de montaje del juego de adaptador
de ventana
1. Inserte los adaptadores de tubo a trav_s de la parte trasera
del panel de la ventana.
2. Asegure cada adaptador de tubo con cuatro tornillos a
trav_s de la parte delantera del panel de la ventana.
3. Inserte en el panel de la ventana las extensiones del panel.
Apriete levemente los tornillos en el panel de la ventana
para sujetar las extensiones en su lugar.
HI
LJ U
J J
I II
$$
Iq
I
I
Adaptadores de tubo
m
Extensiones del panel
de la ventana
®
®
Panel de la ventana
@
Tornillos de las extensiones
del panel de la ventana
I
12

ooooooooooooooooooooooooooooooooooooooooo Instalacion en la ventana
Instalacion del juego de adaptador de
ventana
Nota: el juego de adaptador de ventana debe ser
instalado y conectado para que el acondicionador de aire
funcione en forma debida en el modo 'Cool' (Enfriar).
Usted puede retirar el juego de adaptador de ventana
cuando use el acondicionador en el modo 'Dehumidify'
(Deshumidificar), 'Fan' (Ventilador) o en el modo 'Heat'
(Calefaccion).
El juego de adaptador de ventana ha sido dise_ado para
su uso en la mayoria de aplicaciones est_indares en
ventanas horizontales y verticales. Sin embargo, puede
que usted tenga que improvisar/modificar algunos
aspectos de los procedimientos de instalaci6n para ciertos
tipos de ventanas.
1. Abra la ventana. (fig. A)
2. Coloque el panel con las extensiones en el marco de la
ventana y ajuste de acuerdo con el ancho de la
ventana. (fig. B)
El juego de adaptador de ventana puede instalarse
tanto vertical como horizontalmente. Este tipo de
instalaci6n tambi_n puede usarse en ventanas de
manivela. (fig. E)
3. Apriete los cuatro tornillos del panel de la ventana
para asegurar las extensiones del panel.
4. Cierre la ventana. (fig. C)
5. El juego de adaptador de ventana ahora debe calzar
firmemente dentro del marco de la ventana. Ahora
puede instalar los tubos de renovaci6n del aire. Si
tiene problemas para instalar los tubos, usted puede
instalarlos antes de instalar el juego de adaptador de
ventana.
Instalacion de los tubos de evacuacion del
aire en el acondicionador
1. Instale un extremo de los tubos en el juego de
adaptador de ventana.
2. Instale el otro extremo en el acondicionador de
aire.
Para instalar los tubos, coloque el tubo en el
adaptador del tubo y gire hasta que la leng0eta quede
en su lugar en el agujero del tubo.
Para retirar los tubos, gire el extremo del tubo hasta
que la leng0eta se salga del agujero del tubo y luego
tire de _1 para sacarlo.
No instale los tubos si usa el acondicionador en el
modo 'dehumidify' o en el modo 'heat'.
Mantenga una distancia de despeje (desde las
paredes, muebles, etc.) de por Io menos 10 pulgadas
alrededor del acondicionador para permitir la
circulacion adecuada del aire y evitar que el
acondicionador se da_e.
Importante: No estire demasiado el tubo de escape ni
le haga vueltas innecesarias.
m
|
I I
! Instalaci6n vertical
/ / _
13

Panel de control oooooooooooooooooooooooooooooooooooooooooooooooooo
qD
COOL HEAT HiGH
rAN lOW
@@®
ON/OFF MODE FAN SPEED
Control de _ontro, /
alimentaci6n de Modo Control de la
velocidad del
ventilador
_MAYI G
Luces
indicadoras
de Modo
O
O
TIMER
SET
Indicador
visual
Control del Controles de
temporizador Tem p./Tem poriz.
"Power' (Control de alimentacion)
Este botbn pone en marcha y apaga el
acondicionador de aire.
Luz de advertencia
el agua de la condensaci6n se puede acumular
dentro del acondicionador. Si se Ilena el dep6sito de
agua, esta luz se encender_. El acondicionador no
funcionara hasta que el deposito no haya sido
vaciado. Vea en la secci6n 'Drenaje del exceso de
agua' las instrucciones para desaguar el dep6sito.
"Mode" (Selector de Modo)
El selector de modo tiene 4 ajustes: 'Cool' (Enfriar),
Heat (Calefacci6n), 'Dehumidify' (Deshumidificar) y
'Fan' (Ventilador).
Los ajustes se seleccionan con el bot6n 'Mode'. Una
luz indicar_ el ajuste que est_ siendo usado.
Modo "Cooling" (Enfriar)
Cuando se selecciona el modo Enfriar, la luz
indicadora brillar_ de color verde. Durante este
modo el aire es enfriado y el aire caliente es
evacuado hacia el exterior a trav_s del tubo de
escape. Ajuste la velocidad del ventilador y la
temperatura de acuerdo con su nivel de confort
deseado. Nota: Los tubos de renovation del
aire deben ventilarse fuera de la habitation
cuando use el modo Enfriar.
Modo "Heat" (Calefaccion)
Cuando se selecciona el modo Calefacci6n, la
luz indicadora brillar_ de color rojo. El aire
caliente circular_ en la habitaci6n. Ajuste la
velocidad del ventilador y la temperatura de
acuerdo con su nivel de confort deseado.
Nota: Los tubos de renovacion del aire deben
ventilarse dentro de la habitation cuando use
el modo Calefaccion.
Atencion: Los modelos con Frio/Calor o con calor
electrico han sido disefiados para ser usados como
una fuente de calor suplementaria. Son solo un
complemento para los sistemas de calefaccion
habituales y nunca deben usarse como fuente
primaria de calefaccion.
Modo "Dehumidify" (Deshumidificar)
Cuando se selecciona el modo Deshumidificar, la luz
indicadora brillar_ de color naranja. El aire se
deshumidifica al pasar por el acondicionador de aire sin
estar en el modo de enfriamiento completo. El
ventilador funcionar_ a velocidad media. Esta velocidad
no se puede ajustar. Nota: Los tubos de renovacion del
aire deben ventilarse dentro de la habitation cuando
use el modo Deshumidificar.
Modo "Fan" (Ventilador)
Cuando se selecciona el modo Ventilador, la luz
indicadora brillar_ de color amarillo. El aire circular_ a
trav_s de la habitaci6n sin enfriamiento. Nota: El
acondicionador no necesita evacuation del aire en el
modo Ventilador.
Control "Fan Speed" (Velocidad del ventilador)
El control de la velocidad del ventilador tiene 3 ajustes: Alto,
Mediano y Bajo.
Control "Timer' (Temporizador)
"Auto turn off" (Parada automfitica):
Cuando el acondicionador de aire est_ en el modo
ventilador, optima el bot6n del temporizador para
seleccionar el nQmero de horas que desea que el
acondicionador permanezca en acondicionamiento de
aire hasta que se apague autom_ticamente.
"Auto turn on' (Puesta en marcha automfitica):
Con el aparato apagado, optima el bot6n del
temporizador para seleccionar el n0mero de horas que
usted desea que transcurran antes de que el aparato se
ponga en marcha autom_ticamente en el modo de
acondicionamiento de aire.
Controles de ajuste "Temp/Timer"
(Temperatura/Temporizador)
Se usan para ajustar el temporizador y el termostato.
El ajuste implicito es temperatura ambiente.
En el modo de enfriamiento, cuando se oprime el bot6n "+"
o "-" se despliega la temperatura programada y la misma
puede set ajustada. Despu_s de 15 segundos, el indicador
visual volver_ a desplegar la temperatura ambiente. La
temperaura s61o se puede ajustar en los modos Enfriar y
Calefacci6n.
Nota: Si se oprimen simultaneamente ambos botones, el
indicador digital cambiara entre grados Celsius y Fahrenheit.
14

oooooooooooooooooooooooooooooooooooooooooooooooooooFuncionamiento
Antes de encender el acondidonador de aire
1. Seleccione una ubacaci6n adecuada asegur_ndose de que la superficie este nivelada, que no haya obstrucciones y que haya un tomacorriente
accesible.
2. Instale el juego de adaptador de ventana como se describe en la secd6n de instalaci6n.
Nota: Se requiere el uso del juego de adaptador de ventana solo para el modo Enfriar.
3. Enchufe el acondicionador a un tomacorriente puesto a tierra. No use un cord6n de extensi6n.
Instrucdones de fundonamiento
Aire acondidonado/Modo 'Cool' (Enfriar)
1. Instale el juego de adaptador de ventana y los tubos al acondicionador
de aire.
2. Oprima el bot6n 'On/Off' para encender e[ acondicionador de aire. E[
acondidonador se encendera y mostrara [a temperatura de [a
habitaci6n.
3. Oprima el bot6n 'Mode' (Modo) hasta que la luz indicadora verde se
endenda.
4. Oprima los botones 'Tempfrimer Set' (Ajuste de Temp./Temporiz.) para
programar la temperatura deseada. Mientras ajusta la temperatura, la
luz [ndicadora 'Set Temperature' (Ajuste de Temperatura) se encender& y
el indicador visual mostrar& la temperatura programada. Despu_s de
terminar de ajustar la temperatura, el indicador visual mostrar&
nuevamente la temperatura de la habitaci6n y la luz indicadora 'Room
Temp' (Temp. de la Habitaci6n) se encender&.
5. Oprima el bot6n 'Fan Speed' (Velocidad del Ventilador) para programar
el ajuste deseado: 'High' (Alto), 'Med' (Mediano) y 'Low' (Bajo). La luz
indicadora de la velocidad del ventilador correspondiente se encender&.
6. Es posible que se acumule agua de condensaci6n dentro del
acondicionador. Si el dep6sito de agua interno se Ilena, la luz de
advertencia se encender& y el acondicionador de aire dejara de funcionar
hasta que se vac[e el dep6sito. Vet la secci6n "Drenaje del Exceso de
Agua" para obtener [nstrucdones sobre c6mo vadar el dep6sito.
7. Una vez que la habitaci6n alcance la temperatura programada, el
compresor se apagara y el ventilador continuara funcionando.
Modo 'Heat' (Calefacd6n)
I. Oprima el bot6n 'OnlOff' para encender el acondicionador de aire. El
acondicionador se encendera y mostrara la temperatura de la
habitaci6n.
2. Oprima el bot6n 'Mode' (Modo) hasta que la luz indicadora roja se
endenda.
3. Oprima los botones 'TemplTimer Set' (Ajuste de Temp./Temporiz.) para
programar la temperatura deseada. Mientras ajusta la temperatura, la
luz indicadora 'Set Temperature' (Ajuste de Temperatura) se encender_ y
el indicador visual mostrar_ la temperatura programada. Despu_s de
terminar de ajustar la temperatura, el indicador visual mostrar_
nuevamente la temperatura de la habitaci6n y la luz indicadora 'Room
Temp' (Temp. de la Habitaci6n) se encender_.
Cuando la temperatura de la habitaci6n caiga I ° pot debajo de la
temperatura programada, el acondicionador iniciar_ la calefacci6n.
Cuando [a temperatura de la habitaci6n sobrepase la temperatura
programada en I°, el acondicionador desactivara la calefacci6n
4. El flujo de[ aire se ajusta usando el control de velocidad del ventilador.
Oprima el bot6n 'Fan Speed' (Velocidad del Ventilador) para programar
el ajuste deseado: 'High' (Alto), 'Med' (Mediano) y 'Low' (Bajo). La luz
indicadora de la velocidad de[ ventilador correspondiente se encender_.
5. Caracteristica de seguridad de la calefacci6n: Despu_s de que el
acondicionador haya terminado la calefacci6n de la habitaci6n, el
ventilador continuara funcionando por 5 segundos para eliminar
cualquier residuo de calor que haya quedado en [a unidad. Si se
interrumpe el suministro electrico durante la calefacci6n, el ventilador
continuar_ funcionando por 5 segundos.
Modo 'Dehumidify' (Deshumidificar
I. Oprima el bot6n 'On/Off' para encender el acondicionador de aire. El
acondidonador se encender& y mostrara la temperatura de la
habitaci6n.
2. Oprima el botbn de Modo hasta que la luz anaranjada se encienda
sobre la palabra 'Dehumidify'.
3. Es posible que se acumule agua condensada dentro del
acondicionador. Si el dep6sito de agua interno se llena, la luz de
advertencia se encendera y el acondicionador de aire dejara de
funcionar hasta que se vacie el dep6sito. Ver la secci6n "Drenaje del
Exceso de Agua'.
4. Elventilador funcionar& en el ajuste de velocidad 'Med' (Mediano). La
velocidad del ventilador no se puede ajustar en el modo 'Dehumidify'
(Deshumidificar).
Modo 'Fan' (Ventilador)
I. Oprima el bot6n 'OnlOff' para encender el acondicionador de aire. El
acondidonador se encender& y mostrara la temperatura de la
habitad6n.
2. Oprima el bot6n 'Mode' (Modo) hasta que la luz indicadora amarilla
se encienda.
3. Oprima el bot6n 'Fan Speed' (Velocidad del Ventilador) para
programar el ajuste deseado: 'High' (Alto), 'Med' (Mediano) y 'Low'
(Bajo). La luz indicadora de la velocidad del ventilador
correspondiente se encender&.
4. El acondidonador de aire fundonar& de manera continua cuando se
encuentre en el modo 'Fan' (Ventilador).
Temporizador
El temporizador puede ajustarse para encender o apagar el
acondicionador de aire. Se puede ajustar el temporizador para
funcionar entre I y 12 horas.
Para apagar el acondicionador de aire autom&ticamente:
I. Oprima el bot6n del temporizador mientras el acondicionador este
funcionando en el modo deseado.
2. Use los botones 'Temp/Timer Set' (Ajuste de Temp.ITemporiz.) para
programar la cantidad de horas que desea que el acondicionador
fundone antes de apagarse automaticamente. Despu6s de terminar
de ajustar el temporizador, el indicador visual mostrar& nuevamente
la temperatura de la habitaci6n y la luz indicadora 'Room Temp'
(Temp. de la Habitaci6n) se encendera. La luz [ndicadora del
temporizador destellara una vez que est_ programado. Para apagar
el temporizador, oprima el bot6n del temporizador.
Para encender el acondidonador automaticamente:
I. Programe el modo deseado mientras el acondicionador de aire este
encendido y luego apaguelo.
2. Oprima el bot6n del temporizador para programar la cantidad de
horas que desea que el acondicionador permanezca apagado antes
de encenderse autom&ticamente. La luz [ndicadora del temporizador
destellara una vez que este programado. El indicador visual
mostrar& la cantidad de horas que el acondicionador de aire
permanecera apagado antes de encenderse. Para apagar el
temporizador, oprima el botbn del temporizador.
Los modelos con FriolCalor o con calor el_ctrico han sido diseffados
para ser usados como una fuente de calor suplementaria. Son s61o un
complemento para los sistemas de calefacci6n habituales y nunca
deben usarse como fuente primaria de calefaccibn.
15

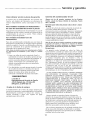
Mantenimiento oooooooooooooooooooooooooooooooooooooooooooooooooo
Limpieza y mantenimiento
• El acondicionador tiene un filtro de aire que debe limpiarse
cada dos semanas y colocarse de nuevo en el acondicionador
una vez que est_ completamente seco.
• La rejilla de salida del aire debe limpiarse con un patio o
una esponja, agua tibia y un detergente suave.
• Cuando limpie el acondicionador, nunca use agua caliente,
blanqueador, gasolina, _cidos, liquidos de limpieza o una
escobilla. Esto puede dafiar el gabinete y el _rea de
descarga del aire.
• No lave el acondicionador de aire con un tubo.
Limpieza del filtro de aire
1. APAGUE el acondicionador de aire.
2. Para retirar el filtro de aire, suj_telo de la parte inferior y
remu_valo hacia arriba y hacia afuera.
3. L_velo con agua caliente enjabonada, enju_guelo y sac0dalo
para secarlo.
4. InstMelo de nuevo en su lugar, asegur_ndose de que el lado
frontal quede mirando hacia usted.
5. Para secar bien el filtro, haga funcionar la unidad durante
unos minutos en modo Ventilador. Recuerde que solo un
filtro limpio har_ funcionar su unidad correctamente y dar_
siempre el servicio m_s eficiente en todas sus funciones.
El uso y mantenimiento
adecuados del
acondicionador de air
prolongara la vida Otil de
la unidad. Se recomienda
inspeccionar y limpiar
anualmente el serpentin
y los pasajes para agua
de condensacion. El
cliente debera cubrir los
gastos de inspeccion
anual.
El no mantener limpio el filtro podria resultar en baja
circulacion del aire. NUNCA haga funcionar la unidad sin
el filtro ya que puede quedar inutilizable.
Advertencia: Antes de limpiar o reparar esta
unidad, se recomienda desconectarla del
tomacorriente.
Drenaje del exceso de agua
El agua de condensaci6n se puede acumular dentro del
acondicionador de aire. Si se Ilena el depOsito interno, se
encender_ la Luz de Advertencia y el acondicionador dejar_ de
funcionar hasta que se drene el agua del depOsito.
Para comenzar, desenchufe el acondicionador. Luego, drene el
exceso de agua del depOsito colocando un recipiente debajo de
la vMvula de drenaje, retire el tapOn de drenaje y deje que el
agua escurra hacia el recipiente.
Cuando se termine de drenar el agua, coloque nuevamente el
tapOn de drenaje y retire el recipiente con agua. Haga
funcionar el acondicionador de aire en modo Ventilador para
secar el interior del aparato.
Siempre drene el agua del acondicionador de aire antes de
guardarlo.
if iiij i_ii
iJiriJii iJ
iffifiiiii
dMvula de
_ f drenaje
Control remoto del acondicionador de aire
Las funciones trabajan igual que los controles manuales de su acondicionador de aire.
Pilas: Retire al tapa en la parte trasera del control remoto e inserte las pilas con los polos
(+) y (-) en la direcciOn correcta.
&
ATENCION
• Use solamente pilas AAA o IEC R03 de 1,5V.
• No intente recargar las pilas suministradas.
• Todas las pilas deben ser reemplazadas a un mismo tiempo.
• No incinere las pilas pues pueden explotar.
• No mezcle pilas antiguas y nuevas.
• No instale las pilas con la polaridad (+I-) inversa.
• No mezcle pilas alcalinas, standard (carbon-zinc), con pilas recargables (niquel-cadmio).
• Mantenga fuera del alcance de los nifios pequefios las pilas y otros articulos que
puedan ser tragados. Pongase inmediatamente en contacto con un medico si un nifio
pequefio se traga un objeto.
F_
y
/
/
16

oooooooooooooooooooooooooooooooooooooooooooooooServicio y garantia
Como obtener servicio o piezas de garantia
El servicio para su deshumidificador ser_ provisto por
CareCo, una divisi6n del fabricante con estaciones de
servicio independientes CareCo autorizadas en todo el
pals.
Para modelos instalados en Norteam6rica -
En caso de necesidad de servicio o piezas
Haga primero las verificaciones recomendadas. En caso de
necesitarse servicio o piezas, consulte en la garantia de su
acondicionador de aire en la secci6n "C6mo obtener
servicio o piezas de garantia'.
Para modelos instalados fuera de
Nortearnerica
Para aires acondicionados comprados para uso fuera de
Norteamerica el fabricante no otorgar_ ninguna garantia
implicita o explicita. Consulte a su distribuidor autorizado
sobre las condiciones de la garantia extendida por el
importador de los equipos de su pals.
Nora: Antes de so/icitar servicio, lea cuidadosamente el folleto
de "lnstrucciones de Instalaci6n y Uso:" Luego, si necesita
servicio:
1. Llame a un taller de servicio autorizado CareCo y
suministreles el n0mero de modelo, n0mero de serie,
la fecha de compra y la naturaleza del problema. El
servicio se prestara durante horas normales de
trabajo. Comuniquese con su distribuidor para
obtener recomendaciones sobre una estaci6nde
servicio autorizada.
2. Si su distribuidor no puede proporcionarle el nombre
de un taller de servicio o si necesita otro tipo de
asistencia, Ilame al siguiente n0mero gratis para
obtener el nombre de un taller de servicio
autorizado o distribuidor de piezas autorizado:
1=866-NIAYTAG 1
o escriba al:
Departamente de Servicio de CareCo
415 W. Wabash Ave., P.O.Box 200
Effingham, IL 62401 EE. UU.
Prueba de la fecha de compra
El establecimiento de la fecha de compra original para
efectos de la garantia es responsabilidad del consumidor.
Recomendamos mantener la factura de compra, el
cheque cancelado o algOn otto registro de pago
apropiado para dicho efecto.
Garantia del acondicionador de aire
(Dentro de los 48 estados contiguos de los Estados
Unidos, estado de Hawai, Distrito de Columbia, Puerto
Rico y Canada)
Garantia para todas las piezas (cinco a_os) y mano
de obra
A partir de la fecha de compra y durante un periodo de
cinco afros, Fedders North America, mediante sus
estaciones de servicio autorizadas, reparar& o reemplazar_
sin costo alguno para el propietario o usuario, cualquier
pieza que presente dafos de material o mano de obra
derivados del uso normal del producto. Si se solicita, se
puede proporcionar servico a domicilio, recoger la unidad,
volveral a dejar y reinstalarla, pero todo esto se har_ bajo
la responsabilidad del duefo.
Nora: En caso de que se requiera reemplazar una pieza mientras
la garantia esta vigente, se utilizaran los repuestos de Fedders
North America los cuales continuaran en vignecia solamente
durante el resto dei periodo de garantia de la unidad.
Excepciones
La garantia antes indicada no cubre las fallas de
funcionamiento causadas por dafos que sufra la unidad
mientras _sta est_ en posesi6n del usuario (excluyendo los
dafos causados por defecto o funcionamiento defectuoso),
o por la instalaci6n incorrecta, o la utilizaci6n indebida de
la unidad, incluyendo pero sin limitarse a ello, la
negligencia en proporcionar el mantenimiento necesario y
adecuado o en seguir las "instrucciones de Instalaci6n y
Uso" indicadas por escrito. En caso de utilizarse la unidad
para fines comerciales, de negocios, de arriendo u otro uso
o aplicaci6n que no sea el uso del consumidor, no
otorgamos garantia explicita ni implicita, incluyendo, pero
sin limitarse a, toda garantia implicita de negociabilidad o
idoneidad para un uso o finalidad particular.
LAS SOLUCIONES EXPUESTAS EN LA GARANTIA ANTERIOR
SON EXCLUSlVAS. SE RECHAZA CUALQUIER OTRA
GARANTIA YA SEA EXPRESA O IMPLICITA, INCLUYENDO,
PERO SIN LIMITARSE A ELLO, TODAS LAS GARANTIAS DE
COMERCIABILIDAD O IDONEIDAD PARA UN FIN EN
PARTICULAR DURANTE ClNCO ANOS A PARTIR DE LA
FECHA DE COMPRA. BAJO NINGUNA CIRCUNSTANClA
FEDDERS NORTH AMERICA SE HARA RESPONSABLE POR
NINGUN DANO DIRECTO, INDIRECTO O CONSECUENClAL,
SIN IMPORTAR LA CAUSA DE LA ACCION, AUN CUANDO
FEDDERS NORTH AMERICA HAYA SIDO ADVERTIDO CON
ANTERIORIDAD DE LA POSlBILIDAD DE DICHOS DANOS. NO
SE OFRECE NINGUNA GARANTIA EXPRESA O IMPLICITA A
COMPRADORES DESPUESDE LA REVENTA.
Algunos estados no permiten limitar el tiempo de
duraci6n de una garantia implicita ni permiten excluir ni
limitar los dafos incidentales o emergentes, de modo que
las limitaciones o exclusiones antes indicadas podrian no
aplicarse en su caso. Esta garantia le otorga derechos
legales especificos. Usted podria tener tambi_n otros
derechos que pueden variar de estado a estado.
No se ofrecen garantias para las unidades vendidas fuera
de las _reas antes indicadas. Su distribuidor o vendedor
final podria proporcionar una garantia para las unidades
vendidas fuera de estas _reas.
17

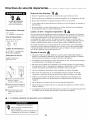
Directives de s curit importantes ooooooooooooooooooooooooooooooo
CALIBRE RECOMMANDI_
DES CONDUCTEURS
(selonle code du b_timent):
Alimentation electrique :
115 V, 60 Hz
c. a. seulement, monophas#
Prise d'alimentation :
Prise avec mise _ la terre
3 trous 125 V, 15 A
125 V
15A
Calibre de fil minimum :
N° 14 A.W.G., 3 conducteurs,
fil de cuivre seulernent
Protection du circuit :
Fusible temporis_ ou
disjoncteur 15 A
O Fiche _ trois broches (avec
liaison _ la terre).
Ne pas modifier la fiche.
I_ Prises de courant murales
trois alv_oles (avec liaison
la terre).
Prise de courant murale
simple (avec liaison _ la
terre).
Risque de choc electrique _ _lb
Brancher I'appareil uniquement sur une prise de courant reli_e _ la terre.
Ne pas utiliser avec cet appareil un cordon prolongateur ou un adaptateur de fiche.
Ne pas faire fonctionner cet appareil Iorsque le filtre _ air est enlev_.
Le non-respect de ces precautions peut entrafner un choc _lectrique, un incendie ou
des blessures.
'[ Ne pas modifier le cordon d'alimentation ou la fiche. N'enlever aucune _tiquette
d'avertissement fix_e au cordon d'alimentation.
Liaison _ la terre - Exigences importantes _
Pour la protection des utilisateurs contre les risques de choc _lectrique, le climatiseur
comporte un cordon d'alimentation muni d'une fiche _ trois broches (avec liaison _ la
terre) qu'on dolt brancher sur une prise de courant murale _ trois alv_oles
convenablement reli_e _ la terre. Si la prise de courant murale ne convient pas, il
incombe au propri_taire de faire installer une prise et un c_blage appropri_s. Ne pas
couper la troisieme broche (mise _ la terre). Ne pas utiliser d'adaptateur de fiche.
Ce modele fonctionne sur une alimentation de 115 volts, 60 Hz, par I'interm_diaire
d'une prise _ trois alv_oles correctement mise _ la terre. Un circuit _lectrique s_par_
n'est pas n_cessaire, mais il est conseill_ de ne pas surcharger le circuit en question
avec de gros appareils comme des laveuses, etc.
Mesures de securite
Ne jamais remiser ou utiliser d'essence ou autre produit inflammable liquide ou
gazeux au voisinage des appareils ou de tout autre appareil m_nager. Les vapeurs
_mises pourraient entrafner un risque d'incendie ou d'explosion.
N'introduire aucun objet dans la zone d'_vacuation de I'air; ceci pourrait provoquer
une d_t_rioration non r_parable de I'appareil.
Ne verser aucun liquide sur le climatiseur; ceci pourrait entrafner une anomalie de
fonctionnement. Pour le nettoyage de I'appareil, le d_brancher et utiliser un chiffon
humide. Cet appareil ne n_cessite pas une addition d'eau ou de glace.
.......Lors du nettoyage du climatiseur, _viter d'employer un solvant _nergique.
..... Pour _viter une obstruction et un _chauffement excessif, nettoyer le filtre du
climatiseur _ intervalles de deux semaines. Ne pas faire fonctionner sans filtre.
Veiller _ ne pas obstruer les entr_es d'air du climatiseur; ceci provoquerait un
_chauffement excessif et le d_clenchement du dispositif de s_curit_ qui arr_te
I'appareil.
Ne pas bloquer la circulation de I'air vers les tubes d'_change d'air.
Ne pas bloquer la circulation de I'air au voisinage de I'appareil, _ I'int_rieur (stores,
rideaux, meubles).
Cet appareil ne dolt jamais fonctionner dans une piece oO se trouvent des personnes
ou animaux qui ne peuvent pas r_pondre _ une panne de I'appareil.
Ce symbole repr_sente une precaution ou un avertissement
Risque de choc _lectrique
Ne pas couper la troisieme broche
(mise _ la terre).
Ne pas utiliser de cordon prolongateur ni
d'adaptateur de fiche avec cet appareil.
18

ooooooooooooooooooooooooooooooooooooooooooooooooooooooIntroduction
Description des pieces du climatiseur mobile
Tableau de commande : Utilisez le tableau de commande
Sortie d'air :
Poignees :
Roulettes :
Entree d'air :
Admission d'air
du systeme :
I_vacuation :
Plaque signaletique :
Robinet de vidange :
Cordon d'alimentation :
_lectronique pour s_lectionner le mode et
la vitesse de ventilateur, et pour r_gler la
minuterie ou observer la temperature
ambiante et latemperature programm_e.
La sortie d'air permet de r_partir I'air trait_
dans I'appareil, dans la piece. Utilisez les
persiennes r_glables pour diriger le
mouvement de I'air.
Utilisez les poign_es pour faciliter le
d_placement de I'appareil dans la piece.
Elles vous permettent de d_placer I'appareil
d'une piece _ une autre sans avoir _ le
soulever.
L'air de la piece est admis dans I'appareil
par cette entree pour _tre refroidi,
r_chauff_ ou d_shumidifi_.
De I'air en provenance de I'ext_rieur est
achemin_ vers I'appareil pour refroidir les
_l_ments internes.
Elle permet _ I'air r_chauff_ par les
_l_ments internes d'etre _vacu_
I'ext_rieur.
Cette plaque fournit le num_ro de modele
et le num_ro de s_rie.
II est pr_vu pour vider le r_servoir d'eau de
condensation.
Ce cordon comporte une fiche _ 3 broches,
mise _ la terre. Cette fiche dolt _tre
branch_e dans une prise correctement mise
la terre. Ne modifiez pas le cordon ni sa
fiche. N'utilisez pas de cordon
prolongateur.
Avant de commencer
_!, Lisez le manuel d'instructions avant de faire fonctionner
I'appareil pour la premiere fois. Ce manuel contient des
renseignements importants sur I'utilisation et I'entretien de
I'appareil, la s_curit_, la garantie, ainsi que sur le service
.... apres-vente.
Ne mettez pas en marche un appareil endommag_.
L'assemblage et le raccordement de I'appareil doivent _tre executes
selon les instructions. Sinon, la garantie risque d'etre rendue nulle
.... et non avenue.
Le cordon d'alimentation est situ_ _ I'arriere de I'appareil. N'utilisez
pas d'adaptateur de fiche ni de cordons prolongateurs. Ne modifiez
pas la fiche. Utilisez seulement une prise de courant mise _ la terre.
Faites en sorte que I'appareil ne soit pas expos_ _ de I'eau.
Ne couvrez pas les persiennes de sortie d'air, ni celles d'admission
d'air de I'appareil.
Pour _viter de vous blesser, d_branchez toujours I'appareil avant de
I'installer ou d'y faire de I'entretien.
m
Poign_e
Admission
d'air du
systeme
Tableau de
commande
vidange
J_
Entre d'air
tevacuation
ue
signal_tique
Cordon d'alimentation
19

Ensemble adaptateur pour fen tre ooooooooooooooooooooooooooooooo
Ensemble adaptateur pour fen_tre
Un ensemble de pieces d'installation est fourni avec votre
appareil dans un cartonnage s_par_. Avant de jeter I'emballage
de I'appareil, rep_rez celui qui contient ces pieces et assurez-
vous qu'aucune piece ne manque.
Panneau de fen_tre :
Rallonges du
panneau de fen_tre :
Adaptateurs de tube :
II s'installe dans I'ouverture de la
fen_tre qui permet I'_change de
I'air pour le transfert de I'air du
systeme.
D_ployez le panneau de fen_tre
selon la dimension de la fen_tre.
IIs permettent de raccorder les
tubes d'_change d'air au panneau
de fen_tre.
Vis :
Tubes d'echange d'air :
12 vis sont comprises pour le
montage de I'ensemble adaptateur
pour fen_tre. Certaines vis peuvent
d_j_ se trouver non serr_es sur le
panneau de fen_tre.
Ces tubes sont pr_vus pour
permettre le mouvement de I'air
entre I'appareil et I'ext_rieur.
_(_ ....................................................................
Rallonges du panneau de fen_tre
Panneau de fen_tre
Vis
Adaptateurs de tube
Instructions pour le montage de I'ensemble
adaptateur pour fen_tre
1. Ins_rez les adaptateurs de tube dans la partie arriere du
panneau de fen_tre.
2. Fixez chaque adaptateur de tube avec quatre vis ins_r_es
dans le devant du panneau de fen_tre.
3. Ins_rez les rallonges du panneau de fen_tre dans le panneau
de fen_tre. Serrez I_gerement les vis dans le panneau de
fen_tre pour maintenir les rallonges en position.
Tubes d'_change d'air
m
Panneau de fen_tre
u u
I®1
I
I
Adaptateurs de tube
Im
Rallonge du panneau
de fen_tre
®
®
Panneau de fen_tre
Vis
Q
[
20
Page is loading ...
Page is loading ...
Page is loading ...
Page is loading ...
Page is loading ...
Page is loading ...
Page is loading ...
Page is loading ...
-
 1
1
-
 2
2
-
 3
3
-
 4
4
-
 5
5
-
 6
6
-
 7
7
-
 8
8
-
 9
9
-
 10
10
-
 11
11
-
 12
12
-
 13
13
-
 14
14
-
 15
15
-
 16
16
-
 17
17
-
 18
18
-
 19
19
-
 20
20
-
 21
21
-
 22
22
-
 23
23
-
 24
24
-
 25
25
-
 26
26
-
 27
27
-
 28
28


Fedders MEP09D2BC0M Installation & Operation Manual
- Category
- Split-system air conditioners
- Type
- Installation & Operation Manual
- This manual is also suitable for
Ask a question and I''ll find the answer in the document
Finding information in a document is now easier with AI
in other languages
- français: Fedders MEP09D2BC0M
- español: Fedders MEP09D2BC0M
Related papers
-
Fedders A6P09D2BCOM Installation & Operation Manual
-
-
-
-
-
-
-
 Air Temp IFC1012N7F Operation Owner's manual
-
-

Other documents
-
Maytag 23-11-2234N-005 User manual
-
-
-
Haier CPF12XHL-EB Owner's manual
-
 Friedrich Air Conditioning PH14B User manual
-
Friedrich A 6 6 2 3 - 0 6 0 User manual
-
Whirlpool YACQ082XK1 Owner's manual
-
-
Honeywell Portable Air Conditioner, MM14CHCSCS User manual
-
Honeywell MM14CCS User manual
