Page is loading ...

ABI(Absolute Innovations, Inc.) - 1320 Third Street, Osceola IN 46561 - 855-211-0598
www.abiattachments.com
Infield Pro Setup Guide
Model shown may have additional options
Please read fully before removing the Pro from the Pallet!
Version 1.0.8

Please read fully and understand before operating the Infield PRO
ABI(Absolute Innovations, Inc.) - www.abiattachments.com - 855-211-0598 Page 2 of 8
Thank You,
On behalf of the ABI family we would like to thank you for your recent purchase of your ABI
Infield PRO. Our Company’s goal is to provide our customers with innovative, quality tools as well as first
rate customer service.
These instructions are designed to help you, the customer, get your new Infield PRO off the
delivery pallet and into the Standard Operating Position. Once you have put your PRO to work, if you
have any further questions, please feel free to call and talk with our friendly and knowledgeable
Customer Service Department. To contact our Customer Service Department call:
855-211-0598 M-F 8am-8pm EST – Friday 8am-5pm EST.
Order parts for your ABI Infield PRO please contact our Customer Support Department by
phone at: 855-211-0598 M-T 8am-8pm EST – Friday 8am – 5pm EST
Additional Contact Information –
Additional information on the Rascal can be found on the ABI Support site at: www.abisupport.com
To contact ABI’s Customer Service Department after hours go to the Help Desk on the ABI Support page
at: www.abisupport.com and send our Customer Service Department an email regarding any issue you
may be experiencing with the Rascal.
To the Operator –
The information presented in this manual will prepare you to operate the PRO in a safe and
knowledgeable manner. Operating the PRO in a proper manner will provide a safer working
environment and create a more efficient result. Read this manual fully and understand the entire
manual prior to setup, operation, adjusting, performing maintenance, or storing the PRO. This manual
contains information that will allow you the operator to get years of dependable performance from the
PRO.
This manual will provide you with information on safely operating and maintaining the PRO. Operating
the PRO outside of the stated safety and operations guidelines may result in injury to operator and
equipment, or void the warranty.
The information provided in this manual was current at the time of printing. Variations may be present
as Absolute Innovations, Inc. continues to improve and upgrade the PRO for future use. Absolute
Innovations, Inc. reserves the right to implement engineering and design changes to the PRO as may be
necessary without prior notification.

Please read fully and understand before operating the Infield PRO
ABI(Absolute Innovations, Inc.) - www.abiattachments.com - 855-211-0598 Page 3 of 8
Operational Safety Rules-
Please exercise caution at all times when setting up, operating, or performing maintenance on the
PRO. Remember, any piece of equipment like the PRO can cause injury/damage if operated
improperly or if the user does not understand how to operate the equipment. Exercise caution at all
times with using the PRO.
Never permit any person to ride or board the Rascal at any time. NEVER ALLOW RIDERS ON ANY ABI
MODEL RASCAL!
Use care and maintain minimum ground speed when operating the Rascal on a hillside, or when
operating close to ditches, fences, or water sources.
Never place any body part under the while the Rascal is in operation.
Never allow anyone near the Rascal while in operation.
Operate the Rascal in the daylight or under good artificial light. Operator should always be able to
clearly see where they are going.
Be alert for hidden hazards. Always operate the Rascal with caution over work environments that
may have buried obstacles.
Stay well and clear of all moving parts. Keep all limbs clear of attachments when making
adjustments with all hydraulically operated attachments.
Use caution when operating the Rascal in icy, wet, or snowy condition.
Do not use the Rascal on highways or public thoroughfares. The Rascal is designed for off road use
only.
Always follow Tractor/UTV/RTV Manufacturer’s rules for safe Operation of Tractor/UTV/RTV, and
for proper procedures for towing attachments. Contact your local dealership for an Owner’s Manual
for any questions related to the safe operation of the Tractor/UTV/RTV.
Use caution when operating the PRO. Using the PRO outside of stated safety and operations guidelines
may result in injury to operator or others, property damage, or a void in warranty.

Please read fully and understand before operating the Infield PRO
ABI(Absolute Innovations, Inc.) - www.abiattachments.com - 855-211-0598 Page 4 of 8
Tools needed for assembly:
¾” Combination Wrench
¾” Socket with Wrench
Metal Snips
Removing the Infield PRO from the Pallet-
1) Remove all boxes containing additional parts from the shipping pallet and place them off to the
side.
2) Locate the hitch bar for the PRO. It is shipped removed from the PRO and will be wrapped in
packing material.
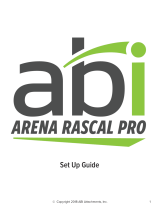
3) Secure the hitch bar to the PRO by inserting it into the receiver
slot using the two provided bolts to secure hitch bar to the PRO
frame. The hardware used to secure the hitch bar to the PRO will
feel cross threaded when you tighten it. The nut is designed to
grip the bolt to prevent it from loosening while the PRO is in use.
Refer to Figure 1 for reference.
4) Remove all banding that is holding the PRO to the shipping pallet.
A pair of metal snips will be needed to remove the banding from around the PRO frame. Be
careful removing the banding as it may spring back once cut, and the banding may have sharp
edges once cut.
5) With the banding removed, lower the tongue of the PRO down towards the ground. The PRO
may shift in the process, so be sure to keep feet clear of any possible pinch points while
lowering the tongue of the PRO.
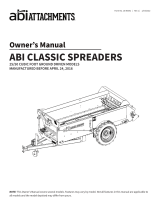
6) Connect the top link to the tongue of the PRO using the
hitch pin securing the square jack to the tongue of the
PRO. The top link will need to be adjusted to secure it back
to the upright mast ears on the back of the PRO. To adjust
the top link, hold the open end in one hand and spin the
top link out using the center bar in the top link. Once, the
top link is extended long enough to secure into the ears on
the upright mats, use the provided hitch pin and lynch pin
to secure it in place.
7) The PRO is now ready to be attached to a tow vehicle. ABI recommends using a tow vehicle to
finish removing the PRO from the pallet. If a tow vehicle is not available at the time of assembly
please refrain from removing the PRO from the pallet until one is available. See section –
“Attaching the PRO to a Tow Vehicle” found on page 4 of this document for assistance on
connecting the PRO to a tow vehicle.
Figure 1
Figure 2

Please read fully and understand before operating the Infield PRO
ABI(Absolute Innovations, Inc.) - www.abiattachments.com - 855-211-0598 Page 5 of 8
8) Once the PRO is attached to a tow vehicle, lower the wheels on the PRO using the square hand
jack, until all attachments raise fully clear of the shipping pallet.
9) When all the attachments on the PRO have properly cleared the shipping pallet the PRO can be
removed from the shipping pallet.
**Ensure that all bolts are tightened prior to using the PRO. If any bolts are loose, secure them
properly before use.**
Infield PRO Standard Operating Procedure –
Once the PRO is removed from the shipping pallet, it will need to be adjusted for first time
use. Below are setup instructions for setting up the PRO for use with the profile blades or
Vibraflex.
Profile Blades:
1) To setup the PRO for use with the profile blades take the PRO to an area that has a hard flat
surface.
2) Next, raise the wheels off the ground using the square
hand jack until the profile blades are resting on the
ground. Raise the wheel s fully off the ground to allow the
profile blades to rest firmly on the surface.
3) Using the top link, increase/decrease the amount of thread
showing on the top link using the center handle on the top
link. Continue until the profile blades are sitting level with
the surface.
4) The PRO is now ready to be used with the profile blades.
Vibraflex:
For assembly of the Vibraflex refer to the Vibraflex setup guide.
1) To setup the PRO for use with the Vibraflex take the PRO to an area with a hard flat surface.
2) Next, raise the wheels off the ground using the square
hand jack until the pins of the Vibraflex are resting
firmly on the ground.
3) Using the top link, increase/decrease the amount of
thread showing on the top link using the center handle
on the top link. Continue until the Vibraflex is sitting
level with the surface.
4) The PRO is now for use with the Vibraflex.
Figure 3
Figure 4

Please read fully and understand before operating the Infield PRO
ABI(Absolute Innovations, Inc.) - www.abiattachments.com - 855-211-0598 Page 6 of 8
5) NOTE: For Infields that are compacted, or have not been maintained; adjust the Vibraflex so the
very front pins are slightly higher than the back, about 1/8”; to help prevent chatter during the
initial setup and use. Once the compaction is gone readjust the Vibraflex to operate level.
Attaching the Infield PRO to a Tow Vehicle –
1) To attach the PRO to a tow vehicle raise or lower the wheels as needed to raise or lower the
tongue on the PRO.
2) Once the tongue lines up just above the ball hitch on the tow vehicle stop.
3) Next, lift the safety latch on the ball hitch coupler on the PRO.
4) Then raise the wheels on the PRO until the ball hitch coupler rests on the ball hitch. You may
need to push down on the PRO tongue to get the ball hitch coupler to rest full on the ball hitch.
5) Once the ball hitch coupler is fully resting on the ball hitch, lower the safety latch on the PRO
ball hitch coupler. Ensure the ball hitch coupler is fully secure before transporting, or using the
PRO.
6) The PRO is now ready for use.
Disconnecting the PRO from a Tow Vehicle –
Use caution when disconnecting the PRO from a Tow Vehicle. Below is the recommended disconnect
procedure for the PRO.
1) Using the square hand jack on the PRO, raise the wheels on the PRO until the weight of the PRO
is sitting on the profile blade(s)/Vibraflex.
2) Continue to raise the wheels on the PRO until the square hand jack can be slid side to side with
out binding up. This will indicate that the weight of the PRO is resting on the profile
blade(s)/Vibraflex.
3) Once the weight of the PRO is sitting on the profile blades/Vibraflex; the ball hitch connector
connecting the PRO to the tow vehicle can be disconnected. The PRO is now free from the tow
vehicle.
4) Lower the wheels of the PRO back to the surface to allow the tongue of the PRO to raise clear of
the ball hitch before moving the tow vehicle.

Please read fully and understand before operating the Infield PRO
ABI(Absolute Innovations, Inc.) - www.abiattachments.com - 855-211-0598 Page 7 of 8
Maintenance:
Wheels and Hubs - Make sure to check the pressure in the tires to ensure they are properly inflated. If
the wheels look to be low on air, fill them until they reach the Manufacturer’s suggested P.S.I. The
proper P.S.I for the wheel can be located on the side wall of the tire.
General information on the PSI for the Rascal Tires:
4-ply Rascal Tire: 45 PSI
2-ply Rascal Tire: 50-60 PSI
Information on the Ply of the tire can be found on the side wall of the Tire.
Make sure to grease the hubs, either using a grease gun or by manually packing the bearings; every 2-3
months or more frequently for high volume use of the Rascal. The hubs will also need to be greased
before any period of storage, and prior to use after a period of storage.
Cleaning the Rascal – Clean the Rascal using soap and water as needed. Avoid using any strong
chemicals as it may damage the paint on the Rascal. A pressure washer may be used to remove built up
material off of the Rascal, if needed. If using a pressure washer, make sure to stand away from the
Rascal as the pressure may remove paint from the Rascal. If cleaning the Rascal with the Optional
Electric Actuator attachment, do not spray water directly on the wiring harness or control box. This may
damage the Electric Actuator, control box, or wiring harness.
Removing rust from the Rascal/Paint touch up – Remove rust from the Rascal using a wire brush, or
piece of fine sand paper. Wash area with soap and water, rinse, and allow area to dry. Spray the area
with a rust inhibiting spray paint and allow paint to dry before use. If desired, a primer can be used
before painting the surface with the finished color. Black Semi-Gloss or Gloss spray paint may be used.
Checking Hardware- Before each use check to make sure that none of the attaching hardware on the
Rascal is loose or damaged, i.e. nuts, bolts, or pins. If any is found to be loose, ensure it is properly
secured prior to using the Rascal. If hardware is damaged replace it prior to operation. All hardware on
the Rascal is Standard S.A.E Grade 5 hardware.

Please read fully and understand before operating the Infield PRO
ABI(Absolute Innovations, Inc.) - www.abiattachments.com - 855-211-0598 Page 8 of 8
For additional setup or usage questions feel free to contact ABI’s Customer Service
Department at 855-211-0598 M-Th 8am-8pm EST - Friday 8am-5pm EST. Additional information on
the PRO is available on the ABI support page at www.abisupport.com.
For questions on purchasing parts for your PRO please contact the ABI Customer Service
Department at: 877-788-7253 M-Th 8am-8pm EST - Friday 8am-5pm EST.
/