2 Source Four jr / jr Zoom User Manual
Fixture information
HPL lamp table
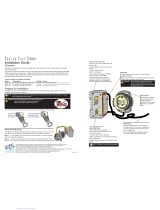
Color frame holder
The color frame holder is equipped with a spring-loaded retaining clip that prevents color frames
and accessories from falling out. See Figure 2.
Step 1: Release the retaining clip by pushing it sideways while gently pulling backwards.
Step 2: Insert the color frame.
CAUTION:
The Source Four jr is rated for 575w maximum lamp. Do not use lamps other than
the HPL in Source Four fixtures. Use of lamps other than HPL or greater than
575w will void your warranty.
Lamp code Watts Volts Initial Lumen Color temp. Average rated life
HPL 550/77* 550 77 16,170 3,250° 300 hours
HPL 550/77X* 550 77 12,160 3,050° 2000 hours
HPL 575/115 575 115 16,520 3,250°K 300 hours
HPL 575/115X 575 115 12,360 3,050°K 2000 hours
HPL 375/115 375 115 10,540 3,250°K 300 hours
HPL 375/115X 375 115 8,000 3,050°K 1000 hours
HPL 575/120 575 120 16,520 3,250°K 300 hours
HPL 575/120X 575 120 12,360 3,050°K 2000 hours
HPL 575/230 575 230 14,900 3,200°K 400 hours
HPL 575/230X 575 230 11,780 3,050°K 1500 hours
HPL 375/230X 375 230 7,250 3,000°K 1000 hours
HPL 575/240 575 240 14,900 3,050°K 400 hours
HPL 575/240X 575 240 11,780 3,050°K 1500 hours
HPL 375/240X 375 240 7,250 3,000°K 1000 hours
* To be used with ETC Dimmer Doubler™
WARNING:
Make sure all color frame accessories are locked in position with the
retaining clip before hanging the Source Four.