
ge.com
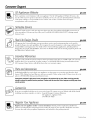
Safety Information ......... 2-6
Operating Instructions
Com'enience Features ..... 14-16
Microwave Terms ............ 18
()ther Features ........... ] 6, 17
Oven Features ............. 7, 8
Power Levels ................ 9
Time Features ............ 9-1,9,
Care and Cleaning ......... 19
Troubleshooting Tips ....... 20
Things That Are Normal ...... 90
Consumer Support
Consumer Support . . .Back Coxer
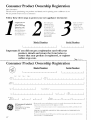
Product Registration ...... 91-99
Warranty .................. 93
y:sz3s4sF
®
©
Writethemodelandserial
numbershere:
Model #
Serial #
You can find them on a label
inside the oven.
3513913700 49-40503 01-06JR

IMPORTANTSAFETYINSTRUCTIONS.
READALLINSTRUCtiONSBEFOREUSING.
For your safety, the information in this manual must be followed to minimize the risk of fire or explosion, electric shock, or
to prevent property damage, personal injury, or loss of life.
PRECAUTIONSTOAVOIDPOSSIBLEEXPOSURE
TOEXCESSIVEMICROWAVEENERGY
(a) Do NotAttempt to operate this oven with the door
open since open<leer operation can result in ham/tiff
eN)osure m microwave energy': It is important not to
defeat or tamper with the satiety interlocks.
(h) DoNotPlace any object between the oven fl'ont fi_ce
and the door or allow soil or cleaner residue to
accumulate on sealing suHi_ces.
(c) Do Not Operate the oven if it is damaged. It is
particularly important that the oven door close
properly and that there is no damage to the:
(1) door (bent),
(2) hinges and latches (broken or loosened),
(3) door seals and sealing suHi_ces.
(d) The Oven Should Not be a(!iusted or rei)aired by
anyone except properly qualified service personnel.
IMPORTANTSAFETYINSTRUCtiONS.
Use this appfiance only for its intended purpose as described in this Owner's Manual.
When using electrical appfiances basic safe_/ precautions should be followed, including the following:
[] Read and folh)w tile specific precautions in the [] Do not store this appliance outdo(n_. Do not use this
PrecautionstoAvoid PossibleExposureto Excessive
Microwave Energy section above.
[] This appliance must be grounded. Connect only
to a properly grotmded ot/flet. See tile Grounding
Instructions section on page 4.
[] Install or locate this appliance only in accordance with
tile provided installation instructions.
[] Be cexlain to place tile fl'ont sm_hce of tile door three
inches or more back h'om the comlteilo} ) edge, to avoid
accidental till) )in,,_ of the appliance in mmnal usage.
[] This micro*<_xe oxen is not apl)rox ed or tested fbr
n/_lYine use.
[] Do not n/omit this appliance o'_er a sink.
[] Do IlOt Ilia/lilt tile iniclowave oven oveF OF Ilear all}
portion of a heating or cooldng appliance.
[] Do not store an}thing directh on top of tile microwave
ovell S[llf_lce whell tile lniCl'OWa',e ovell is ill operation.
[] Do not operate this al)pliance if it has a damaged power
cord or plug, if it is not worldng properly, or if"it has
been damaged or dropped. If the power cord is
damaged, it must be t ei)laced by General Electric
Service or an authorized se_Mce agent using a power
cord a\;dlable fi'om General Electric.
[] Do not coxer or block am, oi)enings, on tile appliance.
[] Use this al)pliance only for its intended use as described
in this manual. Do not use corrosive chemicals or x:q)ol_
in this ai)pliance. This microwave o\vn is si)edfically
designed to heat, dry or cook food, and is not intended
fin laboratory o_ industrial use.
pl'o(hlct lie;H" watel_i()F example, ill a _et basement,
near a sMmming, I)°°l, near a sink or in similar
locations.
[] Kee I) power cord a_,_a}fl'om heated sm'fitces.
[] Do liar ilnlnelNe powel" COld of l)hlg, ill _,_ateE
[] Do not let po_er cord h'm,,,_ oxer edge, of table o_
co[lllteE
[] To reduce tile risk of fire in tile oven cavit}:
--Do not oxercook fi)od. Careful]) attend appliance when
pal)e*; plastic, or other combustible InatelJals al'e placed
inside the oven while cooldng
--Remoxe wire tx_fst-ties and metal handles from paper or
plastic containel_ before l)lacin'"_ them in tile o_en.
--Do not use tile o'_en [()I" ,stor'_oe,_ ptll])oses. Do liar leave
paper i)roducts, cooldng utensils, or fbod in tile oven
when llOt ill use.
[]
[]
--If materials inside tile oven ignite, kee I) tile oven door
closed, mrn tile oven oft; and disconnect the power
cord, or shut oft power at tile tuse or circuit breaker
panel. If tile door is opened, tile fire may spread.
See door sm_Iilce cleaning insti uctions in the Care and
cleaning of the microwave oven section ot this manual.
[]
This apl)liance must only be selMced by qualified selMce
pei_tmnel. Contact nearest authorized se_Mce ii_dlity fin"
examination, repail, or ac!iusm/ent.
_&swith any appliance, close supervision is necessary
when used by children.
SAVETHESEINSTRUCTIONS

WARNING!
ARCING
If you see arcing, press PAUSE/CLEARand correct the problem.
Ardng is tile microwave tem_ fin" sparks in tile oven.
Arcing is caused by:
• Metal or foil touching tile side of tile oven.
• Foil not molded to food (uptm'ned edges act
like antennas).
• Metal, such as twist-ties, poultry pins, or gold-
rimmed dishes, in the microwave.
• Recycled paper tcmvls containing small metal
pieces being used in the microwave.
g_com
FOODS
• Do not l)Ol) l)Ol)('oi'n iI1 yo/li" Illi(Towaxe oven
tmless in a special microwave popcorn accesso_ T
or unless you use I)opcorn labeled fin" use in
inicrowave ovens.
• Some products such as whole eggs and sealed
containe_--fln" example, closed jade--are able
to explode and should not be heated in this
II/iCFOWaVe oven. _tlcl/ tlse of tile illiCFOWaVe
oven could result in injury.
• Do not boil eggs in a microwave oven. Pressm'e
will buiM up inside egg p)lk and will cause it
to bm_t, possibly resulting in iqjm 7.
• Operating tile mic_xm'ave Mth no fl_od inside fin.
i/loi'e than a minute or two may Catlse claI_lage
to tile oven and could start a fire. It increases tile
heat aro/md tile magnetmn and can shorten
tile life of tile oven.
• SUPERHEATEDWATER
Liquids,such aswater,coffee ortea are ableto be
overheatedbeyondtheboilingpoint without
appearingtobe boiling.Visiblebubblingor boiling
when thecontainer isremovedfromthe microwave
ovenisnot alwayspresent.THISCOULDRESULT
IN VERYHOTLIQUIDSSUDDENLYBOILINGOVER
WHENTHECONTAINERISDISTURBEDORA
SPOONOROTHERUTENSILISINSERTEDINTO
THELIQUID.
To reduce tile risk _d iqjm T to pe_ons:
--Do not overheat the liqukl,
IStir tile liquid both befin'e and halfway through
heating it.
--Do not use straight-sided containet_ with narrow
necks.
• Foods Mth tmbroken outer "skin" such as
potatoes, hot clogs, sausages, tomatoes, apples,
chicken live_, and other giblets, and egg )x)l!<s
should be pierced to allow steam to escape
chllJng cooking.
I_Mter heating, allow tile container to stand in tile
illici'owave oven ]'()I" a short til//e betore i'eilloving
tile containe_:
IUse extI'ellle caI'e when inserting a Sl)OOn oi"
other utensil into the container.
• Avoid heating baby fi>od in glass ja_, even •
with the lid off'. Make sure all infimt food is
thoroughly cooked. Stir food to distribute the
heat evenly. Be careful to prevent scalding
when wamfing tommla. Tile container may feel
cooler than the tommla really is. Mwavs test the
tommla 1)elbre ti_edin,, tile baby •
• Don't defl'ost fl'ozen beverages in narrow-necked
bottles (especially carbonated bexerages). Exert •
if' tile container is opened, pressure C_lilbuild up.
This can cause tile container to built, possibly
resulting in iI_jtu>
Hot fi)ods and steam can cause bm'ns. Be careflfl
when opening any containe_ of hot fix)d,
including popcorn bags, cooking i)ouches, and
boxes. To prevent possible iI_jtu> direct smam
away fl'om hands and ti_ce.
Do not overcook potatoes. They could dehydrate
and catch fire, causing damage to veto" oven.
Cook meat and poult_ T thoroughlylmeat to at
least an INTERNAl, temperature _ff 160°F and
poultry to at least an INTERNAl, temperature
of 180°E Cooking to these temperatm'es usually
protects against toodborne illness.
3

IMPORTANTSAFETYINFORMATION.
READALLINSTRUCTIONSBEFOREUSING.
a, WARNING!
MICROWAVE-SAFECOOKWARE
Make sure to use suitable cookware during
microwave cooking. Most glass casseroles, cooking
dishes, measuring cups, custard cups, pottei T or
china dinnerware which does not have metallic trim
or glaze with a metallic sheen can be used. Some
cookware is labeled "suitable fin" microwaving."
• If w)u are not sure if a dish is microwave-sale,
use this test: Place ill the oven both the dish you
are testing and a glass measuring cup filled with
1 cup of water set tile measuring cup either ill
or next to the dish. Microwave 30-45 seconds
at high. If the dish heats, it should not be used
fin" microwaving.
If the dish remains cool and only the water ill
tile cup heats, then tile dish is microwave-sale.
• If you use a meat themlometer while cooking,
l/l_lke stlre it is sate fin" iise in illicrowave ()veils.
• Do not use recycled paper products. Recvcled
paper towels, nal)kins and waxed paper can
contain metal flecks which may cause arcing
or ignite. Paper products containing nylon or
nylon filaments should be avoided, as they Inav
also ignite.
• Some sWroloanl tra):s (like those that meat is
packaged on) have a thin strip of metal
embedded ill tile bottom. When microwaved,
tile metal can burn tile floor of tile oven or
ignite a paper towel.
• Do not use tile microwave to chy ne_vspapei_.
• Not all plastic wrap is suitable fin" use ill
inicrowave ()veils. Check tile package fin" proper
Ilse.
• Paper towels, waxed paper and plastic wrap can
be used to cover dishes ill order to retain
moisture and prevent spattering. Be sure to vent
plastic wrap so steam can escape.
• Cookware ma} become hot because of heat
transtbrred fl'om the heated toed. Pot holdei_
max be needed to handle the cookware.
• "Boilable" cooking pouches and fighdy closed
plastic bags should be slit, pierced or vented as
directed by package. If they are not, plastic could
1)m_t during or immediately after cooking,
possibly resulting ill illjUI T. A]so, plastic storage
containei_ should be at least partially uncovered
because they titan a fight seal. When cooking
with containei_ tightly covered with plastic wrap,
remove covering carefllllv and direct steam away
fi'on/hands and tilce.
• Use fi)il only as directed ill this guide. TV dinneI_
may be microwaved ill foil trays less than 3/4"
high; renlove tile top foil cover and rettlrn tile
tray to tile box. \,_]/en using foil ill tile microwave
oven, kee I) the tOft at least 1 inch away from the
sides of the oven.
• Plastic cookware--Plastic cookware designed fin"
microwave cooking is ver)' useflll, but should be
used carefull> Even micro_we-satb plastic may
not be as tolerant of overcooking conditions as
are glass or ceiamic materials, and may soften or
char if subjected to short periods of overcooking.
Ill hmger exposures to overcooking, tile lend and
cookware could ignim.
Follow those guidelines."
B Use microwave-sate plastics onl) and use
them ill strict compliance with the cook\wire
Illa n IIlil ct/li'e i"s i'ecoi//illen (la tie ns.
] Do not ii/icrowa',e elllpty containei3.
Do not pemfit children to use plastic
cookware without complete superxision.
4

g_com
BROWNERSAFETY
• Any n(m-metal, oven-safe dish can be used when
browning in the oven. Place the dish directly on
the shelf.
• The oven and door will get hot when browning.
• Cookware will become hot when browning.
Pot holdei_ or oven mitts will be needed to
handle the cookware.
• Do not use paper to_vls or c()verings, containers
or cooking/roasting bags made (ff fi)il or other
reflective material, plastic, wax or paper when
browning.
• Do not place food directly against the browner
element.
• Use of the browner shelf:
- Remove the shelffl'om the oven when not
ill rise.
- Use pot holdeis or oven mitts when handling
the shell It may be hot.
Be sure that the shelf is positioned properly
inside the oven to prevent product dalnage.
Do not cover the shelf or any part (ff the oven
with metal fi)il. This will cause overheating of
the oven.
• During and after use, do not touch, or let
clothing, pot holdei_ or other flalmnable
materials contact the browner element or guard.
These SUll'ilces Inay be hot enough to burn even
though they are dark in coloI: Mlow sufficient
tilne fi)r cooling fiI_t.
• Relnove cookware colnpletely fl'Oln the oven
befi)re turlfing food.
• Make sure fl)od is cooked all the way through
befi)re browlfing.
GROUNDINGINSTRUCTIONS
WARNING-I p o o .soo thogro,,,,Ji,,g ,l,gco,,ros,ltino iskofoloct icst,ock.
This ai)pliance inust be grounded. In the e\'ent of
an electlical short drcuit, groulMing reduces the
risk of electric shock by i)roviding an escape wire
for the electric current.
This appliance is equipped Mth a power cord
having a grounding wire with a grounding plug.
The plug nmst be plugged into an outlet that is
i)roperly installed aim grounded.
Consult a qualified electiician or service techlfician
if the grounding instructioi_s are not comi)letely
undei_tood, or if doubt exists as to whether the
ai)pliance is i)roperly grounded.
If the outlet is a st;mdard 2-prong wall outlet, it is
vour pei_onal responsibility and obligation to have
it replaced with a i)roperly grounded 3-prong wall
outlet.
Do not tinder _lily (iI'C[ll//S[ilnces C/lt or i'elll(We
the third (ground) i)rong fl'Oln the power cord.
X_'e do not recomlnelld using an extension cord
with this ai)pliance. If the power cord is too short,
have a qualified electrician or seiMce techifician
install an outlet near the ai)pliance. (See
EXTENSION CORNSsection.)
D)I" best ol)erafion, plug this al)pliance into its
own electrical outlet to prevent _ckering of lights,
blowing of fllse or trii)i)ing of circuit breakeI:

IMPORTANTSAFETYINFORMATION.
READALLINSTRUCtiONSBEFOREUSING.
ADAPTERPLUGS
Usage situations where appliance's power cord will be disconnected infrequently.
Because oI potential safety hazards under certain conditions, {Adapterplugsnot
we stronglyrecommend against the use of an adapter plug.However; if permittedinCanada}
you still elect to use an adaptex; where local codes pemfit, a TEMPORARY Alignlarge
CONNECTIONmay be made to a properly grounded tw_)-prong wall
receptacle by tile use of a UI, listed adapter which is available at most
local hardware stores,
Tile larger slot in tile adapter must be aligned with tile larger slot in
tile wall receptacle to provide proper polarity in tile com_ection of tile TEMPORARY
power cord. METHOD
CAUTION:AttachfiTg the adapter ground terminal to the wall receptacle cover screw does not ground the
appliance unless the cover screw is metal, and not insulated, and the wall receptacle is grounded
through the house wiring.
You should have tile circuit checked by a qualified electrician to make sm'e tile receptacle is i)roperly
gr()lmded.
When disconnecting the power cord fl'om the adapte_, always hold the adapter with one hand. If this
is not done, the adapter gr()tmd terminal is very likely to break with repeated use. Should this hal)pen,
DONOTUSEthe appliance until a proper ground has again been established.
Usage situations where appliance's power cord will be disconnected frequently.
Do not use an adapter plug in these situations because fl'equent disconnection ot the power cord places
tmdue strain on the adapter and leads to eventual fhihu'e of tile adapter grotmd temfinal. You should have
tile two-prong wall receptacle replaced with a three-prong (grotmding) receptacle 1)y a qualified electrician
before using tile appliance.
Ensureproperground
andfirmconnection
beforeuse.
EXTENSIONCORDS
A short power suI)ply cord is provided to reduce tile risks resulting ti'om becoming entangled in or tripping
over a longer cord.
Extension cords may be used if you are careflfl in using them.
ff an extensioncord is used--
] Tile marked electrical rating of tile extension cord should be at least as great as tile electrical rating ot
tile appliance;
,gr()tmding-tx, )e S-wire cord and it must be i)lugged,, into a S-slot outlet
] The extension cord inust be a ,]
] Tile extension cord should be arranged so that it will not drape oxer tile c()tmterto I) or tabletop
where it can be pulled on b) children or tlipped oxer unintentionally:
If you use an extension cord, the interior light may flicker and the blower so:rod may wu'v when the
microwave oven is on. Cooking times may be longe_; too.
READANDFOLLOWTHISSAFETYINFORMATIONCAREFULLY.
SAVETHESEINSTRUCtiONS

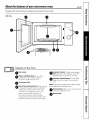
Aboutthe featuresofyourmicrowave oven.
Throughout this manual, features and appearance may vary from your model.
ge.com
1000Watts
--.-I
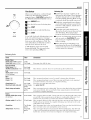
Featuresof theOven
O Door Latches.
O indow with Metal Shield. Screen allows
cooking to be xiewed while keeping
illiCi'Owaxes conlined ii1 tile ox, en.
O Convenience Guide.
ControlPanel and Selector Dial _q/en entering
cooking time using tile dial, time will add
or subtract in 1O-second increments up to
5 minutes. Dw cooking times of 5 to 10
minutes, time will add or subtract in
30-second increments. When entering
cooking times greater than 10 minutes, time
will add or subtract in 1-minute increments.
_ Removable Turntable.Turntable and support
r must be in place when using tile oxen. Tile
tm'ntable may be remoxed for cleaning.
O emovable Turntable Support.Tile rotatable
support must be in place when using tile
oven.
NOTE:Rat/W plate, ovenvent(s)and oven lightare located
on the inside walls of themicrowave oven.
O rowner Element. _Mlows you to brown ah'ead):
cooked food quickly on top.
O Browner Shelf.

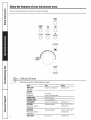
Aboutthe featuresofyourmicrowave oven.
Youcan microwave by time or with the convenience features.
DEFROST
f"l'_**
',.,,_bb
AUTOCOOK _
@LESS(_MO.E _"
POWER LEVEL
TOP BROWN
1_1 /i/
TIME COOK
START
EXPRESSCOOK
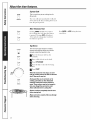
CookingContro/s
Check the Convenience Guide before you begin.
Press Enter Option
TIME COOK Amountofcookingtime more/lesstime
Turndial
DEFROST
Pressonce Foodweight
Presstwice Amountofdefrostingtime
POWERLEVEL PowerlevelO-HI
EXPRESSCOOK Startsimmediately!
TOPBROWN Amountofbrowningtime more/lesstime
POPCORN Startsimmediately! 3.5oz.,3oz.or1.75oz.
Pressonce,twice or more/lesstime
three times
BEVERAGE Startsimmediately! 1cup,2cupsor3cups
Pressonce,twice or more/lesstime
three times
AUTOCOOK Foodtype1-9 more/lesstime

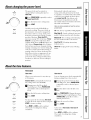
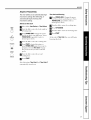
Aboutchangingthepower level ge.com
f
POWER LEVEL
START
EXPRESSCOOK
The power le',el ma) be entered or
changed befiwe entering the time tot
Time Cook.
B Press POWERLEVELrepeatedl)to select
power level 0 to HI.
_'_ Turn the dial to enter cookh_g time.
_ Press START
Variable power levels add fle_bilitv to
IIliCI'OW;l\'e cooking, The })owei" levels OIT
tile IllicI'o_we oven can be COlIll)aI'ed to
tile surfilce units on a range. Each power
level gives you microwave energy a certain
percent of the time. Power level 70 is
micr(mzwe enexgy 70% el tile time. Power
level 30 is energy 30% (d the time. Most
cooking will be done on H/which gives you
100% power H/ power level will cook filster
but fl)(K1 may need more fl'equent stirring,
rotating or turning o\'e_: A lower setting will
cook IlloI'e evenly and need less stirring or
rotating (ff tile toed. Some toods may have
better flav(m texture or appearance if one
of the lower settings is used. Use a lower
power level when cooking fi)ods that have
a tendency to boil o\'e_; such as scalloped
potatoes.
Rest periods (when the microwave
energy' cycles off) give time tot the toed
to "equalize" or transter heat to the inside
of the toed. An example of this is shown
with power level 30_the defl'ost cycle.
If microwave ener_' did not cvcle ofl_
the outside (ff the fl_od _muld cook before
the inside was deii'osted.
Hero am some examples of uses for various
power levels:
HI: Fish, bacon, vegetables, boiling liquids.
Med-High70: Gentle cooking (ff meat and
poultry; baking casseroles and reheating.
Medium 50: Slow cooking and tenderizing
fi)r stews and less tender cuts of nleat.
Low20 or30; Defl'ostin ," simmering;
delicate sauces.
Warm10"KeeI)im*_filed waxm; softening
butter.
Aboutthe time features.
f
pOWER LEVEL
TIME CCOR
START
EXPREFSCOOK
(_MOBE
LESS
Time Cook
TimeCook I
_Mlows you to microwax e fi)r any time tlI)
to 99 minutes.
HIpower level is automafically set, but you
may change it fiw more flexibililv.
Change power lexel if xou don't
[] want i{lll power. (Press' POWER LEVEL
repeatedly to select a desired power
level.)
_'_ Turn the dial to enter cooking time.
_ Press START
You may open the door during Time Cook
to check the food. Close the door and press
STARTto resume cooking.
PressMOREor LESSto add or subtract
I0 seconds ol cookh_g time during
('o/Intdown.
TimeCook fl
i,ets vou change power levels automatically
during cooking. Here's how to do it:
Change the power lexel if _ou don't
B want i{,ll p(,we_: (Press POWER LEVEL.
repeatedly to select a desired power
level.)
_'_ Turn the dial to enter the fi_t cook
tim e.
_ Press POWER LEVEL.Change the power
level if you don't want full power. (Press
POWERLEVELrepeatedly to select a
desired power lexel.)
D Enter the sec(md cook time.
D Press START
At the end of Time Cook I, Time Cook fl
co/ints down.
Press MORE(lr LESSt(> add or subtract
10 seconds of cooking time during
co/intdown.

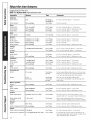
About the time features.
Cooking Guide for -time Cook
NOTE."Use Nlpewer level unless otherwise noted.
Vegetable Amount Time Comments
Asparagus
(fresh spears) l lb. 6 to 9 rain. In ] ½-(jr. casserole, place ]/4 cup watel:
Med-High (7)
(frozen spears) lO-oz, package 5 to 7 rain. In 1-qt. casserole.
Beans
(fresh green) 1 lb. cut in half 9 to 11 min. Ill ] ½-(it. casserole, pl_ce ]/2 cup watei:
(frozen green) lO-oz, package 6 to 8 rain. Ill 1-qt. c_tsserole, place 2 tablespoons watel:
(frozen lima) lO-oz, package 6 to 8 rain. Ill l-qt. casserole, pl_ce l/4 cup _atel;
Beets
(fresh, whole) 1 hunch 17 to 21 rain. in 2-qt. c_t_sero/e, place 1/2 cup _atel:
Broccofi
(fresh cut) 1 bunch (1¼ to 1½ lbs.) 7 to 10 rain. In 2-qt. c_t_serole, place 1/2 cup _tei:
(fresh spears) 1 bunch (1¼ to 1½ lbs.) 9 to 13 min. Ill 2-qt. casserole, pl_ce l/4 cup _atel:
(frozen, chopped) lO-oz, package 5 to 7 rain. In 1-qt. casserole.
(frozen spears) lO-oz, package 5 to 7 rain. In 1-qt. casserole, place 3 tablespoons _atel:
Cabbage
(fresh) l medinm head (about 2 lbs.) 8 to l l rain. In ] ½- or 2-qt. casserole, place ]/4 cup _ter.
(wedges) 7 to 10 rain. In 2- or 3-qt. casserole, place l/4 cup _atel:
Carrots
(fresh, sliced) 1 lb. 7 to 9 rain. Ill 1½-fit. c_sserole, place 1/4 cup _tei:
(frozen) lO-oz, package 5 to 7 rain. Ill l-qt. casserole, pl_ce 2 tablespoons _atel:
Cauliflower
(flowerets) 1 medium head 9 to 14 rain. Ill 2-qt. casser_le, place ]/2 cup _tel'.
(fresh, whole) 1 medium head 10 m 17 rain. In 2-qt. c_t_sel'ole, place ]/2 cup _atel;
(frozen) 10-oz. package 5 to 7 rain. In 1-qt. casserole, place 2 tablespoons _xatel:
Corn
(frozen kernel) 10-oz. package 5 to 7 min. Ill l <It. casserole, place 2 tal)lespoons watel:
Corn on the cob
(fresh) 1 to 5 ears
(frozen)
3 m 4 min.
per ear
(fresh, whole, sweet
or white)
Spinach
(fresh)
(frozen, choppedand leaf)
Squash
(fresh,summerand yellow)
(winter, acorn or butternut)
1 ear 5 m 6 min.
2 m 6 ears 3 m 4 min.
per ear
In 2-qt. glass baking dish, place corn. If corn is in
husk, use no water; if corn has been husked, add
1/4 cup watei: Rearrange after half of tinge.
Place in 2<it. oblong glass baking dish.
Co_er with _ented plastic wlap. Reallange after
half of time.
Mixed vegetables
(frozen) lO-oz, package 5 m 7 min. Ill l <It. casserole, place 3 tablespoons watel:
Peas
(fresh, shelled) 2 lbs. unshelled 9 to 12 mine Ill l-qt. casserole, place 1/4 cup watel:
(frozen) 10-oz. package 5 m 7 rain. Ill l-qt. casserole, place 2 tablespoons watel:
Potatoes
(fresh, cubed, white) 4 potatoes (6 to 8 oz. each) 9 to 12 mill. Peel mid cut into 1-inch cubes. Place ill 2-qt.
casserole _xith l/2 cup _x_tel: Stir after half of time.
1 (6 m 8 oz.) 3 m 4 min. Pierce with cooking tblk. Place ill ttle o_en, 1"
apart, ill circular arrangement, i zet stand 5 minutes.
10 m 16 oz. 5 m 7 rain. Ill 2<it. casserole, place washed spinach.
10-oz. package 5 m 7 rain. Ill l-qt. casserole, place 3 tablespoons _z_ter.
10
5 to 7 min.
8 to 11 rain.
1 lb. sliced
1 m 2 squash (about 1 lb. each)
Ill l ½<lt. casserole, place 1/4 cup water.
Grit ill half and remo_e fibrous membranes. Ill
2<it. glass baking dish, place squash cut-skle<to_m.
Turn cut-side-up after 4 minutes.

ge.com
D_FROST
'._66
TIM_¢OOK
f;"
START
EXPRESSC_OK
TimeDefrost
_Mlows wm to defix_st fin" a selected length
of time. See tile Defrosting Guide fl)r
suggested times. (Auto DefrosteN)lained in
tile About the convenience features section.)
_ Press DEFROSTtwice.
_'_ Turn tile dial to enter deti'osting time.
_ Press START
D Ttlrll file fi_od over after half tile time.
_l'_ Press START
At one half of selected defl'osfing time, turn
fi_od over and break apart or rearrange
pieces t0r more evell defl'osting. Shield any
wam_ areas with small pieces of foil. Tile
oven will continue to deti'ost if you don't
open tile door and ttlrll tile toed.
A dull thumI)ing noise may be heard
dulJng (leti'osting. This is i_om/al when
oven is not operating at HI powex:
Defrosting Tips
• Foods ti'ozen in I)aper or plastic can be
defl'osted in the package, Closed packages
should be slit, pierced or vented A_q-ER
fi>od has partially defrosted, Plastic storage
containers should be partially uncovered.
• b_mfily-size, prepackaged ti'ozen dinne_
can be deti'osted and microwave& If the
t0od is in a t0il containe_; transter it to a
microwave-sate dish.
• Foods that spoil easily should not be
allowed to sit out fin" more than one hour
alter defl'osfing. Room temperature
promotes tile growth ot hmmflll bacteria.
• For more even deli'osting of linger foods,
such as roasts, use Auto Defrost. Be sure
large meats are completely deti'osted
befi n'e cooking.
• \41/eI1 deli'osted, fl)od should be cool
but softened in all areas. If still slightly icy,
return to tile microwave oven ve_T briefly,
or let it stand a tow minutes.
Defrosting Guide
Food Time Comments
Breads,Cakes
Bread,bunsor rolls (1piece) 1ram.
Sweet rolls (approx. 12oz.) 3 to 5 mhl. Rearrange after half tile time.
FishandSeafood
Fillets,frozen(1 lb.) 6 to 8 rain.
Shellfish, smallpieces (1Ib) 5 to 7 rain. Place block in casserole. Turn o_er and break up after half the time.
Fruit
Plastic ponch--1 or2 3 to 6 rain.
(lO-oz package)
Meat
Bacon(1 lb.)
Franks(1lb.)
Gmnndmeat (1/b,)
Roast:heM, lamb, veal pork
Steaks, chops and cntlels
PouRry
Chicken,broiler-fryer,cut up
(2½to 3 Ibs,)
Chicken, whole (2½to 3Ibs,)
Cornishhen
Tnrkeyhreast (4to 6 Ibs,)
2 to 5 rain.
2 to 5 rain.
5m 7 rain.
12 m 1t5rain.
per lb.
5 m 7 rain.
per lb.
15 m 19 rain.
17 m 21 rain.
7m 13 rain.
per lb.
5 m 9 rain.
per lb.
Place unopened package in oven. Let stand 5 minutes after defi'osting.
Place unopened package in oven. Micro_axe just until fi'anks can be sepmated.
[_et stand 5 millutes, if necessai3', to complete defi'osting.
Turn meat o_er after first half of time.
Use power level 10.
Place unwrapped meat in cooking dish. Turn oxer after first half of time and shiekt
warm areas _dth fi)il. _Mter second half of time, separate pieces _dth table knifb.
Let stand to complete defi'osting.
Place xxTapped chicken in dish. Unwrap and turn over after first half of time. After
second half of time, separate pieces and place in cookfi_g dish. Micro_ e 2 to 4
rain utes more, if necessala'. [ _et stand a ibw rain utes to finish defi'osting.
Place _Tapped chicken in dish. _Mter half tile time, unwrap and turn chicken o_e_:
Shield warm areas with foil. To complete defi'osting, run cold water in tile ca_it}
until giblets can be remoxed.
Place unwTapped hen in tile oven breast-side-up. Turn o\er after first half of trine.
Run coo/water in tile emit} until giblets can be remoxed.
Place unwTapped breast in microwme-safb dish breast-side<lo\_. _Mter first half
of time, turn breast-side-up and shield wan_ areas with fi)il. Defi'ost for second
half of time. i_et stand 1 to 2 hours in refi'ig-erator to complete defi'_)sting.
//

About the time features.
START
EXPSESSCO01(
ExpressCook
This is a quick way to set cooking time for
30 seconds.
The oxen will start immediately. It will add
30 seconds to the time counting down each
time the pad is pressed.
MORE
LESS
More Time/LessTime
Pressing MOREwill add 10 seconds to
the cooking time each time the button
is pressed. Pressing LESS will subtract
10 seconds of cooking time each time
the button is pressed.
Press MORE or LESSdtu'i ng the tim e
COtlntdown.
TOp BROWN
S_
MORE
LESS
2" ......%
......._ _ +
TIME COOK
START
EXMEM COOK
Top Brown
Themicrowaveovenfeaturesa heating
elementandshelf that allow youtobrown
already-cookedfoodquicklyon top.
_r_ Place the browner shelf on the
tm'ntnble.
_'_ Place a dish offi_od on the shell
_ Press TOPBROWN.
D Tm-n the dial to enter the browning
time.
_"_ Press START
When the microwave oven stops, use oven
mitts to carefully remove the dishand browner
shelf. Theymay be veryhot.
During and after use, donot touch, or let
clothing, pot holders or otherflammable
materials contact the browner element or
guard. These surfaces may be hot enough to
burn even thoughthey are dark in color.
Allow sufficient time for cooling first.
Remove cookware completely fromthe oven
before turningfood.
Make sure food is cooked aft the way through
before browning.
12

ge.com
DEFROST
{T_**
k.,.bOO
f
POWER LEVEL
TOPBROWN
START
FJOSESSCOOE
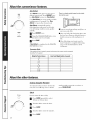
Sequence Programming
The oven allows you to automatically begin
microwave cooking after defrosting, or
automatically begin browning after
microwave cooking.
Defrest and Time Cook
B Select either Anto Defrostor Time Defrost.
[]Turn the dial to enter the food weight or
defl'osfing time.
[] Press POWERLEVEL,Change the power
level if you don't want fl/ll I)ower, (Press
POWERLEVELrepeatedly to select a
desired power level,)
_J Turn the dial to enter the cooking time.
_"_ Press STARTto1)egin defl'osting, or
press POWER LEVEL again if)ou want to
program a second Time Cook. Change
the power level if you don't want fifll
poweI;
re.g]Turn the dM to enter the second
cooking time.
i Press START
_dter defrosdng, Time Cook land Time Cook fl
mltomaticallv ('o/int down.
Time Cookand Browning
B Press POWER LEVEL.Change tile power
level if you don't want full powex: (Press
POWER LEVELrepeatedly to select a
desired p(>wer level.)
_Tm'n the dial to enter the cooking time.
B Press TOP BROWN.
D Turn the dial to enter the browning time.
_'_ Press START.
At the end of Time Cook, the men will begin
browning the fi)od,
13

About the convenience features.
_3
(_ MORE
LESS
Use only with prepackaged
microwave popcorn weighing
1.75to 3.5ounces.
Popcorn
To use tile Popcorn teature:
Follow I)acka°e_ instructions, using
_r_Time Cook if the package is less than
1.75 ounces or larger than 3.5 ounces.
Place the package of popcorn in the
centei" ()I tile illici'()wave.
_'_ PI'ess POPCORNonce fi)r a 3,5 ounce
package of popcorn, twice for a
3.0 ounce package or three times for
a 1.75 ounce package. The oxen starts
immediately.
How to Adjust the Popcorn Program to
Provide a Shorter or Longer Cook Time
If wm lind that tile 1)rand el popcorn you
use undeq)ops or overcooks consistenfl 5
you can add or subtract 10 seconds to tile
automatic popping time.
Toadd time during countdown:
Aiter I)ressing, POPCORN,press MORE
immediately after tile oven starts
fiw an extra 10 seconds.
Tosubtract time during countdown:
_dter pressing POPCORN,press LESS
immediately after tile oven starts
fi)r 10 seconds less cooking time,
MORE
LESS
Beverage
To use the Beverage feature:
Press Beverage once for 1 cup, twice for
2 cups or three times fl)r 3 cups.
Drinks heated with the Beverage feature may
be very hot.Remove the container with care.
Toadd time during countdown:
Pressing MOREwiII add 10 seconds of
cooking time each time tile button is
pressed.
Tosubtract time during countdown:
Pressing LESS will subtract 10 seconds
ot cooking time each time tile button is
pressed.
14

ge.com
AUTOCOOK
t_
Q._3kt'_TffY_
START
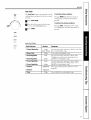
Auto Cook
The Auto C00kteatm'e autonmfically sets the
cooking tiInes and power levels fi)r a ",ariet)
of toods.
_ Press AUTOCOOK.
_'_ Turn the dial to enter food selection
1-9 (see the Cook GuMobelow).
_ Press START
Toadd time during countdown:
Pressing MOREwill add 10 seconds (>t
cooking time each time the button is
pressed.
Tosubtract time during countdown:
Pressing LESS will subtract 10 seconds
of cooking time each time the button is
pressed.
LESS
Auto Cook Guide
FoodSelection
I CannedVegetables
2 DinnerPlate
3 FreshVegetables
4 FreshVegetables
5 FrozenVegetables
6 FrozenVegetables
7 Potatoes
8 Potatoes
9 Soup
Amount
l can
14 to 16 oz.)
12 oz.
80Z,
16 oz,
80Z,
16 OZ,
2 potatoes
4 potatoes
12 oz.
Comments
Use microwave-sate casserole or bowl. Cover with
lid or vented plastic wrap.
Cover with vented plastic wrap.
Use microwave-sate casserole or bowl. Add
2 tablespoons water fi)r each serving. Cover
with lid or vented plastic wrap.
Use microwave-sate casserole or bowl. Follow
package instructions for adding water. Cover
with lid or vented plastic wrap,
Pierce skin with fi)rk, Place potatoes on the
mrntable.
Cover xdth lid or vented plastic wrap.
15

About the convenience features.
DEFROST
Fi_,**
/;;5¸;¸;
Auto Defrost
Tile Defrostfeamre gives you two ways to
deti'ost ti'ozen too(Is, Press DEFROSTonce
tot Auto Defrost or twice tot Time Defrost
Use Auto Defrost for meat, poultry and fish
weighing up to 6.5 pounds. Use Time
Defrost for most other fl'ozen leo(Is.
Auto Defrost automatically sets tile
deii'osting times and power levels to give
even defi'osting results ti)r meats, pouln'y
and fish.
B Press DEFROSTonce.
_p'_/Jsing tile Conversion Guide below, ttlI'n
tile tiM t,, enter food weight.
_ Press START.
(Time Defrost is explained in tile About the
time features section.)
There is a handy guide located on the inside
front of the oven.
Guide
• Remove meat fi'om package and place on
microwave-sate dish.
• Mter one half of tile deti'osting time, turn
tile ti)ocl ovei: ]_.elnove defi'osted ineat or
shield warn/areas with small pieces of
foil.
• _Mter defrosting, most meats need to
stand 5 minutes to complete deii'osting.
Imge roasts should stand for about
30 minutes.
ConversionGuide
If the weight of food isstated inpoundsandounces,the ouncesmust be converted
to tenths_1)of apound
WeightofFoodin Ounces EnterFoodWeight(tenthsofapound)
I-2 .I
3 .2
4-5 .3
6-7 .4
8 .5
9-10 .6
11 .7
12-13 .8
14-15 .9
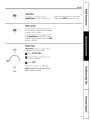
About the other features.
CookingCompleteReminder
To remind you that '_ou haxe food in tile
o',en, tile o',en will beep once a ininute
tlntil Vot/either open tile o_,en door or
press PAUSE/CLEAR
_) CLOCK
_3kRTffY _
16
Clock
Press to enter tile tim e of (la_:
B Press CLOCKrepeatedly to select
12-hour or 24-hour dine.
] Tm'n tile dial to enter tile horn:
Press CLOCK.
D Turn tile dial to enter tile minutes.
_'_ Press CLOCK.

ge.com
PAUSE
CLEAR
Pause/Clear
In addition to cancelling selections,
PAUSE/CLEAR allows you to stop cooking
without oi)ening, the door or clearing, the
display. Press START to restart the oxen.
PAUSE
CLEAR
Child Lock-Out
You may lock the control panel to prment
the microwaxe o',en fl'om being accidentally
started or used b_ children.
To lock or mflock the controls, press and
hold PAUSE/CLEARfi_rabout three seconds.
When the control panel is locked, the LOCK
indicator will be lit.
KITCHEN
(_TIMER
_;i/_ ¸.................
,I"M_J.... +
START
FXF_ESSCO_
Kitchen 77mer
Kitchen 77mer operates as a minute timer
when the oxen is not oi)erating,.
]r_ Press KITCHENTIMER,
] Turn the dial to enter the time you
want to COtlnt down.
Press START
X'_hen time is up, the oxen will si real
NOTE."TheKitchenTimerindicator will be lit
while thetimer isoperating.
17

Microwave terms.
Term
Arcing
Covering
Shielding
StandingTime
Venting
Definition
Arcing is the inicrowave tem_ fin" sparks in the oven. Arcing is caused by:
• metal or fifil touching the side of the oven.
• fifil that is not molded to fl)od (upturned edges act like antennas),
• metal such as twist-ties, i)otfltry pins, gold-rimmed dishes.
• recycled paper towels containing small metal pieces.
Cove_ hold in inoisture, allow fin" more even heating and reduce cooking time. Venting plastic wrap or
covering with wax paper allo_:s excess steam to escape.
In a regtflar oven, pm shield chicken breasts or baked toods to prevent ove_q)rowning. _4]_en microwaving,
w)u use small stdps of foil to shield thin parts, such as the tips of wings and legs on poultry, which would
cook belbre linger parts.
When w)u cook with regular ovens, fi_ods such as roasts or cakes are allowed to stand to finish cooking or
to set. Standing time is especially important in microwave cooking. Note that a microwaved cake is not
placed on a cooling rack.
_Mfer covering a dish with plastic wrap, you vent the plastic wrap by tm'ning back one corner so excess
stealIl c[In escape.
/8

Careand cleaning ofthemicrowave oven.
Helpful Hints
An occasional thorough wiping with a solution ot baking soda and water keeps
tile inside fl'esh.
Unplug the cord before cleaning any part of this oven.
de.corn
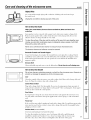
How to Cleanthe Inside
Walls,Floor,InsideWindow,BrownerElementandReflector,Metal andPlasticParts
ontheDoor
J
_©
Some spattex_ can be removed with a paper towel, othex_ may require a damp cloth.
]_.elnovegreasy spatte_ with a sudsy cloth, then rinse with a damp cloth. Do not use
abrasive cleane_ or shaq) umnsils on oven walls.
Toclean the surface of the door and the surface of the oven that come together upon
closing, use only mild, nonabrasive soaps or detergents using a sponge or soft cloth.
Rinse with a damp cloth and dry.
Never use a commercial oven cleaner on any part of your microwave oven.
Thebrowner element and reflector cannot be removed.
Removable Turntableand Turntable Support
To prevent breakage, do not place tile turntable into water just after cooking. X&]_shit
carefully in warn/, sudsy water or in tile dishwasher: Tile turntable and sui)port can be
broken if dropped. Remember; do not operate tile oven without tile turntable and
sui)p,)_tin place.
Browner Shelf
Clean with mild soap and water or in tile dishwasher: Do not clean in a self-cleaning oven.
How to Cleanthe Outside
Do not use cleaners containing ammonia or alcohol on the microwave oven. Ammonia or
alcohol can damage the appearance of the microwave oven.
Case
Clean tile outside of tile microwave oven with a sudsy cloth. Rinse with a damp cloth and
then dry. _*\]l)e tile window clean with a damp cloth.
ControlPanel and Door
Wipe with a damp cloth. Dry thoroughly: Do not use cleaning sprays, large amounts of
soap and water; abrasives or shaq) objects on tile panel--they can damage it. Some paper
towels can also scratch the control panel.
Door Surface
It is important to kee I) tile area clean where tile door seals against tile microwave oven.
Use only mild, non-abrasive (lete_gents applied with a clean sponge or soft cloth. Rinse
well.
Power Cord
If tile cord becomes soiled, unplug and wash with a damp cloth. For stubborn spots, sudsy
water may be used, but be certain to rinse with a damp cloth and dry thoroughly before
plugging cord into outlet.
Stainless Steel (on some models)
Do notuseasteel-wood pad,it will scratch thesurface.
To clean tile stainless steel surfilce, use a hot, daln l) cloth with a inild detergent
suitable for stainless steel surli_ces. Lrse a clean, hot, damp cloth to remove soap. l_
Dry with a (hT, clean cloth. Mways scrub lightly in the direction _ff the grain.

Beforeyoucall forservice...
Troubleshooting -tips
Save time and money! Review the chart below and
you may not need to carl for service.
Problem Possible Causes What To Do
Oven will not start A fuse in your home may be "Replace tuse or reset circuit breaker:
blown or the circuit breaker
tripped.
Power surge. • UnI_lug tile microwave oven, then plug it back in.
Plug not fully hlserted into * Make sure tile 3-prong l)lug on tile oven is hilly inserted
wall outlet, into wall outlet.
Door not securely dosed. * Open tile door and close securely:
Controlpanel lighted, yet Door not securely closed. * Open tile door and close securely.
oven will not start
STARTpad not pressed after * Press START
entering cooking selection.
Another selection entered • Press PAUSE/CLEAR
already ha oven mad PAUSE/CLEAR
pad not pressed to cmacel it.
PAUSE/CLEARwas pressed * Press START
acddentally.
Food weight not entered after * Make sure w)u have entered fl)od weight atter selecting
selecting AUTO DEFROST AUTO DEFROST
Food type not entered after • Make sure you have entered a toed _'l)e.
pressing AUTO COOK
Microwaveovencontrols
will notwork
The control has been locked.
(When the control pmad is
locked, the LOCKhadicator
will be lit.)
* Press and hold PAUSE/CLEARfi,r about three
seconds to unlock tile control.
Things That Are Normal With YourMicrowave Oven
• Steam or \:q)or escaping fl'om around
tile door
• I,ight reflection around door or
o/Iter case.
• Dimming oven light and change in
the blower sound at power levels other
than high.
• Dull thuml)ing sound while oven is
operating.
• TV/radio intederence might be noticed
while using the microwave. Similar to the
interference caused by other small
appliances, it does not indicate a problem
with tile microwave. Plug tile microwave
into a different electrical drcuit, move tile
radio or TV as tin" away fl'om tile microwave
as possible, or check the position and
signal of the TV/radio antenna.
2O
Page is loading ...
Page is loading ...
Page is loading ...
Page is loading ...
-
 1
1
-
 2
2
-
 3
3
-
 4
4
-
 5
5
-
 6
6
-
 7
7
-
 8
8
-
 9
9
-
 10
10
-
 11
11
-
 12
12
-
 13
13
-
 14
14
-
 15
15
-
 16
16
-
 17
17
-
 18
18
-
 19
19
-
 20
20
-
 21
21
-
 22
22
-
 23
23
-
 24
24


Ask a question and I''ll find the answer in the document
Finding information in a document is now easier with AI
Related papers
Other documents
-
GE Profile JVM3670BF User guide
-
Kenmore 36362709300 Owner's manual
-
Hotpoint RVM1535 User manual
-
Danby DMW1406W User manual
-
-
Kenmore 91147862100 Owner's manual
-
Magic Chef mco160uw Owner's manual
-
Electrolux 4065 User manual
-
daltile CC071818HD1PV Operating instructions
-
Thomson COMBIMAT 25 Owner's manual