Page is loading ...

TM
MODEL NUMBER: PG-50506SRL(N)
This unit can match with both side shelves and side cabinets.
CUSTOMER SERVICE: (888)-287-0735
FOR OUTDOOR USE ONLY
Stainless Steel Gas Grill
USER’S MANUAL

LIMITED WARRANTY
TM
Model Number: PG-50506SRL(N)
Stainless Steel BBQ Grill
We warrant to the original consumer purchaser (“Purchaser”) of the Stainless Steel BBQ Grill
(“Product”) that each Product shall be free from defects in workmanship and materials for a period
of the years listed below from the date of original purchase. Our obligation under this warranty shall
be limited to repair or replacement of, or adequate compensation for, the Product, at the option of
us, during the warranty period. Our liability shall not extend beyond repair or replacement, or the
cost equivalent thereto.
This warranty does not cover Product that have been altered or damaged due to: normal wear, rust,
abuse, improper maintenance, improper use, disassembly of parts and/or attempted repair by
anyone other than an authorized employee of Permasteel, Inc.This warranty does not cover
surface scratches, rust or heat damage to the finish, which is considered normal wear.
The warranty period of the years listed below shall not be extended or renewed by the repair or
replacement of, or compensation for, the Product.If your Product is defective or otherwise requires
service or parts, please first call PermaSteel Customer Service toll-free at (888)-287-0735,
between 8:00 a.m. and 5:00 p.m., PST. Please tell us which model you purchased, the date of
purchase, and the problem with your Product. We will use our very best efforts to honor this
warranty, and repair, replace or compensate you for your Product through your original place of
purchase. A copy of your original purchase receipt must accompany your service request.
Component Warranty Period:
Burners: 1 Year
Flame Tamers & Cooking Grids: 1 Year
Valves: 1 Year
Frame, Housing, Cart, Control Panel,
Igniter, and Related Parts: 1 Year
All Stainless Steel Parts: 1 Year
Granite countertop: 1 Year
LIMITATION OF REMEDIES AND LIABILITY
We shall not be liable for any incidental or consequential damages for breach of any express or
implied warranty on its Product. Except to the extent prohibited by applicable law, any implied
warranty or merchantability or fitness for a particular purpose on this Product shall be limited to the
duration of the above warranty. Neither us nor anyone else who has been involved in the creation,
production, or delivery of the Product shall be liable for damages of any type, including but not
limited to any lost profits, lost savings, loss of anticipated benefits, or other incidental or
consequential damages which may arise out of the purchase, use, or inability to use the Product,
whether arising out of contract, negligence, strict tort, or under any warranty, or otherwise, even if
you have been advised of the possibility of such damage or any other claim by any other party.
Our liability for any breach of warranty shall be limited to repair or replacement of the defective part
or parts as described above. Some states do not allow the exclusion or limitation of incidental or
consequential damages, so the above limitation or exclusion may not apply to you. The above
warranty gives you specific legal rights, and you may have other rights which vary from state to
state.

TABLE OF CONTENTS
TM
BEFORE YOU BEGIN
MESSAGE TO OUR USERS PAGE 1
SAFETY SYMBOLS PAGE 1
INSTALLATION & SAFETY PRECAUTIONS PAGE 2
GAS WARNING PAGE 2
ASSEMBLY
PARTS PAGE 3
OPTIONAL SIDES FOR CHIOCE PAGE 5
ASSEMBLE WITH SIDE SHELVES PAGE 8
ASSEMBLE WITH SIDE CABINETS PAGE 13
POST ASSEMBLY
GAS CONNECTION PAGE 18
LEAK TESTING PAGE 23
FINAL INSTALLATION CHECK LIST PAGE 25
GRILL LIGHTING INSTRUCTION PAGE 26
OPERATING INSTRUCTION PAGE 28
CARE & MAINTENANCE PAGE 29
TROUBLE SHOOTING PAGE 30
FOOD SAFETY PAGE 31
GRILL STORAGE PAGE 31

1
Thank you for your purchase of our Stainless Steel BBQ Gas Grill. We sincerely wish
you will enjoy using our fine products.
Please read this User’s Manual in its entirety before using the grill.
Please contact our customer service at (888)-287-0735 if you have any questions.
Please read this User’s Manual carefully. Failure to follow the provided instruction
can result in seriously bodily injury and/or property damage.
Some parts of this grill may have sharp edges. Please wear suitable protective gloves.
IMPORTANT: This grill is intended for outdoor use only and is not intended to be
installed in or on recreational vehicles or boats.
NOTE TO INSTALLER: Leave this User’s Manual with the customer after delivery
and/or installation.
NOTE TO CONSUMER: Leave this User’s Manual in a convenient place for future
reference.
The symbols listed here are being used through out this User’s Manual. Please pay
special attention to them. The meaning of each of the symbols is listed here:
DANGER– this symbol indicates an imminently hazardous situation which
will result in death or serious bodily injury if not properly followed.
WARNING– this symbol indicates a warning of potential serious bodily
injury if the instructions are not strictly followed. Please be sure to read and follow
all these messages carefully.
CAUTION – this symbol indicates a potentially hazardous situation which
may result in minor or moderate bodily injury if the instructions are not properly
followed.
SAFETY SYMBOLS
MESSAGE TO OUR USERS

2
WARNING
READ THIS SECTION FIRST BEFORE INSTALLING THE GRILL
Your grill has been designed to operate using only the gas specified on the rating
plate. Do not attempt to operate your grill with other gases.Failure to follow this
warning may result in a fire hazard and bodily harm, and PermaSteel will void your
warranty.
The installation of this appliance must conform with local codes or, in the absence
of local codes, with either the National Fuel Gas Code, ANSI Z223. 1/NFPA 54,
or CAN/CGA- B149.1; Natural Gas and Propane.
All electric accessories (such as rotisserie) must be electrically grounded in
accordance with local codes, or National Electrical Code, ANSI/NFPA 70, or
Canadian Electrical Code, CSA C22.1. Keep any electrical cords and/or fuel
supply hoses away from any hot surfaces.
This grill is safety certified for use in the United States and Canada only. Never
modify to use in other places. Modification may cause serious bodily injury or
property damage. PermaSteel is not responsible for any modifications, and all
warranties will be void.
WARNING
FOR YOUR SAFETY, PLEASE READ THIS SECTION FIRST
If you smell gas:
Shut off gas to the grill.
Extinguish any open flames immediately.
Open the grill lid.
If the odor persists, please call your gas supplier or your fire department
immediately.
Do not store or use gasoline or other flammable items in the vicinity of this grill.
Any LP cylinder that is not connected for use should not be stored in the vicinity
of this grill.
GAS WARNING
INSTALLATION

3
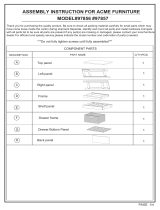
GRILL PARTS LIST
REF# DESCRIPTION Q’TY REF# DESCRIPTION Q’TY
01 Lid 1 34 Back Panel 1
02 Temp. Gauge Seat 1 35 Hole Bushing 1
03 Temp. Gauge 1 36 Rear Burner Cover 1
04 Clip Rings 2 37 Thermocouple Cover 1
05 Name Plate 1 38 Thermocouple Bracket 1
06 Handle Seat 2 39 Smoker Box 1
07 Handle 1 40 Smoker Cover 1
08 Grease Tray 1 41 Firebox 1
09 Knob, Rear Burner 1 42 Corrugated Pipe B 1
10 Knobs 5 43 Thermocouple 1
11 Control panel 1 44 Rear Panel 1
12 Manifold 1 45 Rear Burner 1
13 Safety Switch 1 46 Ignition Electrod , Rear Burner 1
14 Rear Burner Valve 1 47 Warming Rack 1
15 Corrugated Pipe A 1 48 Cooking Grids 3
16 Valves 5 49 Flame Tamers 5
17 Valve Bracket 1 50 Main Burner Brackets 5
18 Door Bracket 1 51 Main Burner 4
19 Front Transom 1 52 Left Main Burner 1
20 Handles , Drawer 2 53 U ring 1
21 Handles Seats, Drawer 4 54 Left Panel 1
22 Drawer Front Panels 2 55 Tank Heat Shield 1
23 Drawers 2 56 Tank Holder Brackets 2
24 Sliding Bars 6 57 Tank Holder 1
25 Casters with Brake 2 58 Tank Holder Rubber Strap 1
26 Bottom Panel 1 59 Lower Door Hinge Bracket 1
27 Right Drawer Transoms 2 60 Casters without Brake 2
28 Right panel 1 61 Magnets 4
29 PVC Washers 2 62 Ignitor Rod 1
30 Grease Tray Heat Shield 1 63 Left Door 1
31 Clapboard 1 64 Lower Door Hinge Bracket 1
32 Acorn Nut 1 65 Gas Hose 1
33 Rotary Pin 1

4
GRILL PARTS DIAGRAM

5
OPTIONAL SIDES FOR CHOICE
Dear Customer: Below parts are optional for your choice (no
Dear Customer: Below parts are optional for your choice (no
included with grill)
included with grill)
A. Side Shelves
B. Side Cabinets

OPTIONAL SIDES FOR CHOICE
REF
#
Parts of Left Shelf
1 Push Bar
2 S-style Hooks
3 Left Side Shelf
4 Left Side Shelf Support
5 Motor Bracket
REF
#
Parts of Right Shel
f
1 Push Bar
2 Right Side Shelf
3 Right Side Shelf Support
6

7
OPTIONAL SIDES FOR CHOICE
REF# Parts of Left Cabinet
1
CounterTop
2
Motor Bracket
3
Back Panel
4
Cross Bar
5
Magnets
6
Left Side Panel
7
Drawer Brackets
8
Sliding Bars
9
Drawer Seat
10
Drawer Transom
11
Right Side Panel
12
Drawer Front Panel
13
Drawer Handle Seats
14
Drawer Handle
15
Upper Door Hinge
16
Left Door Handle
17
Left Door
18
Door Transom
19
Bottom Panel
20
Lower Door Hinge
21
Casters without Brake
22
Casters with Brake
REF# Parts of Right Cabinet
23
CounterTop
24
Back Panel
25
Drawer Transom
26
Magnets
27
Left Side Panel
28
Drawer Transom
29
Drawer Brackets
30
Sliding Bars
31
Drawer Seat
32
Right Side Panel
33
Drawer Front Panel
34
Drawer Handle
35
Right Door
36
Right Door Handle
37
Right Upper Door Hinge
38
Door Transom
39
Bottom Panel
40
Bottom Panel
41
Right Lower Door Hinge
42
Casters with Brake
43
Casters without Brake

8
ASSEMBLY INSTRUCTIONS
Item Description Specification Quantity
1
Truss head screw
(With Split lock And Gasket)
1/4-20x1/2” 20 pcs
2
Truss head screw
(With Split lock And Gasket)
5/32-32x3/8” 10 pcs
3 BBQ hooks
4 pcs
STEP I:
Take out main body of grill from carton. Remove all the packing materials.
ASSEMBLE THE SIDE SHELVES TO GRILL:
ASSEMBLE THE SIDE SHELVES TO GRILL:
Tools Required:
#2 Philips head screwdriver (not provided)
Hexagon/Allen wrench (provided).
The following hardware kit is provided with side shelves.

9
ASSEMBLY INSTRUCTIONS
STEP II:
Take out left side shelf from carton.
Use two 1/4-20x1/2” screws to attach left side shelf from inside of the firebox,
and use three same screws to attach it from outside of firebox.
Use three 5/32-32x1/2” screws to attach left side shelf angle iron to side shelf,
and also use two same screws to attach it to firebox from outside.
Use four 1/4-20x1/2” screws to attach push bar to left side shelf.
Use two 1/4-20x1/2” screws to install motor bracket on left side shelf.
Take out four S-style BBQ tool hooks from the hardware bag, then hang on the
edge of the left side shelf.

10
ASSEMBLY INSTRUCTIONS
STEP III:
Take out right side shelf from carton.
Use two 1/4-20x1/2” screws to attach right side shelf from inside of the
firebox, and use three same screws to attach it from outside of firebox.
Use three 5/32-32x1/2” screws to attach right side angle iron to side shelf,
and also use two same screws to attach it to firebox from outside.
Use four 1/4-20x1/2” screws to attach push bar to right side shelf.

11
ASSEMBLY INSTRUCTIONS
STEP IV:
Remove packing material from flame tamers, cooking grids and warming
rack , then place them in the proper positions shown below.
If separately rotisserie kit is available, please follow below assemble steps(see
the picture as above):
Take out rotisserie parts from carton.
Tread key washers and counter balance onto treaded end of rotisserie
rod ,next tread handle and tighten, slide shaft collar through other side of
rod followed by the two prongs, (forks should be pointing towards each
other) tighten thumb screws on shaft collar and prongs.
Take out motor from the carton, and place it in the bracket.

12
ASSEMBLY INSTRUCTIONS
STEP V:
When the grill is in the desired location, lock the caster brakes, this will keep
the grill unit in place for safe operation.

13
ASSEMBLY INSTRUCTIONS
Item Description Specification Quantity
1
Truss head screw
(With Split lock And Gasket)
1/4-20x1/2” 2 pcs
STEP I:
Take out grill body and the cabinets from packing carton, and remove all the
packing materials.
ASSEMBLE SIDE CABINETS TO GRILL:
ASSEMBLE SIDE CABINETS TO GRILL:
Tools Required:
#2 Philips head screwdriver (not provided)
Hexagon/Allen wrench (provided).
The following hardware is provided with island sides.
(a)
(b)

14
ASSEMBLY INSTRUCTIONS
STEP III :
Remove packing material from flame tamers, cooking grids, warming rack,
then place them in the proper positions shown below.
STEP II :
Place the motor bracket to the left side cabinet with 2 pcs of 1/4-20*1/2 screws.

15
ASSEMBLY INSTRUCTIONS
STEP V :
When the grill is in the desired location, lock the caster brakes, this will keep
the grill unit in place for safe operation.
STEP IV :
Place the side cabinets close to grill, make them on the same line.

16
ASSEMBLY INSTRUCTIONS
If separately rotisserie kit is available, please follow below assemble steps:
Take out rotisserie parts from carton.
Tread key washers and counter balance onto treaded end of rotisserie
rod ,next tread handle and tighten, slide shaft collar through other side of
rod followed by the two prongs, (forks should be pointing towards each
other) tighten thumb screws on shaft collar and prongs.
Take out motor from the carton. And place it in the bracket.
STEP VI:
When the grill island is in the desired location, lock the caster brakes of cabinets,
this will keep them in place for safe operation.

17
ASSEMBLY INSTRUCTIONS
Safety Notice:
The regulator hose(natural gas hose) should go through the U shaped bracket,
in order to prevent the hose from lifting up and touching the hot firebox.
Note: if replacing regulator (natural gas hose) please make sure to put
regulator hose (natural gas hose) through U shape bracket.
/