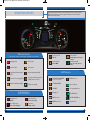
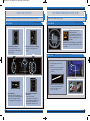
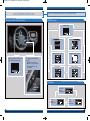
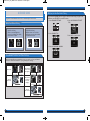
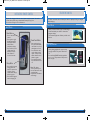
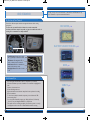
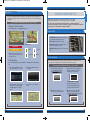
Honda Fit EV offers a thrilling driving experience with its 3-Mode Drive System. Maximize energy efficiency with ECON mode, enhance performance with Sport mode, or strike a balance with Normal mode. Monitor your energy usage and driving style with Eco Assist™, and receive feedback through the Eco Drive Bar and Ambient Meter. Charge your vehicle using a 240V (32 amp) charge at an EV station or a standard household outlet, and keep track of your charging status with the interactive remote control.
Honda Fit EV offers a thrilling driving experience with its 3-Mode Drive System. Maximize energy efficiency with ECON mode, enhance performance with Sport mode, or strike a balance with Normal mode. Monitor your energy usage and driving style with Eco Assist™, and receive feedback through the Eco Drive Bar and Ambient Meter. Charge your vehicle using a 240V (32 amp) charge at an EV station or a standard household outlet, and keep track of your charging status with the interactive remote control.


-
 1
1
-
 2
2
-
 3
3
-
 4
4
-
 5
5
-
 6
6
-
 7
7
-
 8
8
-
 9
9
-
 10
10
-
 11
11
-
 12
12
-
 13
13
-
 14
14
-
 15
15
-
 16
16
-
 17
17


Honda Fit EV Quick start guide
- Type
- Quick start guide
- This manual is also suitable for
Honda Fit EV offers a thrilling driving experience with its 3-Mode Drive System. Maximize energy efficiency with ECON mode, enhance performance with Sport mode, or strike a balance with Normal mode. Monitor your energy usage and driving style with Eco Assist™, and receive feedback through the Eco Drive Bar and Ambient Meter. Charge your vehicle using a 240V (32 amp) charge at an EV station or a standard household outlet, and keep track of your charging status with the interactive remote control.
Ask a question and I''ll find the answer in the document
Finding information in a document is now easier with AI
Related papers
-
Honda CR-Z 2014 Quick start guide
-
-
-
-
Honda Insight 2014 Owner's manual
-
-
-
Honda Ridgeline Quick start guide
-
-
Honda CR-V Quick start guide
Other documents
-
Acura 2014 TL User guide
-
-
-
-
-
-
-
-
Acura 2012 TSX Sport Wagon User guide
-