
Revision B
P/N E132130
www.elotouch.com
Quick Installation Guide
Elo PayP
oint® Plus for Android
© 2017 Elo Touch Solutions, Inc. All rights reserved.
The information in this
document is subject to change without notice. Elo Touch Solutions, Inc. and its Affiliates ( collectively “ Elo”) m akes n o
representations or warranties with respect to the contents herein, and specifically disclaims any implied warranties of merchantability or fitness for a
particular purpose. Elo reserves the right to revise this publication and to make changes from time to time in the content hereof without obligation
of Elo to notify any person of such revisions or changes.
No part of this publication may be reproduced, transmitted, transcribed, stored in a retrieval system, or translated into any language or computer
language, in any form or by any means, including, but not limited to, electronic, magnetic, optical, chemical, manual, or otherwise without prior
written permission of Elo Touch Solutions, Inc.
Elo (logo), Elo PayPoint and Elo Touch Solutions are trademarks of Elo and its Affiliates.
Asia-Pacific
Tel +86 (21) 3329 1385
Fax +86 (21) 3329 1400
Latin America
Tel 786-923-0251
Fax 305-931-0124
EloSales.LAT[email protected]
Contents:
1x PayPoint Plus for Android
1x Receipt paper roll
1x Power cord
2x Cash drawer keys
1x RJ45 to DB9 serial cable
For software development kit please visit
www.elotouch.com
Elo Touch Solutions Technical Support
Online self-help:
https://www.elotouch.com/support
North America
800-ELO-TOUCH
Tel +1 408 597 8000
Fax +1 408 597 8050
Europe
Tel +3
2 (0)16 70 45 00
Fax +32 (0)16 70 45 49

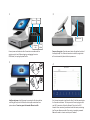
Connect power and ethernet cable. Connections are underneath the
register near the back. Before plugging or unplugging the micro-
HDMI cable, first unplug the power cable.
Install receipt paper: Install the paper by pressing the lid release button
and lifting up the printer lid. Note the correct paper orientation from
pictures above. Do not use paper that exceeds 80 mm in width.
If an Internet connection is not found in Step 3, hold the power button
for 3 seconds and release. This lets you enter the set-up page to find
your Wi-Fi connection. Under the Network Tab, select the Wi-Fi
network. Once connected, your device should start auto provisioning
itself to your software provider. Once set up is complete, password
1elo can be used to re-enter control panel if needed.
Power on the register: Press the power button (located on the back of
the display head). If an Ethernet connection is available, registration
will start automatically when the device powers on.
2
3
4
.
1
Ethernet Power
12VPower
USB
micro
HDMI
-
 1
1
-
 2
2


Elo PayPoint® Plus for Android™ — with Google Play Services (3.0) User guide
- Type
- User guide
- This manual is also suitable for
Ask a question and I''ll find the answer in the document
Finding information in a document is now easier with AI
Related papers
-
Elo PayPoint® for Android™ — with Android Open Source (Rev B) User guide
-
Elo Touch Solutions PayPoint® for Android™ — with Android Open Source (Rev B) User manual
-
-
-
-
-
Elo 2202L Quick setup guide
-
-
-
Other documents
-
Elo Touch Solutions EloPOS E3 User manual
-
Elo Touch Solution 1931L User manual
-
Elo TouchSystems ES601068 Rev A User manual
-
-
Elo Touch Solution E058968 Datasheet
-
-
Elo TouchSystems Flat Panel Television ET4201L User manual
-
-
-