Page is loading ...

Air
.
Contilioner
9
Saf*lnstrutiiOns
.........................2
Operating Instrutiions
Air Direction
. . . . . . . . . . . . . . . . . . . . . . . . . . . . . . . . . . . . . . . . . . . . . . . . . . . . .
4
Control Settings
.........................................3, 4
Care and Cleaning
Air
Filter.............................................................5
Grille and Cabinet ............-.-.-.....-.........-.......--.5
Outdoor
Coils...................................................5
❑
●
Problem
Solver...............................l
3
Things that are normal ...............................1 3
More questions
?...call
GEAnswertintiP
800.626.2000
Installation
Electrical Requirements.......... -.... -....... -........6
Wension
Cords ..............................................6
Grounding.........................................................6
Installation Instructions ..........................6-1 2
Window installation
..............................7-9
ThrougKth&WalI Installation .......1012
Consumer Services
...................l
5
Appliance Registration ...................... -..... ---...2
Important Phone Numbers........................l 5
Model and Serial Number Location ...........2
Warranw
........................................Back Cover
E
Mode&.
AMDIO
AMD12
AMH12
GE Appliances

I
I
Before using your air conditioner,
read this guide
carefilly.
It@ help you operate and maintain your new
air
mnditioner
properly.
Keep it handy for answers to your questions.
E
you don’t
understid
something or need
more help,
dl:
GE Answer
CenkP
~.626.2~
M
hours a day,
7 days
a week
If you received a damaged air
conditioner...
Immediately contact the deder (or builder) that sold
you the air conditioner.
Wfite
do~
the model and serial numkrs. ‘ —
They are
on a label on the right hand side of the
ae
andor
behind the
@e
on the front end of the base pan.
These numbers are
dso
on the
tinsumer
Product
tiership
Registration&d that came with your air
wnditioner.
Before sending in this
car~
please write
these numbers here:
Model Number:
Send
NurnbeK
Use these numbers in any correspondence or
servia
ails concerning your air conditioner.
~
YOU
~ED
SERWCE
To obtain
serviw,
see the Consumer
Servims
page in
the back of this guide.
We’re proud of our
serviu
and want you to be
pleased
If for some reason you are not happy with the
servia
you receive, here are three steps to follow for
further help.
FIRST, contact the people who serviced your
appliance.
@lain
why you are not pleased In most
cases, this
wfll
solve the problem.
=,
if you are still not
pleased
write
dl
the
detail-including your phone number-to:
Manager, Consumer Relations
GE Appliances
{’
Appliance Park
/
huisville,
=
402X
HNALLY,
if your problem is
stfll
not resolve& write:
Major
Applianm
~nsumer
Action Panel
20
Nod
Wacker
Drive
timgo,
L
60606

\
r’
,.*
.>
-..
.
Selector Switch
Cooling
wti
Iowfan speed
I
wm
CAWON:
M
the air conditioner is shut off, wait
at least 2 minutes before restarting
i~
For normal cooling
For quieter operation
5
~ermostat
Control
1 2 3 4 5 6 7 8910
● -m-m-m-m-m-m-m-m-m
)
(
For
mafimum
cooling
Fan and
Ener~
Saver Switch
For fan
operatio~
the Energy Saver Switch must be
set at NO
W.
NORW
—Thefan
DI
runs
di
the
time.
~ea~o~cles
ww—
when
sooling.
HHGYflVER
~mer
Control
men
you turn the Timer
Gntrol
to
the
~W
setting, the air
mnditioner
starts immediately and
operates
mntinuously
if the Selector Switch is at any
setting other than OFF.
To delay the start of the air conditioner anywhere
from 1 to 12 hours:
(@:
‘“-~,
:*&:L
D&u;
Set for the number
mum
Turn to the
of hours
YOU
want to
desired setting.
delay
th6s-
To stop the air conditioner from 1 to 12 hours latec
(@~
fl
:*~:&
sH—D#J
m-
Set for the number of
Turn to the
hours you want the air
desired seting.
conditioner to operate
before
shting
off.
n
3

OPEM~G
YO~
CO~OLS
(mntinued)
Vent Control
The
WNT
control is
lmted
on the grille frame
The cooling effect
is
redumd
when the vent is open.
above the control panel.
men
the
WNT
is set at CLOSE,
ody
the ah inside
the room
w
be circulated and conditioned
men
set at OPEN, some indoor air can be exhausted
from the room.
CLOSE VENT OPEN
Use open v
postion
for
exhaust
Close
vent
to
fiker
end
reciralate
dr
Freezing up
If you notice that your air conditioner
is
not cooling as
it
shod~
it may be that ice has formed on the moling
cotis.
The
iw
block
air flow and stops the unit from
cooling the room. This “freezing up” is a temporary
condition that most often occurs at night when the
ln;$e;s~r
Thermostat is
set on the coldest setting and the Selector
unmmfotile
is set on LO COOL.
To
comect
the condition, set the Selector at
F~
ONLY
or HI COOL with the Thermostat at 1 or 2.
G
Outside air
temperature
dropping
/
‘.
To
adjmt
the
ah
direction
fingertip pressure
adju~
the
~r
dire~on up,
don
or
strtight
oti
Sidste
side
CIRCUUIRE
OFF
D
ON
For fixed side-h-side air direction,
set the
Cirtiaire
Switch to ON
unti
the desired air direction
is
obtaine~
then move it to OFF.
For
contiuous
side-b-side air
circdation,
set the
Circulaire
Switch to ON and leave it there.

Gtile
and
cabtiet
Outdoor
COM
Turn the air conditioner off and remove the plug from
The coils on the weather side of the air
wnditioner
the
wdl
outiet
before cleaning.
should be checked regularly.
H
they are clogged with
dirt or
smt
they maybe
professiotily
steam
cleane~
a service
avatiable
through your GE service outlet.
a
UUCH
.
Use water
md
a mild
daergeti
DO NOT use
bleati
or abrasives.
M
filter
The
air
filter behind the front grille shotid be checked
and cleaned at least every 30 days or more often if
necessary.
The filter can be cleaned with a vacuum cleaner to
remove light
dus~
or washed in warm soapy water.
“
‘ Rinse and let the filter dry before replacing it.
men
-
replacing, be sure the word
~ONT
is facing you.
DO NOT
operate the air
mnditioner
without a filter.
Front
@Ue
To remove the
@Ie:
To replace the
@le:
1.
Remove the
air filter.
2. Remove and save
the screw that
holds the
@le
in place.
3. Press inward on
the lower right
@
+
From
grille
side of the
me
until the tab is clear of the slot and allow the
@le
to come toward you
slightiy.
4. Repeat for the lower left side.
2
1.
Plaw the two
tabs on the grille’s
top inside edge
with the two slots
in
the case.
2. Press on the
lower
5.
Gr&p
the grille’s lower comers and
we~ly
lift
straight up to release the 2 top tabs from the slots in
the
&e
front edge.
right
side of the
case at the slots
and then carefully
push the
@Ue
until the tab fits
with the slot.
~.
Repeat for the lower left side.
4. Replace the screw.
5. Slide the
ffiter
back into place.
NO~:
Do not pull the bottom edge toward you more
than 3 inches or you may damage the tabs of the
@le.
5
—

,,
.,
.
,,,
,
.,,
.
.
.
,.
.
,’ -
.:’
:,
~
:.,
,,
,,,;
:
.,,
,.
:
:,,
..,,
,:,
‘
&’stitioN,ti*q&oNs.”
,::.’”
‘
.::’;
~
.,,
.,
.
.
,.
.
.
.
.
,.
.
.
,,
,..
.,
,.
.
.
.
.,
.,,
‘>
.
,.
‘<
,.,
.
.
.
,..
,
IMPORT~T:
bave
these instructions with the appliance.
O~ER:
Keep these instructions for future use.
Electrical
SafetY—IWORTMT...
P1ease
Read Carefully
For personal safety, this air conditioner must be
properly
~unded.
Electriml
requirements
●
Do
not change the plug on the power cord of this
air conditioner.
●
Fo~ow
mtiod
eltid
codes or
ld
codes and
ordinan=.
●
Numinum
house wiring may present special
problem+
consdt
a
qtified
electrician.
me
115-volt
modek
require a 115/l~volt
a.c.,
~
~
grounded
oudet
proteetedwith
a
15-arnp
time delay fuse
or&tit breaker.
me
power cordon these models has a 3-prong
bounding)
plug that mates with a standard 3-prong
@ounding)
*
oudet
@ig.
1) to
~
the
possibtity
of
eltic
shock
h-d
from these air conditioners.
H
the
w~
oudet
you
plan to use is
ody
a
2-prong
oude~
it is your
persoti
responsibfity
to have it
replad
with a
properly grounded
3-prong
wd
outiet.
me
Xopa-volt
models
require their own
sin@e
b~ch
circuit supplying
ZOLBvolt
a.c.,
protected
tith
a
tie
delay fuse or
eireuit
breaker.
~
is rmmmended for best
petiormance
and to prevent overloading house
fig
circuits, which
eodd
cause a possible fire
tid
from
overheating wires.
me
power cordon these
modek
has a
230~-volt
perpenditiar,
tandem or large tandem-type plug that
plugs into the same type
wd
outiet.
~ese
~
of
outiets
are
avtiable
at most hardware stores.
Q@
Q@
Q@
“
=&-m
~m;l
Wh-m
m~~wfim
m~my15mPM
Omm
~
ammPze
L
I
1
I
Whether your air conditioner is a 115-volt or a
230/208-
volt
uni~
it is important to have the
WW
outiet
and circuit
checked by a
qdtied
electrician if there is any doubt as
to whether a proper ground
etits.
6
Use of adapter plug
(115-volt models only)
Bemuse
of potential safety
huards
under
wrtain
conditions, we strongly recommend against the use of
an adapter plug. However, if you still choose to use an
adapter, a temporary
annection
maybe made where
ld
codes permit. Use a
~listed
adapteq
avdable
at
most
loerd
hardware stores and make sure the 2-prong
wdl
outiet
is properly grounded Gig. 2). You should
have the
circuit
checked by a
qualifi-ed
electrician to
make sure the outlet is properly grounded.
men
you put the adapter
plug into the
wd
outieg
make sure the larger prong
~-
goes into
thelargerdot.
~
m~~
provides the proper polarity
in the connection of the
m
mw
-
[~
~
N~
wmN-)
@~
R
“
f
power
~d
For proper
grounding, you must
dso
hg.
2
T
-m-
WRW~
mm-m
screw the adapter to the
outie~
using the
outiet
cover screw.
CA~ON:
r’-
Serewing
the adapter to the
aver
screw
W
not ground
the air conditioner
urdess:
-
1.
me
outiet
is
tieady
grounded through
the
house
wiring; and
2.
me
cover screw is
meti
and not
instiatd
Men
disconnecting the power
wrd
from the
adapteq
always hold the adapter with one hand
w~e
palling the
plug with the other hand.
U
this is not done, the adapter
ground
ted
is likely to break with repeated use.
Shodd
tie
adap~r ground tirmind
b-
DO NOT USE
tie
air conditioner
unti
a proper
~und
has again been
es~bkhe~
Use of
e*nsion
cords
Because of
potenti
safety
hds
under certain
renditions, we
stron@y
reeommend
against the use of an
exension
mrd.
However, if you
sti
choose to use an
e~nsion
cord
it is absolutely necessary that it be a
~hted
3-wire
grouuding
type
applianw
efinsion
cord.
me
current-~ing
rating of the cord
in
amperes
must be
eqti
to or greater than the branch circuit
sbe
shown on the rating nameplate of the air conditioner.

.’ .’ -
.’
.:
.,:,,
.,.
,
}
,. .,,
:“.
,,:.
.
,,,
‘.
,., .:
..
..;
.
.
,
,,
:..,,
,f
’.,
~.
,
,:”
‘:,..:.
.
,,,:
,1
::
:
.
.
.
.
.
.
.
.
.
,.
.,,
:
.,
,..,
.,.
.
,.
“’.., ,
,’
‘.,
.,
.’,’
.,.
,,
,.
:...:
.
.
“’”
mokti-oN;”:!’?’:’:”;
..
.
.
.
.
.
,,,
,’.
:
,,
.
.
;
‘,.,’.’.
.
.
..-
.,
,
,.
,,
,.’,’
,,
,.
:,’.,
:,:{,
,,,
,
<
.:
.,:;
,.
‘,
,“.
.
.
.
.
,,,.
.,.:;,,,
‘.
,’
:
,,
~~J••ñJ•
;
:
:
,;.,,
‘
,.,
:
‘
,’
.,,,
,.;
,.,”
\,.,,
.
.
.....
,,
f..
‘.
.
.,,
::.,.’,
,..
.’
..,
‘f””.
,.
.,
,,
.
. .
.
,.
:.,
.
-
ght
dow
pane
.
I
I
TOOLS
NEEDED
● Phillips head screwdriver
● Blad~Wpe screwdriver
● Knife or razor blade
● Ruler or tape measure
● Level
● Pencil
● Scissors
,.
-.
.
,.,.
T
pe
A
d
ty-3
T
pe
C
6
ty-4
T
pe D
&
ty-6
WINDOWREQulRE~E~s
●
●
●
The installation will need to be modified for
windows other than the standard doublehung
window.
Install the air conditioner in a window where
there will be enough clearance around the case
to allow ample circulation of the air through the
air conditioner.
All supporting parts should be secured to firm
wood, masonry or metal.
7

,,4
1. REMOVE THE
FRONTGRILLE
.
Seethe Care and Cleaning section of this guide.
2
REMOVE
THEAIR
COND~fONER
FROM THE CASE
locking screw.
Remove
grounds
‘Remove the
ground wire.
NO-:
Save these screws.
~ey
will be used at
the end of the installation.
● Remove the air conditioner from the case using
the base pan as a handle.
8
3. PREPARE
Room side
THE CASE
Install the top
r
mounting rail onto
the top of the
~
~
case with 3
typ
D
n
screws.
+C=etop
Type D screw
ryp
●
H
Install the bottom sill channel onto the case by
inserting the notches on the channel into the
slots located on the bottom of the case and
securing with 3 type D screws.
4.
A~ACH
PANELS.
Slide the left and
right window filler
panels into the
top and
kttom
mounting rails.
1
THE WINDOWFILLER
k
Top
mounting rail
D
Bottom
\
mounting rail
Slide the retainer panels into
the window filler panels and
attach to the case with 2 type
C
screws.
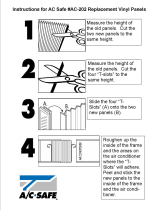
1(

Meas
Cut the
sealing ribbon
to the window
width and
stick adhesive
side to the
bottom of the
lower window
sash.
the centerline.
●
Install the case into the opening and
centaron
the
line marked. Put the top of
thecasetoward
you and
Iowerthewindowbehind the top mounting rail.
Use 2 type
A
screws.
x
\.
e
top
rail
eB
6. INSTALL
~EFOAM
TOP
WINDOW
GASK~
Cut
the
foam top
Stuff the foam between the glass and the window to
prevent air and insects from
geting
into the room.
Z
INSTALL THE WINDOWLOCKING
BRACKE
Window locking
&
INSTALL
THEAIR
CONDIWONERIN
THE CASE
● Slide the air conditioner into the case. Do not
push on the controls or the finned coils. Make
sure the air conditioner is firmly seated toward
the rear of the case.
Reinstall the
locking brackets
and screws
removed earlier.
9.
RECONNE~
THE GROUND WIRE
IMPORTA~
●
Reconnect the ground wire to the air conditioner
and then remove enough power cord to reach
the wall outlet.
la
CHECK FOR
AJRLEAKSAND
REPMCE
THE
FRONTGRILLE
● Seal small openings around the case with the
sealer provided.
● Replace the front grille and the air filter.
See the Care and Cleaning section.
9

IMPORTANTNOTES
c
The case may be installed through the wall in
both existing buildings and new construction.
Q
Any side louvers must project on the outdoor
side of the wall.
● The room side of the case must project into the
room at least 1“ from the finished wall.
● The case must be installed level from side to
side and with a
~”
tilt from front to rear.
TOOLS NEEDED
● Phillips head screwdriver
● Bladetype screwdriver
● Magnetic stud finder (optional)
● Tin snips
● Drill
● Handsaw
● Hammer
. Level
c
Caulking gun
● Chisel
● Tape measure
●
tincrete
saw (if installing through a masonry wall)
MA
TERIALSNEEDED{obtain
IocaIIy)
● 12
#10
wood screws, 1“ long
● 1 tube high grade caulking compound
● Wooden framing studs
●
Lintel, if required, to
SUPPOR
bricks or blocks
above opening
● Flashing, aluminum or galvanized steel
1. PREPARE THE WALL
OPENING
c
Determine the size of the opening.
\
N\
b+
●
●
N%
● *
++
i+
.
++
+\
++
‘~
‘
●
~1
M-SURE
HEIGHT
+
1/8”
M=SURE
WIDTH + 1/8”
●
Choose the wall opening location.
Be sure a
power outlet is (or will be) installed nearby.
● Make the opening. Frame it to support the
weight of the air conditioner.
● Add metal flashing over the bottom of the
frame opening and 1“ up on the sides to reduce
the possibility of moisture entering the area
between the inner and outer wall. The flashing
lip should be 1“ wide and bent down 45°.
See the illustration on the next page.
2. REMOVE THE FRONT GRILLE.
● Seethe Care and Cleaning section of this guide.
10

.
.
.-
.
3. REMOVE THEAIR COND~lONER
AND PREPARE THE CASE
~e
air
Ioc
Remove
ovetie
grounds
nd
wire.
NO-:
Save these screws. They will be used at
the end of the installation.
● Remove the air conditioner from the case using
the base pan as a handle.
● With caulking compound or electrical tape,
seal all holes provided in the case for window
installation hardware not used in this installation.
4. INSTALL THE
CASEIN
THE WALL
● Place the case in the wall opening.
Secure
tie
case bottom
rail to the
wooden
frme
with two 1“ long #1 O
wood screws.
● Secure the case sides and top to the wooden
frame.
Use four 1“ long #10 wood
xrews.
NO~:
Drill holes in the case sides and top,
if necessa~, for proper installation. If the frame is
oversized, use shims to prevent cabinet
distotiion.
c
Caulk all four sides on the outdoor side of the
case to prevent moisture from getting through
to the interior wall. Use of flashing will
futiher
prevent moisture from getting into interior walls.
d)
ide
channel
c
Install wood trim molding, if desired, around the
roomside projection of the case.
11

5
INSTALL
THEAIR
COMD170NERIN
THE CASE
● Slide the air conditioner into the case. Do not
push on the controls or the finned coils. Make
sure the air conditioner is firmly seated toward
the rear of the case.
Reinstall the
locking bracket
and screw
removed earlier.
6. RECONNECT THE GROUND WIRE
lMPORTAN~
●
Reconnect the ground wire to the air conditioner
and then remove enough power cord to reach
the wall outlet.
Z
REPtiCE
WEFRONTGRILLE
1.
Place the two tabs on the grille’s top inside edge
with the two slots in the case.
2. Press on the lower right side of the case at the
slots and then carefully push the grille until the
tab fits with the slot.
3. Repeat for the lower left side.
4,
Replace the screw.
5. Slide the filter back into place.
12

Things that
am
nomal
tith
this air conditioner
You may hear a pinging noise
=used
by water being picked up
DRIP
and thrown against the
mndenser
on
rainy days or when the humidity is
high.
~s
design feature helps
b
remove moisture and improve
efficiency.
You may hear the thermostat
click when the compressor cycles
on and off.
Water
wi~
collect in the base pan during
high humidity or on rainy days.
me
water
may
oveflow and drip from the outdoor
side of the unit.
me
fan
mns
continuously when the
Selector switch is in the COOL or
F~
ONLY position.
THE PROBLEM SOLVER
If you need more
help...d,
toll free:
GE
bwer
Center” 800.626.2000. consumer
tiformation
setice
13

NO~S
14

We’ll
Be There
Wlth
the purchase
ofyournewGE
apphance,
receive the
wsurance
that
ifyou
ever need
information or assistance
horn
GE,
wdU
be there.
AUyou
have to do is d–toU-free!
GEAnswer&nte~
80~62&2000
Whatever your question about any GE major appliance, GE Answer Center”
information service is available to help. Your
cdl-and
your question-will be
anwered
prompdy
and courteously. And you can call anytime. GE Answer
Center”
sefice
is open
24 hours a day, 7 days a week.
lwHome
Repair
Se~ice
80tiWES-(80M32-273fl
AGE
consumer
setice
professional will provide expert repair
setice,
scheduled at a time that’s convenient for you. Many GE Consumer Service
companyaperated
locations offer you
setice
today or tomorrow, or at your
convenience
(7:00
a.m. to
7:00
p.m. weekdays,
9:00
a.m. to
2:00
p.m. Saturdays).
Our factory-trained technicians know your appliance inside and
out+o
most
repairs can be
handed
injust
one visit.
For
Cutiomem
W&
SpecialNeeds...
80~62&2000
Upon request,
GEwill
provide
Consumers with impaired hearing or speech who have
Bdle
controls for a variety of GE
access to a
TDD
or a conventional
tele~etiter
may
appliances, and a brochure to call
80&TDMEAC (80
N3M322)
to request
assist in planning a barrier-free information or service.
kitchen for
personstith
limited
mobflity.
To obtain these items,
free of charge, cdl 800.626.2000.
You can
have the secure feeling that GE Consumer
Setice
til
sti~
be there
after your
warranty expires. Purchase a GE contract while your
warranty is still
in effect and you’ll receive a substantial discount, With a multipleyear contract,
you’re assured of
fiwe
setice
at today’s prices.
Pa&
andAccessories
80M2&2002
hdividti
q-cd to service
their
own appliances
User maintenance
ktructions
contained in this
booMet
can
have needed
pafi
or accessories sent
direcdy
to
cover procedures intended to be performed
byanyuser.
their home. The GE parts system provides access to over
Other servicing
gendy
shoddbe referred to
qu~led
47,000
parts... and
ali
GE
&nuine
Rend
Parts
we
=Ace
peraonneL
Caution
m-t
be
exereisea
since
fully warranted. VISA, MasterCard and Discover cards
improper
servieingrnayeause
unsafe operation.
are
accepted.

YOUR GE ROOM AIR
CONDl~ONER
Staple sales
slip or
cancelled
check
WARRAN~
here. Proof of original
purchase
date
is
needed to obtain
sewice
under
warran~.
HT
IS COWRED
FULL ONE-YEAR WARRANTY
For one year
from
date of original
This warranty is extended to
purchase, we will provide, free of
the original purchaser and any
charge,
pam and service labor in
succeeding owner for products
your home to repair or replace
purchased for use in the
4
anypati of the room air
mainland states, Hawaii and
condltionerthat
fails because
Washington,
D.C.
In
Aaskathe
of a manufacturing
defect.
warranty is the same except that
it
UMl~D
~=-YEAR
WARRAN~
is
LIMITED because you must pay
to ship the product to the
sewice
For five years from the date of
shop
or for the service technician’s
original purchase, we will provide,
travel
costs to your home.
free of charge, parts and service
labor in
your home to repair or
All warranty service will be
replace
anyparf
of
the seal%
provided by our Factory Service
Centers or by
our authorized
refrigerating
sysfem
(the
Customer
Car@
servicers
during
compressor,
mndenser,
normal working hours.
evaporator and all connecting
tubing) that fails because of a
Should your appliance need
manufacturing
defect.
sewice, during warranty period
or beyond,
dl
800-GE-CARES
(80042-273~.
WAT
IS NOT COWRED
●
Improper installation.
●
Failure of the product
resutiing
tim
●
Service trips
to your home to teach
If you have an installation problem,
modifications to the product or due
you how to use the product.
or if the air conditioner is of
to unreasonable use including
Read your Use and Cars
mstedal.
improper
moling
capacity for the
failure to provide reasonable and
If you then have any questions
intended use, contact your dealer
necessary maintenance.
about operating the product,
or installer. You are responsible for
●
Failure due to
mrrosion
on models
please
mntact
your dealer or our
providing adequate electrical not corrosion-protected.
Consumer Affairs office at the
connecting facilities.
●
Damage to product caused by
address below, or call, toll free:
●
Replacement of house fuses or improper power supply voltage,
GE Answer
Cente@
resetiing
of circuit breakers.
accident, fire,
floods
or acts of God.
800.626.2000
●
In
commercial locations labor WARRANTOR IS
NOT
consumer information service
necessary to move the unit to a RESPONSIBLE FOR
location where
his
accessible for
CONSEQUENTIAL DAMAGES.
service by an individual technician.
Some states do not allow
tie
exclusion or limitation of incidental or consequential damages, so
tia
~ove
limitation or
axdusion
may not
SPPN
to you. This warranty gives you
spetic
Iegd
rights, and you may
dso
have otier rights Wich
w
from
stata
to state.
To
how
what your Iegd rights are in your state,
mnsuh
your
Iod
or state consumer affairs office or your state’s Attorney General.
Warrantor: General Electric Company
If
futiher
help
is
needed concerning this warranty, write:
Manager40nsumer
Affairs, GE Appliances, Louisville,
W
4225
Pub
No.
49-7318
AMD1O
AMD12
AMH12
Printed
in Malaysia
/