ADJ Encore Burst 100 IP User manual
- Category
- Floodlights
- Type
- User manual
This manual is also suitable for
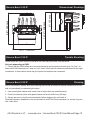
ADJ Encore Burst 100 IP is a high-powered LED fixture with a range of features for professional lighting applications. It offers precise electronic dimming from 0 to 100%, supports DMX-512 protocol for control, and has 4 DMX modes (1/2/3/4) for programming flexibility. Equipped with 5-Pin In/Out DMX connections, it allows for easy daisy-chaining of multiple units. Frequency and gamma adjustments enhance customization options. Tungsten effect emulation and 6 dimmer curves with adjustable speed add creative possibilities.
ADJ Encore Burst 100 IP is a high-powered LED fixture with a range of features for professional lighting applications. It offers precise electronic dimming from 0 to 100%, supports DMX-512 protocol for control, and has 4 DMX modes (1/2/3/4) for programming flexibility. Equipped with 5-Pin In/Out DMX connections, it allows for easy daisy-chaining of multiple units. Frequency and gamma adjustments enhance customization options. Tungsten effect emulation and 6 dimmer curves with adjustable speed add creative possibilities.


-
 1
1
-
 2
2
-
 3
3
-
 4
4
-
 5
5
-
 6
6
-
 7
7
-
 8
8
-
 9
9
-
 10
10
-
 11
11
-
 12
12
-
 13
13
-
 14
14
-
 15
15
-
 16
16
-
 17
17
-
 18
18
-
 19
19
-
 20
20
-
 21
21
-
 22
22


ADJ Encore Burst 100 IP User manual
- Category
- Floodlights
- Type
- User manual
- This manual is also suitable for
ADJ Encore Burst 100 IP is a high-powered LED fixture with a range of features for professional lighting applications. It offers precise electronic dimming from 0 to 100%, supports DMX-512 protocol for control, and has 4 DMX modes (1/2/3/4) for programming flexibility. Equipped with 5-Pin In/Out DMX connections, it allows for easy daisy-chaining of multiple units. Frequency and gamma adjustments enhance customization options. Tungsten effect emulation and 6 dimmer curves with adjustable speed add creative possibilities.
Ask a question and I''ll find the answer in the document
Finding information in a document is now easier with AI
Related papers
-
ADJ Encore Burst UV IP User manual
-
ADJ FOC369 User manual
-
-
ADJ Encore FR50Z User manual
-
-
ADJ Encore Profile 1000 WW User manual
-
-
ADJ Encore Profile 1000 Color User manual
-
-
ADJ PAR Z Move User manual

