Page is loading ...

STIHL MS 500i
Instruction Manual


Translation of Original Instruction
Manual
Printed on chlorine-free paper
Printing inks contain vegetable oils, paper can be recycled.
© ANDREAS STIHL AG & Co. KG 2019
0458-809-0121-A. VA3.A19.
0000008111_006_GB
0458-809-0121-A
English
1
This instruction manual is protected by copyright. All rights reserved, especially the rights to reproduce, translate and process
with electronic systems.
Contents
1 Introduction
. . . . . . . . . . . . . . . . . . . . . . . . . . . . . . . . . . . . . . . . .
2
2 Guide to Using this Manual
. . . . . . . . . . . . . . . . . . . . . . . . . .
2
2.1 Symbols used with warnings in the text
. . . . . . . . . . . . . .
2
2.2 Symbols in Text
. . . . . . . . . . . . . . . . . . . . . . . . . . . . . . . . . . . . .
3
3 Overview
. . . . . . . . . . . . . . . . . . . . . . . . . . . . . . . . . . . . . . . . . . . .
3
3.1 Chainsaw
. . . . . . . . . . . . . . . . . . . . . . . . . . . . . . . . . . . . . . . . . . .
3
3.2 Features
. . . . . . . . . . . . . . . . . . . . . . . . . . . . . . . . . . . . . . . . . . . .
5
3.3 Symbols
. . . . . . . . . . . . . . . . . . . . . . . . . . . . . . . . . . . . . . . . . . . .
5
4 Safety Precautions
. . . . . . . . . . . . . . . . . . . . . . . . . . . . . . . . . .
5
4.1 Warning Signs
. . . . . . . . . . . . . . . . . . . . . . . . . . . . . . . . . . . . . .
5
4.2 Intended Use
. . . . . . . . . . . . . . . . . . . . . . . . . . . . . . . . . . . . . . . .
6
4.3 The Operator
. . . . . . . . . . . . . . . . . . . . . . . . . . . . . . . . . . . . . . . .
6
4.4 Clothing and Equipment
. . . . . . . . . . . . . . . . . . . . . . . . . . . . .
6
4.5 Work Area and Surroundings
. . . . . . . . . . . . . . . . . . . . . . . .
7
4.6 Safe Condition
. . . . . . . . . . . . . . . . . . . . . . . . . . . . . . . . . . . . . .
7
4.7 Fuel Mixture and Refueling
. . . . . . . . . . . . . . . . . . . . . . . . . .
9
4.8 Working
. . . . . . . . . . . . . . . . . . . . . . . . . . . . . . . . . . . . . . . . . . . .
10
4.9 Reactive Forces
. . . . . . . . . . . . . . . . . . . . . . . . . . . . . . . . . . . .
12
4.10 Transporting
. . . . . . . . . . . . . . . . . . . . . . . . . . . . . . . . . . . . . . .
13
4.11 Storing
. . . . . . . . . . . . . . . . . . . . . . . . . . . . . . . . . . . . . . . . . . . . .
14
4.12 Cleaning, Maintenance and Repairs
. . . . . . . . . . . . . . . .
14
5 Preparing the Saw for Operation
. . . . . . . . . . . . . . . . . . .
15
5.1 Preparing the Saw for Operation
. . . . . . . . . . . . . . . . . . .
15
6 Assembling the Saw
. . . . . . . . . . . . . . . . . . . . . . . . . . . . . . . .
15
6.1 Mounting and Removing the Bar and Chain
. . . . . . . . .
15
6.2 Tensioning the Saw Chain
. . . . . . . . . . . . . . . . . . . . . . . . . .
16
6.3 Filling Up with Chain Oil
. . . . . . . . . . . . . . . . . . . . . . . . . . . .
17
6.4 Mounting the Spiked Bumper
. . . . . . . . . . . . . . . . . . . . . . .
18
7 Engaging and Disengaging the Chain Brake
. . . . . . . .
18
7.1 Engaging the Chain Brake
. . . . . . . . . . . . . . . . . . . . . . . . . .
18
7.2 Disengaging the Chain Brake
. . . . . . . . . . . . . . . . . . . . . . .
18
8 Mixing Fuel and Refueling the Chainsaw
. . . . . . . . . . .
18
8.1 Mixing Fuel
. . . . . . . . . . . . . . . . . . . . . . . . . . . . . . . . . . . . . . . . .
18
8.2 Fueling the Saw
. . . . . . . . . . . . . . . . . . . . . . . . . . . . . . . . . . . .
19
9 Starting and Stopping the Engine
. . . . . . . . . . . . . . . . . .
20
9.1 Starting the Engine
. . . . . . . . . . . . . . . . . . . . . . . . . . . . . . . . .
20
9.2 Stopping the Engine
. . . . . . . . . . . . . . . . . . . . . . . . . . . . . . . .
21
10 Checking the Saw
. . . . . . . . . . . . . . . . . . . . . . . . . . . . . . . . . .
21
10.1 Checking the Chain Sprocket
. . . . . . . . . . . . . . . . . . . . . .
21
10.2 Checking the Guide Bar
. . . . . . . . . . . . . . . . . . . . . . . . . . . .
22
10.3 Checking the Saw Chain
. . . . . . . . . . . . . . . . . . . . . . . . . . .
22
10.4 Testing the Chain Brake
. . . . . . . . . . . . . . . . . . . . . . . . . . .
23
10.5 Checking the Controls
. . . . . . . . . . . . . . . . . . . . . . . . . . . . .
23
10.6 Checking Chain Lubrication
. . . . . . . . . . . . . . . . . . . . . . . .
23
11 Operating the Saw
. . . . . . . . . . . . . . . . . . . . . . . . . . . . . . . . .
23
11.1 Adjusting Oil Feed Rate
. . . . . . . . . . . . . . . . . . . . . . . . . . . .
23
11.2 Holding and Controlling the Chainsaw
. . . . . . . . . . . . . .
24
11.3 Sawing
. . . . . . . . . . . . . . . . . . . . . . . . . . . . . . . . . . . . . . . . . . . .
24
11.4 Limbing
. . . . . . . . . . . . . . . . . . . . . . . . . . . . . . . . . . . . . . . . . . . .
25
11.5 Felling
. . . . . . . . . . . . . . . . . . . . . . . . . . . . . . . . . . . . . . . . . . . . .
25
12 After Finishing Work
. . . . . . . . . . . . . . . . . . . . . . . . . . . . . . .
30
12.1 After Finishing Work
. . . . . . . . . . . . . . . . . . . . . . . . . . . . . . .
30
13 Transporting
. . . . . . . . . . . . . . . . . . . . . . . . . . . . . . . . . . . . . . .
30
13.1 Transporting the Chainsaw
. . . . . . . . . . . . . . . . . . . . . . . . .
30
14 Storing
. . . . . . . . . . . . . . . . . . . . . . . . . . . . . . . . . . . . . . . . . . . . .
30
14.1 Storing the Chainsaw
. . . . . . . . . . . . . . . . . . . . . . . . . . . . . .
30
15 Cleaning
. . . . . . . . . . . . . . . . . . . . . . . . . . . . . . . . . . . . . . . . . . .
30
15.1 Cleaning the Saw
. . . . . . . . . . . . . . . . . . . . . . . . . . . . . . . . . .
30
15.2 Cleaning the Bar and Chain
. . . . . . . . . . . . . . . . . . . . . . . .
31
15.3 Cleaning the Air Filter
. . . . . . . . . . . . . . . . . . . . . . . . . . . . . .
31
15.4 Cleaning the Spark Plug
. . . . . . . . . . . . . . . . . . . . . . . . . . .
32
16 Maintenance
. . . . . . . . . . . . . . . . . . . . . . . . . . . . . . . . . . . . . . .
33
16.1 Maintenance Intervals
. . . . . . . . . . . . . . . . . . . . . . . . . . . . .
33
16.2 Deburring the Guide Bar
. . . . . . . . . . . . . . . . . . . . . . . . . . .
33
16.3 Sharpening the Saw Chain
. . . . . . . . . . . . . . . . . . . . . . . . .
33
17 Repairing
. . . . . . . . . . . . . . . . . . . . . . . . . . . . . . . . . . . . . . . . . .
34

0458-809-0121-A
2
English
1 Introduction
Dear Customer,
Thank you for choosing STIHL. We develop and
manufacture our quality products to meet our customers’
requirements. The products are designed for reliability even
under extreme conditions.
STIHL also stands for premium service quality. Our
specialist dealers guarantee competent advice and
instruction as well as comprehensive service support.
We thank you for your confidence in us and hope you will
enjoy working with your STIHL product.
Dr. Nikolas Stihl
IMPORTANT: READ BEFORE USE AND KEEP IN A SAFE
PLACE.
2.1 Symbols used with warnings in the text
WARNING
This symbol indicates dangers that can cause serious
injuries or death.
► The measures indicated can avoid serious injuries or
death.
17.1 Repairing the Chain Saw, Guide Bar and Saw
Chain
. . . . . . . . . . . . . . . . . . . . . . . . . . . . . . . . . . . . . . . . . . . . . .
34
18 Troubleshooting
. . . . . . . . . . . . . . . . . . . . . . . . . . . . . . . . . . . .
35
18.1 Troubleshooting Chainsaw
. . . . . . . . . . . . . . . . . . . . . . . . .
35
18.2 Clearing the Combustion Chamber
. . . . . . . . . . . . . . . . .
36
19 Specifications
. . . . . . . . . . . . . . . . . . . . . . . . . . . . . . . . . . . . . .
37
19.1 STIHL MS 500i Chainsaw
. . . . . . . . . . . . . . . . . . . . . . . . . .
37
19.2 Chain Sprockets and Chain Speeds
. . . . . . . . . . . . . . . .
37
19.3 Minimum Groove Depth of Guide Bars
. . . . . . . . . . . . .
37
19.4 Noise and Vibration Data
. . . . . . . . . . . . . . . . . . . . . . . . . . .
37
19.5 REACH
. . . . . . . . . . . . . . . . . . . . . . . . . . . . . . . . . . . . . . . . . . . .
37
19.6 Exhaust Emissions
. . . . . . . . . . . . . . . . . . . . . . . . . . . . . . . . .
37
20 Bar and Chain Combinations
. . . . . . . . . . . . . . . . . . . . . . .
38
20.1 STIHL MS 500i Chainsaw
. . . . . . . . . . . . . . . . . . . . . . . . . .
38
21 Spare Parts and Accessories
. . . . . . . . . . . . . . . . . . . . . . .
39
21.1 Spare Parts and Accessories
. . . . . . . . . . . . . . . . . . . . . . .
39
22 Disposal
. . . . . . . . . . . . . . . . . . . . . . . . . . . . . . . . . . . . . . . . . . .
39
22.1 Disposing of Chainsaw
. . . . . . . . . . . . . . . . . . . . . . . . . . . . .
39
23 EC Declaration of Conformity
. . . . . . . . . . . . . . . . . . . . . . .
39
23.1 STIHL MS 500i Chainsaw
. . . . . . . . . . . . . . . . . . . . . . . . . .
39
1 Introduction
2 Guide to Using this Manual

0458-809-0121-A
3
English
3 Overview
NOTICE
This symbol indicates dangers that can cause damage to
property.
► The measures indicated can avoid damage to property.
2.2 Symbols in Text
3.1 Chainsaw
This symbol refers to a chapter in this instruction
manual.
3Overview
21
22
23
2425
26
9
10
1
2
3
8
7
6
11
12
4
5
29
30
31
13
14
15
16
18
17
19
20
28
27
0000-GXX-5816-A0
#

0458-809-0121-A
4
English
3 Overview
1 Front Hand Guard
Helps protect operator’s left hand from contact with the
saw chain, serves to engage the chain brake and
activates the chain brake by inertia in certain kickback
situations.
2 Muffler
Reduces chainsaw noise emissions.
3 Spiked Bumper
Toothed stop for holding saw steady against wood while
cutting.
4 Saw Chain
Cuts the wood.
5 Guide Bar
Supports and guides the saw chain.
6 Chain Catcher
Reduces risk of operator contact with the chain if it
comes off the bar or breaks.
7 Tensioning Screw
Adjusts chain tension.
8 Chain Sprocket
Toothed wheel that drives the chain.
9 Chain Sprocket Cover
Covers the chain sprocket and secures the guide bar to
the chainsaw.
10 Nuts
Secure chain sprocket cover to the chainsaw.
11 Shroud
Covers the engine.
12 Shroud Lock
Secures shroud to chainsaw
13 Decompression Valve
Eases engine starts.
14 Spark Plug
Ignites fuel-air mixture in the engine.
15 Spark Plug Boot
Connects ignition lead to spark plug
16 Air Filter
Filters the air entering the engine.
17 Filter Cover
Covers the air filter.
18 Filter Cover Lock
Secures filter cover to chainsaw.
19 Throttle Trigger Lockout
Unlocks the throttle trigger.
20 Control Handle
For operating, holding and controlling the chainsaw.
21 Rear Hand Guard
Protects operator’s right hand from contact with the chain
if it comes off the bar or breaks.
22 Throttle Trigger
Controls engine speed.
23 Stop Switch
Shuts off the engine.
24 Manual Fuel Pump
Eases engine starts.
25 Fuel Tank Cap
Closes the fuel tank.
26 Starter Grip
Serves to crank the engine.
27 Oil Pump Adjusting Screw
Serves to adjust chain oil feed rate.
28 Stop
Limits travel of oil pump adjusting screw.
29 Oil Tank Cap
Closes the oil tank.
30 Handlebar
For holding, controlling and carrying the chainsaw.

0458-809-0121-A
5
English
4 Safety Precautions
31 Chain Scabbard
Helps protect user from contact with saw chain.
# Serial Number
3.2 Features
The chainsaw may be equipped with the following features:
1 Handle heating switch
Switches the handle heating on and off. Heats the front
and rear handles.
3.3 Symbols
Meanings of symbols that may be on the chainsaw:
4.1 Warning Signs
Meanings of warning signs on the chainsaw:
This symbol marks the fuel tank.
This symbol marks the chain oil tank.
The chain brake is engaged or disengaged in
this direction.
This symbol shows the direction of rotation of the
chain.
This symbol marks the oil pump adjusting screw
and the chain oil feed rate.
0000-GXX-5817-A0
1
Rotate in this direction to increase chain tension.
This symbol marks the handle heating switch.
This symbol marks the decompression valve.
This symbol marks the stop switch.
Guaranteed sound power level according to
directive 2000/14/EC in dB(A) in order to make
sound emissions of products comparable.
4 Safety Precautions
Observe safety notices and take the necessary
precautions.
Read, understand and save the instruction
manual.
Wear safety glasses, hearing protection and a
hard hat.
Observe safety notices on kickback and take the
necessary precautions.
L
WA

0458-809-0121-A
6
English
4 Safety Precautions
4.2 Intended Use
The STIHL MS 500i is designed for cutting wood, limbing
and felling trees.
WARNING
■ Using the chainsaw for purposes for which it is not
designed may result in serious or fatal injuries and
damage to property.
► Use the chainsaw as described in this instruction
manual.
4.3 The Operator
WARNING
■ Users without adequate training or instruction cannot
recognize or assess the risks involved in using the
chainsaw. The user or other persons may sustain serious
or fatal injuries.
► If the chainsaw is passed on to another person: Always
give them the instruction manual.
► Make sure the user meets the following requirements:
– The user must be rested.
– The user must be in good physical condition and
mental health to operate and work with the chainsaw.
If the user’s physical, sensory or mental ability is
restricted, he or she may work only under the
supervision of or as instructed by a responsible
person.
– The user can identify and assess the dangers of the
chainsaw.
– The user must be of legal age or is being trained in a
trade under supervision in accordance with national
rules and regulations.
– The user has received instruction from a STIHL
servicing dealer or other experienced user before
working with the chainsaw for the first time.
– The user must not be under the influence of alcohol,
medication or drugs.
► If the user is working with a chainsaw for the first time:
Practice cutting logs on a sawhorse or other support.
► If you have any queries: Contact your STIHL servicing
dealer for assistance.
■ The chainsaw’s ignition system produces an
electromagnetic field. This field may interfere with some
pacemakers. This can result in serious or fatal injuries.
► If the user has a pacemaker: Make sure the pacemaker
is not affected.
4.4 Clothing and Equipment
WARNING
■ Long hair can become entangled in the saw during
operation. This can result in serious injuries.
► Tie up and confine long hair so that it cannot be
entangled in the saw.
■ Objects can be thrown through the air at high speed
during operation. This can result in personal injury.
► STIHL recommends that you wear a face shield.
► Read, understand and save the instruction
manual.
► Wear close-fitting safety glasses. Suitable
safety glasses that have been tested and
labeled in accordance with EN 166 or
national standards are available from
retailers.

0458-809-0121-A
7
English
4 Safety Precautions
► Wear a long-sleeved, snug-fitting upper garment.
■ Noise occurs during operation. Noise can harm your
hearing.
■ Falling objects can cause head injuries.
■ Dust can be whipped up during operation: Whipped up
dust can damage the respiratory passages and cause
allergic reactions.
► If dust is whipped up and forms a cloud: Wear a dust
respirator mask.
■ Inappropriate clothing can snag on wood, brush or the
saw. Not wearing personal protective equipment may
result in serious injury.
► Wear snug-fitting clothing.
► Do not wear a scarf or jewelry.
■ The user can come into contact with the rotating saw
chain during operation. This can result in serious injuries.
► Wear long trousers with cut-retardant inserts.
■ The user can be cut by the wood during operation. The
user can come into contact with the saw chain during
cleaning and maintenance work. This can result in
personal injury.
► Wear work gloves made of durable material.
■ Wearing unsuitable footwear may cause you to slip or
stumble. Contact with the rotating saw chain can result in
cuts. This can result in personal injury.
► Wear chainsaw boots with cut retardant inserts.
4.5 Work Area and Surroundings
WARNING
■ Bystanders, children and animals are not aware of the
dangers of the chainsaw or thrown objects. Innocent
bystanders, children and animals may be seriously injured
and damage to property may occur.
► Keep bystanders, children and animals away from the
work area.
► Do not leave the chainsaw unattended.
► Make sure that children cannot play with the chainsaw.
■ Hot exhaust gas is emitted through the muffler while the
engine is running. Hot exhaust gas can ignite easily
flammable materials and cause a fire.
► Keep exhaust gas well away from easily flammable
materials.
4.6 Safe Condition
4.6.1 Chainsaw
The chainsaw is in a safe condition if the following points are
observed:
– The saw is not damaged.
– There is no fuel leaking from the chainsaw.
– The fuel tank and oil tank caps are closed.
– The saw is clean.
– Chain catcher is fitted and undamaged.
– Chain brake is operating properly.
– The controls function properly and have not been
modified.
– Chain lubrication is operating properly.
– Wear marks on chain sprocket are not deeper than 0.5
mm.
– A combination of guide bar and saw chain recommended
in this instruction manual is mounted.
– The guide bar and chain are properly mounted.
► Wear hearing protection.
► If there is a danger of falling objects during
operation: Wear a safety hard hat.

0458-809-0121-A
8
English
4 Safety Precautions
– The chain is properly tensioned.
– Only original STIHL accessories designed for this saw are
fitted.
– Accessories are properly mounted.
WARNING
■ If components do not comply with safety requirements,
they will no longer function properly, safety devices may
be rendered inoperative and fuel leaks may occur. This
can result in serious or fatal injuries.
► Work only with an undamaged chainsaw.
► If fuel is leaking from the chainsaw: Do not use the
chainsaw and contact a STIHL dealer for assistance.
► Close the fuel tank and oil tank caps.
► If the saw is dirty: Clean the saw.
► Work only with property fitted and undamaged chain
catcher.
► Never modify your chainsaw. Exception: Mounting a
combination of guide bar and saw chain recommended
in this instruction manual.
► If the controls do not function properly: Do not use your
saw.
► Only fit original STIHL accessories designed for this
saw model.
► Mount the guide bar and chain as described in this
instruction manual.
► Mount accessories as described in this instruction
manual or the instructions supplied with the accessory.
► Never insert objects in the saw’s openings.
► If you have any queries: Contact your STIHL servicing
dealer for assistance.
4.6.2 Guide Bar
The guide bar is in a safe condition if the following points are
observed:
– Guide bar is not damaged.
– Guide bar is not deformed.
– The minimum groove depth is maintained, @ 19.3.
– Bar rails are free from burrs.
– Bar groove is not pinched or splayed.
WARNING
■ If the guide bar is not in a safe condition, it can no longer
support and guide the saw chain properly. The rotating
saw chain can jump off the guide bar. This can result in
serious or fatal injuries.
► Work only with an undamaged guide bar.
► If the groove depth is less than the minimum depth:
Mount a new guide bar.
► Deburr the guide bar every week.
► If you have any queries: Contact your STIHL servicing
dealer.
4.6.3 Saw Chain
The saw chain is in a safe condition if the following points
are observed:
– Chain is not damaged.
– Chain is properly sharpened.
– The service marks on the cutters are still visible.
WARNING
■ If components do not comply with safety requirements,
they will no longer function properly and safety devices
may be rendered inoperative. This can result in serious or
fatal injuries.
► Work only with an undamaged saw chain.
► Sharpen the chain properly.
► If you have any queries: Contact your STIHL servicing
dealer for assistance.

0458-809-0121-A
9
English
4 Safety Precautions
4.7 Fuel Mixture and Refueling
WARNING
■ This chainsaw requires a fuel mixture of gasoline and two-
stroke engine oil. Fuel mixture and gasoline are extremely
flammable. If fuel mixture or gasoline make contact with
open fire or hot objects, they can cause a fire or
explosions. This can result in serious or fatal injuries and
damage to property.
► Protect fuel mixture and gasoline from heat and fire.
► Do not spill fuel mixture and gasoline.
► Do not smoke.
► Never refuel near a fire.
► Shut off the engine and allow it to cool down before
refueling.
► Start the engine at least 3 meters from the fueling spot,
outdoors only.
■ Inhaling fuel fumes and gasoline fumes can have toxic
effects.
► Avoid inhaling fuel fumes or gasoline fumes.
► Refuel in a well-ventilated location.
■ The chainsaw becomes hot during operation, or in a very
hot environment. Depending on the type of fuel, altitude,
ambient temperature and the temperature of the saw, the
fuel expands and can cause a pressure build-up in the
tank. Fuel may escape as a spray and ignite when the fuel
tank cap is opened. This can result in serious injuries and
damage to property.
► Allow the saw to cool down before opening the tank cap.
► Open the tank cap slowly in stages.
■ Clothing that has been in contact with fuel or gasoline is
more easily flammable. This can result in serious or fatal
injuries and damage to property.
► If your clothing comes into contact with fuel or gasoline:
Change your clothing.
■ Fuel, gasoline and two-stroke engine oil can harm the
environment.
► Do not spill fuel, gasoline or two-stroke engine oil.
► Fuel, gasoline and two-stroke engine oil can harm the
environment.
■ Fuel, gasoline or two-stroke engine oil can cause irritation
if they come into direct contact with the skin or eyes.
► Avoid contact with fuel, gasoline and two-stroke engine
oil.
► In case of contact with the skin: Wash affected areas
with plenty of water and soap.
► In case of contact with the eyes: Rinse eyes with plenty
of water for at least 15 minutes and seek medical
advice.
■ The saw’s ignition system produces sparks. Unconfined
sparks may cause a fire or an explosion in an easily
combustible or explosive environment. This can result in
serious or fatal injuries and damage to property.
► Use the spark plugs described in this instruction
manual.
► Insert and tighten down the spark plug.
► Connect the spark plug boot and press it down firmly.
■ The saw can be damaged if it is run on a fuel mixture
consisting of unsuitable gasoline or an unsuitable two-
stroke engine oil or if an incorrect mix ratio of gasoline and
two-stroke engine oil is used.
► Mix the fuel as described in this instruction manual.
■ The mixture of gasoline and two-stroke engine oil can
separate if it is stored for a long period. The saw can be
damaged if it is used with a fuel mix that has separated.
► Before refueling the saw: Thoroughly mix the fuel.
► Use a mixture of gasoline and two-stroke engine oil that
is not older than 30 days (STIHL MotoMix: 2 years).

0458-809-0121-A
10
English
4 Safety Precautions
4.8 Working
4.8.1 Cutting
WARNING
■ Always work within calling distance of others in case help
is needed.
► Make sure than persons outside the work area are
within calling distance.
■ If the engine is not started properly, the user may lose
control of the chainsaw. This can result in serious injuries.
► Start the engine as described in this instruction manual.
► If the saw chain is touching the ground or objects: Do
not start the engine.
■ The user cannot concentrate on the work in certain
situations. The user can lose control of the saw, stumble
or fall and be seriously injured.
► Work calmly and carefully.
► If light and visibility are poor: Do not use your saw.
► Operate the chainsaw alone.
► Do not work above shoulder height.
► Watch out for obstacles.
► Stand on the ground while working and keep a good
balance. If it is necessary to work at heights: Use a lift
bucket or a safe platform.
► If you begin to feel tired: Take a break.
■ Exhaust gas is produced when the engine is running.
Breathing in exhaust gas can have toxic effects.
► Avoid inhaling exhaust gas.
► Operate the chainsaw is a well ventilated location.
► In the event of nausea, headache, visual disturbances,
problems with hearing or dizziness: Stop work and seek
medical advice.
■ The user’s ability to hear and assess noises is restricted
when wearing hearing protection with the engine running.
► Work calmly and carefully.
■ Do not accelerate the engine with the chain brake
engaged since this can damage the chain brake.
► Disengage the chain brake before you start cutting.
■ The rotating saw chain can cut the operator. This can
result in serious injuries.
► Do not touch the rotating saw chain.
► If the saw chain is blocked by an object: Shut off the
engine and engage the chain brake. Then remove the
object causing the blockage.
■ The rotating chain becomes hot and expands. If the chain
is not lubricated sufficiently and re-tensioned at regular
intervals, it man come off the guide bar or break. This can
result in serious injuries and damage to property.
► Use special chain oil.
► Check chain tension regularly during cutting work. If
chain tension is insufficient: Tension the chain.
■ If the behavior of the saw changes during operation or
feels unusual, it may no longer be in a safe condition. This
can result in serious injuries and damage to property.
► Stop work and contact your STIHL dealer for
assistance.
■ Saw vibrations may occur during operation.
► Wear gloves.
► Take regular breaks.
► If signs of circulation problems occur: Seek medical
advice.

0458-809-0121-A
11
English
4 Safety Precautions
■ Sparks may occur if the rotating chain makes contact with
a hard object. Sparks may cause a fire in an easily
combustible location. This can result in serious or fatal
injuries and damage to property.
► Do not work in an easily combustible location.
■ Note that the saw chain continues to rotate for a short
period after you release the trigger. The rotating saw chain
can cut the user. This can result in serious injuries.
► Wait for the chain to come to a standstill.
WARNING
■ The guide bar can be pinched when cutting wood that is
under tension. The user can lose control of the saw and
be seriously injured.
► Make a relieving cut in the compression side (1) first,
then perform bucking cut at the tension side (2).
4.8.2 Limbing
WARNING
■ If the underside of the felled tree is limbed first, it will no
longer be supported on the ground by branches. The tree
can move during cutting work. This can result in serious or
fatal injuries.
► Cut through large limbs on the underside of the tree only
after it has been bucked.
► Do not stand on the log while limbing it.
■ A branch may fall to the ground during limbing. The user
may trip, fall or be seriously injured.
► Limb from the base to the crown of the tree.
4.8.3 Felling
WARNING
■ Inexperienced users cannot assess the dangers of felling
a tree. This can result in serious or fatal injuries and
damage to property.
► If you have any queries: Do not fell the tree yourself.
■ A tree and branches can fall on bystanders or objects
during the felling operation. This can result in serious or
fatal injuries and damage to property.
► Determine direction of fall so that the area in which the
tree falls is clear.
► Do not allow bystanders, children or animals within 2.5
tree lengths of the felling site.
► Remove broken or dead branches from the tree crown
before felling.
► If broken or dead branches cannot be removed from the
crown: Do not fell the tree.
► Observe tree crown and crowns of neighboring trees
and keep clear of falling branches.
■ When the tree falls the trunk can break or spring back in
the direction of the user. This can result in serious or fatal
injuries.
► Plan an escape path sideways behind the tree.
► Walk backwards along the escape path and observe the
falling tree.
► Do not walk backwards down slopes.
0000-GXX-1245-A0
1
2
1
2

0458-809-0121-A
12
English
4 Safety Precautions
■ Obstacles in the work area and on the escape path can
hinder the user. The user may trip and fall. This can result
in serious or fatal injuries.
► Remove all obstacles from the work area and escape
path.
■ If you cut into or through the hinge, stabilizing strap or
holding strap too soon, the intended direction of fall
cannot be controlled or the tree can fall prematurely. This
can result in serious or fatal injuries and damage to
property.
► Do not cut into or through the hinge.
► Cut through the stabilizing strap or holding strap last.
► If the tree begins to fall too soon: Abandon the felling cut
and retreat along the escape.
■ Kickback can occur if the rotating chain in the upper
quadrant of the bar nose makes contact with a hard felling
wedge and is suddenly braked. This can result in serious
or fatal injuries.
► Use aluminum or plastic felling wedges.
■ If the tree does not fall all the way to the ground or gets
caught on another tree, the operator cannot finish the
operation in a controlled manner.
► Stop the felling operation and use a cable winch or
suitable vehicle to pull the tree to the ground.
4.9 Reactive Forces
4.9.1 Kickback
Kickback can be caused for the following reasons:
– The rotating saw chain in the upper quadrant of the bar
nose makes contact with a hard object and is suddenly
braked.
– The rotating saw chain is pinched at the bar nose.
The chain brake cannot prevent kickback.
WARNING
■
0000-GXX-2732-A0
0000-GXX-4119-A0

0458-809-0121-A
13
English
4 Safety Precautions
■ If kickback occurs, the saw can be thrown up in the
direction of the operator. The operator can lose control of
the saw and be seriously or fatally injured.
► Hold the saw firmly with both hands.
► Always keep your body out of the plane of the cutting
attachment.
► Use the working techniques described in this instruction
manual.
► Do not cut with the upper quadrant of the bar nose.
► Always cut with a properly sharpened and tensioned
saw chain.
► Use a reduced kickback saw chain.
► Use a guide bar with a narrow radius nose.
► Always cut with the chain running at full speed.
4.9.2 Pull-in
The saw is pulled away from the operator when the bottom
of the bar is used for cutting.
WARNING
■ If the rotating chain makes contact with a hard object and
is suddenly pinched, the saw is abruptly jerked away from
the operator. The operator can lose control of the saw and
be seriously or fatally injured.
► Hold the saw firmly with both hands.
► Operate the saw as described in this instruction manual.
► Keep the guide bar straight in the cut.
► Apply the spiked bumper properly.
► Always cut with the chain running at full speed.
4.9.3 Pushback
The saw is pushed back toward the operator when the top of
the bar is used for cutting.
WARNING
■ If the rotating chain makes contact with a hard object and
is suddenly pinched, the saw can be abruptly pushed back
toward the operator. The operator can lose control of the
saw and be seriously or fatally injured.
► Hold the saw firmly with both hands.
► Operate the saw as described in this instruction manual.
► Keep the guide bar straight in the cut.
► Always cut with the chain running at full speed.
4.10 Transporting
WARNING
■ The saw may turn over or shift during transport. This can
result in serious injuries and damage to property.
► Shut off the engine.
► Engage the chain brake.
0000-GXX-1348-A0
0000-GXX-1349-A0

0458-809-0121-A
14
English
4 Safety Precautions
► Fit the scabbard so that it completely covers the guide
bar.
► Secure the chainsaw with lashing straps or a net to
prevent it turning over and moving.
■
■ The muffler and engine may be hot after a period of
operation. There is a risk of burn injuries.
► Carry the saw by holding the front handle in your right
hand with the guide bar pointing to the rear.
4.11 Storing
WARNING
■ Children are not aware of and cannot assess the dangers
of a chainsaw and can be seriously injured.
► Shut off the engine.
► Engage the chain brake.
► Fit the scabbard so that it completely covers the guide
bar.
► Store the saw out of the reach of children.
■ Dampness can corrode the electrical contacts on the saw
and metal components. This can damage the saw.
► Store the saw in a clean and dry condition.
4.12 Cleaning, Maintenance and Repairs
WARNING
■ The cutting attachment can start rotating unintentionally if
the engine is running during cleaning, maintenance or
repair operations. This can result in serious injuries and
damage to property.
► Shut off the engine.
► Engage the chain brake.
■ The muffler and engine may be hot after a period of
operation. This can result in burn injuries.
► Wait until the muffler and engine cool down.
■ Aggressive cleaning agents, a water jet or pointed objects
can damage the saw, guide bar and saw chain. If the saw,
guide bar or saw chain are not cleaned correctly,
components may no longer function properly or safety
devices may be rendered inoperative. This can result in
serious injuries.
► Clean the saw, guide bar and saw chain as described in
this instruction manual.
■ If the saw is not maintained as described in this instruction
manual, components may no longer function properly or
safety devices may be rendered inoperative. This can
result in serious or fatal injuries.
► Service or repair the saw as described in this instruction
manual.
■ If the guide bar and chain are not maintained or repaired
as described in this instruction manual, components may
no longer function properly or safety devices may be
rendered inoperative. This can result in serious injuries.
► Service or repair the guide bar and chain as described
in this instruction manual.
■ The user can be cut by the sharp cutters while cleaning or
servicing the saw chain. This can result in personal injury.
► Wear work gloves made of durable material.
0000-GXX-2733-A0

0458-809-0121-A
15
English
5 Preparing the Saw for Operation
5.1 Preparing the Saw for Operation
Perform the following steps before starting work:
► Make sure the following components are in a safe
condition:
– Chainsaw, @ 4.6.1.
– Guide bar, @ 4.6.2.
– Saw chain, @ 4.6.3.
► Clean the saw, @ 15.1.
► Mount the bar and chain, @ 6.1.1.
► Tension the saw chain, @ 6.2.
► Fill up with chain oil, @ 6.3.
► Check the chain brake, @ 10.4.
► Refuel the saw, @ 8.2.
► Check the controls, @ 10.5.
► Check chain lubrication, @ 10.6.
► If you cannot carry out these steps: Do not use your
chainsaw and contact your STIHL servicing dealer for
assistance.
6.1 Mounting and Removing the Bar and Chain
6.1.1 Mounting the Bar and Chain
The bar and chain combinations that can be used with the
chain sprocket are listed in the specifications, @ 20.1.
► Shut off the engine and engage the chain brake.
► Rotate the nuts (1) counterclockwise until the chain
sprocket cover (2) can be removed.
► Remove the chain sprocket cover (2).
► Turn the tensioning screw (3) counterclockwise until the
tensioner slide (4) butts against the left end of the
housing.
► Fit the chain in the bar groove so that the arrows on the tie
straps on the top of the bar point in the direction of
rotation.
5 Preparing the Saw for Operation
6 Assembling the Saw
3
0000-GXX-2734-A0
2
4
1
0000-GXX-2954-A0

0458-809-0121-A
16
English
6 Assembling the Saw
► Fit the guide bar and chain on the saw and check the
following points:
– Chain drive links are seated in teeth of chain sprocket
(7).
– Collar studs (5) are located in slot in tail of guide bar (6).
– Peg of tensioner slide (4) engages hole (8) in guide bar
(6).
The guide bar (6) may be either way round. The logo on the
guide bar (6) may also be upside down.
► Disengage the chain brake.
► Turn the tensioning screw (3) clockwise until the chain fits
snugly against the bar. Make sure the drive link tangs
engage the bar groove.
The guide bar (6) and chain are seated against the saw.
► Fit the sprocket cover (2) so that it is flush with the saw.
► Fit and tighten down the nuts (1) firmly.
6.1.2 Removing the Bar and Chain
► Shut off the engine and engage the chain brake.
► Rotate the nuts counterclockwise until the chain sprocket
cover can be removed.
► Remove the sprocket cover.
► Turn the tensioning screw counterclockwise as far as
stop.
The chain is now slack.
► Remove the bar and chain.
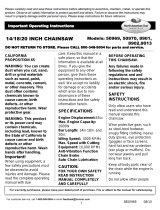
6.2 Tensioning the Saw Chain
The saw chain expands or contracts during cutting work.
Chain tension changes as a result. Check chain tension
regularly during operation and readjust if necessary.
► Shut off the engine and engage the chain brake.
► Loosen the nuts (1).
► Disengage the chain brake.
► Hold the bar nose up and turn the tensioning screw (2)
clockwise until the following points apply:
– Chain sag ‘a’ in the center of the bar is 1 - 2 mm.
– The chain can still be pulled easily along the bar with
two fingers.
► Keep holding the bar nose up and tighten down the nuts
(1) firmly.
► If chain sag ‘a’ in the center of the bar is not 1 - 2 mm:
Readjust chain tension.
0000-GXX-2735-A0
7
0000-GXX-2928-A0
2
1
1
0000-GXX-2929-A1
a

0458-809-0121-A
17
English
6 Assembling the Saw
6.3 Filling Up with Chain Oil
Chain oil lubricates and cools the rotating chain.
► Shut off the engine and engage the chain brake.
► Place your saw on a level surface so that the oil tank cap
faces up.
► Use a damp cloth to clean the tank cap and the area
around it.
► Swing the grip on the oil tank cap to the vertical position.
► Turn the oil tank cap counterclockwise as far as stop.
► Remove the oil tank cap.
► Fill up with chain oil, taking care not to spill any oil and do
not overfill the tank.
► If the grip on the oil tank cap has dropped into the closed
position: Raise the grip until it is vertical.
► Place the cap in the filler opening so that mark (1) lines up
with mark (2).
► Press the cap down and rotate it clockwise as far as stop.
The cap snaps into place. The mark (1) points to mark (3),
► Check to see if the oil tank cap can be pulled upwards and
off.
► If the oil tank cap cannot be pulled upwards and off: Fold
down the grip on the oil tank cap.
The oil tank is closed.
If the oil tank cap can be pulled upwards and off, perform the
following steps:
► Place the oil tank cap in the filler opening – in any position.
► Press the cap down and rotate it clockwise as far as stop.
► Press the cap down and rotate it counterclockwise until
mark (1) points to mark (2).
► Now try again to close the oil tank.
► If the oil tank still cannot be closed properly: Do not use
the chainsaw and contact a STIHL dealer for assistance.
The chainsaw is not in a safe condition.
0000-GXX-2930-A0
2
3
1
0000-GXX-2931-A0
1
1
0000-GXX-3135-A0
2

0458-809-0121-A
18
English
7 Engaging and Disengaging the Chain Brake
6.4 Mounting the Spiked Bumper
► Place the spiked bumper (1) in position.
► Fit the screw (2).
► Insert screw (3) through spiked bumper and nut (4).
► Tighten down the screws (2) and (3) firmly.
The spiked bumper (1) must not be removed.
7.1 Engaging the Chain Brake
The saw is equipped with a chain brake.
The chain brake is activated by the inertia of the front hand
guard if the kickback force is high enough or can be engaged
by the operator.
► Push the hand guard away from the front handle with your
left hand.
The hand guard engages with an audible click. The chain
brake is engaged.
7.2 Disengaging the Chain Brake
► Pull the hand guard toward the front handle with your left
hand.
The hand guard engages with an audible click. The chain
brake is disengaged.
8.1 Mixing Fuel
This chainsaw requires a fuel mixture of gasoline and two-
stroke engine oil in a ratio of 50:1.
STIHL recommends you use STIHL MotoMix.
If you mix the fuel yourself, use only STIHL two-stroke
engine oil or another high-performance engine oil in
accordance with JASO FB, JASO FC, JASO FD, ISO-L-
EGB, ISO-L-EGC or ISO-L-EGD.
STIHL specifies STIHL HP Ultra two-stroke engine oil or an
equivalent high-performance engine oil in order to maintain
emission limits over the machine’s service life.
7 Engaging and Disengaging the Chain
Brake
2
1
3
4
0000-GXX-3823-A0
0000-GXX-2932-A0
8 Mixing Fuel and Refueling the
Chainsaw
0000-GXX-2933-A0
/