
Owner's
Manual
Electric
Warming Drawer
ZKD910
ZTD910
www.monogram.com
Monogram:

(_onsunler Infbrnlafion
El¢_tri_ 14?_rmint{" Drawer
Introduction
Your new Mmmgram wamfing drawer makes an eloquent statement of style, convenience and
kitchen planning flexibility. Whether you chose it fl_r its pm'ity of design, assiduous attention to
detail----or fi)r both of these reasons--you'll find that your Monogram warming drawer's superior
blend offi)rm and flmction will delight you fin" years to come.
Yore" Monogram warming drawer was designed to provide the flexibility to blend in with
yore" kitchen cabinetry. Its sleek design can be beautififlly integrated into the kitchen.
The infiwmation on the following pages will hel I) you operate and maintain yore" wamfing
drawer i)roperl>
If wm have any other questions--in the USA, please call the GE Answer Center _ 800.626.2000.
In Canada, please call 1.888.880.3030.
Contents
Care m_d Clemlhlg
X_'amfing Drawer . ........................ 11
Rack ................................... 11
Stainless Steel ............................ 1 l
Control Knob ............................ 11
Consumer Services
hnportant Phone Nmnbe_ ............... 14
Model and Serial Nmnbe_ ................. 2
Betm'e xam (:all For Service ................ 12
Satety Instructions ....................... 4, 5
X,Van'a ntv ............................. 15, 16
Warming Drawer
Featm'es of Yom'_,Vamfing Drawer . .......... 6
Using the _,V_mfing Drawer . ............. C_10
Moistm'e Selector . ........................ 7
Rack .................................... 8
Proofing ................................. 9
Crisping ................................. 9
]_(for(?
using" your
warrrlln_
drawer
Read this guide careflflly. It is intended to hel I)
vo/l operate and illaintain VO/li" new waFi/ling
drawer properly.
Kee I) it handv fl)r answers to your questions.
If wm don't tmderstand sore ething or need
more hel I) call in the USA:
GE Answer Center _
800.626.2000,
24 hours a day, 7 days a week.
In Canada, call 1.888.880.5050
Write
down the
model &
s_ial
n u _l'l b e rs
You can find them on a label located on the
backside of the lower drawer fl'ont.
These nmnbers are also on the Consmner
Product Ownership Registration Card packed
separately with yore" wamfing drawer.
Before sending in this card, please write these
nmnbers here:
Model Nmnber
Serial Nmnber
Use these nmnbers in any correspondence or
service calls concerning yore" warming drawer.

l[jou
received a
damaged
drawer
hmnediatel_ contact the dealer (or builder) that
sold _ou the warmii_g drawer.
Save time
& mon
Befiwe you request set\ice, check the Before You It lists causes of minor oi)erating i)roblelns that
Call For Serxice section in the back of this guide, you can correct xourself.
Ifyou
72eed
s_vice
To obtain service, see the (_ot_sutner Services
page in the back of this guide.
_'e're proud of our service and want wm to be
pleased. If for solne reason you are not hal)py
with the service you receive, here are two steps
to fi_llow fin" fiu'ther hell),
For customers in the USA:
FIRST, contact the people who serviced wmr
appliance. Explain why you are not pleased.
In most cases, this will solve the problem.
NEXT, if wm are still not pleased, write all the
details--ii_cluding your i)hone immbei_to:
Managei; Customer Relations
GE Appliances
Appliance Park
I,ouisville, KY 40225
For customers in Canada:
FIRST, contact the people who serviced vour
appliance. Explain why you are not pleased.
In most cases, this will solve the problem.
NEXT, if win are still not pleased, write all the
details--inchlding your i)hone nulnbei_to:
Manager, (;onsulner Relations
Cam co Inc.
1 Factory Lane, Suite 310
Moncton, N.B. E1C 9M3

IMPORTANT SAFETY INSTRUCTIONS
WARNING!
For your safety, the infl)rmation in this guide must be fl)llowed to minimize the risk of fire or
explosion, electric shock, or to prevent proper U damage, pei_onal ii_jm T, or loss of life.
WA ENIN G!--ANT T TIP B RA (71,2 QUIPJ,?,D
All warming drawers can tip and iuj ury could
result if not properly installed.
%) prevent accidental tii)ping of the warnfing
drawei; attach it to the wall with an anti-tip brace
as described in the installation ii_sti uctions.
SAP TY PRE (;AUTIONS
When using your appliance, follow basic safety
precautions, including the following:
• Use this appliance only for its intended
purpose as described in this guide.
• Be sure your appliance is properly installed
and grounded by a qualified technician in
accordai_ce with the provided installation
instructions.
• Do not attempt to repair or replace any part of
your warming drawer unless it is specifically
recommended in this guide. All other
servicing should be reterred to a qualified
teclmician.
• Have the installer show you the location of the
drcult breaker or fuse. Mark it fi)r easy reterence.
• Before performing any service, unplug or
disconnect the power supply at the household
distribution panel by removing the fuse or
switching off the circuit breaker.
• Do not leave children alone--children should
not be left alone or tmattended in an area
where an ai)pliance is in use. They should
never be alh)wed to sit or stand on any part
of the al)pliance.
• Do not allow m_yone to climb, strand or hmlg
on the drawer. Thev could dalnage the warnfing
drawer, or cause severe personal ill.jui>
• Be sure the warming drawer is securely
installed in a cabinet that is firmly attached
to the house structure.
• Never leave the drawer open when you
are not watching the warming drawer.
• Always keep combustible wall covering,
curtains or drapes a safe distm_ce from
your warming drawer.
• Always keep wooden and plastic utensils
and cmmed food a safe distance away
from your warming drawer.
• Teach children not to play with the controls
or any other part of the warming drawer.
• Do not place more than 50 pomlds into
the drawer.
• The purpose of the warming drawer is to hold
hot cooked foods at serving temperature.
Always start with hot fi)od; cold food cannot
be heated or cooked in the warming drawer.
• Do not warm food in the warming drawer for
more than two hours.

SAb TY CAU770NS
• CAUTION: Items of interest to
children should not be stored in cabinets
above the warming drawer; children climbing
on the drawer to reach items could be seriously
iqiured.
• Use only dry pot holders--moist or dmnp pot
holders on hot surfaces may result in burns
from steam. Do not let pot holders touch hot
heating elements. Do not use a towel or other
bulky cloth.
• For your safety, never use your applimace
for warming or heating the room.
• Do not let cooking grease or other flammable
materials accumulate in or near the warming
drawer,
• Do not use water on grease fires. Never pick
up a flamhag pan. Turn the controls off.
Flame in the warming drawer can be
smothered by closing the drawer or using
a multi-purpose dry chemical or fl)am-type
fire extinguisher.
• Do not touch the heating element or the
interior surface of the warming drawer.
These surtaces may be hot enough to burn.
REMEMBER: The inside sm'thce of the
warming drawer may be hot when the drawer
is opened.
• Do not store or use combustible materials,
gasoline or other flammable vapors and
liquids in the vicinity of this or any other
appliance.
• Never leave jars or cans of fat drippings in
or near your warming drawer.
• Use care when opening the drawer. Open the
drawer a crack and let hot air or steam escape
before removing or replacing food. Hot air or
steam which escapes can cause bm'ns to hands,
lace and/or eyes.
• Do not heat unopened food containers.
Pressure could build up and the container
could burst, causing ma injury.
• Keep the vent unobstructed.
• Do not use the warming drawer to dry
newspapers. If overheated, they cma catch on fire.
• Do not use the warming drawer for a storage
area. Items stored in the warming drawer
can ignite.
• Do not leave paper products, cooking utensils
or food in the warming drawer when not ha use.
• Clean only parts listed in the Care and
Cleaning section.
• Do not use aluminum foil to line the drawer.
Foil is an excellent heat insulator mad will
trap heat beneath it. This will upset the
perfimnance of the drawer and it could
damage the interior finish.
• Wear proper apparel, i,oose fitting or hanging
garments should never be worn while using
this appliance.
Read and bllow this Sajbty In]brmation car tlly.
SAVE THESE INSTRUCTIONS

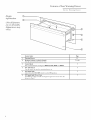
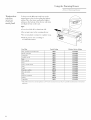
Features of Your Warming Drawer
El+,_lri_ WarmD_g Drawer
Design
injbrmation
(Not all features
are on all modds.
Appearance may
vary.)
O)
®
®
®
®
®
Feature Index Page
1 Warming Drawer 11
2 Moisture Selector (on back of pmlel) 7, 9, 10
Use dfis to keep _bods moist or crisp.
3 Control Knob 7
The control knob has settings tbr PROOF, LOW, MED and HIGH.
4 ON/OFF Switch 7
Use this swit( b to turn the warming drawer on.
5 ON Signal Light 7
(;lows when the ON/OFF swit(h is in the ON position.
6 ON Signal Light Viewer Lens 7
The ON signal light is visible through the light viewer lens when ttle
drawer is closed.

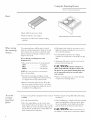
Using the Warlning Drawer
Eh,_tri_ I,larm_g Drawer
Control
knob
The warming drawer controls are hidden with
the drawer shut. Open the drawer. The controls
are on the right side of the fl'ont fl'ame.
To use the warming drawer, press the ON/OFF
switch to the ON position.
Slide the moisture selector control to the open
or closed setting. (See the Moisture Selector
section.)
Turn the control knob clockwise to the desired
settin ,
PROOF ... 75-95°E MED ..... 160-195°E
LOW ..... 140-160°E HIGH .... 195-230°E
PROOF
0
• MED
HI
Q
LO
ON signal
light
The ON signal light is located below the
ON/OFF switch and glows when the ON/OFF
switch is in the ON position. It stays on until the
ON/OFF switch is moved to the OFF position.
The ON signal light is visible through the light
viewer in the drawer fl'ont panel when the
drawer is closed. This is a reminder that the
heat is on.
Moisture
selector
The moisture selector is located on the inside
fl'ont of the drawer.
To keep foods moist, slide the moisture selector
control awav fl'om the control knob. This closes
the vent and seals the moisture inside the
drawer. With the vent closed hot fi)ods stay
moist and soft.
In this setting condensation mav occm" at(rand
the inside edge of the drawer.
To keep foods crisp, slide the moisture selector
control to the right towards the control knob.
This opens the vents and alh)ws the moisture
to escape.
With the vents open, it is normal tot moisture to
collect on surlhces above the warming drawer.
Additional
pans
An accessor) pan kitJXPN2 is available from
(;E at extra cost.
Two pans with lids (4" deep)
• One lar,*e_ pan (14 quarts)
• One medium pan (6 quarts)

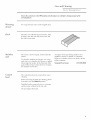
Using the Wanning Drawer
El_,_lri_ I,l?_rming Drawer
Rack
• Rack will fit fron_ front to back.
• Preheat with the rack in place.
• Using the rack allows for double _stackin,*
of item s.
Double stacking items with the rack inposition.
When using
the warming
dT(HUeT. . .
The warming drawer will kee I) hot, cooked
toods at serving temperature. Alwa}:s start with
hot tood. Do not use to heat cold fl)od other
than proofing yeast dough, crisping crackers,
chips or dry cereal.
Do not line the warming drawer with
aluminum foil.
• Allow time fl)r the drawer to be preheated:
LOW .................. 8 minutes
MED .................. 15 minutes
HIGH ................. 20 minutes
NOTE: It is not necessatw to preheat the
drawer for proofing.
• Food in heat-sat _ glass and glass ceramic
utensils may need higher thermostat setting
as compared to tood in metal utensils.
• Repeated opening of the drawer allows the
hot air to escape and the tood to cool. Allow
extra time for temperature inside the drawer
to stabilize after adding items.
• "_ith large, loads it may be necessarx to use a
higher thermostat setting and coxer some of
the cooked food items.
• Food should be kept hot in its cooking
contniner or transferred to a heat-safe seY\ino
dish.
• A1mninmn toil mav be used to cover fl)od to
prevent it from drying out.
CAUTION: Plastic containers or
plastic wrap will melt if in direct contact with
the drawer or a hot utensil. Melted plastic may
not be removable mid is not covered m_der
your warrmlty.
• Remove serving spoons, etc., before placing
containers in warming drawer.
7b warm
s ving
bowl and
plates
To warm serving bowls and plates set the control
on LOW.
• Use only heat-safe dishes.
• Place the empty dishes on the rack to raise
them off the bottom of the drawer. If you want
hotter dishes or want to heat fine china, please
check with the mantflhcttu'er of the dishes fl)r
their maximmn heat tolerance.
• Preheat erupt) serving dish while preheating
the drawer.
• When holding hot, cooked fl)ods and warming
empty serving dishes at the same time, place
the serving dishes on the high rack position
and the fi)od on the bottom of the drawer.
CAUTION: Dishes Inav be hot. Use
pot holders or mitts when remoxinoo hot dishes.

7b proof
yeast bread
dough
Yeast dough can be I)r°°tbd in tile wanning, draxver.
• Place _our dish on the wanning drawer
bottoIll,
• You must always turn the control knob to
LOW then immediatel_ back to PROOF,
• Close the ",ent.
• I,ightly oil tile top of tile dough in a bowl
large enough to double tile dough size. Co\er
wifl/a doth.
• Preheating not required fl_r proofing.
• Check tile dough height in 40 minutes. Add
time as needed. Tile dough should remain in
tile drawer until it has doubled in size and a
slight depression remains when tile surtace is
touched gently with a finger,
7b crisp
stale items
• Place food in low sided dishes or pans.
• Preheat on LOW setting and open tile xent.
• (;heck crispness after 45 minutes. Add time
as needed.
7>rn[)erature
selection
chart /br
crisp./bods
To kee I) several different toods hot, set tile
temperature to tile tood needing tile highest
setting. Place the items needing the highest
setting on tile bottom of tile drawer and items
needing less heat on the rack.
Tips:
• i,ea\'e food/incovered,
• Do not use plastic containers or plastic wrap.
• Preheat prior to use according to
i'ecoiilii/ended tim es,
Food Type
[_ac()n
Bread, hard rolls
Fried/oods
Pies, two crusts
Pizza
Potatoes, baked
"Ibrtilla (;hips
Conb'ol Setting
HIGH
MED
HIGH
MED
HIGH
HIGH
LOW
Moisture Selector Setting
OPEN
OPEN
OPEN
OPEN
OPEN
OPEN
OPEN

Using the Wanning Drawer
El_,_lri_ I.l?_rming Drawer
7bmperature
selection
chart jbr
moist jbods
To kee I) several different fi)ods hot, set the
temperature to the fl)o(1 needing the highest
setting. Place the items needing the highest
setting on the bottom of the drawer and items
needing less heat on the rack.
Tips:
• Cover food with lid or almninmn toil.
• Do not put water in the warnfing drawer,
• Do not use plastic containers or plastic wrap.
• Preheat prior to use according to
recoi/llllended tillles.
Food Type
Beet, medimn and well done*
Bread, soft rolls
Casseroles
Cooked cereal
Eggs
Fish, seatood
Fruit
(',raw, cream sallces
Ilam
I ,arab
Pancakes, wattles
Pies, one CrllSt
Pork
Potatoes, H/aS]led
Pouhrv
Xk'geiables
Control Setting
MED
MED
MED
MED
MED
MED
MED
MED
MED
MED
HIGH
MED
MED
MED
HIGH
MED
Moisture Selector Setting
CLOSED
CLOSED
CLOSED
CLOSED
CLOSED
CLOSED
CLOSED
CLOSED
CLOSED
CLOSED
CLOSED
CLOSED
CLOSED
CLOSED
CLOSED
CLOSED
* _ '_1)A/13,75I_commolds a_ into'_al tem]_emtul_(ff145 °F as the minimum don_,_uss/brbaj. _ s_a [_oltahh,i_uatth_,l'mom_t_,lto ched_i_to'naI
leHI])glYllttl_S.
10

re and (;leaning
Ele_t*'i_ Warming Drawer
Be sure the controls are in the OFF position and all surfaces are cool before cleanin¢ any part of the
warming" drawen
VVarming
drawer
Use soap and warm water to thoroughly clean.
Ra&
Clean the rack with detergent and water. Alier
cleaning, rinse the rack with clean water and
dry with a clean cloth.
Stainless
steel
Do not use a steel wool pad; it will scratch the
S/lI't_lce.
To clean the stainless steel surtace, use warm
sudsy water or a stainless steel cleaner or polish.
_Mways wipe the surtace in the direction of the
grain. Follow cleaner instructions ti)r cleaning
the stainless steel surthce,
To inquire about purchasing stainless steel
appliances cleaner or polish, or to find the
location of a dealer nearest you, please call our
toll-free nmnber:
National Parts Center 1.877.959.8688
Control
knob
The control knob may be removed for easier
cleaning.
gefi)re removing the knob fl)r cleaning, please
note that it is in the PROOF position.
_'ash the knob in soap and water or a vinegar
and hot water solution but do not soak.
Dry and replace the knob.
11

Before You (;all For Service...
Ele_lri_ I>/?_rming Drawer
Save time
and money
t_view the
troubleshooting
tips on this
page first and
you may not
need to call
jbr s_vice.
PROBLEM POSSIBLE CAUSE
WARMING DRAWER
WILL NOT WORK
DRAWER DOES NOT
SLIDE SMOOTHLY
OR DRAGS
_LXCESSIVE
CONDENSATION
• A fllse in your home mav be blown or the circuit breaker tripped.
Replace the fllse or reset the circuit breaker.
• _,lrlning drawer not plugged ill. Plug ill.
• X4._rlniI_g drawer controls imi)roi)erly set. See the Using the
X_,lrlning Drawer section.
• Ball bearings are out of alignmelm Fully extend the drawer and
push it all the way in. See the Care and (_lealfing section.
• Drawer ovelqoaded or load ui_balanced. Reduce weight to less than
50 l)ounds. Redistribute drawer contents.
I,iquid ill warnling drawer. Renlove liquid.
Uncovered fl)ods. Cover fl)od with lid or alunfilmm fl)il.
NO HEAT IN THE •
PRO OF SETTING
FOOD DRIES OUT • Moisture escaping. Coxer food with lid or alunfilmm flfil.
Telnl)erature setting too high. Reduce teml)erature setting.
h_correct Moisture Selector setting. Set the Moisture Selector to
the open vent setting to allow venting.
Rooln temperature may l)revent the thermostat fl'om tril)l)ing oil
Tui'i_ the knob to LOW then back to PROOE
12

Notcs
I_leclric 14clrmt_" Drawer
13

Consumer Services
El_,_tri_ I>/?_rming Drawer
GE Answer
Center ®
In the USA:
800.626.2000
With the purchase of your new Monogram appliance, receive the
assurance that if you ever need information or assistance from GE,
we'll be there. All you have to do is call--toll-free!
Whatever vour question about any Mon()grmn major appliance, GE Answer Center _>
infl)rmation service is awfilable to hell). Your call--and your question--will be answered
promptly and courteouslw And you can call any time. GE Answer Centei _':service is open
24 hours a da> 7 days a week.
In Canada, call 1.888.880.3030.
In-Home Repair
Service
In the USA:
800. 444.1845
In Canada:
1.888.880.3030
A GE consumer service proii_ssional will provide expert repair service, scheduled at a time
that's convenient for you. Many GE Consumer Service companDoperated locations otter you
service today or tom orrow, or at your convenience (7:00 a.m. to 7:00 p.m. weekdays, 9:00 a.m.
to 2:00 p.m. Satm'da)_s). Ore" factory-trained technicians know vour appliance inside and
out--so most repairs can be handled in just one visit.
For Customers
With Special
Needs...
In the USA:
800.626.2000
GE offers Braille controls fi)r a xarietx of GE appliances, and a
brochure to assist in I)lanning, a barriei_free kitchen for persons
with limited mobility.
Consmners with impaired hearing or speech who haxe access to
a TDD or a comentional telet)pewriter ma_ call 800.TDD.(;EA(_
(800.833.4322) to request infi)rmation or serxice.
Service Contracts
M the USA:
800.626.2224
ln Canada:
1.888.880.3030
You can have the secure teeling that GE Consmner Service will still be there after vour
warranty expires. Purchase a GE contract while vour warranty is still in effect and vou'll
receive a substantial discount. _]th a multiple-year contract, you're assured of future
selwice at today's prices.
Par_ and
Accesso_es
M the USA:
800.626.2002
ln Canada:
1.888.880.3030
Individuals qualified to service their own applimaces can have parts or accessories sent directly
to their home. The GE parts system provides access to oxer 47,000 parts...and all GE (;enuine
Renewal Parts are title warranted. VISA, MasterCard and Discoxer cards are accepted.
User maJntenmlce instructions contained in this guide cover procedures intended to be
performed by any user. Other servicing generally should be referred to qualified service
persmmel. Caution must be exercised, since improper servicing may cause unsafe operation.
14

Warranty fbr custonmrs in the USA
Ele_t*'i_ Warming Drawer
YOUR MONOGRAM WARMING DRAWER WARRANTY
Staple sales slip or cancelled check here. Proof of original purchase
date is needed to obtain service under warranty.
WHATIS
COVERED
l%m the Date
of the O'_ginal
Pmvhase
I_RJLLONE-YILAR WARRANTY
For one year fi'om date of original purchase,
we will provide, fl'ee of charge, parts and
service labor in your home to repair or
replace any part of the warming drawer that
tails because of a mantflhcturing defect.
.eeoemeeoleeeeoeeoeeeeoleeeeoeeoeeeeoleeeemeeoeee,
This warranty is extended to tile original
purchaser and any succeeding owner fi)r
products purchased fi)r ordinary home use
in the 48 mainland states, Hawaii and
Washington, D.C. In _Maska tile warran W is
the same except that it is I,IMITED because
w)u must pay to ship tile I)roduct to tile
service shop or for the service technician's
travel costs to Vo/lr hollle.
All warranty service will be provided by our
Factory Service Centers or bv our authorized
Customer Care '_servicers during normal
working hours.
Should vour appliance need service,
during warranty period or beyond, call
800,444.1845.
WHAT IS NOT
COVERED
• Setwice trips to your home to teach vou
how to use tile product.
Read your Use and Care material,
If wm then have any questions about
operating tile product, please contact your
dealer or our Customer Relations ottice
at the address behm, or call, toll ti'ee:
GE Answer Center _
800.626.2000
consumer information service
• Replacement of house fllses or resetting
of circuit breakers.
• Failure of tile product if it is abused,
misused, or used for other than tile
intended lmrpose or used commercially.
• Imi)roper installation, delive_ T or
IllaiIlteIla IlCe.
If vou have an installation problem, contact
vour dealer or installer. You are responsible
fi)r providing adequate electrical, gas,
exhausting and other connecting tacilities
as described in tile Installation Instructions
provided with tile product.
• Damage to tile product caused by accident,
fire, floods or acts of God.
• Incidental or consequential damage caused
by possible defects with this appliance.
• Damage caused after delivery.
Some states do not allow tile exclusion or limitation of incidental or consequential damages,
so tile above limitation or exclusion may not apply to you. This warranty gives you specific
legal rights, and vou mav also have other rights which vary fl'om state to state.
To know what vour legal rights are in your state, consult your local or state consumer attairs
oiiice or your state's Attorney General.
Waacrantor: General Electric Company. If further help is needed concerning this warranty,
write: Manager--Customer Relations, GE Applimaces, Louisville, KY 40225
15

n
Warranty for customers in Ca ada
Eleg:lric I.larm_ng Drawer
YOUR MONOGRAM WARMING DRAWER WARRANTY
Staple sales slip or cancelled check here. Proof of original purchase
date is needed to obtain service under warranty.
WHATIS
COVERED
]?)om the Date
of the O_gir_al
Purchase
FULL ONE-YEAR WARRANTY
For one year fl'om date of original i)urchase,
we will provide, fl'ee of charge, parts and
service labor in your home to repair or
repla ce any part of the warming drawer
that tails because of a mantllhcturing defect.
This warranty is extended to the original
purchaser and any succeeding owner tor
products purchased fin" ordinary home use
in Canada.
All warranty service will be provided by our
Factory Service Cente_ or bv our authorized
Customer Care <'_servicers during normal
working hours.
Should vour al)pliance need service,
during warranty period or beyond, call
1.888.880.3030.
WHAT IS NOT
COVERED
• Serxice trips to your home to teach you
how to use the product.
Read your Use and Care material.
If wm then have any questions about
operating the product, please contact your
dealer or our Consumer Relations ottice at
the address behm, or call, toll fl'ee:
1.888.880.3030
• Replacement of house fl/ses or resetting of
circuit breakers.
• Failure of the product if it is abused,
misused, or used fl)r other than the
intended i)url)ose or used comn/erciallv.
• Imi)roper installation, delixerv or
illaintenance.
If wm have an installation problem, contact
vour dealer or installer. You are resl)onsible
fi_r providing adequate electrical, gas,
exhausting and other connecting tacilities
as described in the Installation ]nst_ uctions
provided with the product.
• Damage to the [)roduct caused by accident,
fire, floods or acts of God.
• Incidental or consequential damage caused
b) possible defects with this appliance.
• Damage caused alter delixerv.
Some provinces do not allow the exclusion or limitation of incidental or consequential
damages, so the above limitation or exclusion may not apply to you. This warranty gives you
specific legal rights, and vou may also have other rights which vary ti'om province to province.
To know what yotlr legal rights are in yotlr province, constllt yotlr local or provincial constllller
attairs ottice.
Waxrantor: Cmnco Inc. If further help is needed concerning this warranty, write: Mmmger,
Consumer Relations, Camco Inc., 1 Factory Lane, Suite 310, Moncton, N.B. E1C 9M3.
[ 49-80301 ]
02-05JR
Printed in the United States
Monogram:
GEConsumer & Industrial
Louisville, KY40225
@2005GECompany
-
 1
1
-
 2
2
-
 3
3
-
 4
4
-
 5
5
-
 6
6
-
 7
7
-
 8
8
-
 9
9
-
 10
10
-
 11
11
-
 12
12
-
 13
13
-
 14
14
-
 15
15
-
 16
16


