Page is loading ...

1byone Products Inc.
1230 E Belmont Street, Ontario, CA, USA 91761
Customer Service: +1 909-391-3888
www.1byonebros.com
Turntable Hi-Fi System with Speakers
Instruction Manual

1
Introduction
Thank you for purchasing 1byone Turntable Hi-Fi System with Speakers. This
instruction manual contains important information about safety, usage and disposal.
Use the product as described and keep this manual for future reference. If you sell this
turntable or pass it on, also give this manual to the new owner.
Safety Instructions
Read and understand this entire manual before using this product. Keep these
instructions for future reference.
1. Do not use the turntable near water.
2. Only connect the turntable to a power outlet type as indicated on the marking
label or in the "Specifications" section of this instruction manual.
3. The turntable has a polarized plug (one pin is wider than the other). To reduce the
risk of electric shock, this plug is intended to fit into a polarized outlet in only one
orientation. If the plug does not fit fully into the outlet, reverse the plug. If it still
does not fit, contact a qualified electrician. Do not attempt to modify the plug in
any way.
4. Protect the power cord from being walked on or pinched, particularly at the power
plug, at the point of connection between the plug and outlet and at the point of
connection between the power cable and speaker.
5. Do not overload wall outlets or extension cords as this will be a fire hazard and may
cause electric shock.
6. Never push objects of any kind into the turntable through openings as they may
touch dangerous voltage points or short out parts that could result in a fire or
electric shock. Never spill liquid of any kind on the product.
7. Do not attempt to service the turntable yourself as opening or removing body
panels may expose you to dangerous voltage or other hazards. Refer all servicing to
qualified service personnel.
8. Changes or modifications to the turntable not expressly approved by the party
responsible for compliance could void the user’s authority to operate the product.
9. Do not use attachments not recommended by the manufacturer as they may cause
hazards.
10. Only place on a flat, sturdy table or use with the cart, stand, tripod or
bracket as specified by the manufacturer or sold with the turntable.
When a cart is used, use caution when moving the cart/turntable
combination to avoid injury from tip-over.

2 3
11. Slots and openings in the cabinet are provided for ventilation and to ensure
reliable operation of the product and to protect it from overheating. Do not block
or cover these openings.
12. Unplug the product during lightning storms or when unused for long periods of
time.
COMPLIANCE WITH FCC REGULATIONS
This device complies with Part 15 of FCC rules. Operation is subject to the following
two conditions:
(1) This device may not cause harmful interference, and
(2) This device must accept any interference received, including interference that may
cause undesired operation.
This equipment has been tested and found to comply with the limits for a Class
B digital device, pursuant to Part 15 of the FCC rules. These limits are designed to
provide reasonable protection against harmful interference in a residential installation.
This equipment generates, uses and can radiate radio frequency energy and, if not
installed and used in accordance with the instructions, may cause harmful interference
to radio communications. However, there is no guarantee that interference will not
occur in a particular installation.
If this equipment does cause harmful interference to radio or television reception,
which can be determined by turning the equipment off and on, the user is
encouraged to try to correct the interference by one or more of the following
measures:
• Reorient or relocate the receiving antenna.
• Increase the separation between the equipment and receiver.
• Connect the equipment into an outlet on a circuit different from that to which the
receiver is connected.
• Consult the dealer or an experienced radio/TV technician for help.
WARNING: Changes or modifications to this unit not expressly approved by the party
responsible for compliance could void the user's authority to operate the equipment.
WARNING:
Cancer and Reproductive Harm - HYPERLINK "http://www.
P65Warnings.ca.gov."
For more information go to HYPERLINK "http://www.1byonebros.com/Compliance/
Prop65"
Product Description
1
2
3
4
5
6
7
8
9
11
10
12
13
14
15
16
17
18
22
24
26
23 25
27
19
20
21
1. Motor Pulley
2. Drive Belt
3. Turntable Spindle
4. Turntable Sub-platter
5. Turntable Platter
6. Lid Hinge
7. Anti-skating Weight
8. Counterweight
9. Anti-skating Stick
10. Tonearm Rest
11. Tonearm Lift Lever
12. Tonearm Clip
13. Volume Control
14. Indicator
15. 33/45RPM Selector
16. Play/Stop Button
17. Mode Button
18. Stylus Cartridge
19. Ground Connector
20. Phono & Line Out Jacks
21. Phono & Line Out Switch
22. USB Port for PC Link
23. Power Cord Jack
24. External Speaker Jacks
25. Power Switch
26. Speaker Jack -
27. Speaker Jack +

4 5
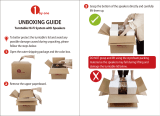
Included Items
Before installing the turntable, check the package contents to ensure all parts below
are included and free of visible damage. Please retain the original packaging materials
for exchange or return purposes.
1 x Turntable Unit
2 x Speakers
1 x Turntable Lid
1 x Slip Mat
1 x Turntable Platter
1 x Tonearm Counterweight
1 x Anti-skating Weight
1 x 45 RPM adapter
1 x Drive Belt
1 x Sub-platter
1 x Belt Hook
1 x Power Adapter
1 x USB Cable for PC Link
2 x Audio Cables for Speakers
1 x Cartridge Adjustment Card
1 x Instruction Manual
Installing the Turntable
• Mount the product on a level surface.
• To avoid the effects of vibrations and acoustic pressure, do not mount the product
next to such items as speakers.
• The product may pick up radio static if placed next to a radio. Therefore, try to keep
the product away from radios.
• If the product is near equipment (cell phone, etc.) that emits strong radio waves,
noise may occur.
Installing the Lid
Insert the hinge pockets of the lid onto the hinges of
the turntable.
Turntable Platter and Belt Setup
1. Remove the protective packaging and ensure the turntable is placed on a sturdy
and level surface.
2. Insert the sub-platter into the turntable spindle located in the middle of the
turntable.
3. Loop the drive belt around the sub-platter and motor pulley (brass-colored).
4. Carefully place the main platter onto the sub-platter (Figure 1).
Figure 1
Rotating the Platter
1. Using your hands, slowly rotate the
platter ten times in the direction of the
arrow (Figure 1).
2. This step is for resetting the auto
mechanism, getting rid of any twists in
the belt and making sure the belt rides
smoothly along the drive rim on the
underside of the platter.
Figure 1
3. Place the slip mat on top of the platter.
Make sure the 1byone logo on the mat
is facing up (Figure 2).
Figure 2

6 7
Cartridge Tracking Force Adjustment
The Counterweight supplied is suitable
for cartridges weighing between 3.0-6.0g.
Counterweight
Center Line
Tracking Force Dial
1. Gently push and turn the Counterweight onto the
rear of the tonearm (with the dial facing toward the
front of the turntable).
2. Pull the protector straight forward to remove it.
NOTE: Applying a downward force may cause
the stylus to come off the body. Only low volume
is output if the stylus has come off, or is about
to come off, so refer to “Replacing the stylus” to
reattach the stylus correctly.
3. Remove the tie-wrap and unlock the tonearm.
4. Lower the tonearm lift lever and position the cartridge in the space between the
tonearm rest and platter.
5. Carefully rotate the Counterweight until the tonearm achieves a neutral balance.
The tonearm should return to this balanced position if it is moved up or down. This
adjustment must be done carefully.
TonearmCounterweight
Adjust so that tonearm is level and neutrally balanced
6. Once the tonearm is correctly balanced, return the tonearm to its rest. Hold the
Counterweight without moving it, and gently rotate the tracking force dial until the
zero is in line with black center line on the rear of the tonearm. Check to make sure
the tonearm is still neutrally balanced.
7. Rotate the counterweight counter clockwise (as seen from the front) to adjust the
tracking force according to the cartridge manufacturer’s recommendations.
1.5
1.25
1.0
1.75
0
0.25
1.25
1.0
1.75
0
1.5
Note: Each mark on the scale represents 0.05g. The recommended tracking force
for the factory-installed cartridge is 3.5g±0.5g. The cartridge tracking force only goes
up to 2g for one rotation of the tracking force dial. You will need to make more than
one rotation to reach 3.5g.

8 9
Anti-skating Force Adjustment
The anti-skating force must be adjusted corresponding to the tracking force as follows:
Tracking Force Groove in the Stick
④ ③ ② ①
5-10 mN 1st from bearing ring
10-15 mN 2nd from the bearing ring
15-20mN 3rd from the bearing ring
>20mN 4th from the bearing ring
1. Slip the loop of the anti-skating weight's
thread over the
3rd
groove of the stick
to set the correct anti-skating force for
the factory-installed cartridge.
2. Feed the thread through the loop of
the wire hanger.
Connection to Speakers
1. Connection to the Included Speakers
This turntable includes a built-in preamp and comes supplied with Hi-Fi speakers.
Connect the speakers using the included audio cable (dark cable to black cable
clamp and light cable to red cable clamp).
2. Connection to External Speaker with the RCA Audio Cable
If you wish to use your own amplifier or speakers, please follow the instructions
below:
RCA wired connection
Active Speakers
or
Amplifier
2.1 Setting pre-amplifier selector switch
This product has a built-in phono equalizer function. You can use the product
even if you do not have a phono amplifier or connectable equipment with a
built-in phono amplifier.
Use the pre-amplifier selector switch to set the output, as shown below.
Connectable equipment
being used
Position of pre-amplifier
selector switch
Where to connect RCA
audio cable
Device with phono input PHONO Phono input jack and
ground (earth) terminal of
connectable equipment
Device without phono
input
LINE AUX or line input jack of
connectable equipment
When connecting via the included speakers, using the pre-amplifier selector
switch is not necessary.
NOTE: The RCA Jacks are not designed to be connected directly to the
passive/unpowered speakers on LINE mode. If connected to the passive
speakers, there will be no sound.

10 11
2.2 Connecting the device
Align the settings for the pre-amplifier selector switch and connect the
RCA audio cable to an input jack that is compatible with the connectable
equipment you are using (amplifier, active speakers, etc.).
• The RCA audio cable's red jack is for the right (R) channel, and the white jack is
for the left (L) channel.
AUX
L R
PHONO
L R
With PHONO Without PHONO
To outlet
Connectable equipment
(Amplifier, etc.)
R L
LINEPHONO
USB-PC
DC IN 15V
SPEAKERS
R+R-
SPEAKERS
L+L-
ON
OFF
With PHONO Without PHONO
To outlet
Main Power Connection
1. Insert the DC plug of the AC adapter cord into the DC INPUT Jack at the back of the
turntable.
2. Plug the AC adapter into a normal power outlet.
NOTE:
Do not plug the AC power adapter into a power outlet before all turntable
assembly is completed. Before turning on turntable power, recheck all connections to
make sure they are correct and secure. Always turn off the turntable before connecting
or disconnecting from power.
Power Management Function
The turntable will automatically go into standby mode after 15 minutes of inactivity.
To resume operation, press and hold the Mode button for 3 seconds.
Playing a Record
1. Before playing a record
1.1 Pull the protector straight forward to remove
it.
NOTE: Applying a downward force may cause
the stylus to come off the body. Only low
volume is output if the stylus has come off, or
is about to come off, so refer to “Replacing the
stylus” to reattach the stylus correctly.
Protector
1.2 Place the record on the felt mat so that the center hole aligns with the spindle.
45 RPM Adapter
If playing a 45 RPM record with a large center hole, attach the 45 RPM adapter.

12 13
2. Turntable Operation
Lower the volume of the amplifier, speakers, etc. sufficiently.
2.1 Connect the included power adapter to the turntable and slide the Power Switch to
the “ON” position.
2.2 Remove the stylus protector from the stylus.
2.3 Press the MODE button to choose turntable mode. Red indicator light indicates
Turntable mode and blue indicator light indicates Bluetooth mode.
2.4 Place the record on the slip mat. If using 45RPM records, put the
45RPM adapter on the center spindle before placing the record on
the platter.
2.5 Press the 33 or 45 RPM speed button according to the type of
record.
2.6 Press the Play/Stop button. The platter will start spinning.
45RPM Adapter
2.7 Unlock the tonearm clip and set the tonearm lift lever to the up position.
2.8 Position the tonearm over the desired location (groove) on the record.
2.9 Carefully lower the tonearm on the record.
2.10 Turn up the volume of the turntable as needed.
2.11 When you are finished playing the record, raise the tonearm, return it to rest on
the arm clip and press the Play/Stop button to stop.
NOTE:
1. If the silent pause time between each track is longer than 1 minute, the platter
will stop spinning automatically to avoid damaging the record. This stoppage does
not mean the turntable is defective.
2. If the felt mat gets dirty, it can easily scratch the record, so remove the felt mat
periodically and wipe off any dust.
3. To prevent the record from scratches and warping, remove it after use.
4. Do not use a disk stabilizer.
Bluetooth Operation
1. Connect the
included power adapter to the turntable and slide the Power Switch to
the “ON” position.
2. Press the MODE button to choose Bluetooth mode. Red indicator light indicates
Turntable mode and blue indicator light indicates Bluetooth mode. You will hear an
activation sound from the turntable.
3. Turn on the Bluetooth feature of your media device and search for and select
“1byone BS017” to pair the media device and turntable.
4. Once your media device is successfully paired with the turntable, the turntable will
play a short confirmation sound.
5. Play and stream music from your media device to the turntable.
Note: Bluetooth version: 4.2
Recording the Vinyl to Your Computer
Please follow the below steps to set up Audacity to record from the USB audio device.
For more details, please refer to the BRIEF INTRODUCTION OF AUDACITY at https://
manual.audacityteam.org/man/recording_with_usb_turntables.html
1. Download the Audacity software and complete installation
1.1 Ensure your Audacity software is up to date. You can download the current
version from http://www.audacityteam.org/download/
1.2 Follow the instructions to complete installation.
2. Set up Audacity to record from the USB audio device
2.1 Connect the USB device
Use the supplied USB cable to connect your turntable and your computer. No
extra driver is required.

14 15
2.2 System settings needed for Windows and Mac
Windows:
1. By the system clock, right-click over the Speaker icon select Sounds then
the Recording tab, and then click on the USB device in the list and click
Properties. Click the Advanced tab set your required bit rate and sample rate
from the Default Format dropdown (normally "2 channel 16-bit 44100 Hz").
2. On the Advanced tab, in the "Default Format" section, make sure the
dropdown menu is set to "2 channel 16-bit 44100 Hz".
For a more detailed walk-through of the above steps for Windows (
or if that does
not work for your version of Windows
), see Windows: accessing the Windows
Sound controls.
Mac:
1.
From Apple Menu > System Preferences select "Sound" and click on the
Input
tab
2. Select "USB Audio CODEC" or similar as the input device and verify the
Recording Meter shows input.
3. If the recording meter in the Sound preferences panel does not show input:
1. From the Finder, select Go > Utilities and open Audio MIDI Setup.
2. If the
Audio Devices
window is not visible, select Window > Show Audio
Devices.
3. Select your USB input device in the list in the left pane of the Audio Devices
window.
4. Set the Format to "44100.0 Hz" and "2ch-16bit".
For a more detailed walk-through of the above steps for Mac
,
see
Mac and USB
input devices
on the Audacity Wiki.
2.3 Launch Audacity.
If Audacity was already running when you connected the cable, choose Transport
>Rescan Audio Devices or restart Audacity.
2.4 Project Rate
Set the Audacity Project Rate in Selection Toolbar at the bottom left of the
Audacity screen to 44100
Hz
:
2.5 Devices
Use Device Toolbar to set the recording and playback devices and to set the
recording channels to "2 (Stereo) Recording Channels", as in the below example on
Windows 10:
• The Recording Device is set to the USB device (in this case the device name, but
often called or including the phrase "USB Audio CODEC").
• Recording Channels is set to stereo.
• The Playback Device is set to the named speakers of the built-in computer sound
device.
• These settings can also be changed in Devices Preferences.
Windows calls most USB external devices "microphones". Some higher-end USB
recording interfaces may appear as their explicit manufacturer's name.
3. Software Playthrough
Use Transport > Transport Options > Software Playthrough (on/off) and click
"Software Playthrough" to turn it "on" (the checkmark is shown when it is "on").
This setting can also be enabled or disabled in Recording Preferences. Software
Playthrough lets you hear the turntable through the computer speakers when
recording. It also lets you hear the turntable
without
recording if you turn on
monitoring (see the next section below).
4. Monitoring
Enable monitoring to set the recording level
• Turn monitoring on by clicking once on the microphone icon in the Recording
Meter.
• In Mixer Toolbar, turn up the left-hand playback volume slider (by the speaker icon).
• The right-hand recording volume slider (by the microphone icon) can often be used
to vary the loudness of the recording, but it may not function with all turntables.
If it does not, try adjusting the output level on the turntable (often, there is a gain
control under the chassis).
Alternatively, you may be able to adjust the input level on Windows and Linux only,
usually by looking for the speaker icon by the system clock. On Windows, right-
click over the speaker icon > "Recording Devices". Then right-click over USB
Audio Codec, choose "Properties" and click the
Levels
tab.

16 17
• Try to aim for a maximum peak of around –6 dB, which corresponds to
around 0.5 on the waveform. You can always boost the level later with Effect
> Amplify... or Effect > Normalize... after you have completed editing.
5. Recording
Then, ignoring any instructions in the manufacturer's guide to select "stereo mix",
simply press the Record button
in Transport Toolbar to start recording from the
turntable.
6. Recording, editing and exporting
Once your USB turntable is set up and working properly, go to the Basic Recording,
Editing and Exporting section of Audacity’s Tutorial - Copying tapes, LPs or
MiniDiscs to CD for instructions on how to:
• make and edit your recording
• export it to an audio file
• import it to iTunes or Windows Media Player
• burn it to CD
Audacity’s reference links:
• Basic Recording, Editing and Exporting : https://manual.audacityteam.org/man/
basic_recording_editing_and_exporting.html
• Tutorial - Copying tapes, LPs or MiniDiscs to CD : https://manual.audacityteam.
org/man/tutorial_copying_tapes_lps_or_minidiscs_to_cd.html
Care
Turntable Body
• When the turntable body is dirty or dusty, first disconnect the AC adapter, and then
wipe off the dirt and dust with a soft, dry cloth.
• Do not use benzenes, thinners, etc.
• When storing the product for a long time, disconnect the AC adapter from the
outlet and wrap the product in plastic; do not allow it to become damp; the drive
belt should be removed to prevent unequal stretching.
Stylus Tip
• If dirt and grime are stuck to the stylus tip, clean it
with a commercially sold brush.
• We recommend using a stylus cleaner (not
included) if the stylus tip is considerably dirty.
Clean the stylus tip by moving the brush from the
rear to the front of the stylus tip.
Replacing the Stylus
It's suggested to replace the stylus after 400 hours of use.
Removing the Stylus
• In addition to the deterioration of sound quality, records may also be damaged as
the cartridge’s stylus tip wears down.
• Be sure to disconnect the product’s AC adapter from the outlet.
• When replacing the stylus, hold the headshell and the cartridge body tightly.
Rotate the front of the stylus in a forward and down motion.
Installing a New Replacement Stylus
1. Mount the new replacement stylus to the cartridge.
Engage in body first
2. Lift the stylus up until you hear a click.
3. Make sure there is no gap between the headshell and the cartridge.

18 19
Replacing the Belt
• The belt is a consumable part. Replace the belt if the speed of playback slows down
or irregular rotation occurs. As a rule of thumb, we suggest replacing the belt once a
year.
• Before replacing the belt, be sure to disconnect the product’s AC adapter from the
outlet.
1. Remove the slip mat.
2. Remove the main platter, and then remove the old belt.
3. Loop the new belt around the sub-platter and motor pulley.
4. Place the main platter back onto the sub-platter.
5. Using your hands, slowly rotate the platter ten times by hand in the direction
of the arrow.
Figure 1
When the Turntable is Moved
Using the product's original packing materials, wrap the turntable in the reverse order
from when you unwrapped it. If you do not have the packaging materials, take the
following measures:
• After disconnecting the AC adapter from the outlet, remove the felt mat and platter,
and then wrap them so that they do not get damaged.
• Attach the protector to the cartridge.
• Use a string or something similar to tie the tonearm to the rest so that it does not
move.
• Wrap the turntable body with paper or a soft cloth so that it does not get damaged.

20 21
Troubleshooting
Problem Solution
The platter does
not spin.
• Is the AC adapter connected to the outlet?
-Connect the AC adapter to the outlet.
• What's the status of the indicator light?
- Power is on, but the indicator light is off. That means the
turntable is in ERP mode. Press and hold the MODE button for 3
seconds to reboot the turntable.
- The indicator light is blue. That means the turntable is in
Bluetooth mode. Press the MODE button once to switch to
Turntable mode.
- The red indicator light will indicate Turntable mode.
• Has the belt slipped from the platter?
-Correctly place the belt on the platter.
• Is the belt placed on the motor pulley?
-Check that the belt is placed on the motor pulley (brass-colored)
correctly
.
• Has the belt been damaged?
-Replace it with a new belt.
The platter spins,
but there is no
sound or the
volume is not
loud enough.
• Are the function settings and input for connected equipment
(amplifier, etc.) selected correctly?
-Check whether the settings for the connected equipment are
correct.
• Is the stylus damaged?
-Check the stylus and replace it, if necessary.
• Is the stylus placed correctly on the body of the cartridge?
-Check the cartridge and adjust it, if necessary.
• Are the setting positions for the pre-amplifier selector switch
correct?
-If you are connection to the speaker (not the speakers from the
pack) with RCA audio cable, check that the pre-amplifier settings
are correct, noting the following common problems and their
causes:
-If there is no sound, or if the volume is not loud enough, the
product is set to the “PHONO” position and connected to the
amplifier’s AUX/LINE input.
-If the volume is too loud or is distorted, the product is set to the
“LINE” position, and the connectable equipment is connected to
the PHONO input.
The stylus skips. • Is the record warped?
-Check the record.
• Is the record scratched?
-Check the record.
There is howling. • Is the product picking up excessive vibrations from the floor,
surfaces of the walls, or nearby speakers?
-Decrease the vibrations or mount the product on a surface that
is not subject to the effects of vibrations.
• Is the product mounted on an unstable surface?
-Check whether the surface on which the product is mounted is
suitable.
There is noise
when the record
is playing.
• Is there dust on the cartridge’s stylus tip?
-If dust is stuck to the stylus tip, clean it with a commercially sold
brush.
The sound when
the record is
playing is either
too fast or too
slow.
• Are the speed settings for this product correct?
-Please select the correct speed for the type of record being
played.
Playback speed
slows down or
there is irregular
rotation.
• Is the belt stretched out?
-Replace it with a new belt.
Needle isn't
touching the
record.
• The screw on the tonearm rest may have loosened during
transport. Gently turn this screw clockwise to move the needle
stylus closer to the record.
Needle is
scratching the
record's surface.
• Gently turn the tonearm rest screw anticlockwise to move the
needle stylus away from the turntable.
NOTE: Factory screw tightness is based on the thickness of the included slip mat.
If a thinner or thicker 3rd-party slip mat is used, gently adjust the screw as needed
following the steps in the last two trouble shooting topics.

22 23
Specifications
Turntable
Power AC power adapter, DC output 15V 2400mA
Power Consumption 70W
Turntable Speed 33 1/3, 45 RPM
Wow and Flutter ±0.15%
Signal to Noise -65dB
Tracking Force Range 0-6.0g
Eective Tonearm Length 8.6” (218.5mm)
Dimensions (L x W x H)
16.34” x 14.17” x 5.51” (415 x 560 x 240mm) (lid
closed), 16.34” x 16.34” x 16.34” (415 x 415 x 415mm)
(lid open)
Weight 20.9lb (9.5kg)
Stylus
Model Audio-Technica AT3600L
Frequency Response 20Hz - 20kHz
Channel Balance <2.5dB
Channel Separation >18dB
Output Voltage 2.5mV
Recommended Load Resistance 47kΩ
Amplier Connection MM (Moving Magnet) - input
Recommended Tracking Force 3.5±0.5g
Weight 0.18oz (5.1g)
Speaker
Output Power 18W*2
Speaker Units
Woofer: 4"
Tweeter: 2"
Impedance 4 Ω
Frequency Response 50Hz-20KHz
Dimensions 6.3" x 6.2" x 9.8" (160 x 158 x 249mm)
Weight 8.4lbs (3.8kg)
Note: Design and specifications are subject to change without notice.
Disposal
Disposal of the Product
Under no circumstances should you dispose of the product in normal
domestic waste.
This product is subject to the provisions of European Directive 2012/19/EU.
Dispose of the product via an approved disposal company or your municipal waste
facility. Please observe currently applicable regulations.
Please contact your waste disposal center if you need any further information.
This product’s packaging is made from environmentally friendly material
and can be disposed of at your local recycling plant.

Customer Service/Kundenservice
Service Clients/Atención al cliente/Assistenza Clienti
US
To ensure speedy handling of your issue,
please call or email us for assistance.
Phone: +1 909-391-3888
(Mon-Fri 9:00am - 5:00pm PST)
Email: ushelp@1byonebros.com
CA
To ensure speedy handling of your issue,
please email us for assistance.
Email: cahelp@1byonebros.com
UK
To ensure speedy handling of your issue,
please call or email us for assistance.
Phone: +44 158 241 2681
(Mon-Fri 9:00am - 6:00pm UTC)
Email: [email protected]
DE
Für eine zügige Bearbeitung ihres
Problems, melden Sie sich bei uns wie
folgt.
Email: euhelp@1byonebros.com
FR
Pour vous assurez une assistance rapide
en cas de problème, veuillez envoyer un
e-mail.
Email: euhelp@1byonebros.com
ES
Para garantizar una rápida atención de su
problema, favor envíenos un email para
ayudarle.
Email: euhelp@1byonebros.com
IT
Per supporto immediato in caso di
bisogno, la invitiamo a contattarci via
email.
Email: euhelp@1byonebros.com
/