LG MJ3966ABS User manual

Category
Kitchen & houseware accessories
Type
User manual

This manual is also suitable for

MJ3966ASS / MJ3966ABS / MJ3966AWS
OWNER’S MANUAL
MICROWAVE OVEN
"CONVECTION"
Please read this owners manual thoroughly before operating.
(optional, please check model specification)
MFL69621104_06
www.lg.com
Copyright © 2016 - 2017 LG Electronics Inc. All Rights Reserved
2
CONTENTS
How the Microwave Function Works
Microwaves are a form of energy similar to radio,
television waves, and ordinary daylight. Normally,
microwaves spread outwards as they travel
through the atmosphere and disappear without
effect.
This oven, however, has a magnetron that is
designed to make use of the energy in microwaves.
Electricity, supplied to the magnetron tube, is used
to create microwave energy.
These microwaves enter the cooking area through
openings inside the oven. A tray is located inside
the oven. Microwaves cannot pass through metal
walls of the oven, but they can penetrate such
materials as glass, porcelain and paper, the
materials out of which microwave-safe cooking
dishes are constructed.
Microwaves do not heat cookware, though cooking
vessels will eventually get hot from the heat
generated by the food.
A very safe appliance
Your Microwave oven, is one of the safest
of all home appliances. When the door
is opened, the oven automatically stops
producing microwaves. Microwave energy is
converted completely to heat when it enters
food, leaving no “left over” energy to harm you
when you eat your food.
CONTENTS
3
IMPORTANT SAFETY INSTRUCTIONS
8
BEFORE USE
8
Unpacking & Installing
10
Control Panel
10
Display Icon Meanings
11
Setting The Clock
11
Quick Start
11
More/Less
11
Energy Saving
12
HOW TO USE
12
Manual Cooking (timed cooking)
12
Microwave Power Levels
13
Grill Cooking
13
Grill Combi. Cooking
14
Convection Preheat
14
Convection Cooking
15
Convection Combi. Cooking
15
Child Lock
16
Inverter Cook
16
Defrost & Cook Menu Instructions
17
Popular Menu Instructions
20
Roast & Bake Menu Instructions
22
Healthy Fry / Steam
22
Healthy Fry Menu Instructions
24
Steam Chef Menu Instructions
25
Sensor Cook
25
Sensor Cook Menu Instructions
27
Slow Cook
27
Slow Cook Menu Instructions
29
Inverter Defrost
29
Inverter Defrost Menu Instructions
30
MICROWAVE-SAFE UTENSILS
31
FOOD CHARACTERISTICS &
MICROWAVE COOKING
33
TO CLEAN YOUR OVEN
34
QUESTIONS & ANSWERS
35
TECHNICAL SPECIFICATIONS
33
USING THE SMART DIAGNOSIS™
FUNCTION
cause death or serious injury.
or safety risk such as fire, causing burns
Doing so can cause an explosion.
Doing so can cause serious injury and damage.
cause sparks and fire.
plants, soil, pets or any other living matter inside it.) The
with reduced
cooking.
N
ever heat baby bottles with the lid or teat still fitted.
Children must not be allowed to
or any part of the
for
oven must only be used for heating or cooking food.
be burnt.
oven.
mode (for ovens with Combination function)
will be
B
e careful when handling the container.
M
icrowave heating of beverages can result in delayed eruptive boiling,
therefore care must be taken when handing the container.
-
his model doesn't provide a temperature probe.
T
must not be used
trays and racks
(for ovens fitted with these functions)
them
Not doing so could cause them to burst or rupture.
liquid and may even cause a fire.
Not doing so could cause
leak from the container
Only connect the supply lead plug to an earthed power outlet socket that has the same rating and
This product is intended for domestic household applications only and not for commercial use.
It must not be used in mobile applications.
specification requirement of the oven.
I
f you are unsure about your outlet socket earth connection,
it should be checked by an electrical contractor.
N
ever cut of the earth pin of the power plug.
damage or electric shock.
power connection in the event of any occurrence,
B
ed and breakfast type environments.
F
arm houses;
B
y clients in hotels, motels and other residential environments;
S
36
When the symbol is used, It means that the surfaces are liable to get hot during use.
Caution, hot surface
A
lways install the oven according to the installation requirements that are outlined in this manual.
F
or
refer to the
Do not use any steam cleaners to clean the oven.
37
D
o not place an object (a book, a box, ect.) on the product.
T
he product may overheat or catch fire or the
38
Metallic containers for food and beverages are not allowed during microwave cooking.
This requirement is not applicable if the manufacturer specifies size and shape of metallic containers suitable
for microwave cooking.
object may fall, causing injury to persons.
Method to use Accessories As per Mode
BEFORE USE
Unpacking & Installing
By following the basic steps on these two pages you will be able to quickly check that your oven is operating
correctly. Please pay particular attention to the guidelines on where to install your oven. When unpacking your
oven make sure you remove all accessories and packing materials. Check to make sure that your oven has not
been damaged during shipping.
Glass tray
Shaft
Rotating
ring
High rack
Low rack
Steam cover
(some models only)
Steam plate
Steam water bowl
(Crisp tray)
STEAMER
• Be certain to use proper accessories on each operation mode .
• Improper use could result in damage to your oven and accessories, or could result in a fire.
NOTE
Microwave Grill Convection Grill combi Conv combi
Glass tray O O O O O
High rack - O O O O
Low rack - O O O O
Crisp tray O O O O O
Steamer O - - - -
Caution: Use accessories in accordance with cooking guides! O Acceptable
- Not Acceptable
2
8 BEFORE USE
Place the oven on a level location of your choice with more
least 8 cm from the front edge of the surface to prevent tipping.
An exhaust outlet is located on the bottom and side of
the oven. Blocking the outlet can damage the oven.
Do not use the microwave oven in an enclosed space or
cupboard, The air flow for cooling the product could be
compromised. It may result in lower performance and
reduced service life and possible malfunction due to
overheating.
Mica Sheet
Mica Sheet
*Do Not Remove
Mica Sheet
NOTE
Do not remove the cavity Mica Sheet (silver plate) inside of oven.
The Mica Sheet is there to protect the microwave components from food spatters.
10 cm
5 cm
15 cm
10 cm
rear ventilation. The front of the oven should be at least
than 85cm height but make sure there is at least 15 cm of space
on the top and 10 cm at the left & right for proper and 5 cm at the
7 The DISPLAY will count down from 30 seconds.
When it reaches 0 it will chime briefly. Open the oven door and test
the temperature of the water. If your oven is operating the water
should be warm.
Be careful when removing the container as it may be hot.
YOUR OVEN IS NOW INSTALLED
8 The contents of feeding bottles and baby food jars must be stirred or shaken and the temperature checked
before consumption in order to avoid burns.
3 Plug your oven into a standard household socket. Make sure your oven is the only appliance connected
to the socket.
If your oven does not operate properly, unplug it from the
electrical socket and then plug it back in.
4
6
Press the STOP/CANCEL button, and press the START button
one time to start 30 seconds of cooking time.
Open your oven door by pulling the door handle.
Place the rotating ring inside the oven and place the
glass tray on top.
5 File a
microwave safe container with 300 ml (1/2 pint) of water.
Place on the glass tray and close the oven door.
If you have any doubts about what type of container to use
please refer to Microwave-safe utensils.
9
Button recognition may be hampered in the foll
owing circumstances:
• Only the outside area of the button is pressed.
The button is pushed using a nail or the tip of the finger.
10
The setting of the cooking time should be shorter than common microwave ovens (700 W, 800 W) due to
the relatively high output power of the product. Excessive heating of food product may cause moisture
on the door. This is not a malfunction.
11
All of the recipes in this book give a range of cooking times. In general, you will find that the food remains
under-cooked at the lower end of the time range, and you may sometimes want to cook your food beyond
the maximum time given, according to personal preference. The governing philosophy of this book is that
it is best for a recipe to be conservative in giving cooking times because overcooked food is undesirable.
NOTE
Do not use rubber gloves or disposable gloves.
When wiping the touch control panel with a wet towel, remove moisture from the touch control panel
when finished.
9 BEFORE USE
• THIS OVEN SHOULD NOT BE USED FOR COMMERCIAL CATERING PURPOSES.
DO NOT USE THIS OVEN IN A BUILT IN APPLICATION.
NOTE
LENAP LORTNOC
DISPLAY ICON MEANINGS
P-10~HI
Icon
Shows when the Microwave function is in
operation
Shows when the Auto Cook function is in
operation
Shows when the Grill function is in
operation
Shows when the Inverter defrost Microwave
function is in operation
Shows when the Convection function is in
operation
Shows when More or Less can be set or
adjusted
Shows when the Convection Temperature
needs to be set
Is shown flashing on the display, when the
cooking can be Started
Shows when the Grill Combi function is in
operation
Shows when the Output Power can be set.
Shows when the weight can be set
Shows when the Convection Combi function
is in operation
Part
COOK MODE
See page 12 Microwave”
See page 13 Grill
See page 13 Grill Combi(Microwave + Grill)
See page 14 Convection
See page 15 Conv Combi(Microwave + Conv)
INVERTER DEFROST
See page 29 "Inverter Defrost
INVERTER COOK
See page 16Inverter cook
HEALTHY FRY / STEAM
See page 22 Healthy Fry / Steam
SENSOR COOK
See page 25Sensor Cook
SLOW COOK
See page 27Slow Cook”
DIAL (MORE / LESS)
• Set cooking time, temperature and power level.
• While cooking with auto and manual function,
you can increase or decrease the cooking time at
any point by turning the dial (except defrost mode).
STOP / CANCEL
• Clears all functions and set entries except time
of day.
START
• Press this button to start cooking or resume cooking
if the door was opened or the STOP button was
pressed once.
• The quick start feature allows you to set 30
second intervals of HIGH power cooking with
each press of the START button.
10 ESU EROFEB
10
10
SMART DIAGNOSIS
Hold the mouthpiece of a phone up to this icon
when directed to by service centre personnel, to
help diagnose problems with the microwave oven
when calling for service.
SETTING THE CLOCK
when power resumes after a power interruption,
the numbers in the display reset to '12H'.
Example: To set 11:11 .
1. Press START
the 12H clock display. (If you
wish to have a 24H clock
display, simply turn the DIAL
to select ’24H’ before following
next steps)
2. Turn the DIAL until display
shows ’11:’.
3. Press START.
4. Turn the DIAL to change the
minutes until the display shows
‘11:11’.
5. Press START.
MORE/LESS
By turning the dial, manual cook settings can be
adjusted to cook food for a longer or shorter time.
Turning the dial will increase 10 seconds or decrease
10 seconds to the cooking time each time. The max
cooking time possible in the manual cook mode will be
99 minutes 59 seconds
Example:To adjust the Inverter Cook
(ex. 0.3kg chicken nuggets) cooking time for a
longer time, or for a shorter time.
1. Press STOP/CANCEL.
2. Press INVERTER COOK
until display shows ‘1’.
5. Press START.
3. Turn the DIAL until display
shows ‘1-3’.
Turn the DIAL until display
shows ‘0.3 kg’.
4. Press START.
6. Turn the Dial to lengthen or
shorten the cooking time by
10 second increments.
ENERGY SAVING
Energy saving means saving energy by automatically
turning off the display. This feature only operates when
the Microwave Oven is in standby and the display will
automatically go out.
NOTE
If you suspect that your food maybe over or
undercooked when using the preset COOK program,
you can increase or decrease the cooking time by
turning the DIAL.
You can lengthen or shorten the cooking time
(except defrost mode) at any point by turning the
DIAL
.
The QUICK START feature allows you to set 30
seconds intervals of HIGH power cooking with
each touch of the START button.
Example: Set 2 minutes of cooking on high
power
To select 2 minutes
on
high power.
Press the START button four times The oven will
start before you have finished the fourth press.
During QUICK START cooking, you can extend
the cooking time up to 99 minutes 59 seconds by
repeatedly pressing the START button.
QUICK START
1.
2.
Press STOP/CANCEL.
NOTE
If the clock has been set, the Energy saving mode
will not operate. The Energy saving mode will only
operate if the clock was not set.
11ESU EROFEB
NOTE
If you don’t want to use clock mode,
Press STOP/CANCEL button, after plugging in your oven.
If you want to set the clock again or change options,
you will need to unplug the power cord and reconnect.
HOW TO USE
MICROWAVE POWER LEVELS
MANUAL COOKING
(timed cooking)
over cooking. The adjacent table will give you
some idea of which foods are prepared at each of
10
This function allows you to cook food for a desired
the various power levels.
time. There are 10 power levels available. The
T he adjacent chart shows the power level
example below shows how to set a 90 % power
level for 5 minutes and 30 seconds
settings for your oven.
MICROWAVE POWER LEVEL CHART
2. P ress COOK MODE once.
The Display will show P-HI
(1st time P-HI appears in the
display. This is to tell you that the
oven is set on 100% power
unless a different power setting
is chosen.)
3. T urn the DIAL until display
shows ‘P-90’.
4. Press START.
5. T urn the DIAL until display
shows ‘5:30’.
6. Press START.
When cooking is complete, a chime will sound. The
word End shows in the display window. 'End' remains
in the display and the chime will sound every minute
for 5 minutes, or until the door is opened or any
button is pressed.
NOTE:
If you do not select a power level, the oven
will operate at power HIGH. To set HI-POWER
cooking, skip step 3 above.
12 HOW TO USE
Example: To cook food on 90 % Power for 5
minutes 30 seconds
1. Press STOP/CANCEL.
Do not use the following accessories in
Microwave mode.
HIGH RACK
LOW RACK
NOTE
Power
Level
Use
* Boiling water.
* Browning ground beef.
* Making candy.
*
Cooking poultry pieces, fish, & vegetables.
* Cooking tender cuts of meat.
* Reheating rice, pasta, & vegetables.
* Reheating prepared foods quickly.
* Reheating sandwiches.
* Cooking egg, milk and cheese dishes.
* Cooking cakes and breads.
* Melting chocolate.
* Cooking veal.
* Cooking whole fish.
* Cooking puddings and custard.
* Cooking ham, whole poultry and lamb.
* Cooking rib roast and sirloin tip.
* Thawing meat, poultry and seafood.
* Cooking less tender cuts of meat.
* Cooking pork chops and roast.
* Taking chill out of fruit.
* Softening butter.
*
Keeping casseroles and main dishes warm.
(100 %)
P-HI
1100 W
990 W
880 W
770 W
660 W
550 W
440 W
330 W
220 W
110 W
P-90
P-80
P-70
P-60
P-50
P-40
P-30
P-20
P-10
* Softening butter and cream cheese.
* Reheating Quiche: about 8 minutes
for 600 g.
GRILL COOKING
This feature will allow you to brown and crisp food
quickly.
Always use gloves when removing food and
accessories after cooking as the oven &
accessories will be very hot.
Example: Use Grill to cook food for 5 minutes 30
seconds
2. Press COOK MODE until
display shows ‘GrIL’.
3. Press START.
htnruT.4 e DIAL until display
shows ‘5:30’ .
5. Press START.
GRILL COMBI. COOKING
Your oven has a combination cooking feature
which allows you to cook food using the built in
Grill heater and microwave.
Example: Programme your oven with micro power
330 W and grill for a cooking time of 25 minutes
2. Press COOK MODE until
display shows ‘GC-1’.
3. Turn the DIAL until display
shows ‘GC-2’.
4. Press START.
5. Turn the DIAL until display
shows ‘25:00’.
6. Press START.
When cooking you can turn the
DIAL to increase or decrease
the cooking time.
Be careful when removing your
food as the cooking vessel will
be hot!
CAUTION
Always use oven gloves when removing the food
and accessories after cooking as the oven &
accessories will be very hot.
NOTE
• This feature will allow you to brown and crisp food
quickly.
• For the best result use the High Rack.
• Not necessary to preheat.
• Do not use any plastic container or trays, or, the
Steamer accessory for any Convection or Grill functions.
HIGH RACK STEAMER
NOTE
• Your oven has a combination cooking feature which
allows you to cook food using the built in Grill Heater
and Microwave.
This generally means it takes less time to cook your
food.
• You can select three different levels of microwave
power in the Grill Combi. function
(GC-1: 220 W, GC-2: 330 W, GC-3: 440 W).
in grill combi mode.
• For the best result use the High Rack.
• Do not use any plastic container or trays, or, the
Steamer accessory for any Convection or Grill
functions.
HIGH RACK STEAMER
13
HOW TO USE
sserP .1 STOP/CANCEL.
CONVECTION PREHEAT
Always use gloves when removing food and
accessories after cooking as the oven &
accessories will be very hot.
Example: To preheat the oven to a temperature of
200 °C.
sserP .2 COOK MODE until
display shows ‘180 °C’.
eht nruT .3 DIAL until display
shows ‘200 °C’.
sserP .4 START to lock in the
temperature and to set a
preheating time if desired.
If a time is entered, the set
temperature may not be
achieved
sserP .5 START.
Preheating will start and show
60° in the display.
The temperature on the display
will then rise to reflect the
actual cavity temperature.
CONVECTION COOKING
The metal tray or metal rack must be used during
convection cooking.
Example: To cook some food at a temperature of
200 °C for 50 minutes.
eht nruT .3 DIAL until display
shows ‘200 °C’.
het nruT .5 DIAL until display
shows ‘50:00’.
sserP .6 START.
When cooking you can turn the
DIAL to increase or decrease
the cooking time.
NOTE
The convection oven has a temperature range of
40~200 °C.
The oven has a ferment function at the oven
temperature of 40 °C. You may need to wait until the
oven is cool because you cannot use a ferment
function if the oven temperature is over 40 °C.
Your oven will take a few minutes to reach the
selected temperature.
Once it has reached correct temperature, your
oven will BEEP to let you know that it has reached
the correct temperature.
Then place your food in your oven and to start
cooking.
CAUTION
Always use oven gloves when removing the food
and accessories after cooking as the oven &
accessories will be very hot.
NOTE
If you do not set a temperature your oven will
automatically select 180 °C, the cooking
temperature can be changed by turning the DIAL.
For the best result please use
the following accessories.
LOW RACK
14 HOW TO USE
sserP .1 STOP/CANCEL.
sserP .4 START for temperature
sserP .2 COOK MODE until
display shows ‘180 °C’.
sserP .1 STOP/CANCEL.
HOW TO USE 15
CONVECTION COMBI. CHILD LOCK
COOKING
This is a unique safety feature that prevents
unwanted oven operations. Once the CHILD LOCK
In the following example, it shows you how to
is set, no cooking can take place.
program your oven at a microwave power of 330 W
and at a convection temperature of 200 °C for a
cooking time of 25 minutes.
Example: To set the CHILD LOCK
Example: To cook food at a convection combi.
1. Press STOP/CANCEL.
mode for 25 minutes.
1. Press STOP/CANCEL.
dloh dna sserP .2
STOP/CANCEL until ‘Loc’
sserP .2 COOK MODE untily
appears in the display and
and a chime is heard.
display shows ‘CC-1’.
If the time of day was already set, the time of day
will appear on the display window after 1 second.
3. T urn the DIAL until display
shows ‘CC-2’.
If the CHILD LOCK is enabled and you touch
a key pad, the word Loc shows in the display.
You can cancel the CHILD LOCK
according to below procedure.
4. P ress START.
Turn the DIAL until display
shows ‘200 °C’.
Example: To cancel the CHILD LOCK
Press and hold
STOP/CANCEL until ‘Loc’
5. P ress START.
disappears in the display.
Turn the DIAL until display
shows ‘25:00’ .
After the CHILD LOCK is turned off, the oven will
operate normally.
sserP .6 START.
When cooking you can turn the
DIAL to increase or decrease
the cooking time.
Be careful when removing your
food as the cooking vessel will
be hot!
CAUTION
Always use oven gloves when removing the food
and accessories after cooking as the oven &
accessories will be very hot.
NOTE
• You can select three different levels of microwave
power in Convection Combi mode.
(CC-1: 220 W, CC-2: 330 W, CC-3: 440 W).
• For the best result use the Low Rack.
• Do not use the STEAMER for this function.
LOW RACK
STEAMER
INVERTER COOK
Your oven’s menu has been preprogrammed to automatically cook food. Select a menu from the below,
INVERTER COOK is included with INVERTER COOK 1(DEFROST & COOK), INVERTER COOK 2(
POPULAR MENU) & INVERTER COOK 3(ROAST & BAKE MENU).
select the weight and then allow the microwave oven to do the rest. To select the different menu Codes,
turn the dial (as in step 3) until the respective menu code appears.
Adjust cook time according to the size, thickness, and your preference of doneness.
Example: To cook 0.3 kg Cheese Sticks
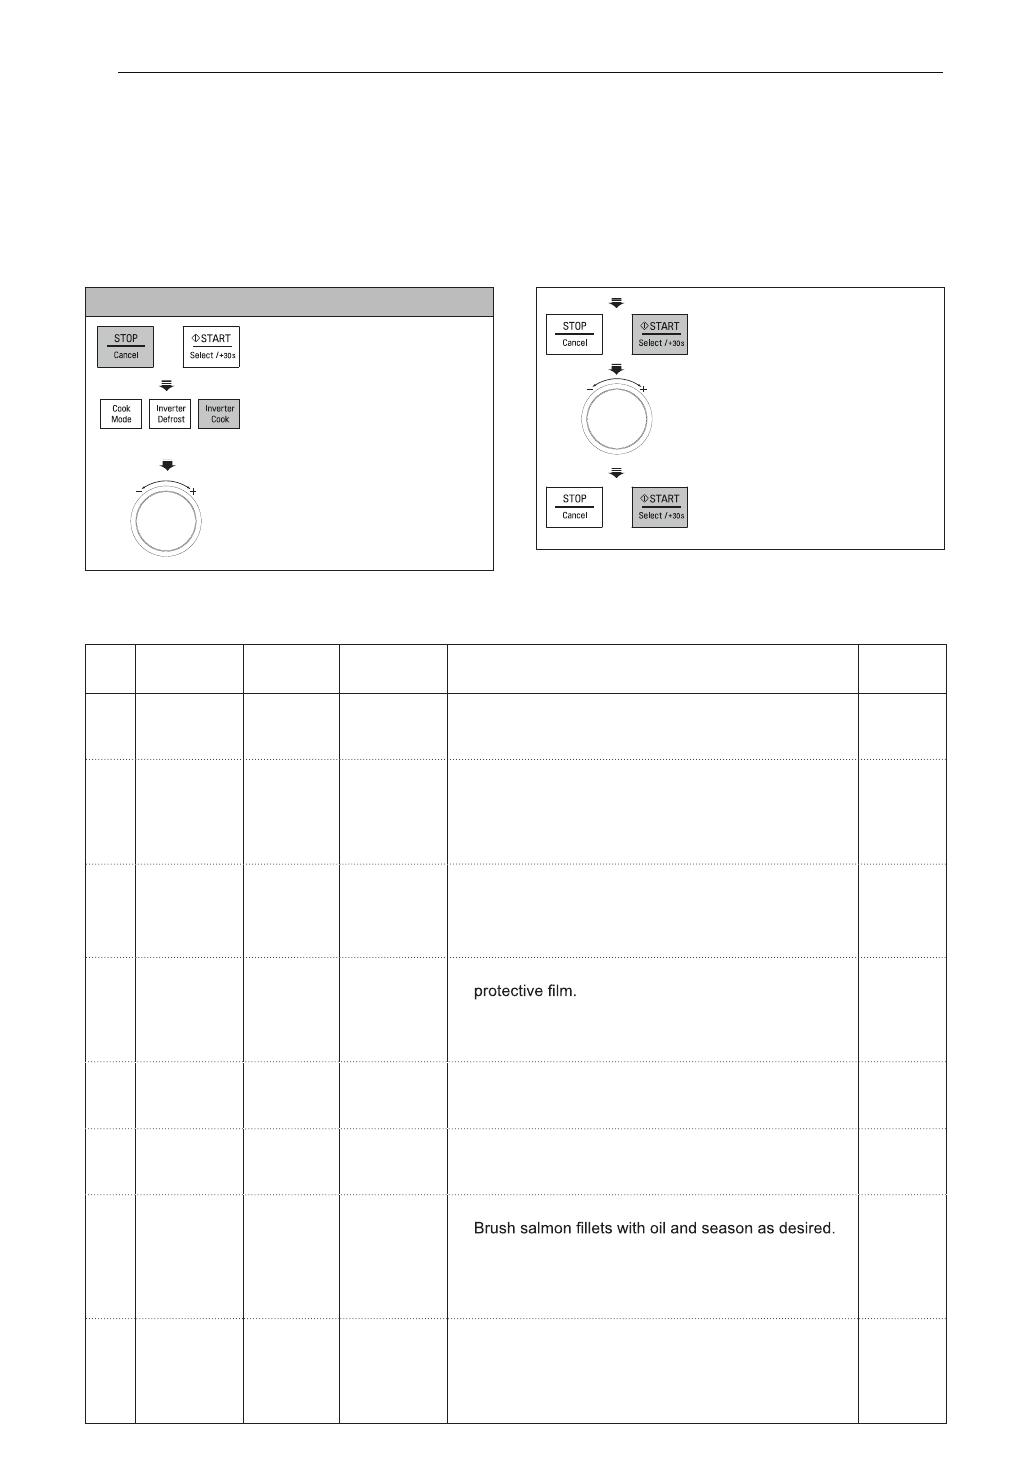
4. Press START.
1. Press STOP/CANCEL.
5. Turn the DIAL until display
2. Press INVERTER COOK
shows ‘0.3 kg’.
until display shows ‘1’.
3. Turn the DIAL until display
6. Press START.
shows ‘1-2’.
DEFROST & COOK MENU INSTRUCTIONS
Weight Initial
Code Menu Instructions Utensil
Limit Temperature
1-1 Baguette/ 0.1 - 0.3 kg Frozen 1. Place frozen bread on the Low rack. Choose the
Low rack
Croissant (50 - 100 g/ menu and weight, press start.
piece)
1-2 Cheese 0.2 - 0.4 kg Frozen 1. Brush cheese sticks with oil.
Crisp tray
Sticks 2.Place food on the Crisp tray on the High rack.
on the High
Choose the menu and weight, press start.
rack
3. When BEEP, turn food over and press start to
continue cooking.
1-3 Chicken 0.2 - 0.3 kg Frozen
1. Place chicken nuggets on the Crisp tray on the
Crisp tray
Nuggets
High rack. Choose the menu and weight, press start.
on the High
rack
2. When BEEP, turn food over and press start to
continue cooking.
1-4 Frozen 0.3 kg Frozen 1. Remove tray from outer carton and remove
Lasagna
Low rack
2. Place food on the Low rack. Choose the menu, press
start.
3. After cooking, stand covered for 2 minutes.
1-5 Frozen Pizza 0.5 kg Frozen 1. Remove thick-crust pizza from all packaging.
Crisp tray
(Thick) 2.Place food on the Crisp tray on the Low rack.
on the Low
Choose the menu, press start.
rack
1-6 Frozen Pizza 0.2 - 0.4 kg Frozen 1. Remove thin-crust pizza from all packaging.
Crisp tray
(Thin) 2.Place food on the Crisp tray on the Low rack.
on the Low
Choose the menu and weight, press start.
rack
1-7 Salmon 0.2 - 0.6 kg Frozen
1. Choose salmon fillets of 200 g and 2,5 cm thick each.
Crisp tray
Fillets
on the High
2.Place food on the Crisp tray on the High rack.
rack
Choose the menu and weight, press start.
3. When BEEP, turn food over and press start to
continue cooking.
1-8 Shrimps 0.2 - 0.4 kg Frozen 1. Brush shrimps with oil and season as desired.
Crisp tray
2.Place food on the Crisp tray on the High rack.
on the High
Choose the menu and weight, press start.
rack
3. When BEEP, turn food over and press start to
continue cooking.
16 HOW TO USE
Note: When using grill and convection mode to reduce heat loss keep door closed when turning or stirring the food.
Weight Initial
Code Menu Instructions Utensil
Limit Temperature
2-1 Apple Tart 1 Room
Crisp tray
Ingredients
on the Low
1 short crust pastry dough or sheets
rack
5 apples
20 g sugar
2 tablespoons liquid honey
1.
2.
On a lightly floured surface, roll out pastry into a round
shape approx. 20 cm 5 mm thick and put in the crisp tray.
Trim edges, leaving little overhang. Prick with a fork and
set aside.
Chop 2 1/2 apples and place in a frying pan with sugar.
Simmer until apple is soft. Cut remaining apples into
5 mm slices.
3. S pread cooked apples onto dough and arrange sliced
apples in spiraling rosettes over the entire surface.
Finally spread honey on the top of apples.
4. P lace the Crisp tray on the Low rack. Choose the menu,
press start.
5. After cooking, remove from the oven and let them cool.
2-2 Lamb Chops 0.2-0.6 kg Refrigerated 1. Choose lamb chops of 100 - 150 g weight and 1.5-2.0
High rack
cm thickness each. Remove excess fat. Season with
salt and pepper or as desired.
on a drip
dish
2. Place food on the High rack onadrip dish. Choose the
menu and weight, press start.
3. When BEEP, turn food over and press start to continue
cooking.
2-3 Lasagne 1 Room
26 x 17 cm
Ingredients
baking dish
9 lasagna instant sheets
on the
500 g spaghetti sauce
Low rack
600 g cheese sauce
300 g grated mozzarella cheese
30 g grated parmesan cheese
For Cheese sauce :
60 g butter
Pinch ground nutmeg
500 ml milk
20 g grated parmesan cheese
1. Melt butter in small saucepan.
nutmeg, stirring until smooth.
2. Gradually add milk and stir until it boils and
thickens.
3. Reduce heat and add parmesan cheese.
Stir until cheese melts well.
1. Prepare lasagna sheets according to package directions
and drain.
2. S pread about 125 g spaghetti sauce in a 26 x17 cm
baking dish.
3. Layer 3 lasagna sheets, 300 g cheese sauce, 125 g
spaghetti sauce, 100 g mozzarella cheese. Repeat
layering.
4. Finally layer remaining lasagna sheets, spread 125 g
spaghetti sauce, sprinkle with 100 g mozzarella cheese
and 30 g parmesan cheese.
5. Place baking dish on the Low rack. Choose the menu,
press start.
17HOW TO USE
Adjust cook time according to the size, thickness, and your preference of doneness.
POPULAR MENU INSTRUCTIONS
Code Menu
Weight
Limit
Initial
Temperature
Instructions Utensil
2-4 1
Ingredients
600-650 g meat mixture
2 puff pastry sheets, thawed (180-200 g/sheet)
1 egg, lightly beaten
1. On a lightly floured surface, roll out 1 puff pastry sheet
into round shape and put in the crisp tray. Trim edges,
leaving a little overhang and prick with a fork. Fill with the
cooled meat mixture and brush around edges with
beaten egg to top will stick to it.
2. Roll out the remaining pastry sheet and place on top of
pie to form a lid and trim edges. Press edges together
with a fork to seal. Cut a vent in top of pie to allow steam
to escape. Brush top with remaining beaten egg.
3. Place crisp tray on the Low rack. Choose the menu,
press start.
1. Choose Pork chops of 200 g weight and 2.5 cm thickness
each. Season with salt and pepper or as desired.
2. Place food on the High rack on a drip dish.
Choose the menu and weight, press start.
3. When BEEP, turn food over and press start to continue
cooking.
1. Peel and wash potatoes then cut into 5 mm slices.
Rub inside of a baking dish with garlic clove and butter.
2. Place half of potatoes in the baking dish and season.
Fill with remaining potatoes and season as desired.
Then pour cream and cheese over the top.
3. Place the baking dish on the Low rack.
Choose the menu, press start.
Crisp tray
on the
Low rack
2-6 1.5 kg
Room
Room
Ingredients
1 kg potatoes
1 garic clove
20 g butter
300 g cream
100 g grated cheese
Nutmeg, salt and pepper to taste
20 x 20 cm
baking dish
on the
Low rack
Meat Pie
Potato Gratin
2-5 0.2 - 0.6 kg
Refrigerated
High rack
on a
drip dish
Pork Chops
For Meat mixture :
1 onion, chopped
500 g steak, finely chopped
2 tablespoons plain flour
250 ml beef stock
1/2 teaspoon thyme
Pinch ground nutmeg
Salt and pepper to taste
Saute chopped onion over a low heat in a saucepan
until soften. Add chopped steak and stir until browned.
Sprinkle flour over steak and continue cooking for
further 2 minutes. Gradually add bouillon and stir
constantly until it boils and thickens. Add all remaining
ingredients. Cover and simmer for 30 minutes. Allow to cool.
18 HOW TO USE
Code Menu
Weight
Limit
Initial
Temperature
Instructions Utensil
Room1.2 kg
2-7 Rice/Pasta 0.1 - 0.3 kg Room
Ingredients for rice
Rice 100 g 200 g 300 g
Butter, melted 30 g 40 g 50 g
Onion, grated 50 g 75 g 100 g
Chicken stock or water 250 ml 500 ml 750 ml
Salt To taste
1. Add rice, melted butter and onion in a deep and large
microwave-safe bowl(3 L) and mix well. Pour boiling
chicken stock or water and add salt. Cover with
plastic wrap and vent.
2. Place food in the oven. Choose the menu and weight,
press start.
3. After cooking, stir and stand covered for
5 - 10 minutes if needed.
1. Place pasta and boiling water with salt in a deep and
large microwave-safe bowl(3 L). Cover with plastic
wrap and vent.
2. Place food in the oven. Choose the menu and weight,
press start.
3. After cooking, Rinse pasta with cold water.
Ingredients for pasta
Pasta 100 g 200 g 300 g
Water 400 ml 800 ml 1000 ml
Salt To taste
Microwave-
safe bowl
2-8 Stuffed
Zucchini
Ingredients
4 round zucchinis of about 200 g each
500 g ground beef
2 tablespoons olive oil
Salt and pepper to taste
1. Cut tops off zucchini to form hats and seed them,
taking care not to pierce flesh or skin. Then sprinkle
each zucchini with salt and pepper.
2. Stuff zucchinis with ground beef and replace hats.
3. Place food on the Crisp tray on the Low rack and
drizzle with olive oil. Choose the menu, press start.
Crisp tray
on the Low
rack
19HOW TO USE
20 HOW TO USE
Weight Initial
Code Menu Instructions Utensil
Limit Temperature
3-1
Baked
0.2 - 1.0 kg Room 1. Wash potatoes and dry with a paper towel. Low rack
Potatoes (180 - 220 g/ 2. Pierce each potato 8 times with a fork.
each) 3. Place food on the Low rack. Choose the menu and
weight, press start.
4. A fter cooking, stand covered with an aluminum foil
for 5 minutes.
3-2
Cookies
1 Room
High rack
Ingredients
+
80 g brown sugar
Low rack
80 g butter, softened
1 egg, lightly beaten
1/2 teaspoon baking powder
1/2 teaspoon baking soda
100 g mini chocolate chips
1. Mix brown sugar and softened butter.
chocolate chips and mix well.
2. Drop dough by tablespoon onto the High rack and
Low rack covered with an aluminum foil.
Cookies should be spaced 2 cm apart.
3. Place the High rack and Low rack in the oven.
Choose the menu, press start.
4. A fter cooking, remove from the oven and let them
cool.
3-3
Fresh Pizza
1 Room
Crisp tray
Ingredients
on the Low
Dough:
rack
1 teaspoon active dry yeast
1/3 teaspoon salt
1 teaspoon sugar
70 ml warm water
1 teaspoon extra-virgin olive oil, plus
little for coating
Topping:
3 tablespoons pizza sauce
30 g sausage, sliced
1/2 onion, sliced
2 fresh mushrooms, sliced
1/2 fresh pepper
100 g shredded mozzarella cheese
1. Combine all Ingredients for Dough in a large mixing
bowl.
2. Knead with an electric mixer to make smooth and
elastic dough.
3. Roll dough out and place dough on the Crisp tray.
Spread pizza sauce. Top with toppings and cheese.
4.Place the Crisp tray on the Low rack.
Choose the menu, press start.
Adjust cook time according to the size, thickness, and your preference of doneness.
ROAST & BAKE MENU INSTRUCTIONS
  • Page 1 1
  • Page 2 2
  • Page 3 3
  • Page 4 4
  • Page 5 5
  • Page 6 6
  • Page 7 7
  • Page 8 8
  • Page 9 9
  • Page 10 10
  • Page 11 11
  • Page 12 12
  • Page 13 13
  • Page 14 14
  • Page 15 15
  • Page 16 16
  • Page 17 17
  • Page 18 18
  • Page 19 19
  • Page 20 20
  • Page 21 21
  • Page 22 22
  • Page 23 23
  • Page 24 24
  • Page 25 25
  • Page 26 26
  • Page 27 27
  • Page 28 28
  • Page 29 29
  • Page 30 30
  • Page 31 31
  • Page 32 32
  • Page 33 33
  • Page 34 34
  • Page 35 35
  • Page 36 36

LG MJ3966ABS User manual

Category
Kitchen & houseware accessories
Type
User manual
This manual is also suitable for

Ask a question and I''ll find the answer in the document

Finding information in a document is now easier with AI