Celestron 44348 User manual

Category
Microscopes
Type
User manual

This manual is also suitable for

InstructIon Manual
Model #44348
LCD DIGITAL MICROSCOPE
ENGLISH
TM
Pantone 877
IntroductIon
Thank you for purchasing the Celestron PentaView
TM
LCD Digital
Microscope with a 4.3” touch screen monitor. Your microscope
is a precision optical instrument, made of the highest quality
materials to ensure durability and long life. It is designed to give
you a lifetime of pleasure with a minimal amount of maintenance.
Before attempting to use your microscope, please read through
the instructions to familiarize yourself with the functions and
operations to maximize your enjoyment and usage. See the
microscope diagram to locate the parts discussed in this manual.
This microscope provides high powers from 40x up to 600x (up
to 2400x with digital zoom). This microscope is mainly suited for
examining specimen slides of yeasts and molds, cultures, plant
and animal parts, fibers, bacteria, etc. You can also examine thin,
small objects such as coins, stamps, PC boards, insects, and other
objects especially at the lower powers, but remember the lowest
power is 40x.
The Celestron PentaView
TM
LCD Digital Microscope does not use
eyepieces that are used in traditional microscopes. You will view
specimens or objects on the LCD screen which are easy to see
and you can also enjoy them with others. In addition, you can
take snapshots or short videos with the built-in digital camera.
Plus, you can view on most TV screens with the AV/TV Cable.
The final sections of this manual provide simple care,
maintenance and troubleshooting tips for you to follow to
ensure that your microscope provides you with years of quality
performance, usage, and enjoyment.
Standard Accessories Included with your Microscope
• Digital Camera — built-in • LCD Touch Screen Monitor • Touch Pen
• 4x Objective Lens • Top & Bottom Illuminators • Hard Case
• 10x Objective Lens • Filter Wheel/Diaphragm — 6 position • Dust Cover
• 20x Objective Lens • USB Cable 2.0 • SD Card Slot
• 40x Objective Lens • AV/TV Cable • AC Adapter
• 60x Objective Lens • 10 Prepared Slides • 4GB SD Card
2
LCD Module
LCD Monitor
Power On/Off
Screw to adjust the
tension of the rotation
Objective Nosepiece
Objective Lenses
Mechanical Stage
Base
Bottom Illuminator
SD Card/USB/AV-TV
Cable Receptacles
Arm
Top Illuminator
Stage Control Knobs
Focus Knobs
Top Illuminator Switch
Figure 1
1. Carefully remove the microscope and other parts from the
carton and set them on a table, desk, or other flat surface.
2. Remove the plastic cover from the microscope.
3. Plug the small cable from the AC adapter into the socket on
the back of the base (see Figure 2).
4. Insert the plug you need (see note below) into the AC adapter
and then plug the adapter into the proper power source.
Note: The AC Adapter supplied with this
microscope has an interchangeable plug
system that can work in the USA, UK, Europe,
Australia, and many other parts of the world.
You can easily change plugs for your particular
requirement by doing the following:
A. You may have one of two different types of
adapters. One is shown in Figure 3A
and another one is somewhat similar
shown in Figure 3B and each has a different means
of changing plugs.
B. For the Figure 3A type, push down on the small button
labeled “PUSH” and hold it down while at the same
time hold the prongs of the plug and rotate it slightly
counterclockwise and pull up to remove it. Then remove
your nger from holding the “PUSH” button down.
Take the plug style that you want to use and center it over
the AC Adapter and rotate it until it falls down into the
opening. Then rotate it clockwise until you hear a click
sound which lets you know the plug is now installed
correctly.
C. For the Figure 3B type, pull the plug up and away while
holding the base of the AC Adapter and the plug will
come off. Take the plug style that you want to use and
align the two holes in the bottom of the
plug with the two pins in the AC Adapter.
Then, push the plug into the AC Adapter
all the way and you are finished.
Battery Operation — You can use your
microscope without AC power if you
choose. This gives you the freedom to
operate the microscope outdoors or
indoors anywhere you please. The battery operation
requires 4AA batteries (user supplied). Open the battery
door on the bottom of the microscope and insert the
batteries according to the battery polarity shown in the
battery compartment (Figure 4). After the batteries are
installed close the battery door. Battery life will typically
be three hours.
settIng up Your MIcroscope
MagnIfIcatIon (power) table
Use the following table to determine the
magnification of the different objective lenses in
combination with your microscope using the normal
mode of the digital image on the LCD screen and
using the digital zoom feature.
specIfIcatIons
Stage Mechanical Stage 3.5” x 3.5” (88 mm x 88 mm)
Digital Camera 5 MP ½.5” CMOS; 10x Magnication in lieu of an Eyepiece
LCD Monitor 4.3” (109 mm) with 4x Digital Zoom — High denition touch
digital TFT display
Resolution — 480 x 272 pixels
Focuser Dual — Coarse/Fine
Objectives Achromatic, glass type — 4x, 10x 20x, 40x and 60x
You can use optional objective lenses up to 60x but not
lower than 4x — DIN35 RMS thread size WJ 4/5” x 1/36”
4GB SD Card (approximately 1,100+ snapshots @ 5mp
Memory
Snapshots in JPEG format and 3GP les for Video
LCD Rotation 180° – 90° left / 90° right
Filter Wheel Red/Green/Blue/1 mm hole/3 mm hole/6 mm hole (default)
Nosepiece Quad with click stop
Illuminators Built-in electric — both are LED 6 Volt and 6 Watt
Condenser N.A. 0.65
AC Adapter Input Universal 100 to 240 Volt 50/60HZ
Batteries User supplied 4AA — approx. 3 hour usage
Weight/Dimensions 67 oz/1.9 Kg 7.0” (178 mm) x 5.5” (140 mm) x 13.0” (330 mm)
Objective Lens 4x 10x 20x 40x 60x
Digital Image
— normal 40x 100x 200x 400x 600x
Maximum with 4x
digital zoom feature 160x 400x 800x 1600x 2400x
FIGURE 3A
FIGURE 4
FIGURE 3B
3
workIng dIstance
Objective Lens 4x 10x 20x 40x 60x
Working
Distance (mm) - est. 35.3 7.8 1.9 0.7 0.2
touch pen
You can keep the touch pen handy by keeping it in the receptable behind the
Power ON/OFF button.
FIGURE 2
Touch Pen
ON/OFF
Button
MIcroscope operatIon
Before looking at specimens you must turn the LCD on, turn
on the proper illumination, and understand how to use the
mechanical stage and then you are ready to begin viewing.
Remove the protective film from the LCD screen.
LCD Module — This digital microscope is different than
traditional microscopes — instead of using eyepieces to look
at a specimen in a traditional microscope, the LCD monitor
replaces the eyepieces so you can look at the specimen on the
screen by yourself or share the views with others. To begin to
view specimens with your microscope, you will have to turn the
LCD monitor on by pushing the Power Button (see Figure 1) and
you see “Celestron Digital Microscope” on the screen. That is
basically all you need to do to use the LCD screen for viewing
specimens. The touch screen functions on the LCD Module
are mainly used for taking images (snapshots and video) and
performing other functions and will be discussed later in
this manual.
Illumination — To get the sharpest and best views, the proper
illumination (lighting) must be chosen:
1. To turn the illuminator(s) on, see Figures 5 & 6 and turn the
switches as shown for each.
2. The top illuminator (Figure 1) was designed to be used at low
power (4x objective) as higher power objective lenses (10x,
20x & 40x) will block some of the light. If you need to use
high power to observe solid objects, use a bright secondary
light (desk lamp, etc.) for directed illumination.
3. The bottom illuminator (Figure 1) is used mainly for specimen
slides where the light shines up through the hole in the stage
through the slide.
4. Having both illuminators on at the same time can provide
enough light for thick and irregular specimens.
Adjusting the Lighting — Specimens of different size, thickness,
and color variations will require different levels of illumination.
Normally you adjust the brightness by turning the switches
shown in Figure 5 & 6. Another way to adjust brightness is by
changing the EV function on the touch screen. The EV (exposure
value) function increases or decreases the brightness level by
using the (+) or (-) buttons on the screen.
When viewing a specimen that is not transparent or dark in color,
you may need to increase the amount of light to resolve certain
features or details. This is best done by simply increasing the
brightness of the illuminator by rotating the brightness control
dial all the way to its highest setting.
Optimum lighting will be found by experimenting with
adjustments as each specimen may require slightly different
illumination as well as the same specimens viewed under
different powers.
Viewing a Specimen — Your instrument is provided with a
mechanical stage with a stage holder clamp and directional
knobs — see Figure 7.
1. Use the clamp lever to open the clamping arm of the stage
holder clamp.
2. Place a specimen slide (1” x 3”/25.4 mm x 76.2 mm size) inside
the holder and gently close the clamping arm against the slide.
3. Use the stage movement knobs to position the specimen
over the opening in the stage. The rear stage movement knob
moves the X axis (forward and backward) whereas the front
stage movement knob moves the Y axis (side to side). For rst
time microscope users, it will take some time to get used to the
movements and shortly you will be able to center objects easily.
4
The PentaView is supplied with a 4GB SD Card and you can use it to capture images (snapshot or video).
SD Cards are inserted into the SD Card Slot in the LCD Monitor (Figure 1).
usIng an sd card
FIGURE 7
FIGURE 6
Figure 5
Note: A vernier scale on both axes allows the exact marking
and replication of an object in the field of view that the user
may want to come back to.
4. Use the objective nosepiece (Figure 1) to rotate the objective
lenses (Figure 1) until the 4x objective lens is directly over
the specimen. Always start with the lowest power objective
(4x with this microscope) which gives you 40 power and work
your way up to higher powers. At 40 power you will have the
widest field of view and the brightest image.
5. Look at the LCD screen while turning the focus knob (Figures
1 & 7) until the specimen comes into view. You may need to
adjust the stage movement knobs (Figure 7) slightly to center
the specimen in the field of view. The larger focus knob is the
coarse focus and the smaller knob is for fine (exact) focusing.
6. With the 4x objective lens, you can also vary the power
anywhere from 40x to 160x by using the digital zoom.
7. For higher powers, you will need to rotate the objective
nosepiece to the 10x or 20x and to the 40x objective for the
maximum power. You will have to refocus when changing
the power of the objective lenses. While using any of these
objective lenses you also can increase power by using the
digital zoom. Note that using a higher power objective lens
will yield sharper images versus a lower power objective lens
and digital zoom for the same magnification.
8. Your microscope includes a 60x objective lens packed
separately. The 60x objective allows you the maximum
power available. When specimen detail requires extreme
power, you can install the 60x objective lens by replacing any
existing objective lens. Turn the knurled ring at the top of the
objective lens you want to replace counterclockwise until it
comes out. Then, install the 60x objective lens by turning it
clockwise until tight.
9. To use the digital zoom, you touch the screen icons on the
right side of the screen to increase or decrease the power
from 1x to 4x.
Note: When changing objective lenses, lower the stage
to its lowest position so you will not hit anything during
the rotation. Also, at the higher powers, be careful when
raising the stage close to the objective lens so that the
objective does not hit the slide specimen (or other object) and
cause damage.
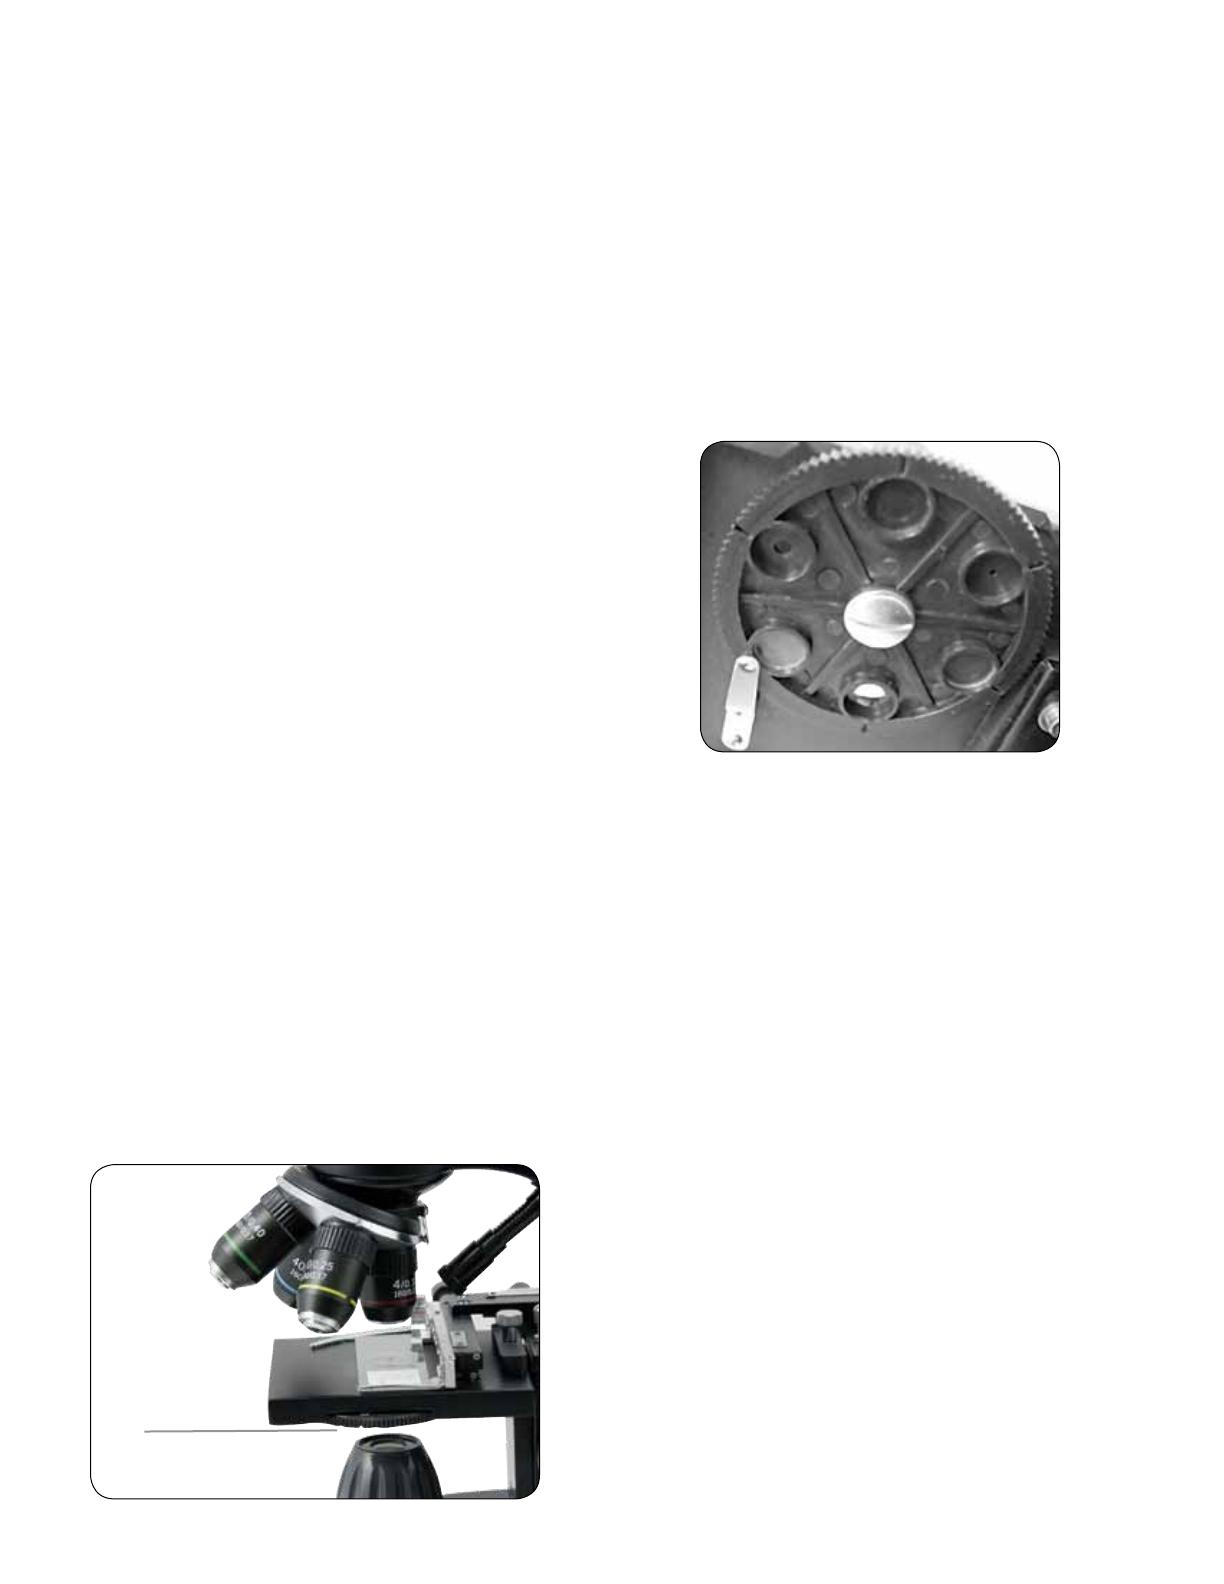
Using Filters & the Diaphragm — Normally most viewing or
imaging will be done without colored filters and before using the
microscope check to make sure no filters are in the optical path.
However, to bring out different levels of detail, experiment with
changing the color of the back lighting of the specimen especially
for very bright transparent specimens. To change the lighting
color, rotate the wheel (Figure 8) to the desired color – Red (R),
Green (G), Blue (B). Each color is centered when you hear/feel the
faint click stop. You may need to refocus by adjusting the focus
knob (Figure 1) slightly for best viewing. You should experiment
with each of the colors to see the results.
Diaphragm — within the wheel are holes with three different
diameters, (1) 1 mm, (3) 3 mm, (6) 6 mm which limit the amount
of light passing through to the specimen. These holes are part of
the diaphragm which allows you to change the hole opening size
to maximize the contrast, brightness, etc.
The default setting is the (6) for the 6 mm hole which should be
used for most viewing. You can look under the stage (see Figure
9) to make sure the proper setting you wish is actually
being used.
Rotating the LCD Screen — You can rotate the viewing position
of the LCD screen 180° – 90° to the right and 90° to the left. You
can view any position you choose along the 180° rotation. This
function allows you to share the view with others without actually
moving the complete microscope. To move the LCD screen, hold
the top of the arm (see Figure 1) with one hand and then hold
the LCD module with the other and move it to the position you
desire.
You can adjust the tension of the rotation of the monitor by
tightening/loosening the adjustment screws as shown in Figure
1. It is best to have the tension somewhat tight so the monitor is
rigid. Turn the LCD screen on and you are now ready to use
your microscope for viewing and if any problems check the
trouble shooting section.
AV/TV Cable — To view specimens or images on a larger format
screen, connect the AV/TV cable in the receptable (see Figure1)
on one end and the other end into the socket on the monitor (if
your monitor has a socket for this purpose).
5
FIGURE 9
FIGURE 8
Wheel
You can take snapshots or a short video with your microscope
with the built-in digital camera. With the SD Card memory, you
do not need to use a PC or any other devices to do imaging.
Transferring of images to your PC for saving and or printing
them is easy and will be discussed later in this manual.
Note: If you are going to take images, do not connect
the USB cable to your PC or damage could occur to the
equipment. The USB cable is not used at all for
taking images.
Settings and Information for the Digital Camera and the
Touch Screen — The touch screen icons and their functions are
quite easy to use and intuitive in nature. Below will be discussed
the general use of the icons. Typically you use your fingers with
the touch screen, but you can use the included touch pen as
well. The touch screen has various functions and choices among
those functions. From the image to the left you will nd the
following twelve icons/ when in the viewing/ snapshot mode!
Note: After turning the LCD Monitor off, most settings will
revert to the default settings.
Settings icon (7)
Time & Date — year, month, date, and time
Language — choose from Chinese (simple or traditional),
English, French, German, Italian, Japanese, Korean, Portuguese,
Russian, and Spanish
Beep — beeps with each touch of the screen or you can
turn it off
Default Factory Settings — change all back to factory settings
Pixel setting icon (4)
Lightly tap the icon to change the pixel setting from 640x360,
1920x1080, 2048x1152, 2560x1440, 3072x1728, and
3648x2048. 3072x1728 is the sensor resolution and 3648x2048
gives you higher resolution through interpolation.
Snapshot selection (5)
Normal is single shot but you can set for timed shots.
Video mode
You can take videos in this mode.
To take videos, you need to make the settings first. The icons
on this image (Figure 11) do the same as in the snapshot mode
except the following:
3. Touch to go to the viewing mode
4. Set the pixel size to 640x360 (the higher resolution for videos) by
touching the screen. In both resolutions (high 640x360 or low -
QVGA), the frame specications is 20fps.
8. Record Video — touch to begin video and touch again to stop
the video
12. Recording time remaining
Snapshot or Video review
From the Video Mode touch the video icon in the lower left
of the screen to go to the Review Mode. In this mode you can
review the snapshots and videos you have taken. Just touch the
arrows and touch/scroll the screen to navigate and view your
videos, snapshots and delete them if you choose.
Note: Inserting or removing an SD card while the LCD is on
may cause the LCD to shut down and/or could damage the
SD card.
Transferring Your Images — To transfer images to a PC or
MAC, you need to have a free USB port and have an imaging
program for snapshots and/or video.
Note: Do not disconnect the USB cable while transferring
images or damage may occur.
1. You can transfer images from the SD Card to your PC
by using the supplied USB Cable. The small plug end of
the cable plugs into the LCD Monitor (see Figure 1) and
the large plug end of the cable plugs into your PC. If the
connections are proper you will see on your microscope
screen “MSDC” or similar data. Your PC will automatically
recognize the new hardware. Then you will choose which
program on your PC you want to transfer the images to.
6
dIgItal IMagIng
3 4
12
8
FIGURE 11 VIDEO MODE
1
2
3 4 5 6 7
9
8
11
10
FIGURE 10 VIEWING/SNAPSHOT MODE
12
1. Increase EV Function
2. Decrease EV Function
3. Selection Mode
4. Pixel Setting
5. Snapshot selection
6. Color special effect
7. Settings
8. Touch to take snapshot
9-10. Digital Zoom Indicator
11. SD Card Storage
12. Snapshots remaining
+
trouble shootIng
If you do not get an image to view on your LCD screen, here are
a few things to double check:
1. Make sure the AC Adapter is plugged in to an AC power
source and attached to the microscope securely and
correctly.
2. Make sure you have the illuminators turned on with
maximum brightness adjustment.
3. Make sure the objective lens you have chosen is set correctly
and it has clicked in the right position.
4. Make sure that the diaphragm (filter wheel) is set correctly
at a click position so that the illuminated light comes up
properly — the normal position is the 6 position (6 mm hole)
for most applications.
5. Make sure the specimen slide is correctly fit into the clamp
on the mechanical stage and properly centered.
6. Make sure the SD Card is inserted properly.
If icon does not display, then remove and insert again.
7. Touch Screen Icons not working properly.
Power OFF and ON.
care, MaIntenance, and warrantY
Your Celestron accessory is a precision optical instrument and
should be treated with care at all times. Follow these care and
maintenance suggestions and your microscope will need very
little maintenance throughout its lifetime.
When you are done using your microscope, remove any
specimens left on the stage.
Turn off the illuminator switches.
Turn off the LCD monitor — push the on/off button until you
see “Shutting Power Off”.
Unplug the power cord.
Always place the plastic bag or dust cover over the
microscope when not in use or when being stored to help
keep it clean.
Store the microscope in a dry and clean place.
Be very careful if using your microscope in direct sun light to
prevent damage to the microscope or your eyes.
When moving your microscope, carry it by the “arm” with one
hand and not by the focuser knob, LCD monitor, etc. Then,
put your other hand under the base for support.
Clean the outside surfaces (metal and plastics) with a moist
cloth.
Always unplug any cords before cleaning.
Never clean optical surfaces with cloth or paper towels as
they can scratch optical surfaces easily.
Blow off dust with a camel’s hair brush or an air blower from
optical surfaces.
To clean ngerprints off of optical surfaces, use a lens
cleaning agent and lens tissue available at most photo outlets
and when cleaning do not rub in circles as this may cause
sleeks or scratches to occur.
Never disassemble or clean internal optical surfaces. This
should be done by qualified technicians at the factory or
other authorized repair facilities.
When handling glass specimen slides, use care as the edges
can be sharp.
2. You can take the SD card out and use the SD card slot on your
PC (if available) to transfer the images. In either way your PC
will ask you to choose which program you want to transfer the
images to.
Deleting all Snapshots/Video Images – To delete all images
use the memory format function – Settings / Memory / Format
and choose SD card or Flash memory.
Your MIcroscope has a two Year lIMIted warrantY.
please see the celestron websIte for detaIled InforMatIon at
www.celestron.coM.
7
2835 Columbia Street • Torrance, CA 90503 U.S.A.
Telephone: 310.328.9560 • Fax: 310.212.5835
©2012 Celestron
All rights reserved. • Printed in China • 01-12
Product design and specifications are subject to change
without prior notification.
Designed and intended for those 13 years of age and older.
www.celestron.com
EEC: This product complies with EEC guidelines in EN61558-2-6:1997 and EN61558-1:1997+A1
FCC Statement
This device complies with Part 15 of FCC Rules. Operation is subject to the following two conditions:
1. This device may not cause harmful interference, and
2. This device must accept any interference received, including interference that may cause undesired operation.
  • Page 1 1
  • Page 2 2
  • Page 3 3
  • Page 4 4
  • Page 5 5
  • Page 6 6
  • Page 7 7
  • Page 8 8

Celestron 44348 User manual

Category
Microscopes
Type
User manual
This manual is also suitable for

Ask a question and I''ll find the answer in the document

Finding information in a document is now easier with AI