Page is loading ...

1.
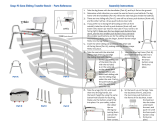
Take the leg frame with the handlebar (Part A), and lay it flat on the ground.
2. Determine which direction you want the seat to face in your bathtub. The leg
frame with the handlebar (Part A) will be the side that goes inside the bathtub.
3. There are two sliding rails (Part C): one rail has 4 brass push buttons (front rail),
and the other rail has 2 brass push buttons (rear rail).
4. If you prefer to sit facing left (if looking at the tub from outside), take the rail
with 4 push buttons (front rail), and insert it into tube X
(or insert it into tube Y if you want to sit facing right).
Make sure the two larger push buttons face down, and the two
smaller push buttons face outwards (the smaller push buttons
are for the sliding rail locking mechanisms). Make sure
the larger, bottom button snaps firmly into the leg
frame.
5. Insert the other sliding rail (rear) into the other side
of the leg frame (Part A), making sure the button snaps
firmly into place.
6.
Take the seat with the attached
sliding rings (Part D), and align
the sliding rings with the rails,
so that the locking side of the seat
(the side with the red tabs)
is on the same rail
as the 4 brass push
buttons (front rail).
Insert both sliding
rails into the sliding
rings under
the seat. Push in
the push buttons to
slide the seat easily
onto the rails.
7.
Take the other leg frame (Part B),
and insert the sliding rails into it.
Make sure the brass buttons snap
firmly into place.
8.
Take the 4 legs (Part E), and insert
them into the leg frames. Set
the bench height by using the same
button-hole location for each leg.
Make sure the buttons snap firmly
into place. For your safety, adjust
the rubber tips on
the legs by
turning them
outward for
maximum
floor
contact.
9.
Sit the bench up on the legs. Take
the backrest (Part F), and insert
the backrest into the two oblong
holes on the top of the seat towards
the rear of the seat.
Push the backrest down
firmly into the seat
until the
backrest
snaps into
place.
Y
X

Locking Mechanism
Lock the seat into place by making sure the slide ring snaps firmly onto the brass
push button at the end of the sliding rail (shown below). Release the locking
mechanism by pressing down on the red tab of the locked slide ring.
UNLOCKED LOCKED
Swivel Seat
Press down on the red tab located under the center of the seat’s front edge to
turn the swivel seat, and rotate the seat slightly. Once the seat starts to swivel,
release the red tab. The swivel seat locks every 90 degrees.
Sliding Rails
If the seat is not sliding as smooth as you would like, we recommend spraying
WD40 along the sliding rails.
Rubber Tips
Be sure the rubber tips are turned outward for maximum floor contact
and stability.
Cleaning
Rinse off the seat area with water after each use to prevent dirt, soap scum,
and mineral deposits from forming which could block the push button areas.
If any push button does not completely snap into place,
or if you feel the bench is not secure, please do not use
the bench, and notify your authorized dealer immediately.
Have Questions? Please contact your authorized dealer for assistance.
Thank you for purchasing an Eagle Health Supplies product!
If you would like to register your product for the 1-year warranty,
please fill out the included Warranty Card, and return to Eagle Health Supplies.
For Bariatric Sliding Transfer Benches
55111/ -81/ -91 55662/ -82/ -92 56411/ -81/ -91
55211/ -81/ -91 56111/ -81/ -91 56662/ -82/ -92
55411/ -81/ -91 56211/ -81/ -91
Email: sales@eaglehealth.com
Phone: (714) 532 – 1777
Fax: (714) 532 – 9777
/