Page is loading ...

TRANSISTORIZED
INVERTER
INSTRUCTION M ANUAL
BRAKE UNIT
400V C LA S S
TYPE BU-H

A-1
Thank you for choosing this Mitsubishi Transistorized inverter option unit.
This instruction manual gives handling information and precautions for use
of this equipment.
Incorrect handling might cause an unexpected fault. Before using the
inverter, always read this instruction manual carefully to use the equipment
to its optimum.
This instruction manual uses the International System of Units (SI). The
measuring units in the yard and pound system are indicated in parentheses
as reference values.
Please forward this manual to the end user.
This section is specifically about safety matters
Do not attempt to install, operate, maintain or inspect the inverter until you
have read through the instruction manual and appended documents
carefully and can use the equipment correctly. Do not use the inverter until
you have a full knowledge of the equipment, safety information and
instructions.
In this instruction manual, the safety instruction levels are classified into
"WARNING" and "CAUTION".
Assumes that incorrect handling may cause
hazardous conditions, resulting in death or severe
injury.
Assumes that incorrect handling may cause
hazardous conditions, resulting in medium or slight
injury, or may cause physical damage only.
Note that even the CAUTION level may lead to a serious consequence
according to conditions. Please follow the instructions of both levels
because they are important to personnel safety.
WARNING
CAUTION

A-2
1. Electric Shock Prevention
2. Fire Prevention
3. Injury Prevention
SAFETY INSTRUCTIONS
WARNING
While power is on or when the inverter is running, do not open the front
cover. You may get an electric shock.
Do not run the inverter with the front cover removed. Otherwise, you
may access the exposed high-voltage terminals or the charging part of
the circuitry and get an electric shock.
If power is off, do not remove the front cover except for wiring or
periodic inspection. Doing so can cause an electric shock because the
inverter connected to the brake unit is charged internally.
Before starting wiring or inspection, check for residual voltages with a
meter etc. more than 10 minutes after power-off.
Any person who is involved in wiring or inspection of this equipment
should be fully competent to do the work.
Always install the option unit before wiring. Otherwise, you may get an
electric shock or be injured.
Do not subject the cables to scratches, excessive stress, heavy loads or
pinching. Otherwise, you may get an electric shock.
CAUTION
Mount the brake resistor on an incombustible surface. Installing the
inverter directly on or near a combustible surface could lead to a fire.
Use the alarm signal of the brake unit to switch power off. Otherwise, a
brake transistor failure or the like can overheat the brake resistor
abnormally, causing a fire.
Do not connect a resistor directly to the DC terminals P(+), N(-). This
could cause a fire.
CAUTION
Apply only the voltage specified in the instruction manual to each
terminal to prevent damage etc.
Ensure that the cables are connected to the correct terminals.
Otherwise, damage etc. may occur.
Always make sure that polarity is correct to prevent damage etc.
While power is on and for some time after power-off, do not touch the
brake resistor as it is hot and you may get burnt.

A-3
4. Additional instructions
Also note the following points to prevent an accidental failure, injury, electric
shock, etc.
(1) Transportation and installation
(2) Operation
(3) Emergency stop
(4) Maintenance, inspection and parts replacement
(5) Disposing of the brake resistor
(6) General instructions
CAUTION
When carrying products, use correct lifting gear to prevent injury.
Do not stack the brake resistor boxes higher than the number
recommended.
Ensure that installation position and material can withstand the weight
of the inverter. Install according to the information in the Instruction
Manual.
Do not operate if the brake resistor is damaged or has parts missing.
Do not stand or rest heavy objects on the brake resistor.
Check the brake resistor mounting orientation is correct.
Prevent screws, wire fragments, other conductive bodies, oil or other
flammable substances from entering the brake resistor.
Do not drop the brake resistor, or subject it to impact.
WARNING
Do not modify the equipment.
CAUTION
Provide a safety backup such as an emergency brake which will prevent
the machine and equipment from hazardous conditions if the inverter
and brake unit fail.
CAUTION
Do not carry out a megger (insulation resistance) test on the brake
resistor.
CAUTION
Treat as industrial waste.
Many of the diagrams and drawings in this instruction manual show the
inverter without a cover, or partially open. Never operate the inverter like
this. Always replace the cover and follow this instruction manual when
operating the inverter.

CONTENTS
1. EXTERNAL VIEW ................................................ 1
2. SPECIFICATIONS................................................ 2
3. CIRCUIT CONFIGURATION................................ 2
4. RATING AND BRAKE TORQUE.......................... 3
5. DISCHARGING RESISTOR BURNING
PREVENTION CIRCUIT....................................... 3
6. INTERNAL CIRCUIT DIAGRAM .......................... 4
7. EXTERNAL CONNECTION DIAGRAM................ 5
8. HANDLING INSTRUCTIONS............................... 5
Brake Unit <Type BU-H>
The brake unit is used in applications that require
large brake torque, e.g. when a motor is run by a
400V class transistorized inverter, when the motor is
rotated by a load, or when sudden deceleration is
necessary.

1
TYPE BU-H 400V CLASS BRAKE UNITS
The brake unit is used for application which requires large brake torque for a
motor operated by the inverter, for example, when the motor is rotated by a
load, or when the motor requires sudden deceleration.
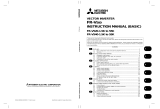
1. EXTERNAL VIEW
Fig. 1 External View
80 (3.15)
7.5 (0.30)
225 (8.86)
240 (9.45)
7.5 (0.30)
TB1
TB2
90 (3.54)
160 (6.30)
RESET
BRAKE
145 (5.71)
1.6 (0.06)
HBHA PC TB HC
NPPR
TB1 TB2
210 (8.27)
15 (0.59)
15 (0.59)
(Unit: mm (inch))
TERMINALS FOR WIRING
2-
66HOLES
80 (3.15)
35
(1.38)
35
(1.38)

2
2. SPECIFICATIONS
Line voltage: Less than 800V DC
Operating voltage: 740V DC ± 3V
Braking torque: 50% 30s
Ambient temperature: -10°C to +50°C (14°F to 122°F)
Painting color: Munsell 5Y 8/1 (50% luster)
Approximate weight: 3.5kg (7.7lbs)
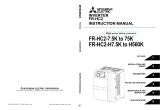
3. CIRCUIT CONFIGURATION
The voltage VD across input
terminals P and N (BN)* is
normally approximately 600V.
However, when the motor is
rotated by load or makes sudden
deceleration, the voltage rises
due to regenerative power.
When VD reaches 740V, the
voltage Vd divided by voltage
divide resistor R1 and R2
becomes higher than the
reference voltage Vc and the
operational amplifier causes the
transistor TR to conduct.
Accordingly, the regenerative
power is consumed through the
discharging resistor R, thereby
causing the motor to generate
large brake torque.
Fig. 2 Brake Unit Circuit
Configuration
VD
R1
R2
Vd
TR
R
Vc
P
Operation
amplifier
LED
N

3
4. RATING AND BRAKE TORQUE
The 400V class brake units BU-H7.5K to 30K are options, which fully
exhibit the regenerative braking performances of inverters, and are
used in combination with the discharging resistors (refer to page 5 ).
The 400V class brake units are available in three types. Although the
rated braking torque is indicated 50% 30s, 100% 30s is also possible
depending on the combination with the motor. Make selection from the
following selection table.
*1: Brake units are connected in parallel.(Reger to Fig.9.)
*2: The 1.5K or lower inverter cannot be used with the brake unit.
Use the 2.2K or higher inverter with the brake unit.
Table 1 Brake Unit Seletion Table
5. DISCHARGING RESISTOR BURNING
PREVENTION CIRCUIT
If the torque higher than the rating is kept generated, the internal
thermal relay of brake unit is tripped. This activates the overvoltage
protection circuit of inverter and the motor comes to a stop after
coasting. If it is desired to fetch the tripping of thermal relay to the
outside of brake unit as an alarm signal, remove the short-circuit
conductors located between the terminals HB and PC and between TB
and HC of TB1, mount a short-circuit conductor between PC and TB,
and then use terminals HA and HC or HB and HC.
When the thermal relay is tripped, the circuit is closed across HA and
HC and opened across HB and HC. In this case, the motor may not
stop, resulting in the overheating of discharging resistors. To prevent
this, therefore, take measures, e.g. turn off the input power of inverter.
When the thermal relay has been tripped, perform reset by use of the
RESET button and also re-set the deceleration time of motor to a longer
value.
Class
Motor
Capacity
kW
(HP)
Braking
Torque
0.4
(0.5)
0.75
(1)
1.5
(2)
2.2
(3)
3.7
(5)
5.5
(7.5)
7.5
(10)
11
(15)
15
(20)
22
(30)
30
(40)
37
(50)
45
(60)
55
(75)
400V
class
50% 30s *2 BU-H7.5K BU-H15K BU-H30K 2 BU-H30K*1
100% 30s *2
BU-H
7.5K
BU-H
15K
BU-H30K
2BU-H
30K*1
3BU-H
30K*1
4
BU-H
30K*1

4
6. INTERNAL CIRCUIT DIAGRAM
Fig. 3 Internal Circuit Diagram
*: Short-circuit conductors are factory-set at the above positions.
WARNING
When the alarm signal is output due to a thermal relay trip, switch
off the inverter’s input power. It can prevent the discharging resistor
from becoming overheat and cause a fire should the brake unit fail
(the transistor be damaged).
HCHBHA TB
P
OCR
PR
OCR
PC
Short circuit conductor
Constant-
voltage
power source
Comparator
N
LED
BRAKE

5
7. EXTERNAL CONNECTION DIAGRAM
Fig. 4 External Connection Diagram
8. HANDLING INSTRUCTIONS
When installing the brake unit, always mount it on a vertical surface in
a vertical direction since mounting it horizontally or on a horizontal
surface will reduce the heat dissipation effect.
(1) Discharging resistors
1)Use the discharging resistors shown in Table 2. When installing the
discharging resistors, select a well-ventilated place. The use of
resistors having resistance and capacity lower than the specified may
result in the failure of brake unit or the overheating of resistors.
Therefore, caution should be exercised.
Since the discharging resistors are separately available, arrange or
prepare them separately.
Table 2 Combinations of Discharging Resistors for Brake Unit
Brake Unit Discharging Resistor Resistor Type
BU-H7.5K 300W, 10Ω, 6pcs. connected in series GRZG200-10Ω
BU-H15K 450W, 5Ω, 8pcs. connected in series GRZG300-5Ω
BU-H30K 600W, 2Ω, 12pcs. connected in series GRZG400-2Ω
NFB
AC400V 50Hz
400/440V 60HZ
R
S
T
U
V
W
10
2
5
ST,
STF, or STR
SD
NP
P
N
PR
OCR
IM
Power
supply
Frequency setter
Start switch
Discharging
resistors
Brake unit
BU-H
Inverter
Motor

6
Unit: mm (inch)
Fig. 5 External View of Discharging Resistor
CAUTION
Use the resistor of the specified resistance value and capacity. Not
doing so can cause the brake unit to fail or the resistor to overheat.
The surface of the discharging resistor is not insulated. Since a high
voltage is applied to its surface, install the discharging resistor at
least 5mm (0.20inches) away.
Because of heat dissipation, provide clearances of at least 60mm
(2.36inches) between the discharging resistors or between the
discharging resistor and panel.
Type W W1 W2 H H1 H2 D D1 d
GRZG200
306
(12.05)
287
(11.30)
266
(10.47)
53
(2.09)
33
(1.30)
22
(0.87)
26
(1.02)
6
(0.24)
5.5
(0.22)
GRZG300
334
(13.15)
309
(12.17)
274
(10.79)
79
(3.11)
47
(1.85)
40
(1.57)
40
(1.57)
9.5
(0.37)
5.5
(0.22)
GRZG400
411
(16.18)
385
(15.16)
350
(13.78)
79
(3.11)
47
(1.85)
40
(1.57)
40
(1.57)
9.5
(0.37)
5.5
(0.22)
D1
D
H2
H
W1
W
H1
W2
d hole
Terminal

7
2)The maximum temperature rise of discharging resistors is
approximately 100°C (212°F). For wiring, therefore, use heat-
resisting wires (such as fiber-glass braided wires) or cover the wires
with silicone tube. Also, perform wiring so that the wires do not make
contact with the resistors.
Also, separate a component, which is low in heat-resisting property,
at least 15cm (5.91inches) to 20cm (7.87inches) from the resistors.
Fig. 6 Installation of discharging resistor
Note: When it is inevitable to place a component, which is low in
heat-resisting property, in the vicinity of the resistors, mount a
temperature sensor to the resistors and change sequence so
that the power of inverter input side is turned off by the
temperature sensor signal.
For the temperature sensor, contact the maker.
(2) Wiring
1)In wiring, use 2mm
2
wires for the BU-H7.5K and 3.5mm
2
wires for the
BU-H15K and H30K.
2)Minimize the wiring distance between the brake unit and inverter and
also the wiring distance between the resistors and brake unit. (2m
(6.56feet) or less)
Discharging
resistor
Cover with
silicone
tube.
IV wire
Heat-resisting
wire
INCORRECT
CORRECT
Note:
Separate a component,
which is low in heat-
resisting property,
15cm (5.90inch) to 20cm
(7.87inch) or more.

8
3)Twist the wires when they are more than 2m (6.56feet). (Even when
the wires are twisted, the wiring distances should be within 5m
(16.40feet).)
4)When the brake units are used in parallel, perform the wiring also in
parallel as shown in Fig.9.
Fig.9 Wiring for Parallel Application
5)When the FR-BEL power factor improving DC reactor (option) is used
(the target inverter should be equipped with the terminals P, P1),
make connections properly as shown below. An incorrect connection
will cause the brake unit to be damaged.
Note: Always connect the terminal P of the brake unit to the terminal
P of the inverter.
Fig. 7 Wiring of Within 2m
(6.56feet)
Fig. 8 Wiring of More than 2m
(6.56feet)
P
P
N
PR
P
Inverter
Brake unit
Within 2m
(6.56feet)
Brake
resisto
r
N
Within 2m
(6.56feet)
Twist
PR
P
P
N
P
N
Inverter
Brake unit
Brake
resistor
Within 5m
(16.40feet)
Within 5m
(16.40feet)
Twist
P
P
N
PR PR
P
N
P
P
N
PR PR
P
N
Brake
unit
Brake
unit
Resistor
Inverter
Resistor
Inverter
Brake
unit
Brake
unit
Resistor
Resistor
INCORRECT
CORRECT
N
N
FR-BEL FR-BEL
P1 P P1 P
PN
P
N
Brake unit
Inverter Inverter
Brake uni
t
NN
CORRECTINCORRECT

9
(3) Discharging resistor burning prevention at the failure of brake unit
If the transistor inside the brake unit is damaged, the burning of
discharging resistors cannot be prevented by the external connection
shown in Fig. 4.
Sequence, which causes the power of input side to be turned off by
the trip signal of thermal relay inside the brake unit, allows the
prevention of abnormal temperature rise and burning of the
discharging resistors if the failure of brake unit occurs (if the transistor
is damaged). Fig. 10 shows the external connection diagram.
Fig. 10 External Connection Diagram in Consideration of Discharging
Resistor Burning Prevention at the Failure of Brake Unit
Power
supply
1
MC
R
S
T
U
V
W
IM
HCHBHA TB
P
PR
OCR
N
PC
P
N
ON
OFF
MC
T (400/200V)
MC
Motor
Brake resistor
Constant-
Voltage
power
source
Use the inverter's start signal (STF,
STR, ST) to start or stop the inverter.
Do not turn the MC on-off to start or
stop the inverter.
1:
2:
The contact rating of OCR is 5A for
110V AC, 2A for 220V AC (AC11
class), 0.5A for 110V DC, and 0.25A
for 220V DC (DC11 class).
Inverter
2
OCR
2

REVISIONS
*The manual number is given on the bottom left of the back cover.
Print Date *Manual Number Revision
Sep., 1985 IB(NA)-66036-A First edition
Mar., 2001 IB(NA)-66036-B
Safety precautions
Instructions for installation of discharging
resistors
Addition
Partial addition
/