Neff EC617501E Owner's manual

Category
Hobs
Type
Owner's manual
Siemens - Electrogeräte GmbH
Operating instructions
Mode d’emploi
Manual de utilizaçao
Instrucciones de funcionamiento
Gebrauchssanweisung
Gebruiksanwijzing
Kullanma ve Montaj Kilavuzu
81739 München
ß
e 34
Carl-Wery-Stra
Cod. 3422100
840
D
www.siemens-home.com
Avverenze per l’uso
en
de
fr
it
es
pt
nl
tr
Dear Customer,
We thank you and congratulate you on your choice.
This practical appliance, which is modern and functional, has been
manufactured from top-quality materials which have been subjected
to a strict quality control during the entire manufacturing process, and
have been carefully tested so that they will meet all your cooking needs.
In addition, we are pleased to supply you with this instruction book
which is divided into two sections: one on how to use the appliance,
and the other on its installation. We strongly advise to read through
and follow these simple instructions, so as to ensure that you get
perfect results from the moment you first use this appliance.This book
contains important information, not only on how to use the appliance,
but also on maintenance and safety.
When our products are being transported, they must be provided with
suitable protective packaging.However, we have reduced our packaging
to the bare essentials, and it is all completely recyclable.You too can
contribute to the conservation of the environment by depositing the
packaging in the nearest recycling container to your home.Used oil
should not be poured down the sink, as this causes serious damage
to the environment.Pour it into a sealable container and take it to a
recycling point, or simply put in your rubbish bin. It will then finish up
in a controlled landfill site, which though it is not the best solution, it
does prevent water pollution. Your children and you yourself will
appreciate this.Before you get rid of an old appliance, make sure you
render it useless, and then take it to a collecting centre for recyclable
materials.Ask your local authorities for details on the nearest centre to
your home.
1
   
/1"$, 5)& "11-*"/$& "/% %*4104& 0' 5)& 1"$,"(*/(
*/ "/ &/7*30/.&/5"--:H3&410/4*#-& ."//&3
)*4 "11-*"/$& *4 -"#&--&% */ "$$03%"/$& 8*5) 5)&
6301&"/ *3&$5*7&  $0/$&3/*/( 64&%
&-&$53*$"- "/% &-&$530/*$ "11-*"/$&4 8"45& &-&$53*$"-
"/% &-&$530/*$ &26*1.&/5 !
)& (6*%&-*/& %&5&3.*/&4 5)& '3".&803, '03 5)& 3&563/
"/% 3&$:$-*/( 0' 64&% "11-*"/$&4 "4 "11-*$"#-&
  

 
If th e sym bol appears on the specifications plate, follow the se instructions:
CONTENTS
Safety warnings 3
Get to know your cooking hob 5
Gas burners 6
Recommended diameters of receptacles 7
Notes on cooking 8
Electric hot plates 8
Electric hot plates with 10-setting adjuster 9
Tips on how to use this appliance 10
Cooking suggestions 10
Cleaning and care 11
Home troubleshooting 12
Warranty conditions 12
2
Safety warnings
Read this user's manual carefully, to ensure that you
use this appliance as effectively and safely as possible.
In accordance with current regulations, installation of the
appliance and changing of gas type may only be carried
out by an officially authorised technician.
Before installing your new cooking hob, check that the
measurements are correct.
This appliance should not be connected to an evacuation
device for combustion products.
The following instructions are only valid in countries
whose symbol appears on the appliance. To adapt the
appliance to the conditions of use, always follow the
technical instructions for your country.
It is of the utmost importance that the place in which the
appliance is to be installed should have suitable, fully-
functioning ventilation (Basic Rules for Gas Installations
in Inhabited Buildings). BOE no. 281, 24/11/93).
Make sure that the appliance is not subjected to strong
draughts, as they might blow out the burners.
This appliance left the factory adjusted for use with the
type of gas that is indicated on the specifications plate.
If any change needs to be made, call our technical
assistance service.
Do not make any adjustments to the interior of the
appliance. If this should be necessary, call our technical
assistance service.
Make sure you keep these instructions for use and
assembly, so that you can hand them on with the
appliance if it ever changes owner.
Never use a malfunctioning appliance.
As the appliance's heating and cooking surfaces get
very hot during operation, always use with care.
Always keep children away from the appliance.
Only use this appliance for cooking, and never as a form
of heating.
3
Very hot fat or oil can easily catch fire,and so if you are
cooking with fat or oil (for example, frying chips), keep
an eye on the pan.
DANGER If a pan containing fat or oil catches fire, do
not pour water onto it, as this may cause burns. Cover
the pan with a damp cloth to extinguish the fire and
disconnect the cooking appliance.
In the event of a malfunction, turn off the appliance’s
gas and electricity supply, before calling our technical
assistance service.
Never place unstable pans or containers on the cooking
hob or the burners, as they may accidentally tip over.
If a gas tap gets stuck, do not force it. Call our official
technical services department, and a technician will
come to repair or replace it.
While using your gas hob, prevent any draughts and do
glass to break.
4
hotplate, as there is risk of electrocution.
This appliance is not intended for use by persons
Do not use steam clearing machines to clean the
(including children) with reduced physical, sensory or
not spill any cold liquids on it, as this may cause the
knowledge, unless they have been given supervision or
instruction concerning use of the appliance by a person
responsible for their safety.
mental capabilities, or lack of experience and
The diagrams contained in this instruction book are for
orientation purposes only.
IF THESE INSTRUCTIONS ARE NOT FOLLOWED,
THE MANUFACTURER ACCEPTS NO
RESPONSIBILITY.
Never leave the appliance unattended during operation.
Get to know your cooking hob:
5
Pan support
Burner
Double-flame
burner B
Control knob
Pan support
Burner
Control knob
Electric plate
Pan support
Burner
Control knob
Pan support
Burner
Control knob
Double-flame
burner C
Burner
Control knob
Pan support
Double-flame
burner D
Pan support
Burner
burner A
Pan support
Burner
Double-flame
The gas burners
Each control knob on the oven and on the control panel is
clearly marked to show which burner it controls Fig. 1.
To light one of the burners, press in the control knob of
the respective burner and turn it to the left, as far as the
maximum symbol, and hold it there for a couple of seconds
until the burner lights. Now release the knob and turn it to
the desired heating setting. If the burner does not light,
repeat the process.
If your cooking hob is not fitted with this automatic lighting
feature, use a lighter or a match to light the burner. If the
ignition sparkers are dirty, this makes the burner harder to
light, so you should keep them as clean as possible. Clean
them using a small brush, and remember that the ignition
sparkers must be treated very gently. If the burners on your
cooking hob are fitted with safety valves (which stop the
flow of gas if one of the burners accidentally goes out), light
the burners in the same way, though you should continue
to hold in the control knob for a few seconds after the flame
lights. If the burner does not light, repeat the process, this
time keeping the control knob pressed in for 10 seconds.
To turn off the burner, turn the control knob to the right,
to setting 0. When you do this, the ignition system will be
activated once more: do not worry, this is completely
normal.
With the modern and functional cooking hob you have
purchased, you can have progressive taps fitted which
allow you to adjust the flame to the desired heat.
Depending on the model, your cooking hob may have a
If your hob is equipped with a double flame burner type B,
C or D, it will have taps that will allow you to control the
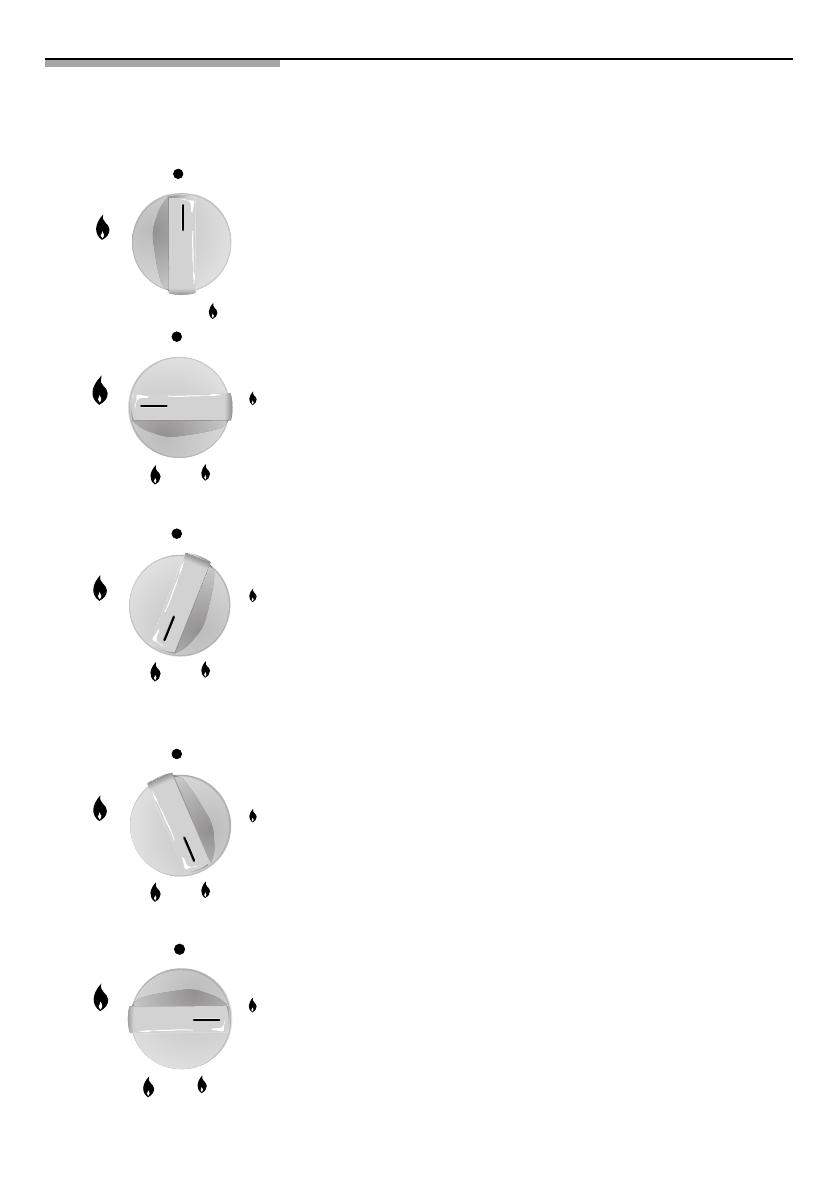
interior and exterior flame individually. Operating description
Fig. 2
When you are using this gas appliance, it will make the
kitchen hot and humid, and therefore you must ensure that
the kitchen is well ventilated. Either keep the natural
ventilation apertures open, or install an extractor hood. If
you use your appliance for a long period of time, you may
need extra ventilation - either open a window (though watch
out for draughts) or turn up the power on the extractor hood,
if possible.
6
The interior crown burns at
minimum power.
The interior crown burns at
maximum power.
The exterior crown burns at
minimum power; the interior crown
burns at maximum power.
Fig. 2.
Each crown (exterior and interior)
burn at maximum power.
Fig. 1.
double-flame burner, which is very practical if
you wish
to cook with receptacles such as paella pans or
Chinese
woks (to create all kinds of Asian dishes).
Recommended diameter of receptacles
(in cm)
Depending on the model:
Depending on which model you have purchased, your
cooking hob may include a very useful extra cradle
receptacles with diameters of over 26 cm, barbecue
griddles, earthenware cooking pots and all kinds of
concave receptacles (Chinese woks, etc.) Fig. 2.
Pan support for coffee pot: Depending on the model,
your cooking hob may include an additional coffee pot
support, which is exclusively for use on the auxiliary
burner with receptacles of a diameter smaller than
10 cm.
The manufacturer declines all responsibility if these
additional pan supports are not used or are used
incorrectly.
Additional
pan supports:
7
Fig. 2.
22 cm
> 22 cm
BURNER
MINIMUM Ø OF RECEPTACLE MAXIMUM Ø OF RECEPTACLE
Quick burner:
Medium fast:
Auxiliary burner:
Double flamme B:
2,80 kW
Double flamme C:
3,80 kW
Double flamme D:
4,25 kW
Electric hot plates:
16 cm
22 cm
22 cm
14 cm
12 cm
18 cm
28 cm
22 cm
28 cm
26 cm
20 cm
14 cm
Double flamme A:
3,80 kW
support for use on the double-flame burner for
An orange-coloured flame is normal and it is
produced in the presence of dust in the atmosphere,
spillages, etc.
Notes on
cooking:
Here are some cooking guidelines:
Electric hot plates
When you begin cooking, we recommend turning the
control up to the maximum setting and then, depending
on the quantity and quality of the foods being cooked,
turn down the heat to medium setting. As the hotplate
takes a while to cool down, you can turn it off a little
before the food is cooked, so as to save energy, and
carry on cooking using the residual heat in the hot plate.
Always use receptacles which have perfectly flat,
thick bottoms, and which have a diameter similar to that
of the heating element - and never use receptacles
smaller than the element.
Try not to spill liquids on the hotplate surface, or to place
wet receptacles on top of it.
8
Very high High Medium Low
Quick
Medium fast
Auxiliary
Boiling, grilling, browning,
paellas and Asian food (woks).
Reheating and keeping things hot:
cooked and pre-cooked dishes.
Scallops, steaks, omelettes,
frying.
Rice, white
sauce and
ragout.
Steaming: fish
and vegetables.
Steaming potatoes, fresh
vegetables, stews and pasta.
Reheating, keeping things hot
and making tasty casseroles.
Cooking: casseroles, rice
pudding and caramels.
Defrosting and
slow cooking:
vegetables,
fruits and frozen
products.
Melting: butter,
chocolate and
jelly.
Double-
-flame:
Electric hot plates with 10-setting knob
These hot plates are controlled by an energy control
knob with which you can choose the heat that is suitable
for the food you are cooking (Fig. 3).
By consulting the following table of cooking methods
and considering the amount of food being cooked, turn
the control knob to the left, to the correct setting for the
dish you want to cook. The "on" control indicator light
will come on.
To switch off the hotplate, turn the control knob to the
setting 0. The heat indicator light will switch off once the
electric hot plate surface has cooled down.
Suggestions
SETTING
Melting: butter, chocolate and jelly 1-2
Cooking: rice, white sauce, ragout 2-3
Cooking: potatoes, pasta, vegetables 4-5
Light frying: stews, barbecued roulées 4-5
Steaming: fish 5
Heating: keeping pre-cooked dishes hot 2-3-4-5
Griddle: scallops, steaks, omelettes 6-7-8
Cooking and browning 9
Cooking with large amounts of liquid.
Cooking large dishes.
Cooking receptacles without lids on.
9
Fig. 3.
cases:
1
2
3
4
5
6
7
8
9
You will need to
cook on a
higher setting in
the following
Warnings and suggestions for
cooking
DO NOT DO
10
Always use receptacles that
are suitable for each burner,
so as to avoid wasting gas
and discolouring the
receptacles.
Always place the lid on the
receptacles.
Place the receptacle on
top of the pan support.
Make sure that the pan
supports and burner
covers are in their correct
positions before using the
appliance.
Handle receptacles with
care when they are on
the cooking hob.
Do not use small
receptacles on large
burners. The flame
should never come up
the sides of the
receptacle.
Never cook without a lid or
with the lid half off - you are
wasting energy.
Do not use receptacles with
uneven bottoms, as they make
the food take longer to cook
and waste energy.
Do not place a receptacle on
one side of a burner, as it
could tip over.
Do not use large-diameter
receptacles on the burners
nearest to the control knobs,
as the flames might reach
them, making them so hot
that they could cause injury.
Never place receptacles
directly on top of the burners.
Do not use excessive weight,
or strike the cooking hob with
heavy objects.
Never use two burners or heat
sources to heat one single
receptacle.
Avoid using griddles and
earthenware pots etc. at
maximum heat for a long time.
Only use one receptacle
per burner.
Use the additional cradle
Only use pots, saucepans
and frying pans with thick,
flat bottoms.
Always place the
receptacle right over the
burner, not to one side.
-flame burner.
support on the
double
Warnings and suggestions for using
glass: cleaning and care
Remove any boiled over food immediately usin the glass scraper. This applies in particular to
melted foodstuffs, sugas, and foodstuffs with high sugar contents.
After washing the pan supports, dry them completely before cooking with them again. Drops
of water or damp patches on the surfaces when you begin cooking may cause deterioration of
the enamel.
When you are cleaning the pan supports, take care with the rubber rests, as they could come
off and the pan support could scratch the glass or the profile next time you use it.
Clean the surface of the
heating element once it
has cooled down, and
every time you use it.
Even small patches of food
or dirt will burn when you
switch the plate on again.
To keep the burners and
pan supports clean, you
must clean them
periodically by placing
them in soapy weather and
brushing and with a non-
metallic brush to ensure
that the holes and grooves
are perfectly clean, and
can provide a perfect
flame. Always dry the
burner covers and the pan
supports if they have
become wet.
Always use a special flat
scraper for glass, taking
special care not to scrape
near the trim of the gas
burners. For cleaning this
surface we recommend
the product "Vitro Clen".
The fact that this product
contains a high percentage
of silicon produces a film
on the surface, which
makes it much easier to
remove. We recommend
taking regular care of this
appliance.
After cleaning and drying
the burners, make sure the
burner covers are correctly
placed on the burner's
flame diffuser.
DO NOT DO
Never use detergent powder,
oven-cleaning sprays or
abrasive sponges, as they
may scratch the glass.
Never slide receptacles
across the glass surface,
as you may scratch it. In
addition, try not to drop
heavy or sharp objects on
the glass.
Never strike any part of the
cooking hob.
Grains of sand that may
come from cleaning fruits
and vegetables will scratch
the glass surface.
Never use sharp objects
such as metal scourers or
knives to remove the
hardened remains of food
from the surface.
Never use a knife, scraper
or similar to clean the area
where the glass meets the
trim of the burners or the
metal trim edging.
11
Home troubleshooting
You do not always need to call the technical assistance service. Very often,
you can solve the problem on your own. The following table contains a few
pieces of advice.
Important note:
Only personnel authorised by our Technical Services Department should
carry out work on the functional gas and electrical system.
Warranty conditions
The warranty conditions which apply to this appliance are those
that have been established by the suppliers representing our
company in the country where the appliance was purchased. If
necessary, the salesperson who sold you the appliance will be
happy to provide details on same. However, the warranty is only
valid if it is submitted together with the purchase document.
We reserve the right to make any changes.
12
In the event that you do call our Technical Services Department, please supply the following code:
E - NR FD
This code can be found on the specifications plate of your appliance,located on the underside of your
cooking hob.
... if the general electrical
system is malfunctioning?
-Defective fuse. -Check the fuse in the main
fuse box and change it if
necessary.
-The automatic fuse may have
fused or the trip switch has
tripped.
-Check the main fuse box to
see whether the automatic
trip switch or a differential
switch has tripped.
... if the electrical sparker does
not work?
-There may be food or cleaning
residue between the sparker
and the burners.
-The burners are wet. -Dry the burner covers and
sparkers carefully.
-Make sure that the burner
covers are correctly
located.
-The burner covers are not
located correctly.
... if the flames on the burners
are not uniform?
-The different parts of the
burner have been located
incorrectly.
-The grooves on the burners'
gas outlets are dirty.
-Place the different pieces
correctly.
-Clean the grooves on the
burners' gas outlets.
... if the gas flow does not seem
normal, or no gas comes out?
-The gas stop cock is turned
off.
-If the gas is coming from a
gas bottle, it may be empty.
-Turn on all stop cocks.
-Replace the gas bottle with
a full one.
... if there is a smell of gas in
the kitchen area?
-A gas tap has been left on.
-There may be a leak at the
connection between the pipe
and the gas bottle.
-Check to see if any gas
taps are on.
-Make sure that the
connection is airtight.
What has gone wrong?
Probable cause Solution
-Carefully clean the spaces
between the sparker and the
burners.
... if the safety valves on the
different burners do not work?
-The control knob has not been
pressed in for long enough.
-The grooves on the burners'
gas outlets are dirty.
-Light the burner, and then
keep the control knob
pressed in a few seconds
longer.
-Clean the grooves on the
burners' gas outlets.
E-Nr
FD
Type
HSE-6FL3W30
99BO806
M(g/h)
G-30
G-31
628
617
V(m3/h)
G-20 0,825
P
ES
PT
DE
IT
GB
FR/BE
DK/FI/SE
BE/FR
CZ/SK
IT/PT
LUES/GB/GR/IE
Cat.
P(mbar)
Cat.
P(mbar)
II
2E+3+
II
2H3B/P
20/25-28-30/37
II
2H3+
II
2H3+
I
2E
20-28/37
20-30/37
20
8,65 kW (Hs)
GQn
0,6 W
230 V~ 50 Hz
0099
AT DE
II
2ELL3B/P
20-50
I
2H
20
20-50
II
2H3B/P
20-50
E-Nr
FD
Type
HSE-6FL4030
M(g/h)
G-30
G-31
559
550
V(m3/h)
G-20 0,734
P
ES
PT
DE
IT
GB
FR/BE
DK/FI/SE/CZ/SK
BE/FR
IT/PT
LU
CH/ES/GB/GR/IE
Cat.
P(mbar)
Cat.
P(mbar)
II
2E+3+
II
2H3B/P
20/25-28-30/37
II
2H3+
II
2H3+
I
2E
20-28/37
20-30/37
20
7,70 kW (Hs)
GQn
0,6 W
230 V~ 50 Hz
0099
AT DE
II
2ELL3B/P
20-5020-50
II
2H3B/P
20-30
99BO806
E-Nr
FD
Type
HSE-6FL3R30
99BO806
M(g/h)
G-30
G-31
421
414
V(m3/h)
G-20 0,553
P
ES
PT
DE
IT
GB
FR/BE
DK/FI/SE
BE/FR
CZ/SK
IT/PT
LUES/GB/GR/IE
Cat.
P(mbar)
Cat.
P(mbar)
II
2E+3+
II
2H3B/P
20/25-28-30/37
II
2H3+
II
2H3+
I
2E
20-28/37
20-30/37
20
5,80 kW (Hs)
GQn
1700 W
230 V~ 50 Hz
0099
AT DE
II
2ELL3B/P
20-50
I
2H
20
20-50
II
2H3B/P
20-50
E-Nr
FD
Type
HSE-6PL3W30
99BO806
M(g/h)
G-30
G-31
631
621
V(m3/h)
G-20 0,829
P
ES
PT
DE
IT
GB
FR/BE
DK/FI/SE
BE/FR
CZ/SK
IT/PT
LUES/GB/GR/IE
Cat.
P(mbar)
Cat.
P(mbar)
II
2E+3+
II
2H3B/P
20/25-28-30/37
II
2H3+
II
2H3+
I
2E
20-28/37
20-30/37
20
8,70 kW (Hs)
GQn
0,6 W
230 V~ 50 Hz
0099
AT DE
II
2ELL3B/P
20-50
I
2H
20
20-50
II
2H3B/P
20-50
E-Nr
FD
Type
HSE-6PL4030
99BO806
M(g/h)
G-30
G-31
559
550
V(m3/h)
G-20 0,734
P
ES
PT
DE
IT
GB
FR/BE
DK/FI/SE
BE/FR
CZ/SK
IT/PT
LUES/GB/GR/IE
Cat.
P(mbar)
Cat.
P(mbar)
II
2E+3+
II
2H3B/P
20/25-28-30/37
II
2H3+
II
2H3+
I
2E
20-28/37
20-30/37
20
7,70 kW (Hs)
GQn
0,6 W
230 V~ 50 Hz
0099
AT DE
II
2ELL3B/P
20-50
I
2H
20
20-50
II
2H3B/P
20-50
E-Nr
FD
Type
HSE-7FL3W30
99BO806
M(g/h)
G-30
G-31
697
685
V(m3/h)
G-20 0,915
P
ES
PT
DE
IT
GB
FR/BE
DK/FI/SE
BE/FR
CZ/SK
IT/PT
LUES/GB/GR/IE
Cat.
P(mbar)
Cat.
P(mbar)
II
2E+3+
II
2H3B/P
20/25-28-30/37
II
2H3+
II
2H3+
I
2E
20-28/37
20-30/37
20
9,60 kW (Hs)
GQn
0,6 W
230 V~ 50 Hz
0099
AT DE
II
2ELL3B/P
20-50
I
2H
20
20-50
II
2H3B/P
20-50
E-Nr
FD
Type
HSE-7FL4W30
99BO806
M(g/h)
G-30
G-31
867
853
V(m3/h)
G-20 1,139
P
ES
PT
DE
IT
GB
FR/BE
DK/FI/SE
BE/FR
CZ/SK
IT/PT
LUES/GB/GR/IE
Cat.
P(mbar)
Cat.
P(mbar)
II
2E+3+
II
2H3B/P
20/25-28-30/37
II
2H3+
II
2H3+
I
2E
20-28/37
20-30/37
20
11,95 kW (Hs)
GQn
0,6 W
230 V~ 50 Hz
0099
AT DE
II
2ELL3B/P
20-50
I
2H
20
20-50
II
2H3B/P
20-50
  • Page 1 1
  • Page 2 2
  • Page 3 3
  • Page 4 4
  • Page 5 5
  • Page 6 6
  • Page 7 7
  • Page 8 8
  • Page 9 9
  • Page 10 10
  • Page 11 11
  • Page 12 12
  • Page 13 13
  • Page 14 14
  • Page 15 15
  • Page 16 16
  • Page 17 17
  • Page 18 18
  • Page 19 19
  • Page 20 20
  • Page 21 21
  • Page 22 22
  • Page 23 23
  • Page 24 24
  • Page 25 25
  • Page 26 26
  • Page 27 27
  • Page 28 28
  • Page 29 29
  • Page 30 30
  • Page 31 31
  • Page 32 32
  • Page 33 33
  • Page 34 34
  • Page 35 35
  • Page 36 36
  • Page 37 37
  • Page 38 38
  • Page 39 39
  • Page 40 40
  • Page 41 41
  • Page 42 42
  • Page 43 43
  • Page 44 44
  • Page 45 45
  • Page 46 46
  • Page 47 47
  • Page 48 48
  • Page 49 49
  • Page 50 50
  • Page 51 51
  • Page 52 52
  • Page 53 53
  • Page 54 54
  • Page 55 55
  • Page 56 56
  • Page 57 57
  • Page 58 58
  • Page 59 59
  • Page 60 60
  • Page 61 61
  • Page 62 62
  • Page 63 63
  • Page 64 64
  • Page 65 65
  • Page 66 66
  • Page 67 67
  • Page 68 68
  • Page 69 69
  • Page 70 70
  • Page 71 71
  • Page 72 72
  • Page 73 73
  • Page 74 74
  • Page 75 75
  • Page 76 76
  • Page 77 77
  • Page 78 78
  • Page 79 79
  • Page 80 80
  • Page 81 81
  • Page 82 82
  • Page 83 83
  • Page 84 84
  • Page 85 85
  • Page 86 86
  • Page 87 87
  • Page 88 88
  • Page 89 89
  • Page 90 90
  • Page 91 91
  • Page 92 92
  • Page 93 93
  • Page 94 94
  • Page 95 95
  • Page 96 96
  • Page 97 97
  • Page 98 98
  • Page 99 99
  • Page 100 100

Neff EC617501E Owner's manual

Category
Hobs
Type
Owner's manual

Ask a question and I''ll find the answer in the document

Finding information in a document is now easier with AI