Nespresso Lattissima Touch User manual
- Category
- Coffee makers
- Type
- User manual
Page is loading ...
Page is loading ...
Page is loading ...

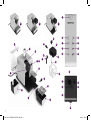
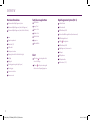
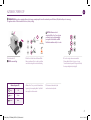
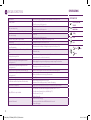
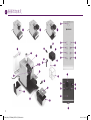
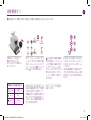
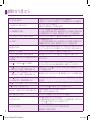
OVERVIEW
Tactile beverage buttons
13
ONOFF button
15
Lungo 110 ml
16
Espresso 40 ml
17
Ristretto 25 ml
19
Latte Macchiato
20
Cappuccino
21
Warm milk froth
Rapid Cappuccino System (R.C.S.)
22
Lid detach button
23
Milk container Lid
24
Milk froth density: MIN
25
Position for milk froth regulator knob (insertionremoval)
26
Milk froth regulator knob
27
CLEAN
: Rinsing button
28
Milk froth density: MAX
29
Rapid Cappuccino System connector
30
Milk spout
31
Milk Spout Lever
32
Milk aspiration tube
33
Milk container (0.35 l)
Overview of machine
A
Machine without Rapid Cappuccino System
B
Machine with Rapid Cappuccino System (for Cappuccino)
C
Machine with Rapid Cappuccino System (for Latte Macchiato)
1
Lever
2
Capsule compartment
3
Water tank (0.9 l)
4
Coee outlet
5
Used capsule container
6
Drip tray (push inside for Latte Macchiato glass)
7
Left grid
8
Right grid
9
Descaling pipe storage door (pull to open)
10
Descaling pipe
11
Steam connector door
12
Steam connector
Alert
14
«Descaling» : descaling alert refer to
section «Descaling»
18
«Clean»
: milk system cleaning alert
refer to section «Preparing Cappuccino»
4
7484_UM_LATTISSIMA_RESTYLE_Z3D.indb 4 19.03.15 09:54
Page is loading ...

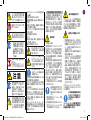
SAFETY
PRECAUTIONS
CAUTION: the safety
precautions are part of
the appliance. Read them
carefully before using your
new appliance for the rst
time. Keep them in a place
where you can nd and
refer to them later on.
CAUTION: when you see
this sign, please refer to the
safety precautions to avoid
possible harm and damage.
INFORMATION: when you
see this sign, please take
note of the advice for the
correct and safe usage of
your appliance.
• The appliance is intended to
prepare beverages according to
these instructions.
• Do not use the appliance for other
than its intended use.
• This appliance has been designed
for indoor and non-extreme
temperature conditions use only.
• Protect the appliance from direct
sunlight eect, prolonged water
splash and humidity.
• This appliance is intended to be
used in households and similar
applications only such as: sta
kitchen areas in shops, oces
and other working environments,
farm houses; by clients in hotels,
motels and other residential
environments; bed and breakfast
type environments.
• This appliance may be used by
children of at least 8 years of age,
as long as they are supervised
and have been given instructions
about using the appliance safely
and are fully aware of the dangers
involved. Cleaning and user
maintenance shall not be made
by children unless they are older
than 8 and they are supervised by
an adult.
• Keep the appliance and its cord
out of reach of children under
8 years of age.
• This appliance may be used by
persons with reduced physical,
sensory or mental capabilities, or
whose experience or knowledge
is not sucient, provided they
are supervised or have received
instruction to use the device
safely and understand the
dangers.
• Children should not use the
device as a toy.
• The manufacturer accepts no
responsibility and the warranty
will not apply for any commercial
use, inappropriate handling or
use of the appliance, any damage
resulting from use for other
purposes, faulty operation, non-
professionals’ repair or failure to
comply with the instructions.
Avoid risk of fatal electric
shock and re
• In case of an emergency:
immediately remove the plug
from the power socket.
• Only plug the appliance into
suitable, easily accessible, earthed
mains connections. Make sure
that the voltage of the power
source is the same as that
specied on the rating plate. The
use of an incorrect connection
voids the warranty.
The appliance must only be
connected after installation
• Do not pull the cord over sharp
edges, clamp it or allow it to hang
down.
• Keep the cord away from heat
and damp.
• If the supply cord is damaged,
it must be replaced by the
manufacturer, its service agent
or similarly qualied persons, in
order to avoid all risks.
• If the cord is damaged, do not
operate the appliance.
• Return the appliance to the
Nespresso Club or to a Nespresso
authorized representative.
• If an extension cord is required,
EN
6
7484_UM_LATTISSIMA_RESTYLE_Z3D.indb 6 19.03.15 09:54

use only an earthed cord with
a conductor cross-section of at
least 1.5 mm
2
or matching input
power.
• To avoid hazardous damage,
never place the appliance on
or beside hot surfaces such as
radiators, stoves, ovens, gas
burners, open ame, or similar.
• Always place it on a horizontal,
stable and even surface.
The surface must be resistant to
heat and uids, like water, coee,
descaler or similar.
• Disconnect the appliance from
the mains when not in use for
a long period. Disconnect by
pulling out the plug and not by
pulling the cord itself or the cord
may become damaged.
• Before cleaning and servicing,
remove the plug from the mains
socket and let the appliance cool
down.
• Never touch the cord with wet
hands.
• Never immerse the appliance or
part of it in water or other liquid.
• Never put the appliance or part
of it in a dishwasher, except
the Rapid Cappuccino System
(R.C.S.).
• Electricity and water together is
dangerous and can lead to fatal
electrical shocks.
• Do not open the appliance.
Hazardous voltage inside!
• Do not put anything into any
openings. Doing so may cause
re or electrical shock!
Avoid possible harm when
operating the appliance
• Never leave the appliance
unattended during operation.
• Do not use the appliance if it
is damaged or not operating
perfectly. Immediately remove
the plug from the power
socket. Contact the Nespresso
Club or Nespresso authorized
representative for examination,
repair or adjustment.
• A damaged appliance can cause
electrical shocks, burns and re.
• Always completely close the lever
and never lift it during operation.
Scalding may occur.
• Do not put ngers under coee
outlet, risk of scalding.
• Do not put ngers into capsule
compartment or the capsule
shaft. Danger of injury!
• Do not touch surfaces that
become hot during and after
operation and descaling:
descaling pipe and milk spout.
Use handles or knobs.
• If coee volumes higher than
150 ml are programmed: let the
machine cool down for 5 minutes
before making the next coee.
Risk of overheating!
• Water could ow around a
capsule when not perforated
by the blades and damage the
appliance.
• Never use a damaged or
deformed capsule. If a capsule
is blocked in the capsule
compartment, turn the machine
o and unplug it before any
operation. Call the Nespresso
Club or Nespresso authorized
representative.
• Fill the water tank only with fresh
and potable water.
• Empty water tank if the appliance
will not be used for an extended
time (holidays, etc.).
• Replace water in water tank when
the appliance is not operated for
a weekend or a similar period of
time.
• Do not use the appliance without
the drip tray and drip grid to avoid
spilling any liquid on surrounding
surfaces.
• Do not use any strong cleaning
agent or solvent cleaner. Use a
damp cloth and mild cleaning
agent to clean the surface of the
appliance.
• To clean machine, use only clean
cleaning tools.
• When unpacking the machine,
remove the plastic lm and
dispose.
• This appliance is designed
for Nespresso coee capsules
available exclusively through the
Nespresso Club or your Nespresso
EN
7
7484_UM_LATTISSIMA_RESTYLE_Z3D.indb 7 19.03.15 09:54

authorized representative.
• All Nespresso appliances pass
stringent controls. Reliability tests
under practical conditions are
performed randomly on selected
units. This can show traces of any
previous use.
• Nespresso reserves the right to
change instructions without prior
notice.
Descaling
• Nespresso descaling agent, when
used correctly, helps ensure
the proper functioning of your
machine over its lifetime and
that your coee experience is as
perfect as the rst day. For the
correct amount and procedure
to follow, consult the user
manual included in the Nespresso
descaling kit.
CAUTION: the descaling
solution can be harmful. Avoid
contact with eyes, skin and
surfaces. Never use any product
other than the Nespresso descaling
kit available at the Nespresso Club
to avoid damage to your machine.
For any additional questions you
may have regarding descaling,
please contact your Nespresso Club.
SAVE THESE
INSTRUCTIONS
Pass them on to any
subsequent user.
This instruction manual is
also available as a PDF at
nespresso.com
EN
8
7484_UM_LATTISSIMA_RESTYLE_Z3D.indb 8 19.03.15 09:54

4°
4°
1
2
3
4
EN
PTIT HU
FR
CZESDE
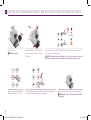
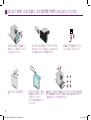
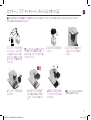
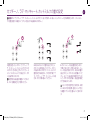
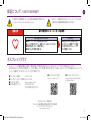
Special care for your rapid
cappuccino SyStem (r.c.S.)
important
:
refer
to User manual for
complete instructions.
1- For a perfect milk froth, use skimmed
or semi-skimmed milk at refrigerator
temperature (about 4° C).
2- Rinse after each milk based preparation.
Place a recipient under milk outlet, press
and hold the «CLEAN»
button until
machine stops pumping automatically
(approx. 15 sec.).
Machine starts rinsing, stops automatically
( ~15sec .) .
3- Place the milk container in the fridge
immediately.
4- Every two days, disassemble the
Rapid Cappuccino System and clean
all components in the upper level of a
dishwasher.
You can refer to the online
assistance video
EN
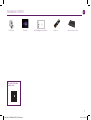
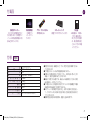
Coee machine «Welcome to Nespresso folder»User manual Capsules set
PACKAGING CONTENT
Care of Rapid Cappucino System leaet
9
7484_UM_LATTISSIMA_RESTYLE_Z3D.indb 9 19.03.15 09:54

EN
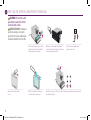
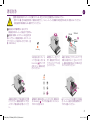
FIRST USE OR AFTER A LONG PERIOD OF NONUSE
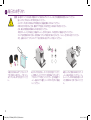
CAUTION: rst read the safety
precautions to avoid risks of fatal
electrical shock and re.
AVERTISSEMENT: commencez
par lire les consignes de sécurité
pour éviter les risques de décharges
électriques mortelles et d‘incendie.
1. When unpacking the machine, remove the
plastic lm and dispose from both left grid
and right grid, and machine panels.
6. Switch the machine on. For the rst 2 seconds, the automatic power o and water hardness setting are
indicated with steady light.
3. Put the machine in upright position,
plug machine into mains.
2. Remove the water tank, drip tray, and capsule
container. Adjust the cable length and store the excess
in the cable guide under the machine.
4. The water tank can be carried by
its cover.
5. Rinse the water tank before lling with
potable water up to maximum level.
10
7484_UM_LATTISSIMA_RESTYLE_Z3D.indb 10 19.03.15 09:54

25 sec.
x3
EN
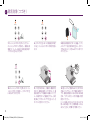
FIRST USE OR AFTER A LONG PERIOD OF NONUSE
8. Disassemble the Rapid Cappuccino System (R.C.S.) and clean all 6 components in the upper level of
your dishwasher. In case a dishwasher is not available, refer to section Hand washing of Rapid Cappuccino
System (R.C.S.).
INFORMATION: refer to section Assembling/Disassembling of Rapid Cappuccino System,
on page 12.
7. Rinsing: place a container under coee outlet and press the lungo button. Repeat three times.
INFORMATION: machines are fully tested after being produced. Some traces of coee
powder could be found in rinsing water.
Descaling
Clean
Descaling
Clean
Automatic power o, refer
to page 25
- Lungo for 8 h
- Espresso for 30 min
- Ristretto 9 min
How to read automatic power o and water hardness settings:
Water hardness settings, refer to
page 23
- Latte Macchiato: level 0/
- Cappuccino: level 1
- Warm milk froth: level 2
- Warm milk froth + Latte Macchiato: level 3
- Warm milk froth + Cappuccino: level 4
After the rst 2 seconds, the
machine heats up for approximately
25 seconds (blinking lights).
Machine ready is indicated by steady
lights.
11
7484_UM_LATTISSIMA_RESTYLE_Z3D.indb 11 19.03.15 09:54

110 ml
40 ml
25 ml
EN
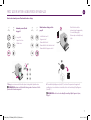
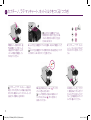
COFFEE PREPARATION
ASSEMBLING/DISASSEMBLING OF RAPID CAPPUCCINO SYSTEM R.C.S./
1. Lift the lever completely and insert the
capsule.
2. Close the lever and place a cup under the
coee outlet.
3. Press the Ristretto (25 ml), the Espresso (40 ml) or the Lungo (110 ml)
button. Preparation will stop automatically. To stop the coee ow or top
up your coee, press again.
4. Take the cup. Lift and close the lever
to eject the capsule into the used capsule
container.
1. Remove the milk container lid and unplug
milk aspiration tube.
4. Remove the milk spout by pulling it o.2. Remove the milk froth regulator knob by
turning it until
and pulling it up.
3. Remove Rapid Cappuccino System connector by
unlocking it from
to and pulling it o.
NOTE: during heat up, you can press any coee buttons. The coee will then ow automatically when the machine is ready.
12
7484_UM_LATTISSIMA_RESTYLE_Z3D.indb 12 19.03.15 09:54

4 ° C
15 sec.
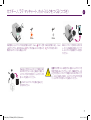
EN
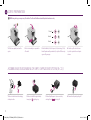
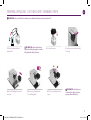
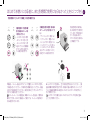
PREPARING CAPPUCCINO LATTE MACCHIATO WARM MILK FROTH
1. Fill the milk container with desired
quantity of milk.
2. Close the milk container. 3. Open the steam connector door by sliding
it to the right.
4. Connect the Rapid Cappuccino System to
the machine.
5. Machine heats up for approximately
15 seconds (blinking lights).
6. Lift the lever completely and insert the
capsule.
INFORMATION: for a perfect milk froth, use skimmed or semi-skimmed milk at refrigerator temperature (about 4° C).
INFORMATION: when the milk container is
empty, before relling, thoroughly rinse it and the
milk aspiration tube with potable water.
INFORMATION: only for Cappuccino
or Latte Macchiato. Skip this step when
preparing a Warm milk froth only.
13
7484_UM_LATTISSIMA_RESTYLE_Z3D.indb 13 19.03.15 09:54

+
Clean
EN
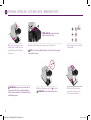
PREPARING CAPPUCCINO LATTE MACCHIATO WARM MILK FROTH
INFORMATION: rinse the milk system after each use.
INFORMATION: recommended settings:
Cappuccino min/Macchiato max.
10. At the end of the preparation, the CLEAN shines orange.
11. Lift and close the lever to eject the
capsule into the used capsule container.
Place a container under milk spout.
7. Close the lever, place a Cappuccino cup or a
Latte Macchiato glass under the coee outlet
and adjust milk spout position by lifting it up
to the right level.
8. Adjust the milk froth regulator knob according to the volume of froth you want.
NOTE: do not overturn the milk froth regulator. Overturned position is for inserting/
removing dial for cleaning.
9. Press the Cappuccino or Macchiato button
or Warm milk froth.
INFORMATION: for cappuccino or Latte Macchiato, the
preparation starts after a few seconds (rst milk and then
coee) and will stop automatically. For Warm milk froth, only
milk froth will be prepared.
14
7484_UM_LATTISSIMA_RESTYLE_Z3D.indb 14 19.03.15 09:54

16 sec.
4° C
Clean Clean
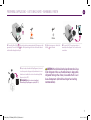
EN
12. Press and hold the «CLEAN» button until machine stops pumping automatically. Rinsing process lasts
approximately 16 seconds. «CLEAN»
blinks. Milk system rinsing process starts and hot water combined
with steam ows through the milk spout.
PREPARING CAPPUCCINO LATTE MACCHIATO WARM MILK FROTH
13. When the rinsing process is nished, the
«CLEAN»
alert is resumed.
14. Disconnect the R.C.S. from machine and place it
immediately in the refrigerator. Close the machine steam
connector door.
INFORMATION: refer to section «Assembling/
Disassembling of Rapid Cappuccino system (R.C.S.)».
CAUTION: this milk should not be kept for more than 2 days
in the refrigerator. In the case the milk container is kept outside
refrigerator for longer than 2 hours, disassemble the R.C.S. and
clean all components (refer to dishwashing or hand washing
recommendations).
15. Every two days, disassemble the Rapid Cappuccino System, and
clean all components in the upper side of your dishwasher. In case a
dishwasher is not available, refer to section Hand washing of Rapid
Cappuccino System (R.C.S.).
15
7484_UM_LATTISSIMA_RESTYLE_Z3D.indb 15 19.03.15 09:54

3 sec.
EN
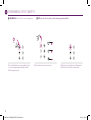
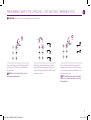
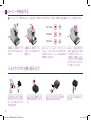
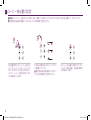
PROGRAMMING COFFEE QUANTITY
INFORMATION: follow the step 1-2 of section «coee preparation». NOTE: please refer to factory settings section for min/max programmable quantities.
1. Touch and hold Ristretto, Espresso or Lungo button for at least
3 sec to enter the programming mode. Brewing starts. Button
blinks fast: programming mode.
2. Release button when desired volume is reached.
3. Water volume is now stored for the next coee preparations.
Button blinks 3 times to conrm the new water volume.
16
7484_UM_LATTISSIMA_RESTYLE_Z3D.indb 16 19.03.15 09:54

3 sec.
3 sec.
EN
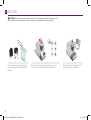
INFORMATION: follow the steps 1-8 of section «Preparing Cappuccino and Latte Macchiato».
1. Touch and hold Cappuccino/ Latte Macchiato/ Warm milk froth
button for at least 3 sec. Milk frothing starts. Button blinks fast:
programming mode.
PROGRAMMING QUANTITY FOR CAPPUCCINO LATTE MACCHIATO WARM MILK FROTH
3. Touch and hold the same button. Brewing starts. Release
button when desired coee volume is reached. Recipe volume
is now stored for the next preparations. Button blinks 3 times to
conrm the new water volume.
2. Release button when desired milk froth volume is reached.
Button still blinks fast: programming mode. (Cappuccino/Latte
Macchiato). When programming the Warm milk froth beverage,
the programming ends here.
NOTE: please refer to Factory settings section for
min/max programmable quantities.
NOTE: the milk froth volume depends on the kind of
milk that is used, its temperature and the position of the
milk regulator knob.
17
7484_UM_LATTISSIMA_RESTYLE_Z3D.indb 17 19.03.15 09:54

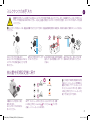
EN
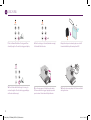
2. Lift and close the lever to eject the capsule into the used capsule container.
Place a container under coee outlet and press the Lungo button to rinse.
3. Clean the coee outlet with a clean damp cloth. Clean
the machine surface using a clean damp cloth.
DAILY CARE
INFORMATION: do not use any strong cleaning agent or solvent cleaner. Use a clean damp cloth and mild cleaning agent to clean the
surface of the machine. Do not put any machine components in dishwasher, except the Rapid Cappuccino System components.
1. Remove drip tray, capsule container. Empty and rinse.
Remove water tank. Empty, rinse it before lling with fresh
potable water.
18
7484_UM_LATTISSIMA_RESTYLE_Z3D.indb 18 19.03.15 09:54

3 sec.
30 min.
40° C
Clean
Descaling
EN
1. Disassemble the Rapid Cappuccino System. Refer to
section «Assembling/Disassembling of Rapid Cappuccino
system (R.C.S.)».
2. Rinse away carefully any milk residue with
potable water.
3. Soak all components in warm water
(approximately 40° C/104° F) together with soap
detergent for at least 30 minutes.
2. Press the Latte Macchiato and Warm milk froth buttons simultaneously for 3 seconds to enter
Menu mode: descaling and clean alerts start blinking.
1. Switch the machine ON.
4. Rinse with potable water and dry them with a
clean damp cloth.
HAND WASHING OF RAPID CAPPUCCINO SYSTEM R.C.S.
INFORMATION: when a dishwasher is not available, the R.C.S.
components can be washed by hand. In that case, the procedure must be
performed daily for a maximum eciency.
RESTORING QUANTITY TO FACTORY SETTINGS
NOTE: remove milk jug.
NOTE: the Menu mode exits automatically after
30 sec if no actions are performed or can be exited
manually by pressing the Latte Macchiatto and Milk
froth buttons simultaneously for 3 seconds.
19
7484_UM_LATTISSIMA_RESTYLE_Z3D.indb 19 19.03.15 09:54

3. Touch in a single continuous movement the following
buttons: Milk Froth ->Cappuccino ->Latte Macchiato
->Lungo ->E spresso ->Ristret to.
4. The Warm milk froth button blinks to indicate reset
mode. Press it to conrm. All buttons blink 3 times:
all volumes are reset.
5. The menu exits automatically and
machine returns to ready mode.
EN
NOTE: *the milk froth volume depends on the kind of milk that is used, its temperature and the
position of the milk regulator knob.
FACTORY SETTINGS
Ristretto: 25 ml
Cappuccino Milk*: 50 ml/Coee: 40 ml
Lungo: 110 ml Latte Macchiato Milk*: 150 ml/Coee: 40 ml
Espresso: 40 ml
Warm milk froth*: 120 ml
Automatic power o. 9 min Water hardness. Level 2
CAUTION: if coee volumes higher than 150 ml are programmed: let the machine cool down for
5 minutes before making the next coee. Risk of overheating!
NOTE: we recommend you to keep factory settings for Ristretto, Espresso and Lungo to
ensure the best in cup results for each of our coee varieties.
Milk volume can be programmed from 30 to 200 ml.
Coee volume can be progammed from 25 to 200 ml.
RESTORING QUANTITY TO FACTORY SETTINGS
20
7484_UM_LATTISSIMA_RESTYLE_Z3D.indb 20 19.03.15 09:54

Descaling
Clean
Descaling
1L
+
100 ml
500 ml
2
1
EN
DESCALING
2. Lift and close the lever to eject any
capsules in the used capsule container.
1. Descale the machine when
descaling alert shines orange in ready
mode.
CAUTION: refer to safety precautions.
5. The machine enters the descaling mode. The descaling alert blinks orange
during the entire descaling process. The Warm milk froth button shines white.
6. Place a container with a minimum 1 litre capacity under
both the coee outlet and under the descaling pipe nozzle.
3. Empty the drip tray and the used capsules container. Fill
the water tank with 100 ml of Nespresso descaling agent
and 500 ml water.
4. Open the descaling pipe storage door. Plug the descaling
pipe into steam connector of machine.
INFORMATION: descaling time is approximately 25 minutes.
NOTE: to ensure the proper functioning of your machine over
its lifetime and that your coee experience is as perfect as the rst
day, follow the below process.
21
7484_UM_LATTISSIMA_RESTYLE_Z3D.indb 21 19.03.15 09:54

Descaling
x5
ok
Descaling
Descaling
EN
11. Once the rinsing process is nished, the machine switches
o. Remove and store descaling pipe. Empty drip tray and used
capsules container. Fill water tank with fresh potable water.
12. Clean the machine using a damp cloth. You have now nished
descaling the machine.
9. Empty the used capsules container, drip tray, rinse out and ll
the water tank with fresh potable water up to level MAX.
10. Press the Warm milk froth button again. The rinsing cycle
continues through the coee outlet, descaling pipe and drip tray
until the water tank turns empty.
DESCALING
8. When the descaling cycle is nished (water tank runs empty),
the Warm milk froth button shines.
7. Press the Warm milk froth button. Descaling product ows
alternately through the coee outlet, descaling pipe and drip tray.
22
7484_UM_LATTISSIMA_RESTYLE_Z3D.indb 22 19.03.15 09:54

1 sec.
0
1
2
3
4
3 sec.
6. Now, within 15 sec, you can set the desired value by
pressing the corresponding button. They blink 3 times
rapidly to conrm new value.
7. The menu exits automatically and machine
returns to ready mode.
Clean
Descaling
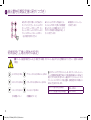
EN
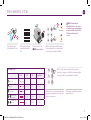
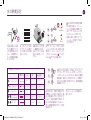
1. Place the water hardness
sticker under water for 1 second.
2. The number of red squares
indicates the water hardness
level.
WATER HARDNESS SETTING
Water hardness table
Level dH fH mg/L CaCo3
Latte Macchiato
0 <3 <5 <50
Cappuccino
1 >4 >7 >70
Warm milk froth
2 >7 >13 >130
+
Warm milk froth +
Latte Macchiato
3 >14 >25 >250
+
Warm milk froth +
Cappuccino
4 >21 >38 >380
4. Press the Latte Macchiato and Warm milk froth
buttons simultaneously for 3 seconds to enter Menu
mode: descaling and clean alerts start blinking.
3. Switch the machine ON.
NOTE: remove milk jug.
NOTE: the Menu mode exits
automatically after 30 sec. if no actions
are performed. It can be exit manually by
pressing the Latte Macchiatto and Milk
froth buttons simultaneously for
3 seconds.
5. Touch in a single continuous movement the following buttons:
Latte Macchiato ->Cappuccino ->Milk froth. The current water hardness
setting is indicated by the corresponding buttons (steady light).
23
7484_UM_LATTISSIMA_RESTYLE_Z3D.indb 23 19.03.15 09:54

Z
Z
Z
3 sec.
Clean
Descaling
EN
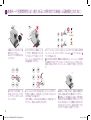
EMPTYING THE SYSTEM BEFORE A PERIOD OF NONUSE FOR FROST PROTECTION OR BEFORE A REPAIR
1.Switch ON machine. 2. Remove the water tank. Lift and close the lever to
eject any remaining capsule. Place a container under
the coee outlet.
3.Press the Latte Macchiato and Warm milk froth buttons simultaneously for 3 seconds to enter Menu mode:
the descaling and clean alerts start blinking.
6. When the process is nished, the machine switches o automatically.
NOTE: appliance will be blocked for approximately 10 minutes
after emptying.
NOTE: the Menu mode exits automatically after 30 sec if no actions are performed or can be exited
manually by pressing the Latte Macchiatto and Milk froth buttons simultaneously for 3 seconds.
4. Touch in a single continuous movement the
following buttons: Cappuccino -> Espresso.
5. The Warm milk froth button blinks for conrmation. Once pressed, the emptying starts.
The coee buttons blink alternately: emptying mode in progress.
NOTE: remove milk jug.
24
7484_UM_LATTISSIMA_RESTYLE_Z3D.indb 24 19.03.15 09:54
Page is loading ...
Page is loading ...
Page is loading ...
Page is loading ...
Page is loading ...
Page is loading ...
Page is loading ...
Page is loading ...
Page is loading ...
Page is loading ...
Page is loading ...
Page is loading ...
Page is loading ...
Page is loading ...
Page is loading ...
Page is loading ...
Page is loading ...
Page is loading ...
Page is loading ...
Page is loading ...
Page is loading ...
Page is loading ...
Page is loading ...
Page is loading ...
Page is loading ...
Page is loading ...
Page is loading ...
Page is loading ...
Page is loading ...
Page is loading ...
-
 1
1
-
 2
2
-
 3
3
-
 4
4
-
 5
5
-
 6
6
-
 7
7
-
 8
8
-
 9
9
-
 10
10
-
 11
11
-
 12
12
-
 13
13
-
 14
14
-
 15
15
-
 16
16
-
 17
17
-
 18
18
-
 19
19
-
 20
20
-
 21
21
-
 22
22
-
 23
23
-
 24
24
-
 25
25
-
 26
26
-
 27
27
-
 28
28
-
 29
29
-
 30
30
-
 31
31
-
 32
32
-
 33
33
-
 34
34
-
 35
35
-
 36
36
-
 37
37
-
 38
38
-
 39
39
-
 40
40
-
 41
41
-
 42
42
-
 43
43
-
 44
44
-
 45
45
-
 46
46
-
 47
47
-
 48
48
-
 49
49
-
 50
50
-
 51
51
-
 52
52
-
 53
53
-
 54
54


Nespresso Lattissima Touch User manual
- Category
- Coffee makers
- Type
- User manual
Ask a question and I''ll find the answer in the document
Finding information in a document is now easier with AI
in other languages
Related papers
-
Nespresso MOMENTO User manual
-
Nespresso EN560B User manual
-
Nespresso Aguila AG420PRO User manual
-
-
-
Breville-Nespresso USA Creatista BEN600 User manual
-
-
-
Nespresso 2023-04 User manual
-
Other documents
-
 Nestle Nespresso EN550S User manual
-
DeLonghi EN550.BM User manual
-
Sage BNE500 User manual
-
Breville BVE850BSS User manual
-
De'Longhi EN750MB User manual
-
-
Sage BNE800 Nespresso Creatista Plus Coffee and Espresso Machine User manual
-
-
DeLonghi DINAMICA ECAM353.75B Owner's manual
-
