Andis 64875 User guide
- Category
- Hair trimmers & clippers
- Type
- User guide
This manual is also suitable for

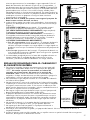
Item pictured may differ from actual product
Il est possible que l’article sur la photo soit différent du produit réel
El artículo ilustrado puede diferir del producto real
Das abgebildete Gerät kann sich vom eigentlichen Produkt unterscheiden
Il prodotto reale può essere diverso da quello rappresentato
De afbeelding kan verschillen van het werkelijke product
Item da foto pode diferir do produto real
图示可能与实际产品不同
Use & Care Instructions
USE ONLY WITH SENSA-CHARGE CHARGER
UTILISER UNIQUEMENT AVEC UN CHARGEUR SENSA-CHARGE
USE ÚNICAMENTE CON UN CARGADOR SENSA-CHARGE
NUR MIT SENSA-CHARGE-LADEGERÄT VERWENDEN
UTILIZZARE SOLO CON IL CARICABATTERIE SENSA
ALLEEN GEBRUIKEN MET SENSA-CHARGE OPLADER
USE SOMENTE COM O CARREGADOR SENSA-CHARGE
只能只用感应充电器
AGR+

Please read the following instructions before using your new Andis clipper.
Give it the care that a fine precision built instrument deserves and it will give
you years of service.
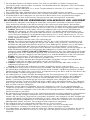
IMPORTANT SAFEGUARDS
When using an electrical appliance, basic precautions should always be followed,
including the following: Read all instructions before using the Andis clipper.
This product not for use by children.
DANGER: To reduce the risk of electric shock:
1. Do not reach for an appliance that has fallen into water.
Unplug immediately. Never use clipper near water.
2. Do not use while bathing or in a shower.
3. Do not place or store appliance where it can fall or be pulled
into a tub or sink. Do not place in or drop into water or other
liquid.
4. Always unplug this appliance from the electrical outlet
immediately after using. Unplug by holding and pulling on
plug, not cord.
5. Unplug this appliance before cleaning, removing, or
assembling parts.
WARNING: To reduce the risk of burns, fire, electric shock,
or injury to persons:
1. An appliance should never be left unattended when plugged in.
2. This appliance can be used by children aged from 8 years and
above and persons with reduced physical, sensory or mental
capabilities or lack of experience and knowledge if they have
been given supervision or instruction concerning use of the
appliance in a safe way and understand the hazards involved.
3. Children shall not play with the appliance.
4. Use this appliance only for its intended use as described in
this manual. Do not use attachments not recommended by
Andis.
5. Never operate this appliance if it has a damaged cord or
plug, if it is not working properly, if it has been dropped or
damaged, or dropped into water. Return the appliance to an
Andis Authorized Service Station for examination or repair.
6. Keep the cord away from heated surfaces.
7. Never drop or insert any object into any opening.
8. Do not use outdoors or operate where aerosol (spray)
products are being used or where oxygen is being administered.
9. Do not use this appliance with a damaged or broken blade or
comb, as injury to the skin may occur.
2
ENGLISH

10. To disconnect remove plug from outlet.
11. WARNING: During use, do not place or leave appliance
where it may be (1) damaged by an animal or (2) exposed to
the weather.
12. Oil blades frequently. Blades may become hot during use.
13. Plug charger directly into receptacle - do not use an
extension cord.
14. Unplug charger before plugging or unplugging appliance.
15. Use of charger not sold by Andis may result in risk of fire,
electric shock, or injury to person.
16. Do not disassemble charger; take it to an Andis Authorized
Service Station when repair is required. Incorrect reassembly
may result in a risk of electric shock or fire.
17. The batteries in this clipper have been designed to provide
maximum trouble-free life. However, like all batteries, they
will eventually wear out. Do not disassemble battery pack
and attempt to replace the batteries.
18. WARNING: Keep the appliance dry.
SAVE THESE INSTRUCTIONS
OPERATING INSTRUCTIONS
• The battery is not intended to be replaced by the user.
• The battery must be removed from the appliance before it is scrapped.
• The appliance must be disconnected from the supply mains when removing the battery.
• The battery is to be disposed of safely.
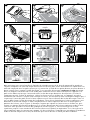
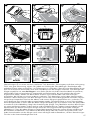
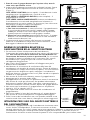
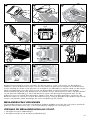
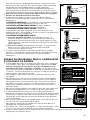
CHARGING CLIPPER
1. Remove the charger from the carton and plug into an AC outlet as identified on charger unit and on
carton.
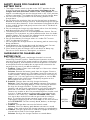
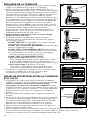
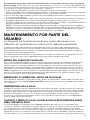
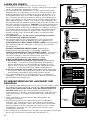
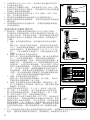
2. Place the clipper in the form-fitting pocket in the charger base (Figure A). Note that the battery pack is
fitted with a slot to align properly with the charger. Once the battery and charger are aligned, press
the battery pack firmly into the charger until it rests at the bottom of the pocket. You may hear a click
as the charging contacts engage; this is normal. The battery pack may be charged while on the
clipper, or separately. Push the battery release button (Figure B) on the clipper, and pull straight out
to remove the battery. NOTE: The battery pack is designed to run the clipper for about one hour.
A clean, sharp, well-oiled blade will provide the best run time. A busy animal shop may want an
additional battery pack, so one pack is char
ging while the other is running the clipper.
3. Before initial use battery pack must be charged for a minimum of one hour.
4. The charger base has two indicator lights. Below is a description of the Sensacharge light sequences
(Figure C):
CONTINUOUS GREEN LIGHT (Fast Charge) - Charger will fully charge battery pack in less than one hour.
RAPID GREEN BLINKING LIGHT (Charging Complete) - Battery pack is fully charged.
LONG GREEN BLINKING LIGHT (“Refresh”) - Charger is draining battery pack in preparation for fast
charge. Please reference the section “Use of the Refresh Feature” for an explanation.
SHORT GREEN BLINKING LIGHT -
a) With Continuous Red Light (Charge Standby) - Battery pack is trickle charging because it is either
too hot or too cold to accept a fast charge. Fast charging will occur once battery pack temperature
moderates.
b) Without Red Light (Charge Preparation) - Battery pack is undergoing trickle charge, because it has
been drained excessively during use.
5. The clipper can be left in the charger base for an indefinite period of time. The charger will supply
only what is needed and will not damage the battery due to overcharge.
3

4
SAFETY RULES FOR CHARGER AND
BATTERY PACK
1. The clipper motor switch must be in the “OFF” position for the
charger to operate properly. Do not return the clipper to the
charger base with the motor switch in the “ON” position. If the
clipper is accidentally put on the charger base in the “ON” position,
remove it promptly. Turn clipper off and return to the charger base.
2. Do not insert anything metallic into the battery pocket of the
charger base.
3. Do not allow the ventilation slots on the charger base to become
blocked or filled with foreign material. Avoid subjecting the charger
to excessively dirty locations. If the slots become clogged with dust
or hair, unplug charger and gently remove hair with a soft brush or
a vacuum cleaner.
4. Do not attempt to charge any other battery other than the battery
pack designed for your Andis AGR+ clipper.
5. The battery pack contains an overload protection feature. Do not
attempt to use it to power any other product other than the Andis
cordless clipper. Do not touch the exposed metal contacts on the
battery pack with any conductive material.
6. Do not store battery or charger where it is under 50°F or over
104°F, as damage may occur.
7. Do not expose the charger base or the battery pack to excessively
damp conditions.
8. Avoid dropping the charger base and the battery pack. Do not
attempt to use a damaged battery pack or charger.
9. Clean external parts of charger with a soft brush or damp rag.
Do not use harsh abrasives, detergents, or solvents.
GUIDELINES FOR CHARGER AND
BATTERY PACK
1. Your clipper, battery pack, and charger function has several
interacting electrical systems. Good electrical contact must be
maintained in order for the motor to deliver full power, the battery
to charge properly, and the Refresh feature to operate. Limited or
erratic performance caused by dirt or age can be restored in the
majority of the cases if you do the following:
A. Problem: Clipper motor starts and stops as if there was a loose
electrical connection.
Solution: Remove the battery pack from the clipper. Examine
the battery pack opening in the clipper. Locate the two sets of
motor contacts. Gently squeeze the metal leaves until they are
about 1/16" (1.6 mm) apart using a long pliers or similar. DO
NOT squeeze the metal leaves completely together or the
battery pack will not re-insert.
B. Problem: Charger does not fully charge the battery.
Solution: Clean the battery pack bottom contacts (the portion
inserted into the char
ging pocket). Clean the charger contacts.
Re-align the charger contacts. To clean the battery pack
contacts, rub gently with a pencil eraser until they are brightly
polished. Use a cotton swab and 91% isopropyl alcohol to
remove any residue or dirt. Denatured alcohol can also be used.
Use care, as both products are flammable. Clean the charger
contacts in the same way - UNPLUG CHARGER FIRST. Make
sure eraser dust and cleaners do not get inside the charger
base. To re-align the charger contacts, again make sure it is
unplugged, and gently pull the metal loops on the four contacts
forward SLIGHTLY. Do not severely bend, deform, or damage
the contacts.
C. Problem: Charger does not exit the Refresh mode.
Solution: Clean the battery pack bottom contacts as noted
above. Clean and re-align the charger contacts as noted above.
D. Problem: Charger lights flash on and off as clipper or battery is
moved side to side in the charger pocket.
Solution: Re-align the charger contacts as noted above.
A
BATTERY
RELEASE
B
Please see instructions for further
details on SensaCharge System.
Green Light
Fast Charge
Charging Complete
Refresh
Charge Preparation
Red Light
Charge Standby
(Analyzing Battery)
C
REFRESH
BUTTON
D

5
2. The battery with this clipper must go through a “charge and use” cycle of 3 to 5 times before it
reaches full charge capacity. The first few times you use and recharge your battery you will not receive
peak battery performance. It will take 3 to 5 “charge and use” cycles for the battery to reach its peak
charge.
3. The charger base is designed to recharge battery packs that are at, or close to, room temperature
(25°C/77°F). If a battery pack is returned to the charger unusually hot or cold, the charger will not
enter fast charge mode. This is normal and the battery pack can remain in the charger. Under certain
conditions the charger may not fully charge a battery pack that has cooled from an unusually hot
temperature. Remove the battery pack for a few seconds, and return to the charger. The charger will
then enter a second fast charge mode.
4.
Optimum charging results will be obtained if the charging unit is operated in a place where the
temperature is stable. Sudden increases in temperature may result in the battery pack receiving less
than a full charge. Avoid locating the charger near heat vents, radiators, or in direct sunlight.
5. Under normal room temperature conditions, there is no need to allow the charger base to cool
between charging battery packs. Completely discharged battery packs may be returned to the charger
base continuously for fast charge. If the room temperature is very warm, however, allowing the charger
to cool 5 minutes between battery packs is advisable. If the charger has become too hot internally, fast
charge will be discontinued. Remove the battery pack and replace after a 5 minute cooling period; the
charger will reset automatically.
6. It is normal for the charger to become warm to the touch during operation.
7. Disconnect the charger from the AC outlet if long periods of non-use are anticipated.
8. Never store batteries in a discharged condition. Recharge them immediately after they are discharged.
9. Many factors influence the life of the battery pack. A battery pack that has received heavy use
and is over a year old may not give the same run-time performance as a new battery pack.
USE OF THE REFRESH FEATURE
The Refresh feature works overnight by first discharging the battery pack, and then quickly charging it.
A trickle charge maintains the battery at 100% for use the next day. This allows a battery pack that has
developed a “memory” to perfor
m like new.
A battery pack that receives monthly Refresh cycles will last much longer than one that does not.
Andis suggests that the Refresh feature be used once per month at the end of a business day. Using the
Refresh feature overnight will ensure that your work will not be interrupted while “Refresh” operates.
1. The charger base needs to be plugged in for the Refresh feature to work.
2. With the AGR+ clipper or AGR+ battery pack in the charger base, press the Refresh button (Figure D)
once. The green light will blink while the battery is discharging.
3. The green light will stop blinking, and remain continuous when the battery pack is charging once
again.
4. If the Refresh button has been accidentally pressed, there are two ways to stop the battery pack from
being discharged. Removing the clipper from the charger, then returning it, will cancel the Refresh
operation and resume fast charge. You may also unplug the charger base for several seconds to reset
the charger.
5. NOTE: The refresh cycle takes approximately 8 hours to produce a fully charged battery pack. The
charge must make accurate battery voltage measurements during this time. If the charger does not
exit the r
efresh cycle or does not produce a fully charged battery, see “Guidelines for Battery Pack and
Charger Use”.
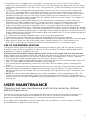
USER MAINTENANCE
Cleaning and user maintenance shall not be made by children
without supervision.
The internal mechanism of your motor clipper has been permanently lubricated by the factory. Other
than the r
ecommended maintenance described in this manual, no other maintenance should be
performed, except by Andis Company, or an Andis Authorized Service Station.
If the supply cord is damaged it must be replaced by the manufacturer, its service agent or similarly
qualified persons in or
der to avoid a hazard.

6
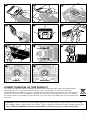
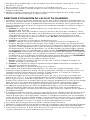
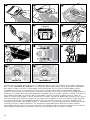
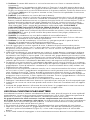
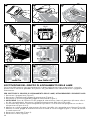
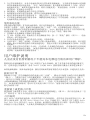
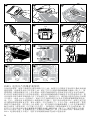
REMOVING BLADE SET
To remove blade set, first make sure your clipper motor is switched “OFF”. Push blade release
mechanism under blade hinge (Figure E). While holding down the blade release mechanism, push down
on blade, then gently pull the blade forward (Figure F), and slide it off the blade hinge. If your blade
hinge should snap closed and is flush with the clipper, use a small standard screwdriver to pry the tongue
of the hinge out (Figure G). NOTE: Hair may accumulate in the front cavity of the housing under the
blade. If this happens, you can clean out the hair by brushing out the cavity with a small brush or an old
toothbrush while the blade is off the clipper.
REPLACING OR CHANGING BLADE SET
To replace or change your blade set, slide the blade bracket onto the hinge of the clipper (Figure H), and
with the clipper turned “ON”, push the blade towards the clipper to lock into position.
BLADE TEMPERATURE
Due to the high speed nature of Andis clippers, please check for blade heat often, especially on close-
cutting blades. If blades are too hot, dip the blades only into Andis Blade Care Plus or apply Andis Cool
Care Plus and then Andis Clipper Oil. If you have a detachable blade unit, you can change your blade in
order to maintain a comfortable temperature; using multiple blades of the same size is popular among
groomers.
CARE AND SERVICING OF YOUR ANDIS CLIPPER BLADES
Blades should be oiled before, during, and after each use. If your clipper blades leave streaks or slow
down, it’s a sure sign blades need oil. Place a few drops of oil on the front and side of the cutter blades
(Figure I). Wipe excess oil off blades with a soft, dry cloth. Spray lubricants contain insufficient oil for
good lubrication, but are an excellent clipper blade coolant. Always replace broken or nicked blades to
prevent injury. You can clean the excess hair from your blades by using a small brush or worn out
toothbrush. To clean the blades, we suggest to immerse the blades only into a shallow pan of Andis
Clipper Oil, while the clipper is running. Any excess hair and dirt that has accumulated between the
blades should come out. After cleaning, turn your clipper off and dry blades with a clean dry cloth and
start clipping again. If upon cleaning your blades you find that the blades will still not cut, there may be
a few fine pieces of hair trapped between the upper and lower blade. If this happens, you will need to
snap the blade of
f the clipper. Proceed to slide the upper blade to one side, without loosening the
tension spring or moving the upper blade completely out from under the tension spring (See Figure J for
position of blade). Wipe the surface between the blades clean with a dry cloth, then place a drop of
clipper oil where the upper and lower blades meet and also in the guide slot of the tension spring
(Figure J). Now slide the upper blade to the opposite side of the lower blade and repeat this process.
After completing this procedure, slide the upper blade, centering it over the lower blade. Handle or
store your Andis clipper with the blades down so excess oil will not run into the clipper case.
CHANGING THE BLADE DRIVE ASSEMBLY
If your clipper blades no longer cut properly (be sure to try more than one blade, since the blade
currently being used may be dull), it could be that your blade drive assembly needs replacement.
TO CHANGE THE BLADE DRIVE ASSEMBLY:
1. Remove blade set (Figur
e F).
2. Remove drive cap (Figure K).
3. Remove blade drive mounting screws (Figure L).
4. NOTE: Before removing blade drive assembly, note the way it is positioned (this will help you in
reassembly). Remove blade drive assembly (Figure M).
5. Drive bearing should be at its lowest position, if not, move it with your finger to lowest position
(Figures N & O).
6. Put on new drive assembly, align screw holes and press down (Figure M).
7. Reassemble blade drive by replacing mounting screws, turning just until snug (Figure L). DO NOT
OVERTIGHTEN.
8. Replace drive cap (Figure K).
9. Replace blade (Figure H).
BLADE & CLIPPER/TRIMMER REPAIR SERVICE
When the blades of your Andis clipper/trimmer become dull after repeated use, it is advised to purchase
a new set of blades available through your Andis supplier. Some blade sets can be resharpened – contact
your Andis supplier or the Andis Company for information on resharpening. If you wish your clipper/
trimmer to be serviced as well, contact your Andis supplier. If you have a problem contacting your Andis
supplier, contact the Andis Company customer service department 1-262-884-2600 (USA) or email at
[email protected]. To find an Andis Authorized Service Station near you log on to www.andis.com
or contact our customer service department by phone at 1-262-884-2600 (USA), or by email at

7
H
E
F
G
OIL
OIL OIL
I
J
K L M
N
CORRECT
O
INCORRECT
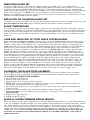
CORRECT DISPOSAL OF THIS PRODUCT
This marking indicates that this product should not be disposed with other household wastes
throughout the EU. To prevent possible harm to the environment or human health from
uncontrolled waste disposal, recycle it responsibly to promote the sustainable reuse of material
resources. To return your used device, please use the return and collection systems or contact
the retailer where the product was purchased. They can take this product for environmental safe
recycling.
CAUTION: Never handle your Andis clipper while you are operating a water faucet and never hold
your clipper under a water faucet or in water. There is danger of electrical shock and damage to your
clipper. ANDIS COMPANY will not be responsible in case of injury due to this carelessness.
Page is loading ...
Page is loading ...
Page is loading ...
Page is loading ...
Page is loading ...
Page is loading ...
Page is loading ...
Page is loading ...
Page is loading ...
Page is loading ...
Page is loading ...
Page is loading ...
Page is loading ...
Page is loading ...
Page is loading ...
Page is loading ...
Page is loading ...
Page is loading ...
Page is loading ...
Page is loading ...
Page is loading ...
Page is loading ...
Page is loading ...
Page is loading ...
Page is loading ...
Page is loading ...
Page is loading ...
Page is loading ...
Page is loading ...
Page is loading ...
Page is loading ...
Page is loading ...
Page is loading ...
Page is loading ...
Page is loading ...
Page is loading ...
Page is loading ...
Page is loading ...
Page is loading ...
Page is loading ...
Page is loading ...
Page is loading ...
Page is loading ...
Page is loading ...
Page is loading ...
Page is loading ...
Page is loading ...
Page is loading ...

Model AGR+ (230-240V, 50 Hz)
©2015 Andis Company
1800 Renaissance Blvd., Sturtevant, WI 53177 U.S.A.
1-262-884-2600 www.andis.com [email protected]
KEEP THIS FOR YOUR RECORDS
CONSERVER CETTE NOTICE
GUARDE ESTAS INSTRUCCIONES
DIESE ANLEITUNG AUFBEWAHREN
CONSERVARE PER USI FUTURI
BEWAAR DEZE GEBRUIKSAANWIJZING
GUARDE ISTO PARA OS SEUS REGISTROS
请保留此说明书作为记录
To find an Andis Authorized Service Station or access this manual
online go to www.andis.com
Si vous souhaitez trouver un point de service authorisé Andis
ou encore consulter ce guide en ligne, rendez-vous sur
www.andis.com
Para encontrar un centro de servicio autorizado de Andis o para
acceder a este manual en línea, visite www.andis.com
Rufen Sie die Website www.andis.com auf, um von Andis
autorisierte Kundendienststellen oder die Online-Version dieser
Betriebsanleitung zu finden.
Per trovare un centro di assistenza autorizzato Andis,
o per visualizzare questo manual online, visitare il sito
www.andis.com
Om een door Andis erkend servicenter te zoeken of deze
handleiding online te openen, gaat u naar www.andis.com
Para encontrar um serviço técnico autorizado perto de você ou ver
este manual on-line, acesse o site www.andis.com
如需查找 Andis 授权的维修站或访问在线阅读手册,请访问
www.andis.com。
Printed in U.S.A.
Form #100154
-
 1
1
-
 2
2
-
 3
3
-
 4
4
-
 5
5
-
 6
6
-
 7
7
-
 8
8
-
 9
9
-
 10
10
-
 11
11
-
 12
12
-
 13
13
-
 14
14
-
 15
15
-
 16
16
-
 17
17
-
 18
18
-
 19
19
-
 20
20
-
 21
21
-
 22
22
-
 23
23
-
 24
24
-
 25
25
-
 26
26
-
 27
27
-
 28
28
-
 29
29
-
 30
30
-
 31
31
-
 32
32
-
 33
33
-
 34
34
-
 35
35
-
 36
36
-
 37
37
-
 38
38
-
 39
39
-
 40
40
-
 41
41
-
 42
42
-
 43
43
-
 44
44
-
 45
45
-
 46
46
-
 47
47
-
 48
48
-
 49
49
-
 50
50
-
 51
51
-
 52
52
-
 53
53
-
 54
54
-
 55
55
-
 56
56


Andis 64875 User guide
- Category
- Hair trimmers & clippers
- Type
- User guide
- This manual is also suitable for
Ask a question and I''ll find the answer in the document
Finding information in a document is now easier with AI
in other languages
- italiano: Andis 64875 Guida utente
- français: Andis 64875 Mode d'emploi
- español: Andis 64875 Guía del usuario
- Deutsch: Andis 64875 Benutzerhandbuch
- Nederlands: Andis 64875 Gebruikershandleiding
- português: Andis 64875 Guia de usuario
Related papers
Other documents
-
Andis Company Go User manual
-
Duux Dock & Battery Pack Owner's manual
-
-
-
Remington HC5780 Owner's manual
-
-
-
Panasonic ER-GP80 Operating Instructions Manual
-
-
Moulinex DJAB 11 Owner's manual