Page is loading ...
Page is loading ...
Page is loading ...
Page is loading ...
Page is loading ...
Page is loading ...
Page is loading ...
Page is loading ...
Page is loading ...
Page is loading ...
Page is loading ...
Page is loading ...
Page is loading ...
Page is loading ...
Page is loading ...
Page is loading ...
Page is loading ...
Page is loading ...
Page is loading ...
Page is loading ...

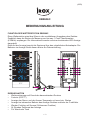
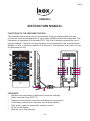
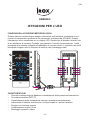
EBR606C
INSTRUCTION MANUAL
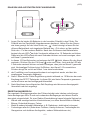
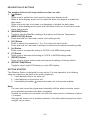
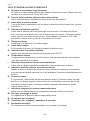
FUNCTIONS OF THE WEATHER STATION
This weather station measures the environment of its surrounding area and may
receive the measured temperature of up to three 433MHz remote thermometers. The
information is displayed by illuminated LED. This kind of display requests the use of
a power-adapter. The main-unit has therefore to be connected to the included power
adapterinordertomakeyoubenetofallfunctions.Thebatteriesinthemainunitare
for data back-up only.
C
o
C
o
N
M
2
4
6
8
1
3
5
7
P
O
A
C
F
H
B
E
D
GG
I
L
H
J
B
E
D
K
FEATURES
• Weatherforecastbasedonbarometricpressurechanges
• Radiocontrolledtime(DCF77)
• Displaysindoor/outdoorminimumandmaximumtemperature
• Lowbatteryindicationformainunitandwirelesssensors
• Dailyalarm(wake-upalarm)withsnoozefunction
• 24hourtimedisplay
• Wallmountorfreestanding
~21~
(ENG)

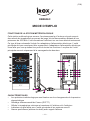
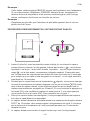
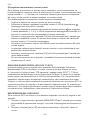
DISPLAY AND FUNCTIONS of the MAIN UNIT
A. IR motion sensor
It is a contact-less key to activate the snooze function. Simply wave your hand
within 15 cm distance of the unit.
B. Air pressure trend arrow
Indicates the trend of air pressure changes
C. Weather forecast icon
Weather icon to show the current weather forecast on the display for the coming
day
D. Low battery indicator
Shown to indicate the battery in the main unit is low. The battery is for data
back-up in case of a power interruption. If this icon appears, replace as soon as
possible. Without good batteries, all data may be lost during a power interruption.
E. Clock window
Displays current time or alarm time
F. Alarm icon
Alarm icon appears on display upon activation of alarm
G. Radio controlled time indicator
AppearstoindicatethedisplayedtimeisreceivedfromthetimeDCF77timesignal
H. Indoor temperature
The temperature displayed is the indoor temperature. This temperature is mea-
sured in the cable of the power adapter
I. Indoor maximum/minimum indicator
Indicates that the maximum or minimum indoor temperature is on the display
J. Remote sensor battery low indicator
Appears when the batteries of the remote sensor are running dry and the tempera-
turemeasuredbythissensorisnolongerreliable.Pleasechangethebatteriesat
once.
K. Remote sensor
The channel of the current remote thermometer is displayed. It can display up to
3 different remote sensors placed within a range of max. 5 to 50 meters distance
from the main unit. The actual distance depends on the environment (walls, elec-
tric noise etc)
L. Outdoor maximum/minimum indicator
Indicates that the maximum or minimum outdoor temperature is on the display
M. Wall mounting hole
To hang the weather station to a wall
N. Battery compartment
O. Jack for connecting the power adapter
P. Removable stand
To place the weather station on a desk
(ENG)
~22~

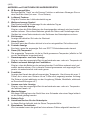
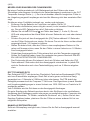
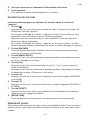
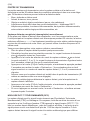
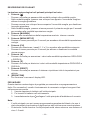
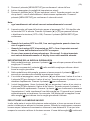
DESCRIPTION OF BUTTONS
The weather station has 8 major buttons on the rear side:
1. [
] Button
- Pressoncetoswitchfromclockmodetoalarmtimedisplaymode
- While in alarm display, press once to make the alarm icon appear to enable the
daily alarm
- Pressonemoretimetoletalarmicondisappeartodisablethedailyalarm
- Whileinalarmdisplaymode,pressandholdAlarmbuttonfor2secondstoenter
alarm setting mode
2. [MAX/MIN] Button
- ToggletoviewtheMax/MinreadingoftheIndoorandRemoteTemperature.
3. [MENU/SETUP] Button
Pressandholdfor2secondstoenterclocksettingmode
4. [CH] Button
- Presstoselectfromchannels(1,2or3)orenterintoscrollmode
- Pressandholdfor2secondstoactivateordeactivatethesensorsearchingmode
5. [▲]Button
PressoncetoincreasethesettinginCLOCKorALARMsettingmode
6. [▼]Button
PressoncetodecreasethesettinginCLOCKorALARMsettingmode
7. [RESET] Button
Pressoncetotriggersystemresetandrestoreallsettingstofactorydefault
8. [BRIGHT/DIM] Button
Toggle to select bight LED display or a dim LED display
GETTING STARTED
This Weather Station is designed for easy set up. For best operation, the following
steps are required to be done in the proper sequence.
1. Insertbatteriesrsttothemainunit
2. Insertbatteriestothesensorunit
3. Immediately thereafter
connect the main unit to the power adapter
Note:
- The main unit cannot be programmed manually until the wireless remote sensor
unit registration procedure has been completed.
- Position the remote unit and main unit within the same room in a distance of about
1-2 meters.
- Although the remote unit is weather resistant, it should be placed away from direct
sunlight, rain or snow.
~23~
(ENG)

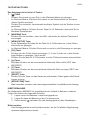
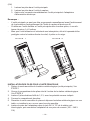
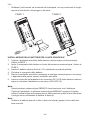
STEP 2STEP 1
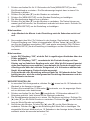
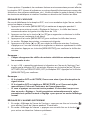
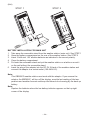
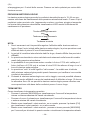
BATTERY INSTALLATION FOR MAIN UNIT
1. Takeawaytheremovablestandfromtheweatherstation(mainunit).SeeSTEP1
2. Openthebatterycompartmentontherearoftheweatherstation.SeeSTEP2
3. Insert2AAAsize1.5Valkalinebatteriesasindicatedinthecorrectpolarity.
4. Closethebatterycompartment.
5. Putbacktheremovablestandandputtheweatherstationonatableormountit
on the wall without the removable stand.
6. InserttheplugoftheadapterintotheDC5VINJackoftheweatherstationand
connecttheadaptortoasocket-outlet(100-240VAC).
Note:
This EBR606C weather station must work with the adaptor. If you remove the
adaptor, the EBR606C will turn off the display, save the last reading of the tem-
perature and weather forecast and keep the internal clock running by the back-up
battery.
Note:
Replace the batteries when the low battery indicator appears on the top-right
corner of the display.
(ENG)
~24~

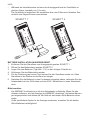
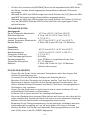
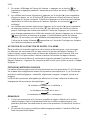
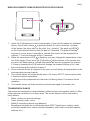
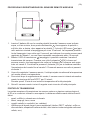
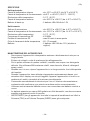
WIRELESS REMOTE SENSOR REGISTRATION PROCEDURE
Q
R
S
1. Insertthe2AAbatteriesinthecorrectpolarity(ifyouholdthesensorasindicated
above, the left side, where
is pointing directly to, has to show the + polarity
of the battery, the other side, on the right, the – polarity). The small red LED
onthefrontpanelwillstarttoashforabout10seconds.Thedefaultashing
frequencyisonceevery2secondstoindicatethissensorwillberegisteredon
channel 1 if not set manually within 10 seconds.
2. WhilethetransmissionLED
isashing,youmaychangethetransmissionchan-
nelofthesensor.Pressoncethe[CH]button
at the bottom of the remote sen-
soranditwillashtwicetoindicatethissensorwillnowberegisteredonchannel
2.Keeponpressingthe[CH]buttonwillchangethechannelsettingupto3and
the next pressing then back to channel 1.
3. Once a remote sensor is registered, the main unit will display its temperature in the
corresponding remote channel.
4. Theremotesensorwillautomaticallystarta10minuteDCF77timereceptionafter
2minuteschannelregistration.
It will not send the temperature to the main unit during these 10 minutes of time
reception.
5. The remote sensor will then send the received time signal to the main unit.
TRANSMISSION RANGE
The maximum transmission range between outdoor sensor and weather station is 30m
under optimum conditions in an open area. The actual distance will be reduced by
many factors:
• Walls,reinforcedconcreteceilings
• Trees,bushes,earth,rocks
• Metal&conductingobjects(egradiators)
• Broadbandinterferencesinresidentialareas(DECTtelephones,mobiles,radio
controlled headphones, radio-controlled speakers, other radio-controlled weather
stations, etc.)
~25~
(ENG)

MANUALLY (RE-)REGINSTER THE REMOTE SENSOR
If the battery is low and needs to be replaced or the communication between the main
unitandremotesensorisinterruptedfor35minutes,theoutdoorreadingdisplays‘--,-’.
It is also possible that your weather station is receiving information from your neigh-
bour which might be using the same frequency and channel.
You can re-register your outdoor sensor manually.
• Removethebatteriesfromtheremotesensorforafewseconds.
• Re-installthebatteriesinthecorrectpolarity.ThetransmissionLED
willash
every2seconds.
• Presstheoutdoorsensorchannelselectbutton
to chose the desired channel
(1,2or3).ThetransmissionLEDwillashevery2secondsasmanytimesasthe
selected channel.
• Pressandholdthe[CH]buttononthemainunitfor2secondstoactivatethe
search mode. A brief beep is audible and a remote sensor channel number (1-3)
startstoash.
• Makesurethattheremotesensorisinstalledwithinrange(maximum50minan
open area).
• Theweatherstationwilldetecttheremotesensorandtheremotesensortempera-
ture will be displayed.
• Pressandholdthe[CH]buttononthemainunitfor2secondstoexitsearchmode.
• Ifnobuttonispressed,searchmodewillautomaticallystopafter2minutes.
DCF77 RADIO CONTROLLED CLOCK (RCC)
TheremotesensorreceivesthetimesignaltransmittedbyPhysikalisch-Technische
Bundesanstalt(PTB)ofGermany.Inaveragethistimedeviateslessthan1second
in2millionyears.PTBtransmitsthetimesignal(DCF77,77.5kHz)continuouslyfrom
MainingennearFrankfurtamMain.Itisexpectedthatthesignalcancoveradistance
of more than 1,000 km from the transmitter. Then the remote sensor transmits the time
signal to the weather station to display the accurate time. However, there are many
environmentfactorsthatmayaffecttheRCCreception(nearbycomputermonitorsor
otherelectronicdeviceslikeTV,metalsurfacesetc.).Pleaseplacetheremotesensor
away from metallic structures and face the transmitter in the direction of Frankfurt a.M.
SET THE CLOCK
IfDCFreceptionfails,oryouwanttosetyourdesiredtime,pleasefollowthesteps
below:
1. Pressandhold[MENU/SETUP]buttonfor2secondstoenterclocksettingmode,
thehourvaluebeginsashingatthefrequencyof1Hz.
2. Press[▲]or[▼]buttononcetoincreaseordecreasethehourvaluebyonehour.
3. Press[MENU/SETUP]buttontoconrmthehourvalue.
4. Theminutessettingmodebeginsashing.
5. Press[▲]or[▼]buttontosetyourdesiredminutevalue.Holdingdowneitherbut-
tonwillincreaseordecreasetheminutesrapidly.Press[MENU/SETUP]buttonto
conrmtheminutevalue.
(ENG)
~26~

Note:
- Every change of minute digit will automatically reset the seconds to zero.
6. Theword“On”willnowappearandashontheclocktimeplace.Thismeansthat
theDCFreceptionisturnedon.Press[▲]or[▼]totoggleDCFreceptiontoOFF
orON.Press[MENU/SETUP]toconrm.
Note:
- When DCF reception is turned ON, the time will be updated once the time
signal is received
- Once DCF reception is set to OFF or the time is set manually, the RCC time
indicator icon will disappear
- If no key press during setting mode for 10 seconds, it will automatically save
the setting value and exit to normal display.
TO SET DAILY ALARM
1. Inclocktimedisplaymode,press[
]buttononcetoswitchtodisplayalarmtime
for 10 seconds.
2. Press[
]buttonagaininalarmdisplaymodetoenableordisablethedailyalarm.
3. Inalarmtimedisplaymode,pressandhold[
]buttonfor2secondstoenter
alarm setting mode.
4. Thehourdigitswillash,use[▲]buttontoincreasebyonehouror[▼]buttonto
decrease by one hour to your desired hours. Holding down the button will change
theincrement/decrementunitrapidly.Press[
]buttontoconrm.
5. Theminutedigitswillash.Use[▲]buttontoincreasebyoneminuteor[▼]but-
ton to decrease by one minute to your desired minutes. Holding down the button
willchangetheincrement/decrementunitrapidly.Press[
]buttontoconrmand
nishthesetting.Theunitwillshowthealarmtimefor10secondsandauto-exit
toclocktimedisplay.Thealarmbellicon[
]willappearinclocktimedisplayto
indicate the daily alarm is enabled.
TO ACITVATE THE SNOOZE FUNCTION
Inthetopmiddleoftheweatherstation,thereisanIRmotionsensorwhichcanacti-
vatesnoozefunction.Whenthealarmsounds,moveyourhandabovetheIRmotion
sensor within the distance of 15cm to pause alarm and activate snooze function. The
alarmbellicon[
]willkeepashingduring5minutesnoozetime.Pressanykeyto
exit snooze.
~27~
(ENG)

WEATHER FORECAST
Theweatherstationforecaststheweatherconditionforthenext12~24hoursbased
on the local air pressure changes. There are 5 kinds of weather conditions forecasted:
Sunny,Slightlycloudy,Cloudy,RainyandStormy.
The air pressure arrow displayed on the LED shows the air pressure change trend:
The weather trend is “better”
The weather trend is “worse”
The weather trend is “unchanged”
NOTE:
1. It is not necessary and not possible to adjust the altitude of the weather station.
Aftertheinitialstartupoftheweatherstation,arstforecastwillbemadewithin
therst24hoursofoperation.
2. Inperiodoflongstableweatherconditions,itbecomesdifculttomakeareliable
forecast.
3. The weather forecast is solely calculated on the basis of barometric air pressure
changes.
4. The probability of a correct weather forecast is approximately 70% and is valid for
the future (in about 12-24 hours) in an area of approx. 20-30 km around the loca-
tion of the Weather station.
5. The forecast “Sunny” means at night “cloudless weather”. Fog is not indicated by
the weather station as this can occur with different weather conditions.
6. If you travel with the weather station, a reliable weather forecast will become im-
possible due to changes in altitude and location. You’ll have to wait up to 24 hours
so that the weather station can calculate a new forecast based on the conditions at
the new location.
THERMOMETER
HowtodisplayMax/Mintemperature
• Press[MAX/MIN]buttontodisplaythememorizedmaximumindoorandoutdoor
temperatureofthedisplayedchannelfor6seconds.
• Pressthiskeyagaintodisplaythememorizedminimumindoorandoutdoortem-
peratureofthedisplayedchannelfor6seconds.
• Whilethemaximum/minimumvaluesononechannelisdisplayed,press[CH]but-
tontodisplaythemaximum/minimumvaluesonanotherchannel.
• Whenmaximum/minimumvalueisdisplayed,pressandhold[MAX/MIN]for2
seconds to clear them in this channel and display the current temperature
(ENG)
~28~

SPECIFICATIONS
Main Unit
Indoortemperaturerange : -10°Cto+60.0°C(14°Fto140.0°F)
Operatingtemperaturerange: 0°Cto+50.0°C(32.0°F-122.0°F)
Temperatureresolution : 0.1°C(0.2°F)
Outdoortemperaturerange : -20.0°Cto+60.0°C(-4.0°Fto140.0°F)
Backupbatteries : 2piecesUM-4AAAsize1.5Vbattery
Remote Unit
Measuringrange : -20.0°Cto+60.0°C(-4.0°Fto140.0°F)
Operatingtemperaturerange: -10.0°Cto+50.0°C(14.0°Fto122.0°F)
Temperatureresolution : 0.1°C(0.2°F)
RFTransmissionFrequency : 433MHz
RFTransmissionRange : max.50metersinopenarea
Temperaturesensingcycle : 60-75seconds
Batteries : 2piecesUM-3AAsize1.5Vbattery(alkalineorbetter)
CARE INSTRUCTIONS
- Do not expose the device to extreme temperatures or direct sunlight over longer
periods.
- Avoid blows and shocks of any kind to the device.
- For cleaning use a dry soft cloth that you have moistened with water and a mild
cleaning agent. Never use volatile substances such as benzene, thinner, cleansing
agents in spray cans etc.
- When the device is not being used store it in a dry area and out of the reach of
small children.
- If the device is activated under extreme coldness it may occur that the display
becomes illegible. As soon as it is returned to a warm environment the device will
function normally.
- Pleasekeeptheuser’smanualandotherdocumentsdeliveredwiththedevice
stored carefully so that you can reference them at a later point if necessary.
- Pleaseuseonlynewbatteriesandnevermixoldandnewbatteries.
- Pleasealsorememberthatoldbatteriesshouldnotbedisposedofwithhousehold
waste but should be handed in at the designated collection centres.
- Important:WithallIroxappliances,alldisposalfeesinSwitzerland(vRG;advance
recycling fee) and in the EU (WEEE) have been paid.
~29~
(ENG)

SUPPORT
This device is a new development of Irox Development Technology. All information
was made and checked by means of a functioning instrument. It may occur that
adjustments and improvements of the device will take place that due to typographical
procedures were not able to be listed in this manual. Should you notice deviations
whichmakeitdifcultforyoutooperateandusetheinstrumentyoumayatanytime
downloadthelatestmanualontoyourPCfreeofchargeatwww.irox.com.
© Irox Development Technology www.irox.com
(ENG)
~ 30 ~
Page is loading ...
Page is loading ...
Page is loading ...
Page is loading ...
Page is loading ...
Page is loading ...
Page is loading ...
Page is loading ...
Page is loading ...
Page is loading ...
-
 1
1
-
 2
2
-
 3
3
-
 4
4
-
 5
5
-
 6
6
-
 7
7
-
 8
8
-
 9
9
-
 10
10
-
 11
11
-
 12
12
-
 13
13
-
 14
14
-
 15
15
-
 16
16
-
 17
17
-
 18
18
-
 19
19
-
 20
20
-
 21
21
-
 22
22
-
 23
23
-
 24
24
-
 25
25
-
 26
26
-
 27
27
-
 28
28
-
 29
29
-
 30
30
-
 31
31
-
 32
32
-
 33
33
-
 34
34
-
 35
35
-
 36
36
-
 37
37
-
 38
38
-
 39
39
-
 40
40


Ask a question and I''ll find the answer in the document
Finding information in a document is now easier with AI
in other languages
- italiano: Irox EBR606C Manuale del proprietario
- français: Irox EBR606C Le manuel du propriétaire
- Deutsch: Irox EBR606C Bedienungsanleitung
Related papers
Other documents
-
Technoline Model User manual
-
 Explore Scientific WSC4009 Owner's manual
-
Konig Electronic KN-WS540 User manual
-
Techno line Model Owner's manual
-
Techno line WS6600 Owner's manual
-
Dexford WSRC 3500 User manual
-
Bresser 80-10011 MyTime Duo Owner's manual
-
 La Crosse Technology WT522 Radio-Controlled Clock User manual
-
 Explore Scientific RDC1005000000 Owner's manual
-
 Explore Scientific WSH4002000000 Owner's manual


