DeLonghi Coffee Makers User manual
- Category
- Coffee makers
- Type
- User manual
This manual is also suitable for
Page is loading ...

IMPORTANT SAFEGUARDS
When using electrical appliances, basic safety precautions should always be
followed to reduce the risk of fire, electrical shock and/or personal injury.
-2-
1. Read all instructions carefully.
2. Do not touch hot surfaces. Use the handle on the carafe.
3. To protect against electrical shock, do not place cord, plug or coffee maker in
water or other liquid.
4. Close supervision is necessary when any appliance is used by or near
children.
5. Unplug from outlet when not in use and before cleaning. Allow to cool before
putting on or taking off parts, and before cleaning the appliance.
6. Do not operate any appliance with a damaged cord or plug or after the
appliance malfunctions or has been damaged in any manner. Return appliance
to authorized service facility for examination, repair or adjustment.
7. The use of accessory attachments is not recommended by the manufacturer.
It may be dangerous and should be avoided.
8. Do not use outdoors.
9. Do not let cord hang over edge of table or counter, or touch hot surfaces.
10. Do not place on or near hot gas or electric burner, or in heated oven.
11. Always plug cord into the wall outlet before turning on any controls. To
disconnect turn power OFF, then remove plug from wall outlet.
12. Always use cold water to make coffee. Warm water or other liquids could
cause damage to the coffee maker.
13. Scalding may occur if the cover is lifted or removed during the brewing cycle.
14. Do not use this appliance for other than intended use.
15. Do not set a hot carafe on a wet or cold surface.
16. Do not place hot carafe on or near paper, cloth or other flammable material.
17. Never use the carafe on a range top or in a microwave oven.
18. Do not allow liquid to evaporate from carafe. Do not heat carafe when empty.
19. Do not move entire unit when carafe contains hot liquid.
20. Use the lid on the carafe while brewing and pouring coffee.
21. Discard carafe if damaged in any manner, or a carafe having a loose or
weakened handle. A chip or crack could result in breakage or contaminate
liquid contents with glass particles.
22. Do not clean carafe with scouring powders, steel wool pads or other abrasive
materials.
23. This carafe is designed for use with this coffee maker only.

A short power cord is provided to reduce the risk resulting from entanglement or
tripping over a longer cord. Longer detachable power supply cords are available and
may be used if care is exercised in their use. If a longer detachable power cord or
extension cord is used (1) the marked electrical rating of the extension cord should be
at least as great as the electrical rating of the appliance, and (2) the longer cord should
be arranged so that it will not drape over the countertop or table top where it can be
pulled on by children or tripped over unintentionally. The electrical rating of the appli-
ance is listed on the bottom of the unit. If the appliance is of the grounded type, the
extension cord should be a grounded type 3 wire cord. This appliance has a polarized
plug. One blade is wider than the other. To reduce the risk of electrical shock this plug
will fit in a polarized plug only one way. If the plug does not fit, contact a qualified
electrician. Do not attempt to modify the plug in any way.
WARNING: TO REDUCE THE RISK OF FIRE OR ELECTRICAL SHOCK, DO NOT RE-
MOVE THE BOTTOM COVER. NO USER SERVICEABLE PARTS INSIDE. REPAIRS
SHOULD BE PERFORMED BY AUTHORIZED SERVICE PERSONNEL.
CAUTION: DO NOT IMMERSE UNIT IN LIQUID.
BEFORE FIRST USE
Place the box on a large, sturdy flat surface. Carefully unpack your coffee maker and
remove all packaging material and literature. Remove any labels or stickers from the
coffee maker. To remove any dust that may have accumulated during packaging, you
may wipe the unit with a clean, damp cloth. Dry thoroughly. Do not immerse the coffee
maker in water or other liquid. Clean the carafe, carafe lid, filter basket and filter in
warm water with mild detergent. Rinse and dry thoroughly. Do not use harsh or
abrasive cleaners. (See “Cleaning Your Coffee Maker” section of this manual for
detailed instructions.) Keep all plastic bags away from children.
-3-
IMPORTANT SAFEGUARDS (continued)
24. WARNING: To reduce the risk of fire or electrical shock, do not remove the
bottom cover. No user serviceable parts inside. Repairs should be performed
by authorized service personnel only. CAUTION: Do not immerse in any liquid.
25. WARNING: If you wish to use the car cup holder adapter provided, please use
caution when traveling. Contents are hot. Never travel in the car without the
carafe sitting in the adapter and the adapter fitted in the cup holder. The
adapter fits most standard car cup holders. Test the adapter with an empty
carafe attached to make sure it fits in your car cup holder before traveling. If it
does not fit properly and securely, do not take the carafe in the car.
SHORT CORD INSTRUCTIONS

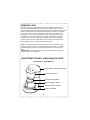
KNOW YOUR COFFEE MAKER
-4-
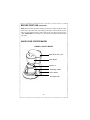
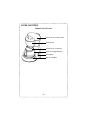
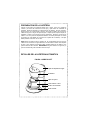
FIGURE 1: DC51TT SERIES
BEFORE FIRST USE (continued)
NOTE: We recommend that prior to brewing your first pot of coffee, operate the coffee
maker once or twice with water only, without ground coffee. This will remove any dust
that may have settled inside the coffee maker, which may affect the flavor of the
coffee. IMPORTANT: Use cold water only. The automatic drip system works best with
cold water.
Filter Basket
Carafe Lid
Travel Mug / Carafe
Power Switch
Non-Stick Plate
Water Reservoir Cover

-5-
FEATURES:
1.
BREW AUTO SHUT-OFF: For safety, this coffee maker is equipped with a brew
auto shut-off feature. The coffee maker shuts off automatically after the
brewing cycle is completed. To restart the coffee maker, simply press the ON-
OFF button and the ON/OFF light will illuminate.
2. PAUSE ‘N SERVE: Allows you to interrupt the brewing cycle and pour a cup of
coffee before the entire carafe is finished brewing. To restart the brewing
process, return the carafe to warming plate and coffee will automatically begin
flowing through filter basket. Make sure carafe is placed all the way on the
warming plate. CAUTION: Do not remove carafe for longer than 30 seconds or
the filter basket will overflow.
3.
SEALED CARAFE: Carafe lip and lid seal help to preserve coffee’s natural
flavor and temperature by preventing excessive evaporation.
4. EASY POUR CARAFE: Uniquely designed carafe with all-around lip and
traditional pour spout allow you to conveniently pour from any side. Cup
markings on each side of the handle make it easier to measure the water level
when filling the carafe.
5. NON-STICK PLATE: Makes cleanup quick and easy.
6. CORD STORAGE: Hidden cord storage allows you to hide excess cord for a
neat appearance and for easy storage.
7. FILTER BASKET WITH HANDLE: Cone shaped filter basket enriches flavor and
prevents bitter taste.
8. CAR CUP HOLDER ADAPTER: Carafe sits in the base of the adapter for the on-
the-go coffee drinker. The body of the adapter is rubberized to prevent
scatching the interior of your cup holder and to secure the adapter in the cup
holder.
KNOW YOUR COFFEE MAKER (continued)

OPERATING YOUR COFFEE MAKER
-6-
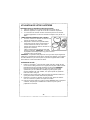
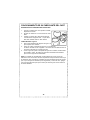
FIGURE 2
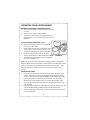
PREPARING COFFEE MAKER FOR BREWING COFFEE:
1. Place the coffee maker on a flat, level surface away from
any edge.
2. Plug the unit into a 120V / 60Hz only outlet.
3. The lid of the carafe must be fitted properly during the
brewing process. And the carafe must be set on the non-
stick plate.
FILLING THE WATER RESERVOIR: Figure 2
4. Open the hinged water reservoir cover located at
the top of the coffee maker.
5. Fill the carafe with cold water corresponding to the
desired cups of coffee you will be brewing. Cup
markings are indicated on the handle of the carafe.
6. Empty the water from the carafe into the water
reservoir, located behind the filter basket holder. NOTE:
The automatic brewing system has been designed to
work with cold water only.
NOTE: The amount of brewed coffee after the brewing process is complete will
always be slightly less than the amount of water placed in the coffee maker’s water
reservoir, since some water is absorbed by the coffee grounds and filter. Add a
little extra water at the beginning so that you have the exact number of cups
desired.
PREPARING THE COFFEE:
7. Insert a #4 cone-shaped filter into the filter basket before filling with coffee
grounds. Place the filter into the removable filter basket. Place the desired
amount of coffee grounds into the filter. NOTE: We recommend using coffee
grounds specifically for automatic drip coffee makers. We suggest one
tablespoon of ground coffee for each cup of coffee being brewed. After
using your drip coffee maker a few times you may adjust the amount to suit
your own taste.
8. Return the filter basket with the coffee-filled filter to the filter basket holder. Be
sure that the filter basket is seated properly in the filter basket holder.
9. Close the hinged water reservoir cover. Place the carafe with the lid in place
on the non-stick plate.

-7-
10. Press the button (located on the side) to the ON position. The switch will
illuminate indicating that the coffee maker is “on” and that the brewing process
has started. Coffee is ready when “bubbling” sound and dripping have
completely stopped.
11. NOTE: If you would like a cup of coffee before the full pot is brewed, the
Pause ‘N Serve feature allows you to interrupt the brewing process. The
brewing process does not stop during this period; only the flow of coffee from
the basket. Do not remove the carafe for longer than 30 seconds or the
coffee may overflow from the basket stops. While we offer this feature, we
do not recommend you pour the coffee before the cycle has reached
completion, since the coffee brewed at the beginning of the cycle has a flavor
which is very different from the flavor at the end of the cycle. Removing a cup
during the brewing cycle will alter the flavor of the finished pot.
12. The thermal carafe will keep coffee hot after brewing is complete.
13. Press the ON / OFF button to turn the unit “off” when the carafe is empty or
when the coffee maker is not in use. After the brewing cycle is complete,
discard the grounds and rinse the filter basket thoroughly with water. (See
“Cleaning Your Coffee Maker” section of this manual for more details). Use
caution when removing the filter basket or paper filter, contents may
be hot. Be sure to discard the paper filter immediately after use. Always
unplug the coffee maker from the electrical outlet after every use.
14. NOTE: Never operate your coffee maker without the carafe lid in place on the
carafe. Doing so will cause your coffee maker to overflow.
OPERATING YOUR COFFEE MAKER (continued)
USING YOUR CAR CUP HOLDER ADAPTER
If you wish to use the car cup holder adapter, use caution when sitting the
carafe in the adapter. Contents in the carafe are hot.
1. The adapter fits most standard car cup holders. Test the adapter with an
empty carafe attached to make sure it fits in your car cup holder before
traveling.
2. If the adapter with carafe fits properly and securely in your car cup
holder, please review the following safety instructions:
a) Make sure that the carafe sits properly in the adapter before traveling.
b) Use caution while traveling, contents of carafe are hot.
c) Remove the carafe from the adapter for drinking.

1. A clean coffee maker is essential for making great tasting coffee. Regular
cleaning is recommended, as specified in the “Cleaning Your Coffee Maker”
section of this manual.
2. Always use fresh, cold water in your coffee maker.
3. Fine grind coffee promotes fuller extraction and provides rich, full-tasting
coffee. Regular grind will require slightly more coffee grounds per cup to
provide the strength of a finer grind.
4. Store coffee grounds in a cool, dry place. Once coffee has been opened,
keep it tightly sealed in refrigerator to maintain freshness.
5. For optimum coffee, buy whole beans and grind them just before brewing.
6. Do not reuse coffee grounds since this will lessen coffee flavor.
7. Reheating coffee is not recommended. Coffee is at its peak flavor immediately
after brewing.
8. Small oil droplets on the surface of brewed black coffee are due to the
extraction of oil from the coffee grounds. Oiliness may occur more frequently
if heavily roasted coffees are used. Over-extraction may also cause oiliness,
indicating a need to clean your coffee maker.
HINTS FOR GREAT TASTING COFFEE
1. CAUTION: Make sure your coffee maker is unplugged before attempting to
clean. To protect against electric shock, do not immerse cord, plug or unit in
water or other liquid.
2. The outside of your coffee maker can be cleaned by wiping the surface with a
damp, soft cloth. CAUTION: Never immerse the coffee maker in water or other
liquid. The non-stick plate can be wiped with a clean, damp cloth as neces-
sary. Be sure to wait a couple hours after the coffee maker has been turned
“off” and unplugged before cleaning the non-stick plate, to allow time to cool.
3. Clean inside of coffee maker with a damp cloth and mild detergent. Do not use
harsh abrasives or scouring pads on carafe.
4. Carafe, carafe lid and removable filter basket may be washed by hand with
warm, soapy water or placed in the top rack of the dishwasher. Do not place
any other parts of the coffee maker in the dishwasher. Wash all other
detachable parts by hand with warm, soapy water and then rinse and dry
thoroughly.
CLEANING YOUR COFFEE MAKER
-8-

5. Do not clean the inside of the water reservoir with a cloth as the cloth may
have a lint residue that could clog the coffee maker. Just rinse with cold water
periodically.
6. For stubborn stains, us a nylon or plastic pad with a non-abrasive cleanser.
Do not use metal scouring pads or abrasive cleansers.
7. Calcium deposits may build up in the coffee maker as a result of minerals
commonly found in drinking water. The build-up is normal and may result in a
slow down of the coffee maker’s brewing time. The slow down can be
eliminated by periodically decalcifying the coffee maker.
8. To decalcify, fill the carafe with cold water and two tablespoons of white
vinegar. Pour the solution into the water reservoir, and then close the lid.
Place the carafe on the warming plate and allow the coffee maker to brew the
vinegar solution. While decalcifying, do not use a filter in the filter basket.
When the vinegar solution has finished brewing, empty the carafe and rinse it
out with cold water. Refill the water reservoir with cold water only and run
another brew cycle to remove any remaining vinegar solution. Repeat if
necessary. We recommend that you decalcify the machine 4 times a year.
CLEANING YOUR COFFEE MAKER (continued)
-9-
Page is loading ...
Page is loading ...
Page is loading ...
Page is loading ...
Page is loading ...
Page is loading ...
Page is loading ...
Page is loading ...
Page is loading ...
Page is loading ...
Page is loading ...
Page is loading ...
Page is loading ...
Page is loading ...
Page is loading ...
Page is loading ...
Page is loading ...
Page is loading ...
Page is loading ...
Page is loading ...
Page is loading ...
Page is loading ...
Page is loading ...
Page is loading ...

••Limited Warranty••
WHAT DOES THE WARRANTY COVER?
We warrant each appliance to be free from defects in material and workmanship. Our
obligation under this warranty is limited to replacement or repair, free of charge at our
factory or authorized service centers of any defective part or parts thereof other than
parts damaged in transit, which shall be returned to us, transportation prepaid. This
warranty shall apply only if the appliance is used in accordance with the factory
directions which accompany it, and on an Alternating Current (AC) circuit.
HOW LONG DOES THE COVERAGE LAST?
This warranty runs for one year from the date of delivery and applies only to the original
purchaser for use.
WHAT IS NOT COVERED BY THE WARRANTY?
The warranty does not cover defects or damage of the appliance which result from
repairs or alterations to the appliance outside our factory or authorized service centers,
nor shall it apply to any appliance which ahs been subject to abuse, misuse, negligence
or accidents. Also, consequential and incidental damage resulting from the use of this
product or arising out of any breach of contract or breach of this warranty are not
recoverable under this warranty. Some states do not allow the exclusion or limitation of
incidental or consequential damage, so the above limitation may not apply to you.
HOW DO YOU GET SERVICE?
If repairs become necessary or spare parts are needed, please contact:
De’ Longhi America Inc.
Park 80 West, Plaza One
Saddle Brook, NJ 07663
Or call us at: 1-800-322-3848
The above warranty is in lieu of all other express warranties and representations. All
implied warranties are limited to the applicable warranty period set forth above. This
limitation does not apply if you enter into an extended warranty with DeLonghi. Some
states do not allow limitations on how long an implied warranty lasts, so the above
exclusions may not apply to you. DeLonghi does not authorize any othe person or
company to assume for it any liability in connection with the sale or use of its appliance.
HOW DOES STATE LAW APPLY?
This warranty gives you specific legal rights, and you may also have other rights which
vary from state to state.
Page is loading ...
Page is loading ...
Page is loading ...

DeLonghi America, Inc.
Park 80 West, Plaza One
Saddle Brook, NJ 07663
1-800-322-3848
DeLonghi Canada, Inc.
6150 McLaughlin Road
Mississauga, Ontario
L5R 4C2 Canada
1-888-335-6644
www.delonghiusa.com
DC51TT Series / DC51TT Séries
Series DC51TT / Serie DC51TT
Made in PRC / Fabriqué en RPC
Fabricado en la RPC / Fabbricato nella RPC
Power Requirement / Caractéristiques électriques: 120 Volts / 60 Hz
Alimentación eléctrica: 120 Voltios / 60 Hz
Per uso con corrente: 120 Volt / 60 Hz
Power Consumption / Puissance consommée: 900 Watts
Consumo de energía: 900 Vatios / Consumo di corrente: 900 Watt
© DeLonghi 2002
-
 1
1
-
 2
2
-
 3
3
-
 4
4
-
 5
5
-
 6
6
-
 7
7
-
 8
8
-
 9
9
-
 10
10
-
 11
11
-
 12
12
-
 13
13
-
 14
14
-
 15
15
-
 16
16
-
 17
17
-
 18
18
-
 19
19
-
 20
20
-
 21
21
-
 22
22
-
 23
23
-
 24
24
-
 25
25
-
 26
26
-
 27
27
-
 28
28
-
 29
29
-
 30
30
-
 31
31
-
 32
32
-
 33
33
-
 34
34
-
 35
35
-
 36
36
-
 37
37
-
 38
38


DeLonghi Coffee Makers User manual
- Category
- Coffee makers
- Type
- User manual
- This manual is also suitable for
Ask a question and I''ll find the answer in the document
Finding information in a document is now easier with AI
in other languages
- italiano: DeLonghi Coffee Makers Manuale utente
- français: DeLonghi Coffee Makers Manuel utilisateur
- español: DeLonghi Coffee Makers Manual de usuario
Related papers
Other documents
-
 brim SIZE-WISE SW20 User manual
-
Windmere WCM2025C User manual
-
Hamilton Beach 49976 User manual
-
-
Hamilton Beach 49902 User guide
-
-
-
Hamilton Beach FlexBrew Owner's manual
-
Bella Linea Collection 12 Cup Programmable Coffee Maker Owner's manual
-
