Page is loading ...

MultiChoice
®
Valve Trim
Installation Instructions
Owners Manual
17 Series
ASME A112.18.1 / CSA B125.1
Write purchased model number here.
T
E
F
L
O
N
You May Need
Table of Contents:
Warranties ................................................................................. Page 2
Installation Instructions ............................................................. Pages 3 - 7
Clean and care........................................................................... Page 8
Maintenance .............................................................................. Page 8
Cartridge Summary Reference Sheet ....................................... Page 8
Replacement Parts .................................................................... Pages 9 - 24
THIS VALVE MEETS OR EXCEEDS THE
FOLLOWING STANDARDS: ASME A112.18.1/
CSA B125.1 and ASSE 1016 (Type -P- or -T-).
CAUTION: This system/device must be set by the
installer to ensure safe, maximum temperature.
Any change in the setting may raise the discharge
temperature above the limit considered safe and
may lead to hot water burns.
NOTICE TO INSTALLER: CAUTION!–As the
installer of this valve, it is your responsibility
to properly INSTALL and ADJUST this valve
per the instructions given. This valve does
not automatically adjust for inlet temperature
changes, therefore, someone must make the
necessary Rotational Limit Stop adjustments
at the time of installation and further adjustments
may be necessary due to seasonal water
temperature change. YOU MUST inform the
owner/user of this requirement by following
the instructions. If you or the owner/user are
unsure how to properly make these adjustments
please refer to page 7 and if still uncertain, call
us at 1-800-345-DELTA.
After installation and adjustment, you must affix
your name, company name and the date you
adjusted the Rotational Limit Stop to the caution
label provided and apply or attach the label to
the back side of the closest cabinet door and the
warning label to the water heater. Leave this
Instruction Sheet for the owner’s/user’s
reference.
WARNING: This pressure balanced or
thermostatic bath valve is designed
to minimize the effects of outlet water
temperature changes due to inlet pressure
changes, commonly caused by dishwashers,
washing machines, toilets and the like. It may
not provide protection from hot water burns
when there is a failure of other temperature
controlling devices elsewhere in the
plumbing system, if the rotational limit stop
is not properly set or if the hot water
temperature is changed after the settings are
made or if the water inlet changes
due to seasonal changes.
WARNING: Do not install a shut-off device on
either outlet of this valve. When this type of
device shuts off the water flow, it can defeat
the ability of the valve to balance the hot and
cold water pressures.
www.deltafaucet.com 1/14/14 Rev. G1
17 Series 17 Series
17 Series
68882

Lifetime Faucet and Finish Limited Warranty
Parts and Finish
All parts (other than electronic parts and batteries) and
finishes of this Delta® faucet are warranted to the original
consumer purchaser to be free from defects in material
and workmanship for as long as the original consumer
purchaser owns the home in which the faucet was first
installed or, for commercial users, for 5 years from the
date of purchase.
Electronic Parts and Batteries (if applicable)
Electronic parts (other than batteries), if any, of this Delta®
faucet are warranted to the original consumer purchaser
to be free from defects in material and workmanship for 5
years from the date of purchase or, for commercial users,
for one year from the date of purchase. No warranty is
provided on batteries.
Delta Faucet Company will replace, FREE OF CHARGE,
during the applicable warranty period, any part or finish
that proves defective in material and/or workmanship under
normal installation, use and service. If repair or replacement
is not practical, Delta Faucet Company may elect to refund
the purchase price in exchange for the return of the
product. These are your exclusive remedies.
Delta Faucet Company recommends using a professional
plumber for all installatio and repair.We also recommend
that you use only genuine Delta® replacement parts.
Delta Faucet Company shall not be liable for any damage to
the faucet resulting from misuse, abuse, neglect or improper
or incorrectly performed installation, maintenance or repair,
including failure to follow the applicable care and cleaning
instructions.
Replacement parts may be obtained by calling the applicable
number below or by writing to:
In the United States and Mexico:
Delta Faucet Company
Product Service
55 E. 111th Street
Indianapolis, IN 46280
1-800-345-DELTA (3358)
In Canada:
Masco Canada Limited, Plumbing Group
Technical Service Centre
350 South Edgeware Road
St. Thomas, Ontario, Canada N5P 4L1
1-800-345-DELTA (3358)
Proof of purchase (original sales receipt) from the original
purchaser must be made available to Delta Faucet Company
for all warranty claims unless the purchaser has registered
the product with Delta Faucet Company. This warranty
applies only to Delta® faucets manufactured after January
1,1995 and installed in the United States of America,
Canada and Mexico.
DELTA FAUCET COMPANY SHALL NOT BE LIABLE FOR
ANY
SPECIAL, INCIDENTAL OR CONSEQUENTIAL DAMAGES
(INCLUDING LABOR CHARGES) FOR BREACH OF ANY
EXPRESS OR IMPLIED WARRANTY ON THE FAUCET.
Some states/provinces do not allow the exclusion or
limitation of special, incidental or consequential damages,
so these limitations and exclusions may not apply to you.
This warranty gives you special legal rights. You may also
have other rights which vary from state/province to
state/province.
This is Delta Faucet Company’s exclusive written warranty
and the warranty is not transferable.
If you have any questions or concerns regarding our warranty,
please view our Warranty FAQs at www.deltafaucet.com,
email us at [email protected] or call us at
the applicable number above.
Delta HDF Limited Warranty
All parts of the Delta HDF faucet are warranted to the original
consumer purchaser to be free from defects in material and
workmanship for a period of five (5) years. This warranty is
made to the original consumer purchaser and shall be
effective from date of purchase as shown on purchaser’s
receipt.
Delta will replace, FREE OF CHARGE, during the warranty
period, any part which proves defective in material and/or
workmanship under normal installation, use and service.
Replacement parts can be obtained from your local dealer or
distributor listed in the telephone directory or by returning the
part along with the purchaser’s receipt to our factory,
TRANSPORTATION CHARGES PREPAID, at the address
listed. THIS WARRANTY IS THE ONLY EXPRESS
WARRANTY MADE BY DELTA. ANY CLAIMS MADE
UNDER THIS WARRANTY MUST BE MADE DURING THE
FIVE YEAR PERIOD REFERRED TO ABOVE. ANY
IMPLIED WARRANTIES, INCLUDING THE IMPLIED
WARRANTY OF MERCHANTABILITY OR FITNESS FOR A
PARTICULAR PURPOSE, ARE LIMITED IN DURATION TO
THE DURATION OF THIS WARRANTY. LABOR CHARGES
AND/OR DAMAGE INCURRED IN INSTALLATION, REPAIR
OR REPLACEMENT AS WELL AS INCIDENTAL AND
CONSEQUENTIALDAMAGES CONNECTED THEREWITH
ARE EXCLUDED AND WILL NOT BE PAID BY DELTA.
Some states do not allow limitations on how long an implied
warranty lasts, or the exclusion or limitation of incidental or
consequential damages, so the above limitations or
exclusions may not apply to you.
This warranty gives you specific legal rights, and you may
also have other rights which vary from state to state.
This warranty is void for any damage to this faucet due to
misuse, abuse, neglect, accident, improper installation, any
use violative of instructions furnished by us or any use of
replacement parts other than genuine Delta parts.
www.deltafaucet.com
© 2014 Masco Corporation of Indiana
2
68882 Rev. G

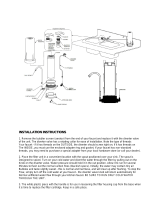
Installation
1
Cartridge Installation
A.
B.
Turn off water supplies. Remove
cover (1), bonnet nut (2) and test cap (3)
from the body. If this is not a thin wall
mounting, the entire plasterguard (4)
may be removed. If screen (5) is in place,
remove before installing cartridge.
Insert adapter assembly (1) into valve
body. Make sure the adapter assembly
is correctly positioned and is pressed all
the way down inside body. Secure adapter
with the screw (2) provided in the adapter
assembly. Remove the retainer (3) from
the adapter.
Rotate cartridge (1) so the words
“HOT SIDE” (2) appear on the left. Insert
cartridge assembly into valve body.
Make sure the key (3) on the cartridge is
fully engaged with the slot in the brass
body (4). Slide bonnet nut (5) over the
cartridge and thread onto the body.
Hand tighten securely.
For back to back or reverse installations
(hot on right and cold on left): Rotate
cartridge (1) so the words “HOT SIDE” (2)
appear on the right. Install the cartridge
making sure that the key is fully engaged
with the slot in the brass body (See step C).
Slide bonnet nut (3) over the cartridge and
thread onto the body. Hand tighten securely.
3
C.
Back to back Installation
Normal Installation
(changes not required)
Reverse
Installation
Cold
Hot
1
2
3
5
4
1
2
3
1
3
4
5
2
1
3
2
68882 Rev. G

58045
Installation
2
Showerhead and Tub Spout Installation
A.
FOR SHOWERHEAD INSTALLATION: Connect top
outlet (1) to shower arm (2) with proper fittings. To
prevent damage to finish on shower arm, insert wall end
of shower arm into shower flange (3) before screwing
arm into riser connection. Thread showerhead (4) onto
shower arm. Apply plumber tape to pipe threads on both
ends. Do not overtighten showerhead.
B.
B.
58045: To combine the two showers, insert the top tab (1) on the handshower into the slot (2) of
the showerhead. Push the handshower into the showerhead until the two parts snap together.
58065: To combine the two showers, push the handshower into the showerhead, then pull down
on the handshower until locked with the showerhead.
If the showerhead moves when removing the handshower, hand tighten the connection between
the showerhead and the shower arm.
To change spray modes, turn the lever (3) left or right to the desired setting. Turn knob (4) to
change between showerhead only, showerhead and handshower or handshower only.
4
58045
58065
1
2
3
4
1
2
3
4
3
4
68882 Rev. G

Installation
5
2
Showerhead and Tub Spout Installation
FOR TUB SPOUT INSTALLATION:
Refer to the installation instructions supplied with your spout. Do not connect deck mount spouts to
in-wall valves. Do not use hand showers connected in lieu of a tub spout to a tub/shower valve. Do not
use PEX tubing for tub spout drop.
Slip-On Installation
The copper tube (1) must be 1/2” nominal
copper. Important: If it is necessary to cut the
copper tube, the end must be chamfered free of
burrs to prevent cutting or nicking O-ring inside
the spout. Slide spout over copper tube flush
with the finished tub or wall surface. Tighten set
screw (2), but do not overtighten.
Iron Pipe Installation
Install threaded pipe nipple (1) to extend past
finished wall. Apply plumber tape to threads on
pipe nipple and screw on tub spout.
Copper Sweat Installation
Remove O-ring (1) from adapter (2). Solder
adapter to tube taking care to keep solder away
from O-ring groove. CAUTION: NO SOLDER
PERMITTED ON OUTSIDE DIAMETER OF
ADAPTER ADJACENT TO O-RING GROOVE.
Cut off tube (3) and replace O-ring on groove of
brass adapter. Thread tub/spout onto adapter,
taking care not to damage O-ring, and hand
tighten until spout is firmly against finished wall
and all slack is taken up behind wall.
Iron Pipe Installation
Installation of easy-on universal tub spout
Install pipe nipple so that end of nipple projects out
from finished wall surface 1/2" to 1 1/4" (13 mm to
32 mm).
Apply plumber tape or pipe dope to pipe threads.
Hand tighten adapter (1) onto pipe nipple (2). Finish
tightening with standard pipe wrench until a positive
seal is implemented. Take care not to damage
O-Ring (3) groove. Back of adapter (1) must not
project more than 1" (25 mm) from finished wall
surface.
Hand tighten tub spout onto adapter (1) taking care
not to damage the O-Ring (3).
C-4
C-3
C-2
C-1
1
2
1
1
2
3
1/2" to 1 1/4"
(13 mm to 32 mm)
1 2
3
68882 Rev. G

Installation
3
6
Trim Installation
A.
B.
Escutcheon Installation for
Models T17053, T17253, T17453,
T17067, T17267 & T17467.
Slide O-ring (1) over cartridge and the
bonnet nut (2). The O-ring, which acts as
a spacer to steady the sleeve, should rest
behind the bonnet nut. Slide the sleeve
(3) over the cartridge, body and O-ring.
Ensure sleeve is properly positioned over
the front of cartridge.
Install volume control handle (1) with lever
to the right, then turn to the on position.
DO NOT SECURE WITH SCREW.
Secure the escutcheon (1) and backplate (2)
(if your model has one) to the bracket (3) using
the 2 screws provided (4). Do not overtighten
escutcheon screws.If you are installing the
Cassidy models T17097, T17297 & T17497:
Thread the cover (5) onto the escutcheon (1).
For models T17053, T17253, T17453, T17067,
T17267 & T17467:
Install bracket (5) over the cartridge body using
the 2 screws provided (6). Install escutcheon (7)
by placing it over the bracket as shown and
rotating it to lock the tabs (8). Secure the escut-
cheon to the bracket using set screw (9).
C.
8
9
7
6
5
8
4
1
2
3
5
1
2
3
1
68882 Rev. G

Installation
4
Installation and Adjustment of the Rotational Limit Stop
A.
B.
Place the temperature control knob (1) on
volume handle and rotate to the mixed
position
(if required). DO NOT SECURE WITH
SCREW. Turn on water supplies; let the
water
run until both hot and cold water is as hot/
cold
as possible. Place thermometer in a plastic
tumbler, and hold the tumbler in the water
stream. Record the temperature reading.
Secure temperature control knob (1) with
screw (2). Hook (3) front of temperature
control cover (4) onto knob (1) before
engaging rear snap (5).
If the water temperature is above 120°F,
remove the temperature control knob (1)
and rotate the limit stop (2) clockwise one
tooth for every 4°F - 6°F (approximate)
change in temperature. If water temperature
is cooler than desired, rotate the limit stop
counterclockwise.
IMPORTANT: The first position of the
Rotational Limit Stop (the Limiter) is that
position that restricts the rotation of the
stem the most and is at the maximum
clockwise setting. According to industry
standards, the maximum allowable
temperature of the water exiting from the
valve is 120
o
F. This temperature may vary
in your local area. The Rotational Limit Stop
may need to be readjusted if the inlet water
temperature changes. For instance, during
the winter, the cold water temperature is
colder than it is during the summer which
could result in varying outlet temperatures.
Typical temperature for a comfortable bath
or shower is between 90
o
–110
o
F.
7
5
Potential scald or thermal shock injury could result due to cross flow if outlet at the
shower is blocked or restricted (e.g., pause control on showerhead). Be sure to point
showerhead away from you when re-starting flow or install inlet check valves on both
supply lines to prevent possible injury.
C-1
C-2
Hotter
Colder
Secure temperature control knob (1) with
screw (2). snap on temperature control cover
(3) with side snaps onto knob (1).
3
1
5
2
4
1
2
3
1
2
1
68882 Rev. G

Clean and Care
Care should be given to the cleaning
of this product. Although its finish is
extremely durable, it can be damaged by
harsh abrasives or polish. To clean, simply
wipe gently with a damp cloth and blot dry
with a soft towel.
Warning: Scrubbing Bubbles
®
Bathroom
Cleaner and Lysol
®
Basin Tub and Tile
Cleaner must not be used on the clear knob
handles and levers. Use of these cleaners
can result in cracked or severely damaged
handles. If overspray gets onto the handles,
immediately wipe them dry with a soft
cotton cloth.
Maintenance
Faucet leaks from tub spout/showerhead:
SHUT OFF WATER SUPPLIES.
Replace valve carridge
RP46463 or RP32104
See Helpful Hints 1, 2, 3 & 4.
Helpful Hints:
1. Before removing valve cartridge assembly for any
maintenance, be sure to note the position of the
rotational limit stop on the cap. The valve cartridge
assembly must always be put back in the same
position. BE SAFE! After you have finished the
installation, turn on valve to make sure COLD
WATER FLOWS FIRST.
2. To remove valve cartridge from body, shut off
water supplies and remove handle and bonnet nut.
Do not pry the valve cartridge out of the body with
a screwdriver. Place handle on stem and rotate
counterclockwise approximately 1/4 turn after the
stop has been contacted. Lift valve cartridge out
of body.
Remove seats and springs and replace.
Place the largest diameter of the spring into the
seat pocket first and then press the tapered end
of the seal over the spring. Reassemble valve
cartridge and replace in body following instructions
given in 1 above.
3. If the water in your area has lime, rust, sand
or other contaminants in it, your pressure
balance valve will require periodic inspection.
The frequency of the inspection will depend
on the amount of contaminants in the water. To
inspect valve cartridge remove it and follow the
steps in note 1 above. Turn the valve to the full
mix position and shake the cartridge vigorously.
If there is a rattling sound, the unit is functional
and can be reinstalled following instructions given
in note 1 above. If there is no rattle, replace the
housing assembly with the proper RP.
8
Cartridge Summary Reference Sheet
Units shipped in March
2006 and after.
Units shipped before
March 2006.
Order RP46463 to
Replace Cartridge.
Order RP32104 to
Replace Cartridge.
Grey Upper Cap
White Upper Cap
V Notch
Square Notch
Adapter
Shorter Tab Longer Tab
17 1700
68882 Rev. G

58045, 58064, & 58065 Models / Modelos / Modèles
9
58065
RP64024
▲
Showerhead
Cabeza de Rogadora
Pomme de Douche
RP64021
Hose & Gaskets
Manguera y Empaques
Tuyau souple et joints
RP64025
▲
Handshower
Regadera Manual
Douche à main
58045
RP64022
▲
Showerhead
Cabeza de Rogadora
Pomme de Douche
RP64021
Hose & Gaskets
Manguera y Empaques
Tuyau souple et joints
RP64025
▲
Handshower
Regadera Manual
Douche à main
58064
RP76839
▲
Showerhead
Cabeza de Rogadora
Pomme de Douche
RP64021
Hose & Gaskets
Manguera y
Empaques
Tuyau souple et
joints
RP76840
▲
Handshower
Regadera Manual
Douche à main
68882 Rev. G
▲
Specify Finish / Especifíque el Acabado / Précisez le Fini

T17030, T17130, T17230, T17230-H2O, T17430 & T17430-H2O
Models / Modelos / Modèles
RP6025
▲
Shower Flange
Pestaña de
la Rogadora
Collerette
RP6023
▲
Shower Arm
Brazo de la Rogadora
Tuyau de Pomme de Douche
10
RP70173
▲
Showerhead
Cabeza de Rogadora
Pomme de Douche
RP43381
▲
Showerhead
Cabeza de Rogadora
Pomme de Douche
RP28795
▲
Escutcheon
Roseta
Rosace avec Orifice
RP196
▲
Trim Screws/Atornillos de
Franja/Vis de Finition
RP12630
▲
For Longer Screws
Para Tornillos Más Grandes
Pour Vis Plus Longues
RP46463
Cartridge Assembly
Cartucho
Cartouche
*
RP23336
O-Ring
Anillo "O"
Joint Torique
RP50880
▲†
Trim Sleeve
Manga de Fran ja
Manchon de Finition
Designates the accent color on split finish models. / Designa el color para acentuar los modelos con
acabados divididos. / Désigne la couleur contrastante sur les modèles à deux finis
RP32105
Screw/Tornillo/Vis
NOTE: Do NOT
overtighten screw.
NOTA: NO apriete
demasiado el
tornillo.
NOTE: NE serrez
PAS trop la vis.
RP73642
▲
Temperature Knob and Cover
Perilla de la Temperatura y Cubierta
Poigneé de Réglage de Température
RP32102
Rotational Limit Stop
Tope para Limitar
Butée Rotative
RP73643
▲
Handle Assembly
Ensamble de la Manija
Poignée
RP5833
▲
(Metal/Metálico/Métal)
Tub Spout/Non Diverter
Tubo de Salida para Bañera/
Sin Desviador
Bec/Sans Dérivation
RP17453
RP17454
▲
Tub Spout/Pull-Down Diverter
Tubo de Salida para Bañera/
Desviador de Halar
Bec/Avec Dérivation sur Embout
68882 Rev. G
▲
Specify Finish / Especifíque el Acabado / Précisez le Fini
Refer to page 8 for more information. / Consulte con la página 8 para más información. /
Pour obtenir de plus amples renseignements, reportez-vous à la page 8.
*
†
†

RP196
▲
Trim Screws/Atornillos de
Franja/Vis de Finition
T17038, T17238, T17238-H2O, T17438 & T17438-H2O
Models / Modelos / Modèles
11
RP70173
▲
Showerhead
Cabeza de Rogadora
Pomme de Douche
RP51305
▲
Showerhead
Cabeza de Rogadora
Pomme de Douche
RP6025
▲
Shower Flange
Pestaña de
la Rogadora
Collerette
RP6023
▲
Shower Arm
Brazo de la Rogadora
Tuyau de Pomme de Douche
RP28795
▲
Escutcheon
Roseta
Rosace avec Orifice
RP12630
▲
For Longer Screws
Para Tornillos Más Grandes
Pour Vis Plus Longues
RP46463
Cartridge Assembly
Cartucho
Cartouche
*
RP23336
O-Ring
Anillo "O"
Joint Torique
RP50880
▲
Trim Sleeve
Manga de Fran ja
Manchon de Finition
RP32105
Screw/Tornillo/Vis
NOTE: Do NOT
overtighten screw.
NOTA: NO apriete
demasiado el
tornillo.
NOTE: NE serrez
PAS trop la vis.
RP51307
▲
Temperature Knob and Cover
Perilla de la Temperatura y Cubierta
Poigneé de Réglage de Température
RP51306
▲
Handle Assembly
Ensamble de la Manija
Poignée
RP32102
Rotational Limit Stop
Tope para Limitar
Butée Rotative
RP51303
▲
Tub Spout/Pull-Up Diverter
Tubo de Salida para Bañera/
Botón Desviador de Alzar
Bec/avec dérivation à tirette
68882 Rev. G
▲
Specify Finish / Especifíque el Acabado / Précisez le Fini
Refer to page 8 for more information. / Consulte con la página 8 para más información. /
Pour obtenir de plus amples renseignements, reportez-vous à la page 8.
*

T17051, T17251, T17251-H2O, T17451 & T17451-H2O
Models / Modelos / Modèles
12
RP62283
▲
Showerhead
Cabeza de Rogadora
Pomme de Douche
RP70171
▲
Showerhead
Cabeza de Rogadora
Pomme de Douche
RP6023
▲
Shower Arm
Brazo de la Rogadora
Tuyau de Pomme de Douche
RP52144
▲
Shower Flange
Pestaña de la Rogadora
Collerette
RP12630
▲
For Longer Screws
Para Tornillos Más Grandes
Pour Vis Plus Longues
RP46463
Cartridge Assembly
Cartucho
Cartouche
*
RP52588
▲
Escutcheon
Roseta
Rosace avec Orifice
RP23336
O-Ring
Anillo "O"
Joint Torique
RP37731
▲
Trim Sleeve
Manga de Fran ja
Manchon de Finition
RP32105
Screw/Tornillo/Vis
NOTE: Do NOT
overtighten screw.
NOTA: NO apriete
demasiado el
tornillo.
NOTE: NE serrez
PAS trop la vis.
RP52147
▲
Temperature Knob and Cover
Perilla de la Temperatura y Cubierta
Poigneé de Réglage de Température
RP52146
▲
Handle Assembly
Ensamble de la Manija
Poignée
RP32102
Rotational Limit Stop
Tope para Limitar
Butée Rotative
RP28598
Decal (Red/Blue)
Etiqueta (Rojo/Azul)
Etiquette (Rouge/Bleu)
RP52148
▲
Tub Spout/Pull-up Diverter
Tubo de Salida para Bañera/
Desviador de Halar
Bec/Avec Dérivation sur Embout
RP196
▲
Trim Screws/Atornillos de
Franja/Vis de Finition
68882 Rev. G
▲
Specify Finish / Especifíque el Acabado / Précisez le Fini
Refer to page 8 for more information. / Consulte con la página 8 para más información. /
Pour obtenir de plus amples renseignements, reportez-vous à la page 8.
*

T17053, T17253, T17253-H2O, T17453 & T17453-H2O
Models / Modelos / Modèles
13
RP62956
▲
Temperature Knob and Cover
Perilla de la Temperatura y Cubierta
Poigneé de Réglage de Température
RP62955
▲
Showerhead
Cabeza de Rogadora
Pomme de Douche
RP70171
▲
Showerhead
Cabeza de Rogadora
Pomme de Douche
Shower Arm
▲
Brazo de la Rogadora
Tuyau de Pomme de Douche
RP51034
▲
Shower Flange
Pestaña dela Rogadora
Collerette
RP51035
▲
Bracket & Screws
Abrazadera y Tornillos
Support et Vis
RP12630
▲
For Longer Screws
Para Tornillos Más Grandes
Pour Vis Plus Longues
RP46463
Cartridge Assembly
Cartucho
Cartouche
*
RP23336
O-Ring
Anillo "O"
Joint Torique
RP50880
▲
Trim Sleeve
Manga de Fran ja
Manchon de Finition
RP32102
Rotational Limit Stop
Tope para Limitar
Butée Rotative
RP62958
▲
Escutcheon
Roseta
Rosace avec Orifice
RP51019
Set Screw
Tornillo de Ajuste
Vis de Calage
RP53419
▲
Tub Spout/Pull-up Diverter
Tubo de Salida para Bañera/
Desviador de Halar
Bec/Avec Dérivation sur Embout
RP32105
Screw/Tornillo/Vis
NOTE: Do NOT
overtighten screw.
NOTA: NO apriete
demasiado el
tornillo.
NOTE: NE serrez
PAS trop la vis.
RP62957
▲
Handle Assembly
Ensamble de la Manija
Poignée
RP28598
Decal (Red/Blue)
Etiqueta (Rojo/Azul)
Etiquette (Rouge/Bleu)
RP196
▲
Trim Screws/Atornillos de
Franja/Vis de Finition
RP46870
▲
Shower Arm
Brazo de la Rogadora
Tuyau de Pomme de Douche
68882 Rev. G
▲
Specify Finish / Especifíque el Acabado / Précisez le Fini
Refer to page 8 for more information. / Consulte con la página 8 para más información. /
Pour obtenir de plus amples renseignements, reportez-vous à la page 8.
*

T17061, T17261 & T17461 Models / Modelos / Modèles
RP70175
▲
Showerhead
Cabeza de Rogadora
Pomme de Douche
RP6023
▲
Shower Arm
Brazo de la Rogadora
Tuyau de Pomme de Douche
RP73374
▲
Escutcheon
Roseta
Rosace avec Orifice
RP12630
▲
For Longer Screws
Para Tornillos Más Grandes
Pour Vis Plus Longues
RP46463
Cartridge Assembly
Cartucho
Cartouche
*
RP23336
O-Ring
Anillo "O"
Joint Torique
RP50880
▲
Trim Sleeve
Manga de Fran ja
Manchon de Finition
RP32105
Screw/Tornillo/Vis
NOTE: Do NOT
overtighten screw.
NOTA: NO apriete
demasiado el
tornillo.
NOTE: NE serrez
PAS trop la vis.
RP73380
▲
Temperature Knob and Cover
Perilla de la Temperatura y Cubierta
Poigneé de Réglage de Température
RP73379
▲
Handle Assembly
Ensamble de la Manija
Poignée
RP32102
Rotational Limit Stop
Tope para Limitar
Butée Rotative
RP73372
▲
Tub Spout/Pull-Up Diverter
Tubo de Salida para Bañera/
Botón Desviador de Alzar
Bec/avec dérivation à tirette
RP6025
▲
Shower Flange
Pestaña de la Rogadora
Collerette
14
RP196
▲
Trim Screws/Atornillos de
Franja/Vis de Finition
68882 Rev. G
▲
Specify Finish / Especifíque el Acabado / Précisez le Fini
Refer to page 8 for more information. / Consulte con la página 8 para más información. /
Pour obtenir de plus amples renseignements, reportez-vous à la page 8.
*

15
RP64859
▲
Showerhead
Cabeza de Rogadora
Pomme de Douche
RP6023
▲
Shower Arm
Brazo de la Rogadora
Tuyau de Pomme de Douche
RP6025
▲
Shower Flange
Pestaña dela Rogadora
Collerette
RP12630
▲
For Longer Screws
Para Tornillos Más Grandes
Pour Vis Plus Longues
RP46463
Cartridge Assembly
Cartucho
Cartouche
*
RP77162
▲
Escutcheon
Roseta
Rosace avec Orifice
RP23336
O-Ring
Anillo "O"
Joint Torique
RP50880
▲
Trim Sleeve
Manga de Fran ja
Manchon de Finition
RP32105
Screw/Tornillo/Vis
NOTE: Do NOT
overtighten screw.
NOTA: NO apriete
demasiado el
tornillo.
NOTE: NE serrez
PAS trop la vis.
RP77164
▲
Temperature Knob and Cover
Perilla de la Temperatura y Cubierta
Poigneé de Réglage de Température
RP32102
Rotational Limit Stop
Tope para Limitar
Butée Rotative
RP77163
▲
Handle Assembly
Ensamble de la Manija
Poignée
RP77092
▲
Tub Spout/Non Diverter
Tubo de Salida para Bañera/
Sin Desviador
Bec/Sans Dérivation
RP196
▲
Trim Screws/Atornillos de
Franja/Vis de Finition
68882 Rev. G
T17064, T17264, T17264-I, T17464 & T17464-I
Models / Modelos / Modèles
RP76839
▲
Showerhead
Cabeza de Rogadora
Pomme de Douche
RP76840
▲
Handshower
Regadera Manual
Douche à main
▲
Specify Finish / Especifíque el Acabado / Précisez le Fini
Refer to page 8 for more information. / Consulte con la página 8 para más información. /
Pour obtenir de plus amples renseignements, reportez-vous à la page 8.
*
RP64021
▲
Hose & Gaskets
Manguera y Empaques
Tuyau souple et joints
RP77091
▲
Tub Spout/Pull-Up Diverter
Tubo de Salida para Bañera/
Botón Desviador de Alzar
Bec/avec dérivation à tirette

16
RP75440
▲
Temperature Knob and Cover
Perilla de la Temperatura y Cubierta
Poigneé de Réglage de Température
Showerhead
▲
Cabeza de Rogadora
Pomme de Douche
RP40593
▲
Shower Arm
Brazo de la Rogadora
Tuyau de Pomme de Douche
Shower Flange
▲
Pestaña dela Rogadora
Collerette
RP51035
▲
Bracket & Screws
Abrazadera y Tornillos
Support et Vis
For Longer Screws
▲
Para Tornillos Más Grandes
Pour Vis Plus Longues
RP46463
Cartridge Assembly
Cartucho
Cartouche
*
RP23336
O-Ring
Anillo "O"
Joint Torique
RP50880
▲
Trim Sleeve
Manga de Fran ja
Manchon de Finition
RP32102
Rotational Limit Stop
Tope para Limitar
Butée Rotative
RP75438
▲
Escutcheon & Gasket
Roseta y Empaque
Rosace avec Orifice et Joint
RP51019
Set Screw
Tornillo de Ajuste
Vis de Calage
RP75435
▲
Tub Spout/Pull-up Diverter
Tubo de Salida para Bañera/
Desviador de Halar
Bec/Avec Dérivation sur Embout
RP73532
▲
Channel Tub Spout/Pull-up Diverter
Tubo de Salida para Bañera/
Desviador de Halar
Bec/Avec Dérivation sur Embout
RP32105
Screw/Tornillo/Vis
NOTE: Do NOT
overtighten screw.
NOTA: NO apriete
demasiado el
tornillo.
NOTE: NE serrez
PAS trop la vis.
RP75439
▲
Handle Assembly
Ensamble de la Manija
Poignée
T17067, T17267, T17467 Models / Modelos /Modèles
RP196
▲
Trim Screws/Atornillos de
Franja/Vis de Finition
68882 Rev. G
▲
Specify Finish / Especifíque el Acabado / Précisez le Fini
Refer to page 8 for more information. / Consulte con la página 8 para más información. /
Pour obtenir de plus amples renseignements, reportez-vous à la page 8.
*

T17078, T17278, T17278-H2O, T17478 & T17478-H2O
Models / Modelos / Modèles
17
RP51305
▲
Showerhead
Cabeza de Rogadora
Pomme de Douche
RP70172
▲
Showerhead
Cabeza de Rogadora
Pomme de Douche
RP6023
▲
Shower Arm
Brazo de la Rogadora
Tuyau de Pomme de Douche
RP6025
▲
Shower Flange
Pestaña de la Rogadora
Collerette
RP12630
▲
For Longer Screws
Para Tornillos Más Grandes
Pour Vis Plus Longues
RP46463
Cartridge Assembly
Cartucho
Cartouche
*
RP23336
O-Ring
Anillo "O"
Joint Torique
RP50880
▲
Trim Sleeve
Manga de Fran ja
Manchon de Finition
RP32105
Screw/Tornillo/Vis
NOTE: Do NOT
overtighten screw.
NOTA: NO apriete
demasiado el
tornillo.
NOTE: NE serrez
PAS trop la vis.
RP32102
Rotational Limit Stop
Tope para Limitar
Butée Rotative
RP51424
▲
Temperature Knob and Cover
Perilla de la Temperatura y Cubierta
Poigneé de Réglage de Température
RP51425
▲
Handle Assembly
Ensamble de la Manija
Poignée
RP28598
Decal (Red/Blue)
Etiqueta (Rojo/Azul)
Etiquette (Rouge/Bleu)
RP42915
▲
Tub Spout/Pull-Up Diverter
Tubo de Salida para Bañera/
Botón Desviador de Alzar
Bec/avec dérivation à tirette
RP196
▲
Trim Screws/Atornillos de
Franja/Vis de Finition
RP28795
▲
Escutcheon
Roseta
Rosace avec Orifice
68882 Rev. G
▲
Specify Finish / Especifíque el Acabado / Précisez le Fini
Refer to page 8 for more information. / Consulte con la página 8 para más información. /
Pour obtenir de plus amples renseignements, reportez-vous à la page 8.
*

T17082, T17085, T17282, T17285, T17285-H2O,T17482, T17485 &
T17485-H2O Models / Modelos / Modèles
18
RP48590
▲
Showerhead
Cabeza de Rogadora
Pomme de Douche
RP70175
▲
Showerhead
Cabeza de Rogadora
Pomme de Douche
RP46870
▲
Shower Arm
Brazo de la Rogadora
Tuyau de Pomme de Douche
RP40593
▲
Shower Arm
Brazo de la Rogadora
Tuyau de Pomme de Douche
RP40592
▲
Shower Flange
Pestaña de
la Rogadora
Collerette
RP52382
▲
Showerhead
Cabeza de Rogadora
Pomme de Douche
RP28795
▲
Escutcheon
Roseta
Rosace avec Orifice
RP12630
▲
For Longer Screws
Para Tornillos Más Grandes
Pour Vis Plus Longues
RP46463
Cartridge Assembly
Cartucho
Cartouche
*
RP23336
O-Ring
Anillo "O"
Joint Torique
RP50880
▲
Trim Sleeve
Manga de Fran ja
Manchon de Finition
RP32105
Screw/Tornillo/Vis
NOTE: Do NOT
overtighten screw.
NOTA: NO apriete
demasiado el
tornillo.
NOTE: NE serrez
PAS trop la vis.
RP53413
▲
Temperature Knob and Cover
Perilla de la Temperatura y Cubierta
Poigneé de Réglage de Température
RP53414
▲
Handle Assembly
Ensamble de la Manija
Poignée
RP32102
Rotational Limit Stop
Tope para Limitar
Butée Rotative
RP28598
Decal (Red/Blue)
Etiqueta (Rojo/Azul)
Etiquette (Rouge/Bleu)
RP28598
Decal (Red/Blue)
Etiqueta (Rojo/Azul)
Etiquette (Rouge/Bleu)
▲
Handle Assembly
Ensamble de la Manija
Poignée
RP40625
▲
Tub Spout/Pull-Up Diverter
Tubo de Salida para Bañera/
Botón Desviador de Alzar
Bec/avec dérivation à tirette
▲
Tub Spout/Pull-Up Diverter
Tubo de Salida para Bañera/
Botón Desviador de Alzar
Bec/avec dérivation à tirette
RP196
▲
Trim Screws/Atornillos de
Franja/Vis de Finition
68882 Rev. G
▲
Specify Finish / Especifíque el Acabado / Précisez le Fini
Refer to page 8 for more information. / Consulte con la página 8 para más información. /
Pour obtenir de plus amples renseignements, reportez-vous à la page 8.
*

T17086, T17286, T17286-H2O, T17486 & T17486-H2O
Models / Modelos / Modèles
19
RP70171
▲
Showerhead
Cabeza de Rogadora
Pomme de Douche
RP46870
▲
Shower Arm
Brazo de la Rogadora
Tuyau de Pomme de Douche
RP46872
▲
Shower Flange
Pestaña dela Rogadora
Collerette
RP12630
▲
For Longer Screws
Para Tornillos Más Grandes
Pour Vis Plus Longues
RP46463
Cartridge Assembly
Cartucho
Cartouche
*
RP53420
▲
Escutcheon
Roseta
Rosace avec Orifice
RP23336
O-Ring
Anillo "O"
Joint Torique
RP50880
▲
Trim Sleeve
Manga de Fran ja
Manchon de Finition
RP32105
Screw/Tornillo/Vis
NOTE: Do NOT
overtighten screw.
NOTA: NO apriete
demasiado el
tornillo.
NOTE: NE serrez
PAS trop la vis.
RP53417
▲
Temperature Knob and Cover
Perilla de la Temperatura y Cubierta
Poigneé de Réglage de Température
RP53418
▲
Handle Assembly
Ensamble de la Manija
Poignée
RP32102
Rotational Limit Stop
Tope para Limitar
Butée Rotative
RP49758
▲
Tub Spout/Pulll-down Diverter
Tubo de Salida para Bañera/Desviador de Halar
Bec/avec dérivation sur embout
RP49761
▲
Trim Plate
Chapa de guarnición
Plaque de finition
RP53419
▲
Tub Spout/Pull-Up Diverter
Tubo de Salida para Bañera/
Botón Desviador de Alzar
Bec/avec dérivation à tirette
RP28598
▲
Decal (Red/Blue)
Etiqueta (Rojo/Azul)
Etiquette (Rouge/Bleu)
RP196
▲
Trim Screws/Atornillos de
Franja/Vis de Finition
68882 Rev. G
▲
Specify Finish / Especifíque el Acabado / Précisez le Fini
Refer to page 8 for more information. / Consulte con la página 8 para más información. /
Pour obtenir de plus amples renseignements, reportez-vous à la page 8.
*

RP61269
▲
Tub Spout/Pull-Up Diverter
Tubo de Salida para Bañera/
Botón Desviador de Alzar
Bec/avec dérivation à tirette
T17092, T17292 & T17492 Models / Modelos / Modèles
RP6023
▲
Shower Arm
Brazo de la Rogadora
Tuyau de Pomme de Douche
20
RP61265
▲
Showerhead
Cabeza de Rogadora
Pomme de Douche
RP61270
▲
Escutcheon
Roseta
Rosace avec Orifice
RP12630
▲
For Longer Screws
Para Tornillos Más Grandes
Pour Vis Plus Longues
RP46463
Cartridge Assembly
Cartucho
Cartouche
*
RP23336
O-Ring
Anillo "O"
Joint Torique
RP50880
▲
Trim Sleeve
Manga de Fran ja
Manchon de Finition
RP32105
Screw/Tornillo/Vis
NOTE: Do NOT
overtighten screw.
NOTA: NO apriete
demasiado el
tornillo.
NOTE: NE serrez
PAS trop la vis.
RP61272
▲
Temperature Knob and Cover
Perilla de la Temperatura y Cubierta
Poigneé de Réglage de Température
RP32102
Rotational Limit Stop
Tope para Limitar
Butée Rotative
RP61271
▲
Handle Assembly
Ensamble de la Manija
Poignée
RP54863
▲
(Metal/Metálico/Métal)
Tub Spout/Non Diverter
Tubo de Salida para Bañera/
Sin Desviador
Bec/Sans Dérivation
RP61266
▲
Shower Flange
Pestaña de
la Rogadora
Collerette
RP196
▲
Trim Screws/Atornillos de
Franja/Vis de Finition
68882 Rev. G
▲
Specify Finish / Especifíque el Acabado / Précisez le Fini
Refer to page 8 for more information. / Consulte con la página 8 para más información. /
Pour obtenir de plus amples renseignements, reportez-vous à la page 8.
*
/