Kohler K-8362-CP Installation guide
- Category
- Sanitary ware
- Type
- Installation guide
Page is loading ...

Thank You For Choosing Kohler Company
Thank you for choosing Kohler Company. Your Kohler Company product reflects the
true passion for design, craftsmanship, artistry, and innovation Kohler Company stands
for. We are confident its dependability and beauty will surpass your highest expectations,
satisfying you for years to come.
All information in this guide is based upon the latest product information available at
the time of publication. At Kohler Company, we strive to fulfill our mission of improving
the level of gracious living for each person who is touched by our products and services.
We reserve the right to make changes in product characteristics, packaging, or
availability at any time without notice.
Please take a few minutes to review this guide. Pay special attention to the care and
cleaning instructions.
Merci d’avoir choisi la compagnie Kohler
Merci d’avoir choisi la compagnie Kohler. Votre produit de la compagnie Kohler reflète la
véritable passion du design, d’artisanat, d’art et d’innovation représentant la compagnie
Kohler. Nous sommes confiants que sa fiabilité et beauté surpasseront vos exigences les
plus élevées, vous satisfaisant pendant les années à venir.
Toute information contenue dans ce guide est basée sur l’information la plus récente du
produit disponible au moment de la publication. A la compagnie Kohler, nous aspirons à
remplir notre mission d’améliorer le niveau de vie gracieux pour chaque individu affecté
par nos produits et services. Nous nous réservons le droit d’apporter des modifications
aux caractéristiques, emballages et disponibilités des produits à tout moment, et ce sans
préavis.
Veuillez prendre s’il vous plaît quelques minutes pour étudier ce guide. Prêter une
attention toute particulière aux instructions d’entretien et de nettoyage.
Gracias por elegir los productos Kohler
Gracias por elegir los productos de Kohler. Su producto de Kohler Company refleja la
verdadera pasión por el diseño, la mano de obra, la artesanía y la innovación que
forman parte de Kohler Company. Estamos seguros que su confiabilidad y belleza
excederán sus más altas expectativas, dándole satisfacción por años.
Toda la información que aparece en la guía está basada en la información más reciente
disponible al momento de publicación. En Kohler Company, nos esforzamos por alcanzar
nuestra misión de mejorar el nivel del buen vivir de quienes disfrutan de nuestros
productos y servicios. Nos reservamos el derecho de efectuar cambios en las
características, embalaje o disponibilidad del producto en cualquier momento, sin previo
aviso.
Dedique unos minutos para leer esta guía. Preste especial atención a las instrucciones de
cuidado y limpieza.
1089448-2-A 2 Kohler Co.

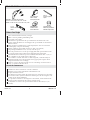
Tools/Outils/Herramientas
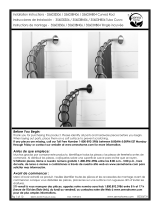
Before You Begin
Please read all instructions before you begin.
Observe all local plumbing and building codes.
Shut off the water supply.
The dimensions given assume the spout and bath are mounted on the same
surface. Adjust the dimensions accordingly if the spout and bath are mounted on
different surfaces.
If this product is installed with an overflowing bath, the outer rim of the bath
should slightly overlap the 2x4 framing.
Installer supplied copper tubing must be 5/8″ OD (1/2″ Nominal).
The plaster guard diameter is 7/8″ (2.2 cm) from the spout.
Leave the protective sleeve on the spout supply tube until spout installation. This
is an O-ring sealing surface which may be damaged when unprotected.
The finished wall to which the spout is installed should add less than 1-1/2″ (3.8
cm) of thickness to the outside of the rough-in wall.
For installation on baths other than an overflowing bath, a wider deck may be
required. Carefully review this document and any appropriate rough-in sheets.
Design the bath enclosure accordingly.
Kohler Co. reserves the right to make revisions in the design of faucets without
notice, as specified in the Price Book.
Avant de commencer
Veuillez lire toutes les instructions avant de commencer.
Respecter tous les codes de plomberie et de bâtiment locaux.
Couper l’alimentation d’eau.
Les dimensions fournies partent du principe que le bec et la baignoire sont montés
sur la même surface. Ajuster les dimensions sachant que le bec et la baignoire sont
montés sur des surfaces différentes.
Si le produit est installé avec une baignoire à déversement, le rebord extérieur de
la baignoire devra légèrement chevaucher le cadrage de 2x4.
La tuyautrerie en cuivre fourni par l’installateur doit être de Ø Ext 5/8″ (1/2″
nominal).
Plumbers Putty
Mastic de plomberie
Masilla de plomería
Level
Niveau à bulle
Nivel
Pencil
Crayon à papier
Lápiz
Drill with 1-1/4" and 7/8" Hole Bits
Perceuse avec nèches de 1-1/4" et 7/8"
Taladro con brocas de corona de 1-1/4" y 7/8"
Masking Tape
Ruban cache
Cinta adhesiva
Tape Measure
Mètre ruban
Cinta para medir
Kohler Co. 3 1089448-2-A
Page is loading ...

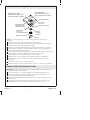
1. Prepare the Site
NOTE: Required mounting plate locations vary by model. The wall may be higher
than 21-1/2″ (54.6 cm), but the hole for the mounting bracket must be a certain height
from the floor for your specific model. Refer to the illustration above for mounting
bracket locations.
Construct a 2x4 surround around the overflowing bath. For other bathing fixtures,
reference the dimensions for your chosen installation.
For K-8359 only: depending on the design of the finished wall, the 2x4 may be cut
down to fit flush with the rough wall exterior and match the overflowing bath
outer rim height.
Locate the position on the surround framing where the spout will be mounted
and mark the side of the top and base 2x4.
From the base 2x4 mark, measure 3-1/4″ (8.3 cm) from the outside surface of the
surround framing. Mark this location on the floor.
Cut a 7/8″ (2.2 cm) hole for the stem mounting assembly.
Locate the height for the mounting plate hole according to the dimensions in the
illustration above for your specific model.
Drill a 1-1/4″ (3.2 cm) diameter by 2-1/4″ (5.7 cm) deep hole using the marked
location as the center point.
Spout Base Location
7/8" (2.2 cm) D. Hole
Emplacement de la base du bec
Orifice Ø 7/8" (2,2 cm)
Ubicación de la base del surtidor
Orificio de 7/8" (2,2 cm) D.
K-8359
K-8361
K-8362
3-1/4" (8.3 cm)
Mounting Plate Location
1-1/4" (3.2 cm) D. Hole
Emplacement de la plaque de fixation
Orifice drain Ø 1-1/4" (3,2 cm)
Ubicación de la placa de montaje
Orificio de 1-1/4" (3,2 cm) D.
= 20-1/2" (52.1 cm)
= 16-5/8" (42.2 cm)
= 18-5/8" (47.3 cm)
Mark here.
Marquer ici.
Marque aquí.
Kohler Co. 5 1089448-2-A
Page is loading ...

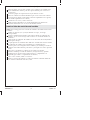
1. Install the Spout Supply Tube
NOTE: Leave the protective sleeve on the spout supply tube until the spout
installation.
Drill a 7/8″ (2.2 cm) D. hole at the proper location in the floor.
Slide the brass washer from the bottom of the spout supply tube over the threads
until the washer reaches the supply tube shoulder.
Insert the spout supply tube through the mounting hole from the top of the floor.
The flat portion of the brass washer should face forward. The spout supply tube
will be suspended by the brass washer.
Slide the plate (oriented with the tabs toward the deck) and washer onto the spout
supply tube from the bottom and thread on the nut. Tighten the nut.
Secure the plate to the rough deck with two wood screws.
Slide the washer onto the supply tube and thread the nut on and tighten it.
Ensure that the valves are closed (cold = fully counterclockwise; hot = fully
clockwise).
Attach the tee to the valves; solder, if required.
Plumb the supply to the supply tube using 1/2″ Nom. or 5/8″ OD copper tubing.
Installer le tube d’alimentation du bec
REMARQUE: Laisser en place le manchon de protection du tube d’alimentation du
bec jusqu’à l’installation de ce dernier.
Percer un trou de 7/8″ (2,2 cm) de diamètre au bon emplacement dans le sol.
Glisser une rondelle en laiton sur le filetage du tube d’alimentation du bec et
contre l’épaulement du tube d’alimentation d’eau.
Insérer le tuyau d’alimentation d’eau au bec à travers l’orifice de fixation à partir
du dessus du sol.
La partie plate de la rondelle en laiton devrait faire face vers l’avant. Le tube
d’alimentation du bec sera suspendu à l’aide d’une rondelle en laiton.
Spout Supply Tube
Tuyau d'alimentation du bec
Tubo de suministro del surtidor
Brass Washer
Rondelle en laiton
Arandela de latón
Wood Screw
Vis à bois
Tornillo para madera
Washer
Rondelle
Arandela
Supply Tube Shoulder
Épaule de tube d'alimentation
Reborde del tubo de suministro
Wood Screw
Vis à bois
Tornillo para madera
Tee/T/T
Plate/Plaque/Placa
Nut/Écrou/Tuerca
Kohler Co. 7 1089448-2-A
Page is loading ...

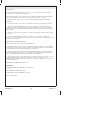
2. Check the Valve Operation
WARNING: Risk of personal injury. Wrap a cloth towel around the pipe plug to
prevent water spray. Water will purge from the supply tube when you remove
the plug.
Thread a 3/8″ pipe plug into the top of the spout supply tube.
Ensure that the valves are in the closed position. Turn the cold valve fully
couterclockwise. Turn the hot valve fully clockwise.
Turn on the main water supply.
Check the complete installation for leaks with the valve closed and open.
Repair leaks as needed.
Close both valves and turn off the main water supply.
Carefully loosen the pipe plug to remove pressure.
Thread the pipe plug back into the spout supply tube.
Install the cardboard plaster guards over both valves and the spout supply tube.
Vérifier l’opération de la valve
AVERTISSEMENT: Risque de blessures corporelles. Enrouler une serviette
autour du bouchon du tuyau pour empêcher l’eau de gicler. L’eau purgera du
tube d’alimentation lorsque le bouchon sera retiré.
Visser un bouchon de 3/8″ (1 cm) sur le tuyau d’alimentation du bec.
S’assurer que les valves soient en position fermée. Tourner la valve d’eau froide
complètement vers la gauche. Tourner la valve d’eau chaude complètement vers la
droite.
Ouvrir l’alimentation d’eau principale.
Vérifier qu’il n’y ait pas de fuites dans l’installation avec la valve fermée et
ouverte.
Réparer les fuites au besoin.
Fermer les deux valves et l’alimentation principale d’eau.
Dévisser doucement le bouchon du tuyau de manière à libérer la pression.
Brass Washer
Rondelle en laiton
Arandela de latón
3/8" Pipe Plug
Bouchon tuyau de 3/8"
Tapón de tubo de 3/8"
Spout Supply Tube
Tuyau d'alimentation du bec
Tubo de suministro del surtidor
Supply Tube Shoulder
Épaule de tube d'alimentation
Reborde del tubo de suministro
Kohler Co. 9 1089448-2-A
Page is loading ...

Install the Spout Support (cont.)
Make sure the O-ring is in the groove on the inside of the escutcheon.
Slide the escutcheon onto the standoff rod.
Installer le support du bec
Installer la plaque de fixation dans l’orifice du mur brut.
Sécuriser avec les vis fournies.
Visser la tige dans le montant jusqu’à l’arrêt.
S’assurer que le joint torique soit dans la rainure à l’intérieur de l’applique.
Glisser l’applique sur la tige à distance.
Instale el soporte del surtidor
Instale la placa de montaje en el orificio de la pared con las conexiones de
plomería.
Fije con los tornillos provistos.
Enrosque la varilla de separación en el montaje hasta que se detenga.
Asegúrese de que el arosello (O-ring) esté en la ranura del interior del chapetón.
Deslice el chapetón por la varilla de separación.
4. Install the Spout
Remove the plaster guard from the supply tube.
Slide the spout over the supply tube.
Adjust the height by loosening the locknut and rotating the base as needed.
Thread the standoff rod out of the mounting base and into the spout by hand.
Check for proper fit following the diagram above.
2-1/4"
(5.7 cm)
K-8359
K-8361
K-8362
Standoff Rod
Tige à distance
Varilla de separación
Locknut
Contre-écrou
Contratuerca
Spout Base
Base du bec
Base del surtidor
Water/Eau/Agua
3-1/4" (8.3 cm)
= 20-1/2" (52.1 cm)
= 16-5/8" (42.2 cm)
= 18-5/8" (47.3 cm)
Kohler Co. 11 1089448-2-A

Install the Spout (cont.)
Trace the spout base on the rough floor with a pencil. The circle serves as the floor
rough-in guide.
Tighten the locknut and thread the standoff rod back into the mounting base.
Remove the spout and standoff rod.
Replace the plaster guards.
Installer le bec
Retirer le renfort de plâtre du tube d’alimentation.
Glisser le bec sur le tuyau d’alimentation.
Ajuster la hauteur en desserrant le contre-écrou et pivotant la base selon la
nécessité.
Dévisser la tige hors de la base de fixation et visser dans le bec à la main.
Vérifier le bon ajustement selon le diagramme ci-dessus.
Tracer la base du bec sur le sol brut avec un crayon. Le cercle sert de guide de
raccordement au sol.
Serrer le contre-écrou et visser la tige à distance sur la base de fixation.
Retirer le bec et la tige à distance.
Replacer les renforts en plâtre.
Instale el surtidor
Retire el protector de yeso del tubo de suministro.
Deslice el surtidor sobre el tubo de suministro.
Ajuste la altura aflojando la contratuerca y girando la base según sea necesario.
Desenrosque la varilla de separación de la base de montaje y en el surtidor con la
mano.
Verifique que encaje bien siguiendo el diagrama mostrado más arriba.
Trace la base del surtidor en el piso no acabado con un lápiz. El círculo sirve
como guía de la instalación de plomería en el piso.
Apriete la contratuerca y vuelva a enroscar la varilla de separación en la base de
montaje.
Retire el surtidor y la varilla de separación.
Vuelva a colocar los protectores de yeso.
1089448-2-A 12 Kohler Co.

5. Complete the Installation
Install the finished floor and walls. Leave the marked area at the base of the spout
clear.
Install the spout and attach the standoff rod.
Attach the base of the spout to the exposed subfloor with the provided screws.
Slide the base and standoff escutcheon into place.
Ensure that both faucet handles are turned off (hot = clockwise, cold =
counterclockwise).
Remove the aerator assembly.
Turn on the hot and cold valves and run water through the spout to remove
debris. Check for leaks.
Turn off the hot and cold valves.
Install the aerator.
Compléter l’installation
Installer le sol fini ainsi que les murs. Laisser l’emplacement marqué à la base du
bec clair.
Installer le bec et attacher la tige à distance.
Attacher la base du bec au plancher exposé avec les vis fournies.
Glisser la base et l’applique en place.
S’assurer que les deux poignées de robinet soit fermées, (chaud = vers la droite,
froid = vers la gauche).
Retirer l’ensemble de l’aérateur.
Ouvrir les valves d’eau chaude et froide et faire couler l’eau à travers le bec pour
chasser tous les débris. Vérifier s’ilyadesfuites.
Fermer les valves d’eau chaude et froide.
Installer l’aérateur.
Spout
Bec
Surtidor
Aerator
Aérateur
Aireador
Kohler Co. 13 1089448-2-A

Termine la instalación
Instale el acabado del piso y las paredes. Deje despejada la zona marcada en la
base del surtidor.
Instale el surtidor y monte la varilla de separación.
Fije la base del surtidor al subpiso expuesto con los tornillos provistos.
Deslice la base y el chapetón de separación en su lugar.
Verifique que ambas manijas de la grifería estén cerradas (agua caliente = derecha;
agua fría = izquierda).
Retire el montaje del aireador.
Abra las válvulas del agua fría y caliente y deje correr el agua por el surtidor para
eliminar los residuos. Verifique que no haya fugas.
Cierre las válvulas del agua fría y caliente.
Instale el aireador.
Care and Cleaning
For best results, keep the following in mind when caring for your KOHLER product:
•
Use a mild detergent such as liquid dishwashing soap and warm water for
cleaning. Do not use abrasive cleaners that may scratch or dull the surface.
•
Carefully read the cleaner product label to ensure the cleaner is safe for use on the
material.
•
Always test your cleaning solution on an inconspicuous area before applying to
the entire surface.
•
Do not allow cleaners to sit or soak on the surface.
•
Wipe surfaces clean and rinse completely with water immediately after cleaner
application. Rinse and dry any overspray that lands on nearby surfaces.
•
Use a soft, dampened sponge or cloth. Never use an abrasive material such as a
brush or scouring pad to clean surfaces.
For detailed cleaning information and products to consider, visit www.kohler.com/clean.
To order Care & Cleaning information, call 1-800-456-4537.
Entretien et nettoyage
Pour de meilleurs résultats, prendre ce qui suit en considération lors de l’entretien de
votre produit KOHLER:
•
Utiliser un détergent doux tel que liquide pour vaisselle et de l’eau chaude pour
nettoyer. Ne pas utiliser de nettoyants abrasifs car ils pourraient rayer ou abîmer
la surface.
•
Lire attentivement l’étiquette du produit de nettoyage pour vérifier qu’il soit
adéquat à utiliser sur le matériau.
•
Toujours tester la solution de nettoyage sur une surface la moins évidente avant
de l’appliquer sur la totalité de la surface.
•
Ne pas permettre aux nettoyants de reposer sur la surface.
•
Essuyer les surfaces et rincer complètement avec de l’eau immédiatement après
l’application du nettoyant. Rincer et sécher tout éclaboussement sur les surfaces
avoisinantes.
•
Utiliser une éponge ou un chiffon doux et humide. Ne jamais utiliser de matériau
abrasif tel que brosse ou éponges à récurer pour nettoyer les surfaces.
Pour l’information détaillée de nettoyage et des produits à considérer, visiter
www.kohler.com/clean. Pour commander des informations d’entretien et de nettoyage,
composer le 1-800-456-4537.
1089448-2-A 14 Kohler Co.

Cuidado y limpieza
Para obtener los mejores resultados, tenga presente lo siguiente al limpiar su producto
KOHLER:
•
Para la limpieza, utilice solamente un detergente suave como el jabón líquido para
lavar platos y agua tibia. No utilice limpiadores abrasivos que puedan rayar u
opacar la superficie.
•
Lea atentamente la etiqueta del producto de limpieza para asegurar que no
presente riesgos al usarse en el material.
•
Siempre pruebe la solución de limpieza en un área oculta antes de aplicarla a toda
la superficie.
•
No deje por tiempo prolongado los limpiadores en la superficie.
•
Limpie con un trapo y enjuague completa e inmediatamente con agua después de
aplicar limpiadores. Enjuague y seque las superficies cercanas que se hayan
rociado.
•
Utilice una esponja o trapo suave y húmedo. Nunca utilice materiales abrasivos
como cepillos o estropajos de tallar para limpiar las superficies.
Para obtener información detallada de limpieza y los limpiadores a considerar, visite
www.kohler.com/clean. Para solicitar información sobre el cuidado y la limpieza, llame
al 1-800-456-4537.
Lifetime Limited Warranty
Kohler Co. warrants its faucets manufactured after January 1, 1997, to be leak and drip
free during normal residential use for as long as the original consumer purchaser owns
his/her home. *If the faucet should leak or drip during normal use, Kohler will, free of
charge, mail to the purchaser the cartridge necessary to put the faucet in good working
condition.
Kohler also warrants all other aspects of the faucet, except gold finish, to be free of
defects in material and workmanship during normal residential use for as long as the
original consumer purchaser owns his/her own home. If a defect is found in normal
residential use, Kohler Co. will, at its election, repair, provide a replacement part or
product, or make appropriate adjustment. Damage to a product caused by accident,
misuse, or abuse is not covered by this warranty. Proof of purchase (original sales
receipt) must be provided to Kohler with all warranty claims. Kohler Co. is not
responsible for labor charges, installation, or other consequential costs. In no event shall
the liability of Kohler exceed the purchase price of the faucet.
If the faucet is used commercially, Kohler warrants the faucet to be free from defects in
material and workmanship for one (1) year from the date the product is installed, with
all other terms of this warranty applying except duration.
If you believe that you have a warranty claim, contact Kohler Co., either through your
Dealer, Plumbing Contractor, Home Center or E-tailer, or by writing: Kohler Co., Attn.:
Customer Service Department, 444 Highland Drive, Kohler, WI 53044, USA. Please be
sure to provide all pertinent information regarding your claim, including a complete
description of the problem, the product, model number, color, finish, the date the
product was purchased and from whom the product was purchased. Also include your
original invoice. For other information, or to obtain the name and address of the service
and repair facility nearest you, call 1-800-4-KOHLER from within the USA,
1-800-964-5590 from within Canada and 001-877-680-1310 from within Mexico.
The foregoing warranties are in lieu of all other warranties, express or implied,
including but not limited to the implied warranties of merchantability and fitness for
a particular purpose.
Seller disclaims any liability for special, incidental or consequential damages. Some
states/provinces do not allow limitations of how long an implied warranty lasts or the
exclusion or limitation of such damages, so these limitations and exclusions may not
Kohler Co. 15 1089448-2-A
Page is loading ...
Page is loading ...

One-Year Warranty
KOHLER CO.
It is recommended that at the time of purchase, you verify that all accessories and
components are complete in this package.
This Kohler product is warranted to be free of defects in material and workmanship for
one (1) year from the date of purchase as shown on the invoice or receipt.
1. Kohler Co. will only service its commercialized products through its authorized
distributors.
2. To obtain warranty service, please present the invoice and corresponding warranty.
3. Through its authorized distributors, Kohler Co. promises to repair the defective
product or provide a new replacement or an equivalent model (in those cases that the
model has been discontinued) when the product is beyond repair, without any charge to
the consumer.
4. The time of repair will not exceed six (6) weeks commencing on the date the product
is received.
5. It is recommended that the consumer save the invoice or receipt as additional
protection, as it may substitute the warranty in the case that there is a discrepancy in the
validity of the warranty.
EXCEPTIONS AND RESTRICTIONS
The Warranty will not be valid in the following cases:
1. When the product is not operated in accordance with the instructions concerning use
and operation set forth in the owner’s manual or installation instructions, and when the
recommendations and warnings included are not observed.
2. When the product has been modified or dismantled partially or totally; or has been
used in a negligent fashion and as a consequence has suffered damages attributable to
the consumer, individual, or hardware not authorized by Kohler Co.
3. This warranty does not cover the damages as a result of disaster such as fire or acts of
God, including flooding, earthquake, or electric storms, etc. To obtain a list of
distributors in your area where you can exercise your rights under this warranty, please
call 001-877-680-1310.
KOHLER CO., KOHLER, WI 53044 U.S.A.
IMPORTER:
INTERNACIONAL DE CERÁMICA, S.A.B. DE C.V.
AV. CARLOS PACHECO NO. 7200
CHIHUAHUA, CHIH., MEXICO C.P. 31060
TEL: 52 (14) 29-11-11
1089448-2-A 18 Kohler Co.
Page is loading ...

Service Parts/Pièces de rechange/Piezas de repuesto
**Finish/color code must be specified when ordering.
**Vous devez spécifier les codes de la finition et/ou de la couleur
quand vous passez votre commande.
**Se debe especificar el código del acabado/color con el pedido.
38820
O-Ring
Joint torique
Arosello
1008772**
Aerator
Aérateur
Aireador
1006088**
Upper Spout
Bec supérieur
Surtidor superior
1088968**
[X = 16-1/8"(41 cm)]
[X = 19-1/8"(48.6 cm)]
1006098**
Mount
Monture
Montura
1006091
Screw
Vis
Tornillo
1006758**
Rod
Tige
Varilla
42084
O-Ring
Joint torique
Arosello
1088965**
Tube/Tuyau/Tubo
1088964**
1006094**
[Y = 15-1/4"(38.7 cm)]
[Y = 17-1/4"(43.8 cm)]
[Y = 19-3/16"(48.7 cm)]
65874
O-Ring/Joint torique/Arosello
29464
O-Ring/Joint torique/Arosello
1006760**
Escutcheon
Applique
Chapetón
1006836**
Hex Nut
Écrou hexagonal
Tuerca hexagonal
1006091
Screw/Vis/Tornillo
32725
O-Ring/Joint torique/Arosello
1006099**
Base/Base/Base
29464
O-Ring
Joint torique
Arosello
Y
X
1006759**
Escutcheon
Applique
Chapetón
1089448-2-A
-
 1
1
-
 2
2
-
 3
3
-
 4
4
-
 5
5
-
 6
6
-
 7
7
-
 8
8
-
 9
9
-
 10
10
-
 11
11
-
 12
12
-
 13
13
-
 14
14
-
 15
15
-
 16
16
-
 17
17
-
 18
18
-
 19
19
-
 20
20


Kohler K-8362-CP Installation guide
- Category
- Sanitary ware
- Type
- Installation guide
Ask a question and I''ll find the answer in the document
Finding information in a document is now easier with AI
in other languages
- français: Kohler K-8362-CP Guide d'installation
- español: Kohler K-8362-CP Guía de instalación
Related papers
-
Kohler K-7304-5A-CP Installation guide
-
Kohler K-394-4-BN User manual
-
-
-
-
Kohler 1284-96 User manual
-
Kohler 10413-G User manual
-
-
-
Other documents
-
Black Bull 802580 User manual
-
 Zenna Home 35603HB04 Installation guide
-
American Standard R350.000 Installation guide
-
HOUSE OF ROHL RH0506F1 User manual
-
Sterling 71311100-0 Installation guide
-
Kallista P31571-00-CP Installation guide
-
 A&E Bath & Shower 151010 Operating instructions
-
-
Sterling 71120120-0 Installation guide
-
Sterling 71240110-0 Installation guide

