4
5
Quick Start Guide
1. Verify the battery is installed and both
battery cables are attached to their
corresponding polarity.
Compruebe que la batería esté instalada y que ambos cables de la
batería estén conectados a los terminales de la polaridad correcta.
Vérifier si la batterie est installée et si ses câbles sont fixés à la
polarité correspondante.
2. Make sure nothing is plugged into power outlets.
Asegúrese de que no haya nada enchufado en los
tomacorrientes eléctricos.
S’assurer qu’aucun appareil n’est branché dans les prises de courant.
3. Make sure the circuit breakers are properly
set to operating.
Asegúrese de que los disyuntores estén en la posición correcta.
S’assurer que les disjoncteurs sont correctement réglés.
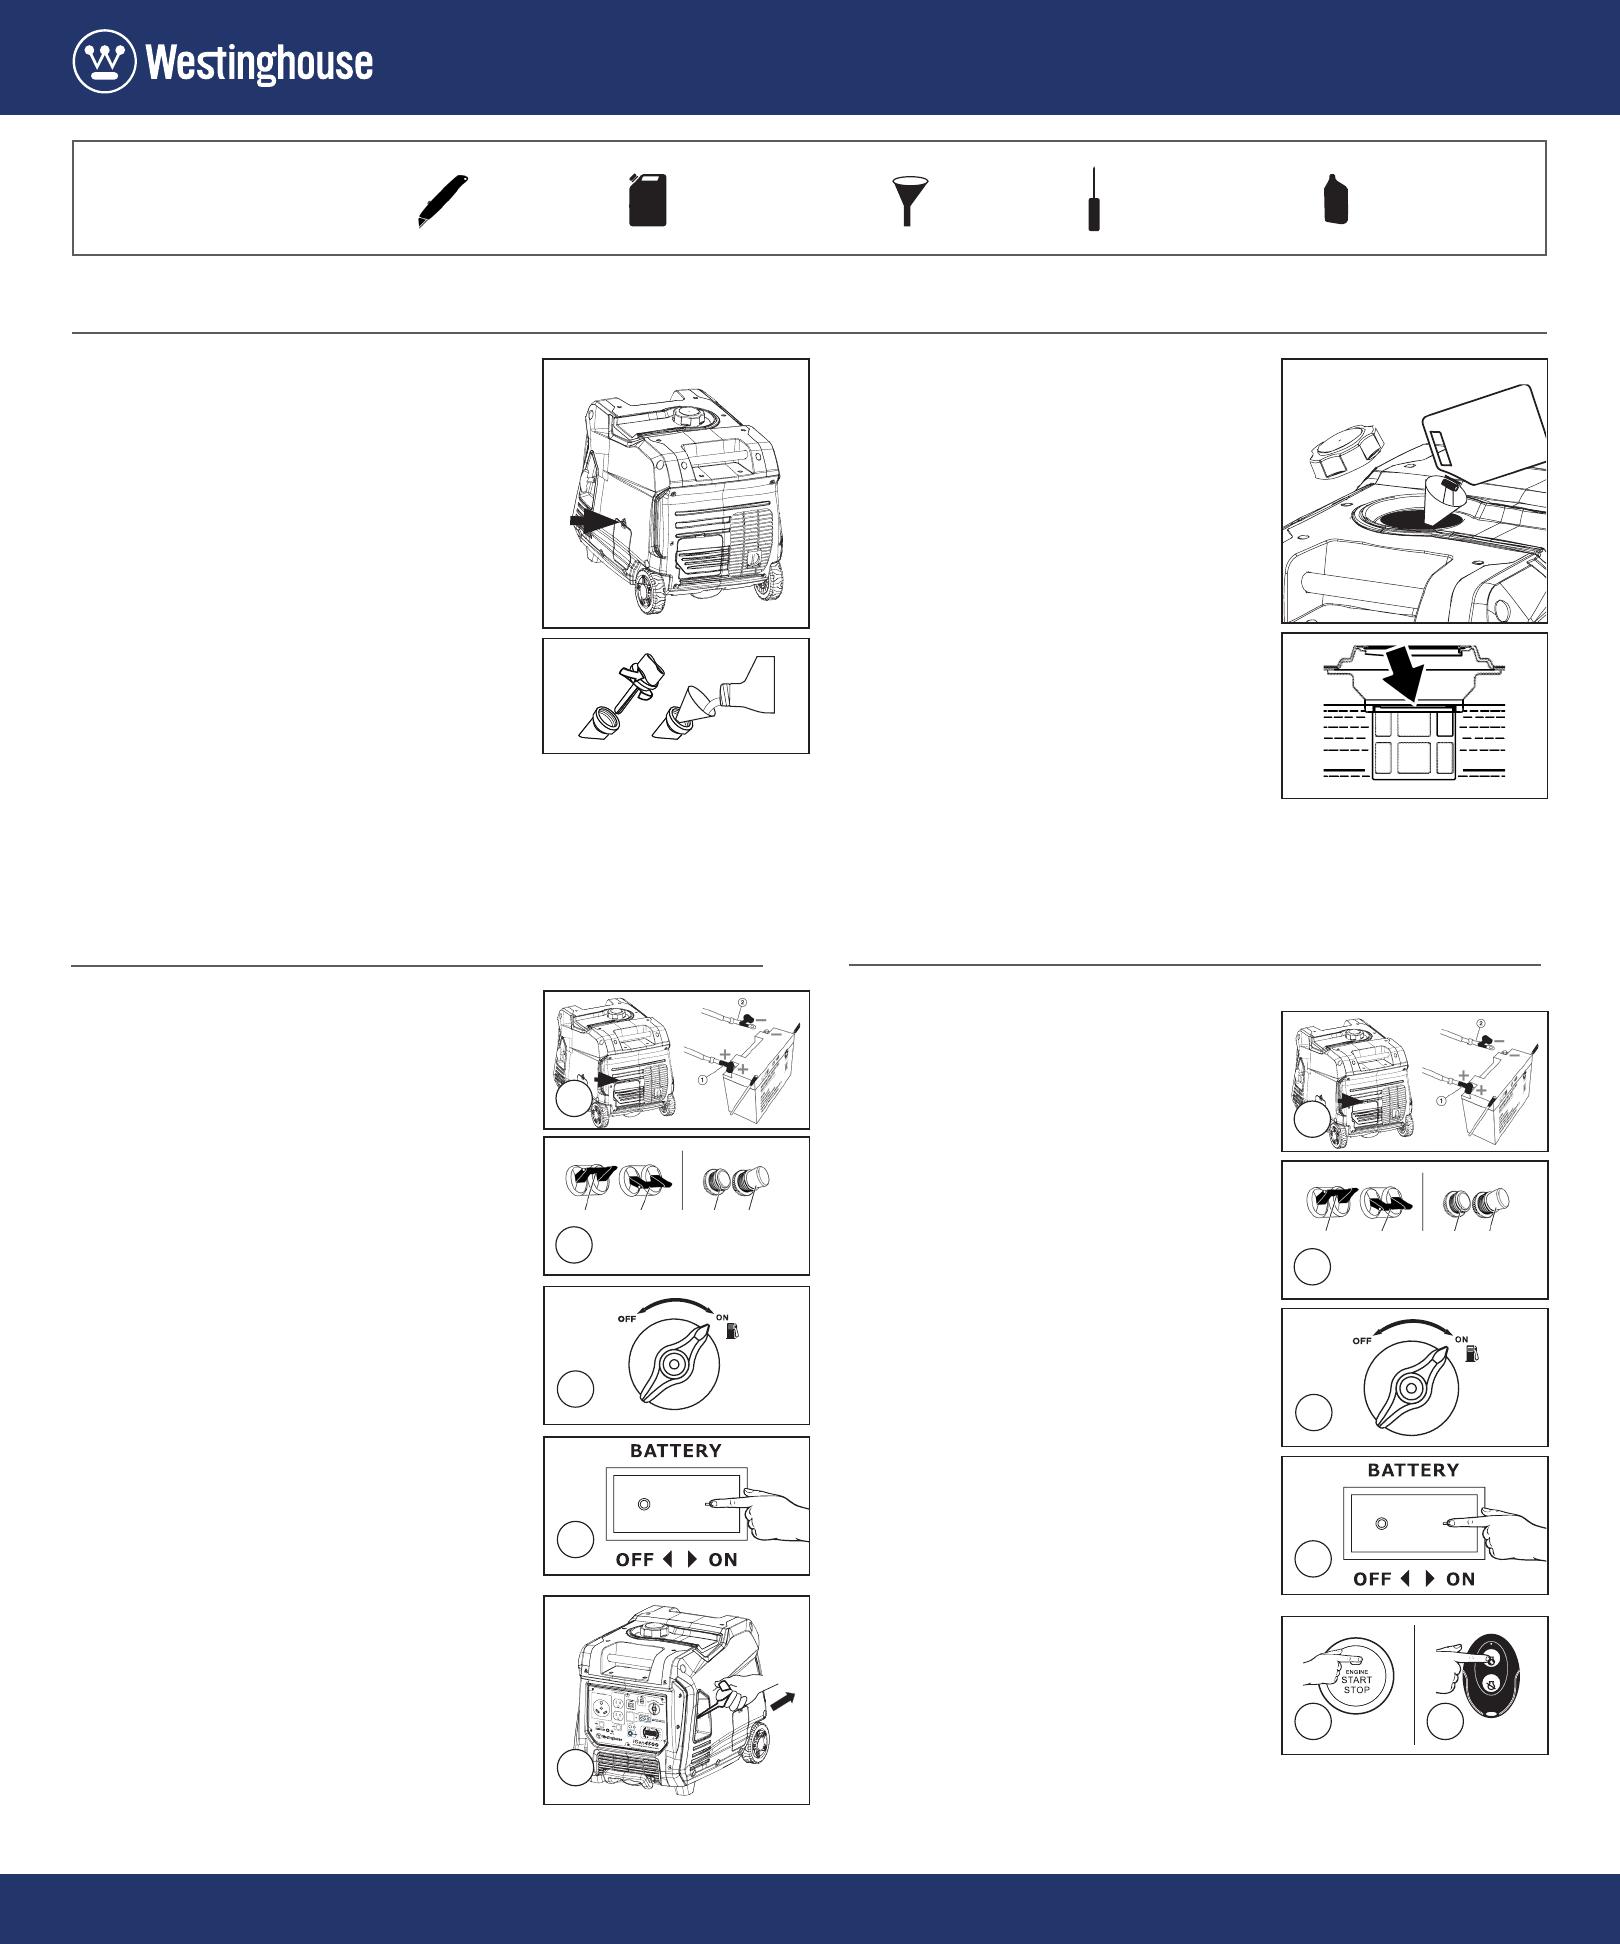
4. Turn the Fuel Control Switch to the
ON position.
Gire el interruptor de control del combustible a la posición ON.
Tournez le commutateur de carburant sur la position ON.
5. Switch the battery ON.
Cambie la batería a ON.
Mettez la batterie sous tension.
6. Firmly grasp and pull the recoil handle slowly
until you feel increased resistance. At this
point, apply a rapid pull while pulling out
from the inverter.
Sujete firmemente la cuerda de arranque y tire de ella lentamente
hasta que sienta resistencia. En este punto, tire rápidamente hacia
arriba y alejándose algo del generador.
Saisir fermement la poignée de lanceur et la tirer doucement
jusqu’à ce que vous sentiez une augmentation de la résistance. À ce
moment, tirer sur celle-ci rapidement tout en l’amenant vers le haut
et en l’éloignant légèrement de la génératrice.
7. Plug in electronic devices.
Enchufe los dispositivos electrónicos.
Brancher les appareils électroniques.
1. Verify the battery is installed and both
battery cables are attached to their
corresponding polarity.
Compruebe que la batería esté instalada y que ambos cables de la
batería estén conectados a los terminales de la polaridad correcta.
Vérifier si la batterie est installée et si ses câbles sont fixés à la
polarité correspondante.
2. Make sure nothing is plugged into
power outlets.
Asegúrese de que no haya nada enchufado en los
tomacorrientes eléctricos.
S’assurer qu’aucun appareil n’est branché dans les prises de courant.
3. Make sure the circuit breakers are properly
set to operating.
Asegúrese de que los disyuntores estén en la posición correcta.
S’assurer que les disjoncteurs sont correctement réglés.
4. Turn the Fuel Control Switch to the
ON position.
Gire el interruptor de control del combustible a la posición ON.
Tournez le commutateur de carburant sur la position ON.
5. Switch the battery ON.
Cambie la batería a ON.
Mettez la batterie sous tension
6. Push and hold the engine start button for 1
second and release.
Mantenga pulsado el botón de arranque del motor durante 1
segundo y suelte.
Poussez et maintenez le bouton de démarrage du moteur pendant 1
seconde et relâchez.
7. For remote start click the START button on the
wireless remote.
Para el inicio remoto, haga clic en el botón “INICIO” en el control
remoto inalámbrico.
Pour le démarrage à distance, cliquez sur le bouton “START” de la
télécommande sans fil.
8. Plug in electronic devices.
Enchufe los dispositivos electrónicos.
Brancher les appareils électroniques.
1. Add Engine Oil
Agregar aceite al motor | Ajouter de l’huile pour moteurs
a. Unclip and remove the oil service panel to
access the oil/fill drain plug.
Desenganche y retire el panel de servicio de aceite para acceder
al tapón de drenaje de aceite / llenado.
Déclipser et retirer le panneau du service d’huile pour accéder
au bouchon de vidange d’huile / remplissage.
b. Remove oil fill plug/dipstick.
Quite el tapón de llenado/varilla de medición.
Retirer le bouchon du goulot de remplissage/la jauge.
c. Using the supplied 4-cycle engine oil
and funnel, slowly add engine oil to the
engine until full.
Con el aceite para motor de 4 tiempos que se suministra y el embudo,
agregue lentamente aceite al motor hasta llenarlo.
Au moyen de l’entonnoir (inclus), ajouter lentement l’huile pour
moteurs à 4 temps (fournie) jusqu’à ce que le réservoir soit plein.
d. Do not overfill, if oil level is too high, oil
will drain out through the fill plug.
No llene demasiado, si el nivel de aceite es demasiado alto, el
aceite se drenará a través del tapón de llenado.
Ne pas trop remplir, si le niveau d’huile est trop élevé, l’huile
s’écoule par le bouchon de remplissage.
2. Add Unleaded Gasoline to Gas Tank
Agregar gasolina sin plomo al depósito de gasolina
Ajouter de l’essence sans plomb au réservoir
a. Unscrew gas cap on top of tank and
insert a clean funnel into the tank.
Desenrosque el tapón del depósito de gasolina e
introduzca el embudo en el orificio.
Desserrer le capuchon situé au-dessus du réservoir et y
insérer un entonnoir propre.
b. Slowly add gasoline into the fuel tank.
The gasoline level should NOT be
higher than the filler neck.
Lentamente, agregue gasolina al depósito de gasolina. El nivel
de gasolina NO debe superar el cuello del depósito.
Ajouter lentement de l’essence dans le réservoir. Le niveau
d’essence NE doit PAS dépasser le goulot de remplissage.
c. Secure gas cap.
Asegure el tapón de la gasolina.
Revisser le capuchon du réservoir.
BEFORE STARTING | ANTES EMPEZAR | AVANT DE COMMENCER
MANUAL STARTING
ARRANQUE MANUAL | DÉMARRAGE MANUEL
ELECTRIC STARTING
ARRANQUE ELÉCTRICO | DÉMARRAGE ÉLECTRIQUE
3
6
6
3
Utility Knife
(not included)
Cúter (no incluido)
Couteau tout usage
(non inclus)
Fresh clean unleaded
gasoline (not included)
Gasolina sin plomo fresca y
limpia (no incluida)
Essence sans plomb, neuve
et propre (non incluse)
Funnel (included)
Embudo (incluido)
Entonnoir (non inclus)
Screw Driver (not included)
Destornillador (no incluida)
Screw Driver (non incluse)
4-stroke engine oil
(included)
Aceite para motores de 4
tiempos (incluido)
Huile pour moteurs à 4
temps (incluse)
TOOLS YOU WILL NEED
HERRAMIENTAS QUE NECESITARÁ
OUTILS NÉCESSAIRES
Guía de inicio rápido del inversor
Guide de démarrage rapide de l’onduleur
Questions? Call 855.944.3571 or email service@wpowereq.com
¿Tiene preguntas? Llame al 855.944.3571 o escriba a service@wpowereq.com
Des questions? Téléphoner au 855 944-3571 ou envoyer un courriel à service@wpowereq.com
Operating Tripped Operating Tripped
Operating Tripped Operating Tripped
4
5
Positive
(Red)
Negative
(Black)
Positive
(Red)
Negative
(Black)
1
1
5
START
STOP

