Page is loading ...

THANK YOU
We appreciate the trust and condence you have placed in Hampton Bay through the purchase of this gazebo. We strive to continually create
quality products designed to enhance your home. Visit us online to see our full line of products available for your home improvement needs.
Thank you for choosing Hampton Bay!
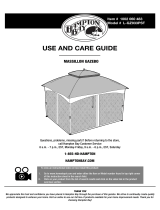
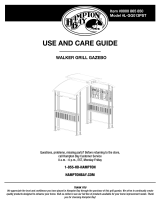
USE AND CARE GUIDE
11 FT. X 11 FT. GAZEBO
Questions, problems, missing parts? Before returning to the store,
call Hampton Bay Customer Service
8 a.m. - 7 p.m., EST, Monday – Friday, 9 a.m. – 6 p.m., EST, Saturday
1-855-HD-HAMPTON
HAMPTONBAY.COM
Item #1000 000 000
Model #FSC17008

2
Table of Contents
Table of Contents ...................................2
Safety Information ..................................2
Warranty ..........................................2
Pre-Assembly ......................................3
Planning Assembly .................................3
Hardware Included .................................3
Package Contents .................................4
Assembly. . . . . . . . . . . . . . . . . . . . . . . . . . . . . . . . . . . . . . . . . . 6
Care and Cleaning .................................11
Safety Information
Please read and understand all instructions before you begin this
assembly.
□ This assembly requires at least two to three people.
□ Some parts may contain sharp edges. Wear protective gloves.
□ When assembling and using this product, basic safety
precautions should always be followed to reduce the risk of
personal injury and damage to equipment.
WARNING: Do not leave the gazebo where there is a risk
of high wind, as possible damage will occur to the structure.
WARNING: This unit is heavy! Do not assemble this item
alone.
WARNING: KEEP ALL FLAME AND HEAT SOURCES AWAY
FROM THIS TENT FABRIC. This tent meets the ammability
requirements of CPAI-84. The fabric may burn if left in
continuous contact with any ame source. The application
of any foreign substance to the tent fabric may render the
ame-resistant properties ineffective.
CAUTION: Do not climb on top of the gazebo. Falling off
the gazebo can result in serious injury, possibly even death.
Warranty
WHAT IS COVERED
This limited warranty is extended to the original purchaser and applies to defects in materials and workmanship of your item provided the
item is maintained with care and used only for personal, residential purposes. The item is warranted to be free from defects in material or
workmanship for a period of 2 years.
WHAT IS NOT COVERED
We do not reimburse for transportation of delivery costs, or compensate the individual or any outside party for assembling or disassembling
the product.
Contact the Customer Service Team at 1-855-HD-HAMPTON or visit www.HAMPTONBAY.com.

3 HAMPTONBAY.COM
Please contact 1-855-HD-HAMPTON for further assistance.
Pre-Assembly
PLANNING ASSEMBLY
Before beginning assembly of this product, make sure all parts are present. Compare parts with the Hardware Included and Package
Contents lists. If any part is missing or damaged, do not attempt to assemble the product. Contact customer service for replacement parts.
TOOLS REQUIRED (NOT INCLUDED)
Safety Goggles Safety Hat Level Gloves Step Ladder Phillips Screwdriver
HARDWARE INCLUDED
NOTE: Hardware not shown to actual size.
AA
BB
CC
DD
EE
FF
GG
HH
Part Description Quantity Part Description Quantity
AA M6x35 bolt 24 EE M6 nut 16
BB M6x15 bolt 184 FF Hex wrench 2
CC M5x15 screw 8 GG Ground stake 16
DD M6x30 bolt 16 HH Screwdriver 1

4
Pre-Assembly (continued)
PACKAGE CONTENTS
A
B
C
D
E
F
G
H
I
J
K
L
M
N
Part Description Quantity Part Description Quantity
A Post 4 H Left lower slide rail 4
B Left wall screen 4 I Right lower slide rail 4
C Right wall screen 4 J Left upper rail track 4
D Left sliding door 4 K Right upper rail track 4
E Right sliding door 4 L Inner connector 4
F Right support bar 4 M Lower track connector 4
G Left support bar 4 N Top center connector 1

5 HAMPTONBAY.COM
Please contact 1-855-HD-HAMPTON for further assistance.
Pre-Assembly (continued)
PACKAGE CONTENTS (CONTINUED)
O P
Q
R
S
T
U
V
W
X
Y
Part Description Quantity Part Description Quantity
O Upper corner bar 4 U Door bolt 8
P Lower corner bar 4 V Track wheel 16
Q Middle bar 4 W Large cover 1
R Roof nishing bar 8 X Small cover 1
S Corner connector 4 Y Screen connector 8
T Door knob 8

6
Assembly
1
Assembling the wall screens
□ Position a right wall screen (C) to the right side of a post
(A) and a left wall screen (B) to the left side of the post (A).
Secure the right and left wall screens (C and B) to the post
(A) using M6x35 bolts (AA).
□ Repeat for the remaining wall screens (B and C) and posts (A).
NOTE: Ensure the horizontal supports on the screens (B
and C) go on the outside of the gazebo.
C
B
AA
A
4
A
B C
AA
x24
2
Assembling the support bars
□ Slide a right support bar (F) and a left support bar (G) onto
an inner connector (L) until they meet in the center of the
inner connector (L).
□ Secure the support bars (F and G) onto the inner connector
(L) using M6x15 bolts (BB). Ensure the center hole of the
support bar assembly is exposed, as shown.
□ Repeat for the three remaining right and left support bars
(F and G) and inner connectors (L).
4
BB
F
L
G
BB
x32

7 HAMPTONBAY.COM
Please contact 1-855-HD-HAMPTON for further assistance.
Assembly
3
Attaching the wall screens to the support bars
□ Connect a support bar assembly (F and G) to the top of a wall screen assembly (B and C) using two screen connectors (Y) and six
bolts M6x15 bolts (BB). Repeat for the other three support bar assemblies (F and G) and screen assemblies (B and C).
□ Connect the support bars (G and F) to the post (A) using four M6x15 bolts (BB) at each corner.
8
4
BB
BB
C
B
F
G
Y
BB
x40
A
(continued)

8
Assembly (continued)
4
Attaching the corner connectors
□ Attach a corner connector (S) to each top corner of the
gazebo assembly using two screws (CC). Tighten with
the screwdriver (HH).
5
Assembling the lower slide rails
□ Connect a right lower slide rail (I) and a left lower slide rail
(H) onto a lower track connector (M) until the right and left
slide rails (I and H) meet in the center of the lower track
connector (M).
□ Connect the right and left slide rails (I and H) to the lower
track connector (M) using M6x15 bolts (BB), ensuring
the center hole on the right and left slide rails (I and H) is
exposed.
□ Repeat for the three remaining right and left slide rails
(I and H) and lower track connectors (M).
4
BB
M
I
H
BB
x16
4
HH
CC
S
CC
x8

9 HAMPTONBAY.COM
Please contact 1-855-HD-HAMPTON for further assistance.
Assembly (continued)
6
Attaching the lower slide rails
□ Position the lower slide rail assemblies (H and I) along the bottom perimeter of the gazebo assembly.
□ Position two nuts (EE) into each left lower slide rail (H) and right lower slide rail (I), as shown.
□ Secure the lower slide rail assemblies (H and I) to the bottom corners of the screens (B and C) using M6x30 bolts (DD), ensuring
the bolts (DD) go through the screens (B and C) and into the nuts (EE) placed in the slide rail assemblies (H and I).
8
4
4
EE
H/I
DD
H/I
H
I
C/B
DD
EE
DD
x16
EE
x16

10
7
Preparing the sliding doors
□ Attach two track wheels (V) to each left sliding door (D) and right sliding door (E) using M6x15 bolts (BB).
□ Attach a door bolt (U) to a door knob (T) on each sliding door (D and E).
NOTE: Ensure the horizontal supports on the screens (B
and C) go on the outside of the gazebo.
8
16
D
E
U
T
BB
V
BB
x32
U
x8
T
x8
Assembly (continued)

11 HAMPTONBAY.COM
Please contact 1-855-HD-HAMPTON for further assistance.
Assembly (continued)
8
Attaching the upper rail tracks
to the doors
□ Slide a left upper rail track (J) onto the top of each left
sliding door (D) and a right upper rail track (K) onto the top
of each right sliding door (E). Ensure the upper rail tracks
(J and K) slide smoothly over the rollers on the tops of the
doors (D and E).
4
D
J
K
E
9
Installing the sliding
doors
□ Position a set of left and right
sliding doors (D and E) into the
bottom track of the gazebo
assembly (see callout 1 and 2).
Secure the tops of the doors
(D and E) in place using M6x15
bolts (BB). Ensure that you can
slide each door pair (D and E)
together until they lock into
place (see callout 3).
□ Repeat this step until all sets
of sliding doors (D and E) are
installed on each side of the
gazebo assembly.
IMPORTANT: When the
screens and doors are assembled
accurately, the doors should
automatically lock together. If this
is not the case, please go back to
the previous steps and re-install
correctly.
D
D
B
E
C
E
4
4
1
2
3
BB
E
D
BB
x24

12
Assembly (continued)
10
Assembling the roof
□ Connect a middle bar (Q) into every other connector on the top center connector (N) until the middle bars (Q) click into place.
□ Connect an upper corner bar (O) into the remaining connectors on the top center connector (N) until the upper corner bars (O)
click into place.
□ Slide a lower corner bar (P) onto the ends of each upper corner bar (O) until the lower corner bars (P) click into place.
4
4
P
O
Q
N
P
O

13 HAMPTONBAY.COM
Please contact 1-855-HD-HAMPTON for further assistance.
11
Attaching the roof assembly
to the gazebo
□ Attach the roof assembly to the center and corner sections of the gazebo using M6x15 bolts (BB).
4
4
BB
BB
BB
x8
Assembly (continued)

14
12
Preparing the top cover
□ Slide the eight roof nishing bars (R) into all four edges of the large cover (W).
W
R
W
R
8
R
Assembly (continued)

15 HAMPTONBAY.COM
Please contact 1-855-HD-HAMPTON for further assistance.
Assembly (continued)
13
Completing the assembly
□ Place the large cover (W) over the roof assembly of the gazebo. Secure the large cover (W) in place using M6x15 bolts (BB).
□ Install the small cover (X) on top of the large cover (W).
□ Secure the gazebo to the ground using the ground stakes (GG).
H
I
12
GG
BB
W
X
BB
x32
GG
x16
Care and Cleaning
□ Clean gently with a sponge using environmentally-friendly soap and water solution. Do not use abrasive materials, such as wire
brushes, chemicals, cleansers or bleach. Do not use a pressure washer. Rinse well. Allow to air dry.

Questions, problems, missing parts? Before returning to the store,
call Hampton Bay Customer Service
8 a.m. – 7 p.m., EST, Monday – Friday, 9 a.m. – 6 p.m., EST, Saturday
1-855-HD-HAMPTON
HAMPTONBAY.COM
Retain this manual for future use.
/