Page is loading ...

TEMPERATURE AND PRESSURE LIMITS
Minimum Pressure 35kPa
Maximum Pressure 1000kPa
Maximum hot water Temperature 70 degrees Celsius
For cold water pressure above 600kPa we recommend the installaon of a pressure
liming valve.
We recommend using a line strainer on both hot and cold supply lines to this mixer. This
will help protect the ceramics in your mixer.
CLEANING
To retain the original look of your Aquaca laundry product, please follow these simple
suggesons:
DO NOT use acidic, abrasive, chlorine or alcohol based cleaners. Many of these products
can damage chrome and powder coated surfaces.
DO remove dirt or calcium stains with soap and water, rinse with clean water and dry
with a clean so cloth.
Aquaca NZ Ltd oer, from the date of purchase, a 5 year guarantee on the
cabinet and taps and a 25 year guarantee on the laundry bowl. Aquaca NZ Ltd
warrants that only high quality workmanship and materials have been used in
the manufacture of the laundry tubs. The guarantee is transferable but original
proof of purchase is required. If any faulty workmanship or materials are
proven during the warranty period Aquaca NZ Ltd will, at its own cost, repair
or, at its opon, replace the faulty product. If spray or abrasive cleaners are
used on the chrome and powder coated surfaces, it will void the warranty. (The
chrome and cabinet should only be cleaned with mild detergent on a so damp
cloth).
Failure to use an in-line strainer or lter on the mixer may also void the
warranty. Pressure liming is recommended above 600kPa and should never
exceed 1000kPa.
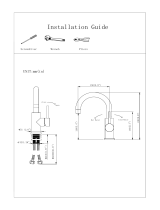
INSTALLATION INSTRUCTIONS
AQ LAUNDRACENTRO
AQ LAUNDRATUBBIE AQ LAUNDRATUBBIEPLUS
AQ LAUNDRASLIM AQ LAUNDRASLIMPLUS
AQ LAUNDRAMAX2 AQ LAUNDRAMAXSLIM2
DRAWER MODEL
If you have a drawer model, read below. If not, ignore this secon.
Drawer Removal
Drawer models require the removal of the drawers to complete the supply
and waste connecons. The top drawer is removed by opening fully and
then liing the drawer front upwards unl the drawer
runners disengage.
To remove the boom drawer, almost fully extend the
drawer and remove the clear rubber blocks from the
drawer runners (pictured). Then disengage the grey
lock tabs by sliding backwards, then forwards (pictured).
Now fully extend the drawers and li the drawer front
upwards unl the runners disengage.
DOOR MODEL
If you have a door model and want the door to swing from the other side, read below.
If not, ignore this secon.
Door Reversal
Open door and remove locking nut from top pivot pin and then unscrew pivot pin.
Li door o boom pivot pin
Remove the magnets and ret to opposite side of door frame (4 screws).
Remove boom pivot pin and nylon washers. Relocate pin and washers
to opposite side of the door frame.
Rotate door 180 degrees
Relocate door basket by removing 4 x screws and reposioning
brackets to the new boom of door.
Fit door to boom pivot pin. Ensure the nylon washers are between
the door and the frame.
Ret top pivot pin and locking nut.
Ret door basket to locang tabs on door brackets.
PLUS MODEL (ie. Pull-Out Spray Mixer)
If you have a Plus model, read below. If not, ignore this secon.
To prevent damage to the tap and cabinet, the pull-out spray tap is not ed to the
cabinet during transport.
The mixer should be installed before installaon of the cabinet. When installing
pipes and ngs, ensure they do not interfere with the pull-out spray.

INSTALLATION
The Aquaca laundry tub has hot and cold taps on the console to supply the washing machine.
Unpack and inspect laundry tub for shipping damage. Please advise your plumbing retailer if
damage has occurred. Aquaca NZ Ltd will not be responsible for repair costs if damage is
reported aer installaon.
Check that the pre-plumb work is suitable for your tub.
All models must be installed level to ensure door or drawers line up correctly. If the cabinet
is out of level the drawer fronts can become staggered. Adjust feet to correct any
misalignment. On the drawer model, if further adjustment is required, this can be achieved
using a screwdriver on the drawer connecon brackets.
We recommend that all laundry cabinets are securely fastened to prevent movement and
excessive load on plumbing connecons. Drawer model cabinets must be secured to the
oor or wall framing at both sides to prevent pping forwards.
Congure your single lever mixer depending on your water supply system.
Mains pressure hot and cold water
Does not need P.C.W.
Can leave ow guide (max ow) in mixer or swap to P.C.A. (8 litres/min)
Low pressure hot and cold water
Fit as supplied. May t aerator but will reduce the ow of water.
Low pressure hot and mains pressure cold water-
Leave ow guide in place. Must t P.C.W. to prevent high pressure cold water back-owing
into the low pressure hot water line.
With the cabinet secured, connect the hot and cold water inlets at the wall to the boom
end of the 1/2” BSP brass T ngs (using standard plumbing ngs).
Connect washing machine hot and cold hoses to the 20mm exi tail outlets
(red - hot / blue - cold).
Connect waste outlet to household plumbing via trap (trap not supplied).
Insert discharge hose from washing machine directly into the inlet on the cabinet side.
Secure in place using the cable e provided. Cabinet washing machine inlet ng can be
reversed to the opposite side of the cabinet if required.
Turn household water supply on and test to ensure that all connecons are waterght.
BACK VIEW OF CABINET
This shows the open area at the rear of
the tub to allow for posioning of the
water inlets and waste water outlet.
Suggested height for water outlets ~600mm up
from the oor (centered around the tap).
Suitable for P and S traps.
Trap aachment height ~ 460mm up from
the oor.
Floor area required to t laundry tub:
Standard: Width: 560mm
Depth: 570mm
Slim: Width: 460mm
Depth: 660mm
Notes:
1. Not recommended to have waste pipe within 50mm of plug centre line as this
will make waste connecons more dicult.
2. Bracing on base of the cabinet extends in 40mm from each side and 70mm in
from front and rear.
3. Height dimensions will vary a bit depending on the adjustment of the leveling
feet.
4. On drawer models, drawer to oor and drawer to rear wall gap is at least
120mm to allow for plumbing connecons.
If you require any addional assistance, please contact :
Aquaca NZ Ltd, P O Box 19146, Avondale, Auckland.
Phone: (09) 828 2068 Fax: (09) 828 2069
Email: info@aquaca.co.nz
550/450
REMOVABLE
BACK PANEL
/