Page is loading ...

Inverter RS Smart Solar
Rev 04 03/2021
ENGLISH

Table of Contents
1. Safety Instructions ................................................................................................................... 1
2. General Description ................................................................................................................. 3
2.1. High efficiency ............................................................................................................... 3
2.2. Frequency shift function .................................................................................................... 3
2.3. High power, safe operation ................................................................................................. 3
2.4. Interfacing and Communications .......................................................................................... 3
2.5. Battery charger .............................................................................................................. 4
2.6. Setup options ................................................................................................................ 4
3. Installation ............................................................................................................................. 5
3.1. Location of the inverter ..................................................................................................... 5
3.2. MPPT grounding and detection of PV array insulation faults ........................................................... 5
3.3. Battery and battery lead requirements .................................................................................... 6
3.4. Solar array configuration .................................................................................................... 6
3.4.1. Inverter RS Example PV Configuration ......................................................................... 6
3.5. Cable connection sequence ................................................................................................ 7
3.6. Connection to the load ...................................................................................................... 7
3.7. VE.Direct ..................................................................................................................... 7
3.8. VE.Can ....................................................................................................................... 7
3.9. Bluetooth ..................................................................................................................... 7
3.10. User I/O ..................................................................................................................... 7
3.10.1. Remote on/off connector ........................................................................................ 7
3.10.2. Programmable relay ............................................................................................. 8
3.10.3. Voltage sense .................................................................................................... 8
3.10.4. Temperature sensor ............................................................................................. 8
3.10.5. Programmable analog/digital input ports ...................................................................... 8
3.10.6. User I/O terminal diagram ...................................................................................... 8
3.10.7. User I/O functions ................................................................................................ 8
3.11. Programming with VictronConnect ....................................................................................... 9
3.11.1. Settings ........................................................................................................... 9
3.11.2. Battery settings ................................................................................................. 10
3.12. Connecting to AC PV inverters ......................................................................................... 12
4. Operation ............................................................................................................................ 13
4.1. Device display ............................................................................................................. 13
4.2. STATUS - Live Data Information ......................................................................................... 14
4.3. HISTORY - Thirty-day Graphic ........................................................................................... 15
4.4. Protections and automatic restarts ...................................................................................... 16
4.4.1. Overload .......................................................................................................... 16
4.4.2. Low battery voltage thresholds (adjustable in VictronConnect) ............................................ 16
4.4.3. High battery voltage ............................................................................................. 16
4.4.4. High temperature ................................................................................................ 17
5. Troubleshooting Guide - MPPT .................................................................................................. 18
5.1. Troubleshooting and Support ............................................................................................ 18
5.2. The controller is not operational ......................................................................................... 18
5.2.1. Visual check ..................................................................................................... 18
5.2.2. Battery supply check ............................................................................................ 18
5.3. Batteries are not charged ................................................................................................. 19
5.3.1. Battery supply issue ............................................................................................ 19
5.3.2. Reverse battery polarity ........................................................................................ 20
5.3.3. PV voltage too low .............................................................................................. 21
5.3.4. Reverse PV polarity ............................................................................................. 21
5.3.5. PV voltage too high ............................................................................................. 22
5.3.6. Battery full ........................................................................................................ 22
5.3.7. Battery voltage setting too low ................................................................................. 22
5.3.8. The charger is disabled ......................................................................................... 23
5.3.9. Controlled by an external device .............................................................................. 23
5.4. Batteries are undercharged .............................................................................................. 23
5.4.1. The battery is almost full ....................................................................................... 23
5.4.2. Too much DC load .............................................................................................. 24
5.4.3. Insufficient solar ................................................................................................. 24
Inverter RS Smart Solar

5.4.4. Battery charge current too low ................................................................................. 24
5.4.5. Battery charge voltages are too low ........................................................................... 24
5.4.6. Battery cable voltage drop ..................................................................................... 24
5.4.7. Wrong temperature compensation setting ................................................................... 25
5.4.8. Temperature difference between solar charger and battery ................................................ 25
5.5. Batteries are overcharged ................................................................................................ 26
5.5.1. Battery voltage setting too high ................................................................................ 26
5.5.2. Battery charge voltages too high .............................................................................. 26
5.5.3. Battery unable to deal with equalization ...................................................................... 26
5.5.4. Battery old or faulty ............................................................................................. 26
5.6. Solar issues ................................................................................................................ 27
5.6.1. PV reverse current too high .................................................................................... 27
5.6.2. PV yield less than expected .................................................................................... 27
5.6.3. Full rated output not reached .................................................................................. 28
5.6.4. Mixed PV panel types ........................................................................................... 29
5.6.5. MC4 connectors wrongly connected .......................................................................... 29
5.6.6. PV connections burned or melted ............................................................................. 29
5.6.7. Optimisers cannot be used ..................................................................................... 29
5.6.8. Ground current .................................................................................................. 29
5.6.9. Earth fault detection missing ................................................................................... 30
5.7. Communication issues .................................................................................................... 30
5.7.1. VictronConnect issues .......................................................................................... 30
5.7.2. Bluetooth issues ................................................................................................. 30
5.7.3. VE.Direct port communication issues ......................................................................... 31
5.7.4. VE.Smart communication issues .............................................................................. 31
5.8. Settings or firmware issues ............................................................................................... 31
5.8.1. Incorrect settings ................................................................................................ 31
5.8.2. Firmware issues ................................................................................................. 31
5.8.3. Interrupted firmware update .................................................................................... 32
5.9. Operation issues ........................................................................................................... 32
5.9.1. Unable to operate as a power supply ......................................................................... 32
5.9.2. Unable to operate as a DC to DC charger ................................................................... 32
5.9.3. Connection issues ............................................................................................... 32
5.10. Errors, error codes and LED codes .................................................................................... 32
5.10.1. Errors via LEDS ................................................................................................ 33
5.10.2. Error codes ..................................................................................................... 33
5.11. Warranty ................................................................................................................... 34
6. Technical Specifications .......................................................................................................... 35
7. Appendix ............................................................................................................................. 37
7.1. Appendix A : Connection Overview ..................................................................................... 38
7.2. Appendix B : Block Diagram ............................................................................................. 41
7.3. Appendix C : Example Wiring Diagram ................................................................................. 42
7.4. Appendix D : Dimensions ................................................................................................. 43
7.5. Error Codes ................................................................................................................ 43
7.5.1. Error 2 - Battery voltage too high .............................................................................. 43
7.5.2. Error 3, Err 4 - Remote temperature sensor failure ......................................................... 43
7.5.3. Error 5 - Remote temperature sensor failure (connection lost) ............................................ 43
7.5.4. Error 6, Error 7 - Remote battery voltage sense failure ..................................................... 43
7.5.5. Error 8 - Remote battery voltage sense failure (connection lost) .......................................... 43
7.5.6. Error 11 - Battery high ripple voltage .......................................................................... 43
7.5.7. Error 14 - Battery low temperature ............................................................................ 44
7.5.8. Error 17 - Controller overheated despite reduced output current .......................................... 44
7.5.9. Error 18 - Controller over-current .............................................................................. 44
7.5.10. Error 20 - Maximum Bulk-time exceeded ................................................................... 44
7.5.11. Error 21 - Current sensor issue .............................................................................. 44
7.5.12. Error 24 - Fan failure .......................................................................................... 44
7.5.13. Error 26 - Terminal overheated ............................................................................... 44
7.5.14. Error 27 - Charger short circuit ............................................................................... 44
7.5.15. Error 28 - Power stage issue ................................................................................. 44
7.5.16. Error 29 - Over-Charge protection ........................................................................... 45
7.5.17. Error 33 - PV over-voltage .................................................................................... 45
7.5.18. Error 34 - PV over-current .................................................................................... 45
7.5.19. Error 35 - PV over-power ..................................................................................... 45
7.5.20. Error 38, Error 39 - PV Input shutdown ..................................................................... 45
7.5.21. Error 40 - PV Input failed to shutdown ...................................................................... 45
7.5.22. Error 41 - Inverter shutdown (PV isolation) ................................................................. 45
Inverter RS Smart Solar

7.5.23. Error 42 - Inverter shutdown (Ground Fault) ................................................................ 45
7.5.24. Error 43 - Inverter shutdown (Ground Fault) ................................................................ 46
7.5.25. Error 50, Error 52 - Inverter overload, Inverter peak current .............................................. 46
7.5.26. Error 51 - Inverter temperature too high .................................................................... 46
7.5.27. Error 53, Error 54 - Inverter output voltage ................................................................. 46
7.5.28. Error 55, Error 56, Error 58 - Inverter self test failed ....................................................... 46
7.5.29. Error 57 - Inverter ac voltage on output ..................................................................... 46
7.5.30. Notification 65 - Communication warning ................................................................... 46
7.5.31. Notiofication 66 - Incompatible device ....................................................................... 46
7.5.32. Error 67 - BMS Connection lost .............................................................................. 46
7.5.33. Error 68 - Network misconfigured ............................................................................ 47
7.5.34. Error 114 - CPU temperature too high ....................................................................... 47
7.5.35. Error 116 - Calibration data lost .............................................................................. 47
7.5.36. Error 119 - Settings data lost ................................................................................. 47
Inverter RS Smart Solar

1. Safety Instructions
ELECTRIC SHOCK HAZARD
Please read this manual carefully before the product is installed and put into use.
This product is designed and tested in accordance with international standards. The equipment should be used for the designated
application only.
Refer to the specifications provided by the manufacturer of the battery to ensure that the battery is suitable for use with this
product. The battery manufacturer's safety instructions should always be observed.
Protect the solar modules from incident light during installation, e.g. cover them.
Never touch uninsulated cable ends.
Use only insulated tools.
Connections must always be made in the sequence described in the installation section of this manual.
The installer of the product must provide a means for cable strain relief to prevent the transmission of stress to the connections.
In addition to this manual, the system operation or service manual must include a battery maintenance manual applicable to the
type of batteries used.
SELECTION OF WIRE CONDUCTORS
Use flexible multistranded copper cable for the battery and PV connections.
The maximum diameter of the individual strands is 0,4mm/0,125mm² (0.016 inch/AWG26).
A 25mm² cable, for example, should have at least 196 strands (class 5 or higher stranding according to VDE 0295, IEC 60228
and BS6360).
An AWG2 gauge cable should have at least 259/26 stranding (259 strands of AWG26)
Maximum operating temperature: ≥ 90°C
Example of suitable cable: class 5 “Tri-rated” cable (it has three approvals: American (UL), Canadian (CSA) and British (BS)).
In case of thicker strands the contact area will be too small and the resulting high contact resistance will cause severe
overheating, eventually resulting in fire.
RISK OF INJURY OR DEATH
The internals can carry a 400-500V DC voltage even when the product is off!
Input and/or output terminals may still be dangerously energized, even when the equipment is switched off. Always disconnect all
power connections (e.g. the battery, DC solar isolator, etc) and wait at least 5 minutes before carrying out work on the product.
The product has no internal user-serviceable components. Do not remove the front plate or operate the product if any panels
have been removed. All servicing must be undertaken by qualified personnel.
Please read the installation instructions in the installation manual before installing the equipment.
This is a Safety Class I product (supplied with a protective grounding terminal). The chassis must be grounded. Whenever it is
likely that the grounding protection has been damaged, the product must be turned off and secured against unintended operation;
please contact qualified service staff.
Environment and Access
Inverter RS Smart Solar
Page 1 Safety Instructions

Ensure that the equipment is used under the correct ambient conditions. Never operate the product in a wet or dusty
environment. Never use the product where there is a risk of gas or dust explosions. Ensure there is adequate free space for
ventilation above and below the product and check that the ventilation vents are not blocked.
Installation of this product must in a location that restricts access by persons (including children) with reduced physical, sensory
or mental capabilities, or lack of experience and knowledge, unless they have been given supervision or instruction concerning
use of the appliance by a person responsible for their safety.
Inverter RS Smart Solar
Page 2 Safety Instructions

2. General Description
The Inverter RS is a combined battery inverter and MPPT solar charge controller. It is designed to operate with a 48V battery
bank, a PV input voltage range of between 80-450V, and produces a pure AC sine wave at 230V.
• Low battery voltage alarm trip and reset levels
• Low battery voltage cut-off and restart levels, or Dynamic cut-off
• Adjustable Output AC voltage 210 - 245V
• Select Frequency 50 Hz or 60 Hz
2.1. High efficiency
Ultra-fast Maximum Power Point Tracking (MPPT) - Especially in case of a clouded sky, when light intensity is changing
continuously, a fast MPPT algorithm will improve energy harvest by up to 30% compared to PWM charge controllers and by up to
10% compared to slower MPPT controllers.
Advanced Maximum Power Point Detection in case of partial shading conditions - If partial shading occurs, two or more
maximum power points may be present on the power-voltage curve. Conventional MPPTs tend to lock to a local MPP, which may
not be the optimum MPP. The innovative SmartSolar algorithm will always maximize energy harvest by locking to the optimum
MPP.
Outstanding conversion efficiency - Maximum efficiency of 96%. The inverter is short circuit proof and protected against
overheating, whether due to overload or high ambient temperature.
2.2. Frequency shift function
When external PV inverters are connected to the output of the inverter, excess solar energy is used to recharge the batteries, just
as with the internal MPPT solar controller. Once the battery absorption voltage is reached, charge current will reduce by shifting
the output frequency higher. This feature is used for battery over charge protection and solar assist. It does not allow charging the
battery to fully charge to 100% SoC for safety reasons.
2.3. High power, safe operation
High Peak Power - The maximum AC output power can increase to up to a peak 9000W or 50A AC, when sufficient PV power is
also available to support the battery supply.
Isolated PV connections for additional safety - Full galvanic isolation between PV and battery connections provide additional
overall system safety.
Temperature Protected - Over-temperature protection and power derating when temperature is high.
2.4. Interfacing and Communications
Bluetooth Smart built-in
The wireless solution to set-up, monitor and update the controller using Apple and Android smartphones, tablets or other
compatible devices. No additional dongle or accessory required.
VE.Direct port and two VE.Can ports
Either communications port type can be used for a wired data connection to a GX device (e.g. Cerbo GX, Color Control GX) PC
or other devices. Note that only one port can be used at a time.
Device Display
A 4 line LCD backlit display that operational information including battery levels, solar yield, and system icons.
User I/O connector:
• Aux 1, 2 input
• Programmable relay
• Battery Vsense
• Battery Tsense
• Remote H & Remote L - Configurable
Configuring and monitoring with VictronConnect
Configure the solar charge controller with the VictronConnect app. Available for iOS, Android devices, as well as macOS and
Windows computers. An accessory might be required for some systems; enter VictronConnect in the search box on our website
and see the VictronConnect download page for details.
Inverter RS Smart Solar
Page 3 General Description

2.5. Battery charger
The batteries are charged by solar energy using the built-in MPPT solar controller. It can also be charged by a PV grid inverter
connected to the AC out. In this case the battery will be charged to ~98%. The built-in MPPT has a power limit of 4000W. So the
maximum charging current for a 50V battery will be 80A. If an additional PV grid inverter is connected (max 5000W) the maximum
total charging current is limited to 100A. The maximum charging current of 100A is reduced if battery voltage goes above 60V. A
custom maximum charge current value can also be defined by the installer in VictronConnect.
The charger algorithm is the same as for the BlueSolar MPPT solar controllers. This provides built-in battery preset parameters,
and allows for expert mode to define additional charging parameters. Please see the MPPT section of the VictronConnect manual
for additional explanation of these charging features.
2.6. Setup options
Adaptive three step charging
The MPPT Charge Controller is configured for a three step charging process: Bulk – Absorption – Float.
A regular equalization charge can also be programmed.
Bulk- During this stage the controller delivers as much charge current as possible to rapidly recharge the batteries.
Absorption - When the battery voltage reaches the absorption voltage setting, the controller switches to constant voltage mode.
When only shallow discharges occur the absorption time is kept short in order to prevent overcharging of the battery. After a deep
discharge the absorption time is automatically increased to make sure that the battery is completely recharged.
Additionally, the absorption period is also ended when the charge current decreases to less than 2A.
Float - During this stage, float voltage is applied to the battery to maintain a fully charged state.
Optional external voltage and temperature sensor
Wired connections are available for battery voltage and temperature sensing. The Solar Charger uses these measurements to
optimize its charge parameters. The accuracy of the data it transmits will improve battery charging efficiency, and prolong battery
life.
The Smart Battery Sense and other VE.Smart networking features are not currently supported.
Remote on-off input
On/off control by a VE.Bus BMS when charging Li-ion batteries.
Remote L functions as ‘allow to charge’ in case lithium battery is selected and remote H functions as ‘allow to discharge’. Use
smallBMS for the RS with Victron lithium batteries.
Programmable relay
Can be programmed (with a smartphone) to open or close on an alarm, or other events.
Inverter RS Smart Solar
Page 4 General Description

3. Installation
3.1. Location of the inverter
Table 1.
For best operating results, the inverter should be placed on a flat surface. To ensure a
trouble free operation of the inverter, it must be used in locations that meet the
following requirements:
a) Avoid any contact with water. Do not expose the inverter to rain or moisture.
b) Do not place the unit in direct sunlight. Ambient air temperature should be
between -20°C and 40°C (humidity < 95% non-condensing).
c) Do not obstruct the airflow around the inverter. Leave at least 30 centimeters
clearance above and below the inverter.
When the unit is running too hot, it will shut down. When it has reached a safe
temperature level the unit will automatically restart again.
This product contains potentially dangerous voltages. It should only be installed under
the supervision of a suitable qualified installer with the appropriate training, and
subject to local requirements. Please contact Victron Energy for further information or
necessary training.
Excessively high ambient temperature will result in the following:
· Reduced service life.
· Reduced charging current.
· Reduced peak capacity, or shutdown of the inverter.
Never position the appliance directly above lead-acid batteries. The Inverter RS is
suitable for wall mounting. For mounting purposes, a hook and two holes are provided
at the back of the casing. The device must be fitted vertically for optimal cooling.
For safety purposes, this product should be installed in a heat-resistant environment.
You should prevent the presence of e.g. chemicals, synthetic components, curtains or
other textiles, etc., in the immediate vicinity.
Try and keep the distance between the product and the battery to a minimum in order to minimise cable voltage losses
3.2. MPPT grounding and detection of PV array insulation faults
The RS will test for sufficient resistive isolation between PV+ and GND, and PV- and GND. In the event of a resistance below the
threshold, the unit will stop charging, display the error, and send the error signal to the GX device (if connected) for audible and
email notification.
The positive and negative conductors of the PV array must be isolated from ground.
Ground the frame of the PV array to local requirements. The ground lug on the chassis should be connected to the common
earth.
The conductor from the ground lug on the chassis of the unit to earth should have at least the cross-section of the conductors
used for the PV array.
When a PV resistance isolation fault is indicated, do not touch any metal parts and immediately contact a suitably qualified
technician to inspect the system for faults.
The battery terminals are galvanically isolated from the PV array. This ensures that PV array voltages cannot leak to the battery
side of the system in a fault condition.
Inverter RS Smart Solar
Page 5 Installation

3.3. Battery and battery lead requirements
In order to utilize the full capacity of the product, batteries with sufficient capacity and battery cables with sufficient cross section
should be used. The use of undersized batteries or battery cables will lead to:
• Reduction in system efficiency.
• Unwanted system alarms or shutdowns.
• Permanent damage to system.
See table for MINIMUM battery and cable requirements.
Model
Battery capacity Pb 200 Ah
Battery capacity Lithium 50 Ah
Recommended DC fuse 125 A - 150 A
Minimum cross section (mm2) per + and - connection terminal 0 - 2 m 35 mm
2
2 - 5 m 70 mm
2
Consult battery manufacture recommendations to ensure the batteries can take the total charge current of the
system. Decision on battery sizing should be made in consultation with your system designer.
Use a torque wrench with insulated box spanner in order to
avoid shorting the battery.
Maximum torque: 14 Nm
Avoid shorting the battery cables.
• Undo the two screws at the bottom of the enclosure and remove the service panel.
• Connect the battery cables.
• Tighten the nuts well for minimal contact resistance.
3.4. Solar array configuration
The maximum operational input current for each tracker is 18A.
MPPT PV inputs are protected against reverse polarity, to a maximum short circuit current of 20A for each tracker.
Connecting PV arrays with a higher short circuit current is possible, as long as connected with correct polarity. This outside of
specification potential allows for system designers to connect larger arrays, and can be useful in case a certain panel
configuration results in a short circuit current just slightly above 20A, or to oversize the array to take care of winter versus summer
PV yield.
While functional with correct installation, BEWARE that the product warranty will be void if a PV array with a
short circuit current larger than 20A array is connected in reverse polarity.
When the MPPT switches to float stage it reduces battery charge current by increasing the PV Power Point voltage.
The maximum open circuit voltage of the PV array must be less than 8 times the minimum battery voltage when at float.
For example, where a battery has a float voltage of 54.0 volts, the maximum open circuit voltage of the connected array cannot
exceed 432 volts.
Where the array voltage exceeds this parameter the system will give a "Over-charge Protection" error and shut down.
To correct this, either increase the battery float voltage, or reduce PV voltage by removing panel from the string.
3.4.1. Inverter RS Example PV Configuration
This is an example of an array configuration. The decision on the specific array configuration, sizing and
design for your system should be made in consultation with your system designer.
Inverter RS Smart Solar
Page 6 Installation

Table 2. PV Array Example
Panel Type Voc Vmpp Isc Impp # of
panels
Max
String
Voltages
Power
total
Victron 260W (60 cell) 36.75 V 30 V 9.30 A 8.66 A #1 - 8
#2 - 8
304 V 4160 W
3.5. Cable connection sequence
First: Confirm correct battery polarity, connect the battery.
Second: if required, connect the remote on-off, and programmable relay, and communications cables
Third: Confirm correct PV polarity, and then connect the solar array (if incorrectly connected with reverse polarity, the PV voltage
will drop, the controller will heat up but will not charge the the battery). Torque: 2,4 Nm
3.6. Connection to the load
Never connect the output of the inverter to another AC supply, such as a household AC wall outlet or AC wave forming petrol
generator. Wave synchronising PV solar inverters can be connected to the AC output, see section on Frequency Shift Function for
more information.
The Inverter RS is a safety class I product (supplied with a ground terminal for safety purposes). Its
AC output terminals and/or grounding point on the outside of the product must be provided
with an uninterruptible grounding point for safety purposes.
The Inverter RS is provided with a ground relay that automatically connects the Neutral output
to the chassis. This ensures the correct operation of the internal earth leakage switch and an
earth leakage circuit breaker that is connected to the output.
─ In a fixed installation, an uninterruptable grounding can be secured by means of the
grounding wire of the AC input. Otherwise the casing must be grounded.
─ In a mobile installation (for example, with a shore current plug), interrupting the shore
connection will simultaneously disconnect the grounding connection. In that case, the casing must
be connected to the chassis (of the vehicle) or to the hull or grounding plate (of the boat).
Torque: 2 Nm
3.7. VE.Direct
Used to connect a PC/laptop to configure the inverter.
3.8. VE.Can
Used to connect to a GX Device.
3.9. Bluetooth
Used to connect to the device via VictronConnect for configuration.
3.10. User I/O
3.10.1. Remote on/off connector
The remote on/off has two terminals: Remote L and Remote H.
A remote on/off switch or relay contact can be connected between L and H. Alternatively, terminal H can be switched by a
connection to battery positive, or terminal L can be switched by a connection to battery minus.
Special case for Victron lithium batteries in combination with the smallBMS. When Lithium is selected in the software, the remote
on/off is changed, and that physical interface instead becomes the connection point for the allow-to-charge and allow-to-
discharge wires.
The remote H input is the connection point for the allow-to-discharge control wire and must to be connected to the Load output of
the smallBMS. The remote L input is the connection point for the allow-to-charge control wire and must be connected to the
Charger output of the smallBMS. Remote on/off function is now taken over by the smallBMS.
Inverter RS Smart Solar
Page 7 Installation

3.10.2. Programmable relay
Programmable relay which can be set for general alarm, DC under voltage or genset start/stop function. DC rating: 4A up to
35VDC and 1A up to 70VDC
3.10.3. Voltage sense
For compensating possible cable losses during charging, two sense wires can be connected directly to the battery or to the
positive and negative distribution points. Use wire with a cross-section of 0,75mm².
During battery charging, the charger will compensate the voltage drop over the DC cables up to a maximum of 1 Volt (i.e. 1V over
the positive connection and 1V over the negative connection). If the voltage drop threatens to become larger than 1V, the
charging current is limited in such a way that the voltage drop remains limited to 1V.
3.10.4. Temperature sensor
For temperature-compensated charging, the temperature sensor (supplied with the unit) can be connected. The sensor is isolated
and must be fitted to the negative terminal of the battery. The temperature sensor can also be used for low temperature cut-off
when charging lithium batteries (configured in VictronConnect).
3.10.5. Programmable analog/digital input ports
The product is equipped with 2 analog/digital input ports.
The digital inputs are 0-5v, and when a input is pulled to 0v it is registered as 'closed'
These ports can be configured in VictronConnect. For more information search Victron Community.
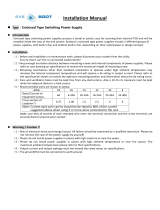
3.10.6. User I/O terminal diagram
Figure 1.
User I/O Connector is located on bottom left side of connection area, diagram shows 3 perspectives. Left Side - Top - Right Side
3.10.7. User I/O functions
Table 3. User I/O Functions - See Installation Section for more details.
Number Connection Description
1 Relay_NO Programmable relay Normally Open connection
2 AUX_IN - Common negative for programmable auxiliary inputs
3 AUX_IN1+ Programmable auxiliary input 1 positive connection
4 AUX_IN2+ Programmable auxiliary input 2 positive connection
5 REMOTE_L Remote on/off connector Low
6 REMOTE_H Remote on/off connector High
7 RELAY_NC Programmable relay Normally Closed connection
8 RELAY_COM Programmable relay common negative
9 TSENSE - Temperature Sensor negative
Inverter RS Smart Solar
Page 8 Installation

Number Connection Description
10 TSENSE + Temperature Sensor positive
11 VSENSE - Voltage Sensor negative
12 VENSE + Voltage Sensor positive
3.11. Programming with VictronConnect
This guide will help you with the specific elements of VictronConnect that relate to the MPPT Solar Charge Controller.
More general information about the VictonConnect App - how to install it; how to pair it with your device; and how to update
firmware, for example - can be found by referring to the overall VictronConnect manual. A list of all VictronConnect compatible
devices can be viewed here.
Note: These instructions can apply to different products and configurations, where battery voltage is referred to in these
instructions, a 12V battery is used as a reference point. Please multiply the given values by 4 to arrive at settings for an
installation configured for the 48V battery system.
3.11.1. Settings
The settings page is accessed by clicking on the Cog icon at the top right of the Home page. The settings page provides access
to view or change the settings of the Battery; Load; Streetlight; and Port functions. From this page you can also view Product
information such as the Firmware versions installed on the MPPT Solar Charger.
Inverter RS Smart Solar
Page 9 Installation

3.11.2. Battery settings
Battery voltage
The RS is fixed to 48V, and is only available for 48V systems.
Max charge current
Allows the user to set a lower maximum charge current.
Charger enabled
Toggling this setting turns the Solar Charger off. The batteries will not be charged. This setting is intended only for use when
carrying-out work on the installation.
Charger settings - Battery preset
Battery preset allows you to select the battery type; accept factory defaults; or enter your own preset values to be used for the
battery charge algorithm. The Absorption voltage, Absorption time, Float voltage, Equalisation voltage and Temperature
compensation settings are all configured to a preset value - but can be user-defined.
User-defined presets will be stored in the preset library - in this way installers will not have to define all the values each time they
are configuring a new installation.
By selecting Edit Presets, or on the Settings screen (with expert mode on or not), custom parameters can be set as follows:
Absorption voltage
Set the absorption voltage.
Adaptive absorption time
Select with adaptive absorption time or fixed absorption time will be used. Both are better explained below:
Fixed absorption time: The same length of absorption is applied every day (when there is enough solar power) by using the
maximum absorption time setting. Be aware that this option can result in overcharging your batteries, especially for lead batteries
and system with shallow daily discharges. See your battery manufacturer for recommended settings. Note: make sure to disable
the tail current setting to make the same absorption time every day. The tail current could end absorption time sooner if the
battery current is below the threshold. See more information on the tail current setting section below.
Adaptive absorption time: The charge algorithm can use an adaptive absorption time: it automatically adapts to the state of
charge in the morning. The maximum duration of the absorption period for the day is determined by the battery voltage as
measured just before the solar charger begins operation each morning (12 V battery values used - Multiply Battery voltage by 4
for 48V ):
Battery voltage Vb (@start-up) Multiplier Maximum absorption times
Vb < 11.9 V x 1 06:00 hours
> 11.9 V Vb < 12.2 V x 2/3 04:00 hours
> 12.2 V Vb < 12.6 V x 1/3 02:00 hours
Vb > 12.6 V x 2/6 01:00 hours
Inverter RS Smart Solar
Page 10 Installation

The multiplier is applied to the maximum absorption time setting and this results in the maximum duration of the absorption period
used by the charger. The maximum absorption times shown in the last column of the table are based on the default maximum
absorption time setting of 6 hours.
Maximum absorption time (hh:mm)
Set the absorption time limit. Only available when using a custom charge profile.
Enter the time value in the notation hh:mm, where hours are between 0 and 12; and minutes are between 0 and 59.
Float voltage
Set the float voltage.
Re-bulk voltage offset
Set the voltage offset that will be used over the float voltage setting that will determine the threshold that the charge cycle will
restart.
E.g.: For a Re-bulk voltage offset off 0.1V and a float voltage setting of 13.8 V, the voltage threshold that will be use to restart the
charge cycle will be 13.7 V. In other words, if the battery voltage drops below 13.7 V for one minute, the charge cycle will restart.
Equalization voltage
Set the equalization voltage.
Equalization current percentage
Set the percentage of the Max charge current setting that will be used when equalisation is performed.
Automatic Equalization
Set-up the frequency of the auto equalize function. Available options are between 1 and 250 days:
• 1 = daily
• 2 = every other day
• ...
• 250 = every 250 days
Equalization is typically used to balance the cells in a lead battery, and also to prevent stratification of the electrolyte in flooded
batteries. Whether (automatic) equalization is necessary, or not, depends on the type of batteries, and their usage. Consult your
battery supplier for guidelines.
When the Automatic equalization cycle has initiated, the charger applies an equalization voltage to the battery as long as the
current level stays below the equalization current percentage setting of the bulk current.
Duration of the Automatic equalization cycle
In the case of all VRLA batteries and some flooded batteries (algorithm number 0, 1, 2 and 3) automatic equalization ends when
the voltage limit (maxV) has been reached, or after a period equal to (absorption time/8) - whichever comes first.
For all tubular plate batteries (algorithm numbers 4, 5 & 6); and also for the user-defined battery type, automatic equalization will
end after a period equal to (absorption time/2).
For the Lithium battery type (algorithm number 7), equalization is not available.
When an automatic equalization cycle is not completed in one day, it will not resume the next day. The next equalization session
will take place according to the interval set in the 'Auto Equalization' option.
The default battery type is a VRLA battery and any user-defined battery will behave as a tubular plate battery with regard to
equalization.
Equalisation stop mode
Set how the equalisation will end. There are two possibilities, first is if the battery voltage reaches the equalisation voltage and the
second is on fixed time, where the maximum equalisation duration is used.
Maximum equalisation duration
Set the maximum time that the equalisation phase will last.
Tail current
Set the current threshold that will be used to finish absorption phase before the maximum absorption time expires. When the
battery current gets below the tail current for one minute, the absorption phase will end. This setting can be disabled by setting it
to zero.
Temperature compensation
Many types of battery require a lower charge voltage in warm operating conditions, and a higher charge voltage in cold operating
conditions.
Inverter RS Smart Solar
Page 11 Installation

The configured coefficient is in mV per degree Celsius for the whole battery bank, not per cell. The base temperature for the
compensation is 25°C (77°F), as shown in the chart below.
With a temperature sensor installed to the User I/O connection block; the actual battery temperature will be used for
compensation; throughout the day.
Low temperature cut-off
This setting can be used to disable charging at low temperatures as required by Lithium batteries.
For Lithium Iron Phosphate batteries this setting is preset at 5 degrees Celsius, for the other battery types it is disabled. When
creating a user defined battery the cut-off temperature level can be adjusted manually.
Manual Equalization - Start now
Selecting 'Start now' on 'Manual equalisation' allows manual initiation of an Equalization cycle. To allow the charger to equalize
the battery properly use the manual equalize option only during absorption and float periods, and when there is sufficient sunlight.
Current and voltage limits are identical to the automatic equalize function. The duration of the equalisation cycle is limited to a
maximum of 1 hour when triggered manually. Manual equalization can be stopped at any time by selecting 'Stop Equalize'.
3.12. Connecting to AC PV inverters
The includes a built in AC PV inverter detection system. When there is a feedback of AC PV (a surplus) from the AC-out
connection port, the will automatically enable an AC output frequency adjustment.
While no further configuration is required on the , it is important that the AC PV inverter is configured correctly to respond to the
frequency adjustment by reducing its output.
Note the 1:1 rule of AC PV inverter size to size, and minimum battery sizing applies. More information about these limitations are
available in the AC Coupling manual, and this document is required reading if using an AC PV inverter.
The frequency adjustment range is not configurable, and includes a built in safety margin. Once the absorption voltage is
reached, the frequency will increase. So it is still essential to include a DC PV component in the system for complete battery
charging (i.e. float stage).
It may be possible to adjust the power output response to various frequencies on your AC PV inverter.
The default configuration has been tested and works reliably with the Fronius MG50/60 grid code configuration.
Inverter RS Smart Solar
Page 12 Installation

4. Operation
4.1. Device display
The inverter has an LCD screen that displays operational information.
Inverter:
Inverter state, Power output, Frequency and AC Voltage
Battery:
Battery Power (charging shows positive number, discharging shows negative number), Current, DC voltage, Temperature (*),
State-of-charge (*) and Time-to-go (*). Battery state (e.g. discharging, bulk, absorption, float, etc).
(*) These items are only visible if the data is available.
Solar:
Solar Power, Voltage and Current, kWh daily and total Yield.
In the top right of the display are other system information icons.
Communicating on any interface (e.g., Bluetooth, VE.Can, etc.)
Bluetooth Enabled, Icon colour changes when connected
MPPT Active
(Blinking) Error or Warning
Inverter Active
Battery, fill corresponds with voltage, blinks when empty
Inverter RS Smart Solar
Page 13 Operation

4.2. STATUS - Live Data Information
• MPPT [Model Number] confirms the connected device. A custom name can also be set if desired.
• Solar 'Gauge' icon shows the dynamic real-time power output from the solar array. With regard to the Solar Panel voltage,
note that the Solar charger will only operate once the Panel voltage has risen more than 5V above battery voltage.
• Battery - Voltage The voltage measurement is taken at the battery terminals of the Solar charger.
• Battery - Current This reading shows the current flowing-to, or drawn-from the battery terminals of the Solar charger. Note that
in the case of the 100/20 Solar chargers and smaller - which have a dedicated load output - a Positive notation alongside the
current reading means that current is flowing to the battery; whereas a Negative notation means that current is being drawn
from the battery.
• Battery - State:
• Bulk: During this stage the Controller delivers as much charge current as possible to rapidly charge the batteries. When the
battery voltage reaches the Absorption voltage setting, the Controller activates the Absorption stage.
• Absorption: During this stage the Controller switches to the constant voltage mode, where a pre-set absorption voltage,
suitable to the battery type (See section 4.1 Battery Settings below), is applied. When the charge current decreases below
the Tail current and/or the pre-set Absorption time has elapsed, the battery is fully charged. The Controller switches to the
Float stage. The Tail current is 1A for models 100/20 and smaller; and 2A for larger models. (When an automatic equalisation
is being performed this will also be reported as 'Absorption'.)
• Float: During this stage the float voltage is applied to the battery to maintain a fully-charged state. When the battery voltage
drops below float voltage during at least 1 minute, a new charge cycle will be triggered.
• Equalization: This is shown when 'Start equalization now' is pressed in the battery settings. The charger applies the
equalization voltage to the battery as long as the current level stays below 8% (Gel or AGM) or 25% (tubular plate) of the
bulk current.
* Menu items only available on MPPT models with load output (100/20 and smaller.)
• Load output on/off The function of the load output switch is to disconnect the load when the battery is low on power in order to
avoid damaging it. See the configuration section (4.2 below) for available load switching algorithms.
• Load current This shows the current being drawn by electronic devices, lights, fridge, etc.
Note that for the load output reading to be reliable, all loads must be wired directly to the load output …including their negative
terminals. See manual or consult your installer for details.
Note that some loads (especially inverters) are best connected directly to the battery. In such cases the load output does not
show a reliable reading - the current drawn by the inverter, for example, will not be included. Consider adding a BMV battery
monitor which will measure all current going to - or being drawn from the battery, including loads connected directly to the battery
…not just the load output terminals of the charge controller.
Is my battery being charged?
The battery will be charged whenever the power available from the PV panels exceeds the power being drawn by the loads
(lights, fridge, inverter, etc.).
You can only tell if that is the case with Charge Controllers which have all loads connected to the load output terminals.
Remember: any loads connected directly to the battery can't be monitored by the Solar Charger.
Inverter RS Smart Solar
Page 14 Operation

4.3. HISTORY - Thirty-day Graphic
(The fragmented square icon (top left) allows you to toggle between 'portrait' and 'landscape' screen presentations.)
A summary of activity for the last 30 days is presented graphically. Swipe the bar left or right to show any of the previous 30 days.
The daily log shows:
• Yield: The energy converted for that day.
• P max: The maximum power recorded during the day.
• V max: The highest voltage from the PV array during the day.
Clicking on any day/bar in the graph will expand the information to show charge-status times - both as hrs/m; and also as a
percentage of the 'charge' day. This graphic provides an at-a-glance representation of how much time your charger is spending in
each of three modes: Bulk / Absorption / Float.
Tip! You can use the charge times to see if the PV array is properly sized for your requirements. A system which never reaches
'Float' may need more panels; or perhaps the load could be reduced?
It is possible to export the history as a comma separated file (.csv) by clicking the three connected dots at the top right of the
history screen:
This is an example of the exported data for 3 of 30 days:
Inverter RS Smart Solar
Page 15 Operation

Days
ago
Yield
(Wh)
Max.
PV
power
(W)
Max.
PV
voltage
(V)
Min.
battery
voltage
(V)
Max.
battery
voltage
(V)
Time in
bulk(m)
Time in
absorp.
(m)
Time
in
float
(m)
Last
error
2nd
last
error
3rd
last
error
4th
last
error
0 14500 2167 118.80 51.34 52.99 748 0 0 0 0 0 0
1 15450 2326 118.81 51.68 53.97 869 0 0 0 0 0 0
2 12350 2925 126.67 51.73 55.42 872 0 0 0 0 0 0
Battery Voltage
The first figure shows the maximum battery voltage for the day …the figure below is the minimum battery voltage.
Errors
Shows the number of errors (if any) for the day, to see the error codes click on the orange point. See MPPT Solar Charger Error
Codes. (You may need to slide the display on your device up to see the errors.)
Total
This shows the total energy converted by the installation and is not re-settable.
Since Cleared
This shows how much energy has been converted by the installation since the last reset.
4.4. Protections and automatic restarts
4.4.1. Overload
Some loads like motors or pumps draw large inrush currents during start-up. In such circumstances, it is possible that the start-up
current exceeds the over current limit of the inverter. In this case the output voltage will quickly decrease to limit the output current
of the inverter. If the over current limit is continuously exceeded, the inverter will shut down for 30 seconds and then automatically
restart. After three restarts followed by overload within 30 seconds of restarting, the inverter will shut down and remain off. To
restart normal operation, disconnect the load, Switch Off the inverter, then switch it On.
4.4.2. Low battery voltage thresholds (adjustable in VictronConnect)
The inverter will shut down when the DC input voltage drops below the low battery shutdown level. After a minimum shutdown
time of 30 seconds, the inverter will restart if the voltage has risen above the low battery restart level.
After three shut down and restarts, followed by a low battery shutdown within 30 seconds of restarting, the inverter will shut down
and stop retrying based on the low battery restart level. To override this and restart the inverter, switch it Off, and then On, and
limit loads to enable recharging of the battery with solar energy.
The solar MPPT will continue to recharge the battery even when the inverter has shut down due to low battery voltage. If the
inverter has shut down 4 times, it will again attempt to switch itself back on as soon as the DC voltage stays above the Charge
Detect level for 30 seconds.
See the Technical Data table for default low battery shut down, restart and charge detect levels. They can be adjusted with
VictronConnect (computer or app).
Additionally another external MPPT or battery charger can also be used to recharge the battery to reach the Restart Voltage or
Charge Detect voltage level. !!! If using the allow to charge signal functionality, it must remain above the minimum voltage, so if
the battery is completely dead it will not allow charging to start. In this case, you can temporarily disable this function in
VictronConnect to allow charging to resume, then enable it again.
See the Technical Data table for default low battery shut down and restart levels. They can be changed with VictronConnect
(computer or app). Alternatively Dynamic Cut-off can be implemented, see https://www.victronenergy.com/live/ve.direct:phoenix-
inverters-dynamic-cutoff
4.4.3. High battery voltage
Reduce DC input voltage and/or check for a faulty battery- or solar-charger in the system. After shutting down due to a high
battery voltage, the unit will first wait 30 seconds and then retry operation as soon as the battery voltage has dropped to
acceptable level.
Inverter RS Smart Solar
Page 16 Operation
/