Page is loading ...

UV 160
8229016-60
Type UV 01
MANUAL
WATER PURIFIER
U
SER MANUAL
INSTALLATION INSTRUCTIONS
WATER PURIFIER
BRUKSANVISNING
INSTALLATIONSANVISNING
VATTENRENARE

2
Funktionsknappar
1
Alarm (rött ljus = larm/vänta)
2
Ready (grönt ljus = klar att använda)
3
Flush (spolning)
4
On/Off (av/på)
5
Water (starta/stoppa fl ödet av vatten)
Övriga delar
6
Kontrollpanel
7
Utloppspip för renat vatten (skyddslock
monterat vid leverans)
8
Ytterhölje
9
Nätsladd med stickkontakt
10
Lock
11
Låsspärr (lock)
12
Slang till vattenledning
13
Kranadapter
Tillbehör
Följande samlevereras med UV 160:
• Monteringssats för vägg
• Avkalkningsmedel
• Bruksanvisning
Kontakta återförsäljaren om tillbehören ej är kom-
pletta vid uppackningen.
PRODUCT DESCRIPTION
Functional buttons
1
Alarm (red light = alarm/wait)
2
Ready (green light = ready to use)
3
Flush
4
On/Off
5
Water (start/stop of water fl ow)
Other parts
6
Control panel
7
Purifi ed water outlet (cover mounted
at delivery)
8
Outer casing
9
Power cord with plug
10
Top cover
11
Release button
12
Inlet hose
13
Faucet adapter
Accessories
The following is supplied with the UV 160:
• Wall mounting kit
• Descaling agent
• User manual
If the accessories are not complete, please contact
your dealer.
SE
EN

3
INTRODUCTION
EN
THANK YOU
for entrusting us to supply your new water purifi er.
To avoid problems, it is important for you to read the user manual. Read the “Safety information” and “Installation”
instructions particularly carefully. Everybody using the water purifi er should be familiar with operation and safety features.
The user manual should be kept and stay with the water purifi er if it is ever moved or changes owners.
The user manual’s English instructions begin on page 4.
SE
TACK
för att vi fi ck förtroendet att leverera Din nya vattenrenare.
För att undvika problem är det viktigt att Du läser igenom bruksanvisningen och noga följer ”Säkerhetsinformation” och
anvisningar om ”Installation”. Alla som använder vattenrenaren ska vara väl förtrogna med användningssätt och
säkerhetsdetaljer.
Spara bruksanvisningen och låt den följa med vattenrenaren vid fl ytt eller ägarbyte.
Bruksanvisningens svenska handledning börjar på sida 19.

4
CONTENTS
. . . . . . . . . . . . . . . . . . . . . . . . . . . . . . . . . . . .
4
INFORMATION
. . . . . . . . . . . . . . . . . . . . . . . . . . . . . . . . .
5
Y
our new water purifi er
Your new water purifi er Y
5
U
npacking
5
Waste management/Recycling
5
Accessories, spare parts and consumables
5
SAFETY INFORMATION
. . . . . . . . . . . . . . . . . . . . . . . . .
6
U
sing the UV 160
6
Installation and service
6
Connection of inlet hose
7
Outlet spout cover
8
Wall-mounted installation
8
USING THE UV 160
. . . . . . . . . . . . . . . . . . . . . . . . . . . . .
9
Using the UV 160 for the fi rst time
9
Normal use of the UV 160
9
CONTENTS
MAINTENANCE
. . . . . . . . . . . . . . . . . . . . . . . . . . . . . . .
1
0
Replacing the carbon block 1
0
Replacing the UV-lamp and Starter 1
1
Descaling 1
2
Replacing the fuse 1
3
Cleaning
the Coarse Filter 1
3
Draining 1
4
REGULAR CARE OF THE UV 160
. . . . . . . . . . . . . . . .
1
4
Regular care and maintenance 1
4
TROUBLE-SHOOTING GUIDE
. . . . . . . . . . . . . . . . . . .
1
5
SERVICE
. . . . . . . . . . . . . . . . . . . . . . . . . . . . . . . . . . . .
1
6
Service and spare parts 1
6
TECHNICAL DATA
. . . . . . . . . . . . . . . . . . . . . . . . . . . . .
1
6
Guidelines for using the manual
The following symbols will be found in the text to guide you throughout the instructions:
Safety information
Hints and information
Environment information
Step-by-step information
PRODUCT DESCRIPTION
. . . . . . . . . . . . . . . . . . . . . . .
2
INTRODUCTION
. . . . . . . . . . . . . . . . . . . . . . . . . . . . . . .
3

5
Your new water purifi er
UV 160 is constructed to produce water for cooking and drink-
ing in a normal household. All users should be well acquainted
with usage, function and safety details.
Read the user manual very carefully before the water purifi er
is used for the fi rst time. To ensure function and safety, always
follow the instructions in the sections “Safety Instruction” and
“Installation”.
While reading this manual, it is recommended to
refer to the section “Product description”.
Unpacking
If the UV160 has been damaged during transportation, you
should immediately notify the freight company and your dealer.
Examine the UV160 for any signs of damage and check that all
accessories are enclosed. If you should discover any damage,
faults or anything missing, you should notify your dealer im-
mediately.
Packaging material is not a toy. Never leave
packaging material within reach for children!
Waste management/Recycling
Unplug the power cord from the power supply and then, cut the
power cord close to the connection to the water purifi er. Store
the power cord and plug away from children.
Appliances bearing this symbol must be deposited at
the designated local reception point for the disposal
of electrical and electronic equipment. It is not
permitted that this product be disposed of by way of
the normal household refuse collection system.
Accessories, spare parts and consumables
The following accessories, spare parts and consumables can be
bought from your dealer.
Accessories, spare parts and consumables Part number
• UV-lamp 194 00 43-00
• Carbon block fi lter 150 78 93-00
• Fuse (230 V/0,5 A(slow)) 194 01 37-00
• Starter 194 01 38-00
• Descaling agent 150 79 57-00
• Connection for a ¾"-connections 150 00 55-01
(not supplied with the product)
INFORMATION

6
SAFETY INFORMATION
Installation and service
UV-160 should only be installed and used with cold water
Ensure that you are aware of local regulations, recommenda-
tions, plumbing codes etc. before UV 160 is installed.
UV 160 shall not be installed in places where temperature
drops below +2ºC.
Don´t put the water purifi er in a hot/cold place or in direct
sunlight.
Any damage to the power cord or the plug may only be
repaired by an authorized service provider.
UV 160 shall always be installed upright (vertically).
Check that the inlet hose and power cord is not kinked,
squeezed etc. when the water purifi er is moved, for example
during installation and/or cleaning.
Some faucets shall not be exposed to counter pressure, for
example due to the installation of a water purifi er, since
seals are not always of the necessary quality. Check with the
supplier of the faucet.
If the inlet water is unfi t for drinking, a sample of the pu-
rifi ed water from UV 160 shall be taken for analysis after
installation. If the analysis result shows that the water is fi t
for drinking, tests should be made regularly.
Note!
If the taste or smell deteriorates, a new test shall im-
mediately be made!
Note!
Do not drink the water if the analysis of the purifi ed
water is not satisfying. Contact your dealer for further infor-
mation.
•
•
•
•
•
•
•
•
•
Using the UV 160
Do not attempt to modify or alter the UV160 in any way at
all. This could result in personal injury and/or damage to
property. These eventualities are not covered by any war-
ranty.
The green light on the control panel must be lit before any
discharge of UV-purifi ed water can take place.
UV 160 shall not be used without carbon fi lter, except
during descaling.
UV 160 shall not be pressurized when not in use. The faucet
adapter shall be in position normal fl ow, fi g 14. Valve/faucet
for inlet water shall be closed.
If UV 160 is not in use it shall be shut off to avoid unneces-
sary wear of UV-lamp.
Leakages: Check all connections, pipes at least once a
month.
If the water purifi er does not function normally, unplug the
power cord.
The water from UV 160 can, if it has been turned on for a
long time, be hot! Be careful when dispensing.
If UV 160 has not been in use for the last 24 hours, water
shall be allowed to fl ow for 5 minutes before it is used.
•
•
•
•
•
•
•
•
•
UV 160 is very safe to use. For the best possible function and service life, every user shall read through the user manual
and carefully study usage, functions and safety instructions.
To avoid problems, always follow:
The safety instructions in this section.
The installation procedure, see section “Installation”.
•
•

7
UV 160 can be wall-mounted, see section “Wall-mounting”, or
placed on the sink.
The connection to water can be made in one of the following
ways:
Adapter 1 with a diverter valve for faucet/UV160
Adapter 2 with a diverter valve for faucet/UV160
Against a ¾” threaded hose (threads on outside)
For installation instructions, see section “Connection of inlet
hose.
Before installation, please read section “Safety
instruction” carefully.
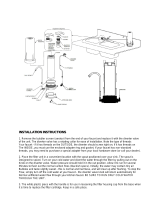
Connection of inlet hose
Connection to the water purifi er
Remove the hose from the plastic bag
Carefully put the water purifi er on the side, the con-
nection is placed below the water purifi er.
Screw the plastic nut on the hose onto the threaded
inlet connection, see
fi g 1
. No tool is required for
this, hand tighten only. Make sure the hose is point-
ing in the desired direction, before the fi nal tighten-
ing.
Connection to the tap
The water purifi er can be connected to the faucet in several
ways, depending on type and quality of faucet, local rules and
other regulations.
Adapter 1 – for connection to a tap with a 22mm (55/64
inch) external thread
Remove external strainer from the tap if applicable,
see
fi g. 2
.
Unscrew the diverter kit into three components, see
fi g. 3
.
Connect part 4 to the cold water tap securely, see
fi g. 4
.
Open the tap valve on the inlet water supply and
check for leakages.
Adapter 2 – for connections with faucet without threads or
other treads than 22mm
Unscrew the diverter kit into three components, see
fi g. 3
.
Connect part 1 with part 2, using only ½ - 1 turn,
see
fi g 5
.
Mount the two parts on the tap pressing the tap outlet
fi rmly against the rubber seal and tighten the three
screws, see
fi g 6
.
Complete the tightening of part 2 to part 1. N.B.
Hand tighten only, see
fi g. 7
.
Screw diverter valve part 3 (with the hose) onto part
2, see
fi g 8
.
Open the tap valve on the inlet water supply and
check for leakages.
•
•
•
1.
2.
3.
1.
2.
3.
4.
1.
2.
3.
4.
5.
6.
INSTALLATION
Fig 1
Fig 2
Fig 3
Fig 4
Fig 5
Fig 6
Fig 7
Fig 8

8
Connection to external ¾” thread
If a permanent installation is made, without the diverter valve,
make sure that it is possible to turn off the inlet water via a
faucet or a valve. Use the connection for the external ¾” thread
(accessory).
Remove the faucet adapter by unscrewing the look-
ing ring and pull away the hose, see
fi g.9
.
Connect the adaptor to the hose by pushing the hose
over the barb. Tighten the looking ring fi rmly.
Make sure that the edge of the hose reaches well
over the barb and that it is fi rmly secured by the
looking ring.
Carefully open the faucet/valve and check for any
leakages.
Outlet spout cover
When delivered, a cover is mounted on the spout of the purifi ed
water outlet (see section “Product description” - item 7). This
cover ensures that the product is sealed during transportation.
The cover can also be used when the product is put in storage,
e.g. if not used during wintertime.
Ensure that the outlet spout cover is removed or
opened before the product is used.
Wall-mounted installation
Ensure that the area where the UV 160 will be mounted is large
enough. UV 160 should be mounted within 1 meter from the
water connection (kitchen faucet or similar).
Drill three 6 mm (1/4 inch) holes, 43-45 mm (1 ¾
inch) deep, in the wall using the holes in the wall
bracket as a template, see
fi g 10
.
Insert the plastic masonry plugs in the holes and
screw the wall bracket to the wall.
Push the release button to remove the top cover, see
fi g. 11
.
Place the UV160 on the wall bracket, inserting the
bottom of the UV160 fi rst. Then lifting the spring
loaded button at the top of the bracket, push the unit
into the bracket and release the button, see
fi g. 12
.
Ensure that the UV160 is securely mounted on the
wall bracket.
Refi t the top cover , see
fi g 13.
1.
2.
3.
1.
2.
3.
4.
5.
6.
INSTALLATION
Fig 9
Fig 9
Fig 10
Fig 11
Fig 12
Fig 13

9
N.B.! Connect only cold water to UV 160!
If the connection hose with the diverter valve is used: Put the
diverter valve in the right position, see
fi g. 14
and
fi g. 15
.
Using the UV 160 for the fi rst time
Connect the power plug.
Press the On/Off button, see
fi g 16
( 4 ). The red
fi g 16 ( 4 ). The red fi g 16
lamp (1) will light up.
Open the tap to the water supply. Water will now
fl ow to the UV160.
Make sure that a drain or a suitable vessel is at hand.
(The fi rst water produced shall not be consumed).
Flush the carbon fi lter by simultaneously pressing
Flush ( 3 ) and Water ( 5 ) for about a minute.
Press Water ( 5 ) and allow the water to fl ow for
another 5 minutes to fl ush the water purifi er.
Press Water ( 5 ) again to stop the water fl ow. The
UV160 is now ready to produce fi ltered and micro-
biologically safe water
Switch off the UV160 by pressing On/Off ( 4 ).
Normal use of the UV 160
Open the faucet for the inlet water. The water fl ows
to the water purifi er.
Press On/Off ( 4 ). The red lamp ( 1 ) will be lit for
approximately 10 seconds.
When the green lamp ( 2 ) is lit, press Water ( 5 ).
Water ( 5 ) is thus used both to turn on and turn off
the water.
Shut off the water purifi er by pressing On/Off ( 4 ).
The product should not be connected to pressure
when not in use.
1.
2.
3.
4.
5.
6.
7.
8.
1.
2.
3.
4.
Fig 14
Fig 15
USING THE UV 160
Fig 16
Fig 16
Position for normal fl ow for dish washing, rinsing etc
Position for water purifi er

10
Replacing the carbon block
The carbon block needs to be replaced when the water fl ow has
been decreased to about half of the normal amount or when it
has been in use for six months.
Make sure that the inlet water is turned off.
Disconnect the power plug
Open the top cover by pressing the Release button at
the back of the UV160, see
fi g 17
.
Open the fi lter house lid by turning it as indicated by
the arrow on the fi lter housing top, see
fi g 18.
Remove the old carbon block, see
fi g 19
.
Clean the inside of the fi lter house carefully with a
dishbrush. Rinse with clean water.
Avoid damaging the tube in the centre of the
fi lter house.
Replace the carbon block, see
fi g. 20
.
Refi t the fi lter house lid by pressing and turning
fi rmly against the fi lter house, see
fi g 21
.
Refi t the top cover see
fi g 22
.
Connect the power plug.
1.
2.
3.
4.
5.
6.
7.
8.
9.
10.
Fig 17
Fig 18
Fig 19
Fig 20
Fig 21
Fig 22
MAINTENANCE

11
Replacing the UV-lamp and Starter
To ensure microbiologically safe water, a genuine
UV lamp from your dealer should be used.
When replacing the UV lamp it is advisable to change the
starter at the same time, as their rated working lives are ap-
proximately the same.
Disconnect the power plug and open the top cover.
Unscrew the three screws of the UV-lamp cover and
remove the protective cover over the UV-lamp,
see
fi g 23
.
Remove the starter by turning it anticlockwise.
Insert the new starter by pressing down and turning
clockwise, see
fi g. 24
.
Remove the connection from the lamp, pull the
socket up, see
fi g 25
.
Pull out the lamp, see
fi g 26
.
Do not touch the new lamp glass with your fi n-
gers, as fi ngerprints can seriously reduce the UV
intensity!
Install the new lamp in the bottom socket by turning
the lamp until the two visible pins are in alignment
with the arrows and carefully press the lamp down
into the lower lamp socket, see
fi g 27
.
Connect the upper socket, see
fi g 28
.
Refi t the UV-lamp cover and fasten the three screws
tightly, see
fi g 23
.
Connect the power plug into the wall socket. Turn on
the UV160. A violet light should be visible when the
lamp lights after a few seconds.
If the UV-lamp does not light, turn off the power and
disconnect the power plug. Check the connection
between the lamp and the sockets. Also check the
starter’s connection.
Refi t the top cover.
Connect the power plug.
Return the old UV-lamp to your dealer as it contains
mercury, which is harmful to the environment.
1.
2.
3.
4.
5.
6.
7.
8.
9.
10.
11.
12.
Fig 23
Fig 24
Fig 25
Fig 26
Fig 27
Fig 28
MAINTENANCE

12
Descaling
Disconnect the power plug
Take out the carbon block. See section “Replacing
the carbon block”.
Clean the inside of the fi lter housing using a dish-
brush or similar. Rinse well in clean water.
Put about half a bottle (50 gram) of the descaling
agent in a glass of lukewarm water, see
fi g 29
and stir until fully dissolved.
Pour into the fi lter house, see
fi g 30
.
Fasten the fi lter house lid and mount the top cover.
Connect the power plug and press the On/Off button
( 4 ), see
fi g. 31
.
Open the tap, simultaneously press and hold
Flush ( 3 ) and Water ( 5 ) until the water just starts
to come from the outlet.
Allow the descaling agent to work for about 10
minutes.
To fl ush the unit, simultaneously press and hold
Flush ( 3 ) and Water ( 5 ), for at least 1 minute
Put the carbon block back into the fi lter house, see
section “Replacing the carbon block”.
Press Water ( 5 ) and allow the water to run from the
UV160 for about 10 minutes. This will remove any
traces of descaling agent which, although harmless,
may cause a sour taste.
Press Water ( 5 ) and close the water tap to stop the
water fl ow.
Shut off the UV160 by pressing the On/Off (4) but-
ton.
1.
2.
3.
4.
5.
6.
7.
8.
9.
10.
11.
12.
13.
14.
Fig 29
Fig 30
Fig 30
Fig 31
MAINTENANCE

13
Replacing the fuse
Disconnect the power plug
Remove the top cover
Remove the display panel by unscrewing the two
screws holding it, see
fi g 32
.
.
Note! Ensure the power plug is disconnected from
the mains supply.
Unscrew the fuse cap, fi t the new fuse into the cap.
Ensure the new one is rated 0,5 A(slow).
Screw the fuse holder with fuse back in place.
Refi t the display panel ensuring the location lug is
correctly positioned before tightening the two fasten-
ing screws, see
fi g. 34
.
Refi t the top cover, see
fi g 35
.
Connect the power plug.
Cleaning the Coarse Filter
Disconnect the power plug
Close the tap/valve to the water supply.
Put the purifi er carefully on the side.
Release the water inlet hose connection on the UV
160, see
fi g 35
. N.B.! Be prepared for some water to
come out of the hose.
Use pliers to grip and remove the coarse fi lter, see
fi g 37
.
Clean the fi lter with a brush under running water and
push it back with the pliers into the unit.
Refi t the water inlet hose.
Open the tap to the water supply and check for leak-
ages.
Connect the power plug.
1.
2.
3.
4.
5.
6.
7.
8.
1.
2.
3.
4.
5.
6.
7.
8.
9.
Fig 33
Fig 34
Fig 35
Fig 36
Fig 37
Fig 32
MAINTENANCE

14
Regular care and maintenance
For optimal function and service life:
Check the indicator lamps, red ( 1 ) and green ( 2 )
every time the UV160 is used, to ensure the UV160
is functioning correctly. The green lamp should nor-
mally be lit after 10 sec. If the red lamp is lit more
then 15 sec. or none of the lamps are lit, see section
”Trouble-shooting guide”.
Everyday care of the UV160 simply consists of
keeping it clean. The outside of the UV160 should
be cleaned using a damp, but not wet cloth.
Once a month check that all connections to the
UV160 are properly tightened and not leaking.
Do not pour over, or submerge the unit into,
water and do not use any corrosive or abrasive
cleaning products.
The descaling procedure should be carried out at
regular intervals, depending on the hardness of the
water, see the
table 1, Frequencey of descaling
.
Be sure to replace the carbon block. The life of the
carbon block is determined by the level of impurities
in your water supply. The carbon block needs replac-
ing when the water fl ow has decreased to about half
the normal amount, or when it has been in service
for six months.
After replacing the carbon block, allow the used
carbon block to drain for a few minutes. It can be
discarded in your ordinary household waste as it
does not contain any substances which are hazardous
to the environment (assuming the UV160 has been
used for the purpose for which it was intended)
•
•
•
•
•
Fig 38
Frequency of Descaling
Calcium Ca
2+
and
Magnesum Mg
2+
mg/l
Water hardness
°d
(German water
hardness)
Frequency of
descaling
- 50
- 7
6 månad
50 - 100
7 - 14
3 månad
100 - 140
14 - 20
1 månad
Table 1
MAINTENANCE
Draining
When risk for freezing or during longer storage, the UV 160
must be emptied of water.
Remove the old carbon fi lter and throw it away, see
section “Replacing the carbon fi lter”, points 1-4”.
Ensure that the faucet/valve for the inlet water is
closed.
Disconnect the hose for the water supply, see section
“Cleaning the Coarse Filter”.
Turn UV 160 up side down a number of times to
empty all the water from the fi lter house. Dry the
fi lter house gently with a dry cloth.
Refi t the fi lter house lid and top cover. The product
is now ready for storage.
When taking the UV 160 back in operation again
be sure to refi t a new carbon fi lter, see section
“Changing the carbon fi lter”.
1.
2.
3.
4.
5.
REGULAR CARE OF THE UV 160

15
Symptoms Check/Remedy
The red lamp ( 1 ) is lit for more than 15 sec.
Is the room temperature less than +2 °C (35 °F)?
Place the product in a warmer place. In a cold environ-
ment it could take up to 5 minutes after switching on the
UV160 for the green light to show.
Is the room temperature too high, above +43 °C (110
°F) or is the UV160 in direct sunlight?
Placera den i ett svalare utrymme eller i skuggan och låt
den stå till dess att den svalnat.
I
s the starter connected properly?
Adjust or change the starter. See section “Replacing UV-
lamp and starter”
Is the UV-lamp connected properly?
Check the lamp socket connections. See section “Replac-
ing UV-lamp and starter”
Is the UV-lamp decayed? (UV intensity too low)
Change UV-lamp. See section “Replacing UV-lamp and
starter””
.
Is there scaling inside the UV chamber?
Descale UV160. See section “Descaling”
.
•
•
•
•
•
•
If no, or only a little amount of water comes out despite
green light
Is the inlet water tap open?
Is the coarse fi lter blocked?
Clean the coarse fi lter. See section “Cleaning the Coarse
Filter”.
Is the carbon block clogged?
Change the carbon block. See section “Replacing the
Carbon Block”
Is the inlet pressure high enough?
Notify your landlord or call plumber. The water pressure
should be 0.4 bar (40 kPa, 6 psi) or more.
•
•
•
•
No lamps are lit
Is the electrical plug connected properly?
Has the fuse blown?
Change the fuse located underneath the display panel, see
section “Replacing the fuse” or call a service technician.
•
•
Water leaks from under the UV160.
Is the fi lter house lid open?
Is the inlet hose securely connected beneath the prod-
uct
•
•
Bad smell from the water.
Has the unit not been used for a long period?
Flush the UV160 for about 5 minutes.
Is the carbon block saturated?
Change the carbon block, see section “Replacing the
Carbon Block”
•
•
Säkring
TROUBLE-SHOOTING GUIDE

16
Power supply:
230 V, 50 Hz
Power consumption:
25 W when producing pure water.
Line pressure:
0.4 - 8 bars
Weight (dry):
2.9 kg (excluding inlet hose with adapter)
Flow:
Approx. 2.5 litre per minute at
≥
2 bars water pressure
Dimensions:
Width * depth * height 23 x 17 x 34 cm
Ambient temperature:
+2 till + 43 °C
Requirements, inlet water:
Turbidity < 1 FNU*
Chlorine < 4 mg/l*
Organic. substances < 1 mg/l*
*
* Higher amounts will require fi lter changes more frequent than every 6 months
TECHNICAL DATA
Service and spare parts
If the UV160 is malfunctioning, we recommend in the fi rst in-
stance that you consult the trouble-shooting guide. You may av-
oid unnecessary time and expense in calling a service engineer.
If you have taken all the applicable measures described in the
guide and still cannot get the UV160 to operate, it is then time
to call a service technician.
SERVICE
Before calling service, it is a good idea to make note of some
UV160 details. Look at the data plate at the bottom of the app-
liance, which has all the details you need when calling service.
Write them down here:
Product no: 950 13 25- ................................
Serial no: ................................
For service or spare parts, please contact your local dealer.

Marketed by:
Dometic AB
Torggatan 8
SE-171 54 Solna
Sweden
Tel. +46 (0)8 – 501 025 00
Fax. +46 (0)8 – 501 025 99
UV 160 is developed and marked by Dometic AB in Sweden. Dometic also produces and
markets water purifi ers for purifi cation of other and also more complicated types of water,
for example desalination and purifi cation of brackish water
Please visit our web-page:
www.dometic.com
Dealer:

/