Page is loading ...

1
VR-32 Voltage Regulator with Quik-Drive Tap-Changer
Installation, Operation, and Maintenance Instructions
Voltage Regulators
Service Information
Safety Information . . . . . . . . . . . . . . . . . . . . . . . . . . . 2
Product Information . . . . . . . . . . . . . . . . . . . . . . . . . 3
Introduction . . . . . . . . . . . . . . . . . . . . . . . . . . . . . . 3
Acceptance and Initial Inspection . . . . . . . . . . . . 3
Handling and Storage . . . . . . . . . . . . . . . . . . . . . . 3
Standards . . . . . . . . . . . . . . . . . . . . . . . . . . . . . . . 3
Description . . . . . . . . . . . . . . . . . . . . . . . . . . . . . . 4
Available Options . . . . . . . . . . . . . . . . . . . . . . . . . 4
Installation. . . . . . . . . . . . . . . . . . . . . . . . . . . . . . . . . . 6
Pre-installation Inspection . . . . . . . . . . . . . . . . . . 6
Systems Connection . . . . . . . . . . . . . . . . . . . . . . . 6
Nameplates . . . . . . . . . . . . . . . . . . . . . . . . . . . . . . 8
Mounting . . . . . . . . . . . . . . . . . . . . . . . . . . . . . . . . 8
Placing Regulator into Service . . . . . . . . . . . . . . 10
Setting the Manual Limit Switches . . . . . . . . . . . 12
Removal from Service . . . . . . . . . . . . . . . . . . . . . 13
Construction and Operation . . . . . . . . . . . . . . . . . . 14
Standard Pole-Mounted Regulator,
External Features . . . . . . . . . . . . . . . . . . . . . . . . 14
Position Indicator and ADD-AMP Capabilities . 15
Surge Protection . . . . . . . . . . . . . . . . . . . . . . . . . 15
Internal Construction and Wiring . . . . . . . . . . . . 16
Quik-Drive Tap-Changers . . . . . . . . . . . . . . . . . . 20
Maintenance . . . . . . . . . . . . . . . . . . . . . . . . . . . . . . . 23
Periodic Inspection . . . . . . . . . . . . . . . . . . . . . . . 23
Untanking the Regulator . . . . . . . . . . . . . . . . . . . 24
Retanking the Regulator . . . . . . . . . . . . . . . . . . . 25
Spare Parts . . . . . . . . . . . . . . . . . . . . . . . . . . . . . . . . 25
Troubleshooting . . . . . . . . . . . . . . . . . . . . . . . . . . . . 29
Appendix . . . . . . . . . . . . . . . . . . . . . . . . . . . . . . . . . . 45
Contents
S225-10-30
Printed in USA
October 2007 • New Issue
Figure 1.
VR-32 Voltage Regulator with Quik-Drive tap-changer and CL-6 control.
1

The instructions in this manual are not intended as
a substitute for proper training or adequate experi-
ence in the safe operation of the equipment described.
Only competent technicians, who are familiar with this
equipment should install, operate, and service it.
A competent technician has these qualifications:
• Is thoroughly familiar with these instructions.
• Is trained in industry-accepted high- and low-voltage
safe operating practices and procedures.
• Is trained and authorized to energize, de-energize,
clear, and ground power distribution equipment.
• Is trained in the care and use of protective
equipment such as flash clothing, safety glasses, face
shield, hard hat, rubber gloves, hotstick, etc.
Following is important safety information. For safe
installation and operation of this equipment, be sure to read
and understand all cautions and warnings.
Safety Instructions
Following are general caution and warning statements that
apply to this equipment. Additional statements, related to
specific tasks and procedures, are located throughout the
manual.
SAFETY INFORMATION
SAFETY FOR LIFE
Cooper Power Systems products meet or exceed all applicable industry standards relating to product safety. We actively
promote safe practices in the use and maintenance of our products through our service literature, instructional training
programs, and the continuous efforts of all Cooper Power Systems employees involved in product design, manufacture,
marketing, and service.
We strongly urge that you always follow all locally approved safety procedures and safety instructions when working around
high voltage lines and equipment and support our “Safety For Life” mission.
Hazard Statement Definitions
This manual may contain four types of hazard
statements:
DANGER: Indicates an imminently hazardous
situation which, if not avoided, will result in
death or serious injury.
WARNING: Indicates a potentially hazardous
situation which, if not avoided, could result in
death or serious injury.
CAUTION: Indicates a potentially hazardous
situation which, if not avoided, may result in
minor or moderate injury.
CAUTION: Indicates a potentially hazardous situa-
tion which, if not avoided, may result in equipment
damage only.
WARNING: This equipment is not intended to
protect human life. Follow all locally approved
procedures and safety practices when installing or
operating this equipment. Failure to comply may result
in death, severe personal injury, and equipment damage.
G102.1
DANGER: Hazardous voltage. Contact with
hazardous voltage will cause death or severe
personal injury. Follow all locally approved safety
procedures when working around high- and low-voltage
lines and equipment. G103.3
WARNING: Before installing, operating, maintaining,
or testing this equipment, carefully read and
understand the contents of this manual. Improper
operation, handling, or maintenance can result in death,
severe personal injury, and equipment damage. G101.0
WARNING: Power distribution and transmission
equipment must be properly selected for the
intended application. It must be installed and serviced by
competent personnel who have been trained and under-
stand proper safety procedures. These instructions are
written for such personnel and are not a substitute for
adequate training and experience in safety procedures.
Failure to properly select, install, or maintain power
distribution and transmission equipment can result in
death, severe personal injury, and equipment damage.
G122.3
!
SAFETY
FOR LIFE
!
SAFETY
FOR LIFE
2
VR-32 Voltage Regulator Installation, Operation, and Maintenance Instructions

Introduction
Service Information S225-10-30 provides the installa-
tion, operation, and maintenance instructions for the
Cooper Power Systems VR-32 voltage regulator with the
Quik-Drive tap-changer. This manual also includes parts
replacement information.
Read This Manual First
Read and understand the contents of this manual and
follow all locally approved procedures and safety prac-
tices before installing or operating this equipment. Read
and understand the manual detailing the installation and
operation of the control used with this regulator. Refer to
S225-11-1 CL-6 Series Control Installation, Operation, and
Maintenance Instructions for information on the CL-6 volt-
age regulator control.
Additional Information
These instructions cannot cover all details or variations in
the equipment, procedures, or process described nor pro-
vide directions for meeting every possible contingency dur-
ing installation, operation, or maintenance. For additional
information, please contact your Cooper Power Systems
representative.
Acceptance and Initial Inspection
The regulator is thoroughly tested and inspected at the fac-
tory. It is carefully calibrated, adjusted, and in good condi-
tion when accepted by the carrier for shipment.
Upon receipt of the regulator shipment, before unloading, a
thorough inspection should be made for damage, evidence
of rough handling, or shortages. The position indicator,
junction box, arrester, radiators and bushings should all
be inspected for evidence of damage. Should this initial
inspection reveal evidence of rough handling, damage, or
shortages, it should be noted on the bill of lading and a
claim should immediately be made with the carrier. Also,
notify your Cooper Power Systems representative.
Handling and Storage
Be careful during handing and storage of equipment to
minimize the possibility of damage. If the regulator is not
to be placed into immediate use, it can be stored with
minimal precautions. Store the unit where the possibility of
mechanical damage is minimized.
Unloading
When an overhead crane is used for unloading, the regu-
lator must be lifted by means of a sling and spreader bar
utilizing the tank-mounted lifting lugs, which are shown in
Figure 3. Do not lift the entire unit with the lifting eyes on
the cover. The lifting eyes are only to be used to untank the
internal assembly that is attached to the cover.
Standards
Cooper Power Systems regulators are designed and
tested in accordance with the following standards:
IEEE Standard C37.90.1-2002™
IEEE Standard C37.90.2-1995™
IEEE Standard C57.13-1993™
IEEE Standard C57.15-1999™
IEEE Standard C37.91-1995™
IEEE Standard C57.131-1995™
EN 50081-2
EN 61000-4
IEC 60068-2
IEC 60214-1
IEC 610255-5
Quality Standards
ISO 9001:2000 Certified Quality Management System
S225-10-30
!
SAFETY
FOR LIFE
PRODUCT INFORMATION
WARNING: Equipment Damage. Lift the entire
unit only with tank-mounted lifting lugs. The cover
may warp or fracture if the cover-mounted lifting eyes
are used to lift the entire unit causing death or severe
personal injury or equipment damage. VR-T218.0
3

Description
The Cooper Power Systems VR-32 Voltage Regulator
operates to keep voltage levels within programmed limits
to improve power quality and is compatible with SCADA
and automation distribution systems.
Available in pole-, platform-, and pad-mounted and sub-
station configurations, the Cooper VR-32 is suitable for
three- or four-wire overhead and underground systems.
Cooper Power Systems VR-32 voltage regulators are regu-
lating auto-transformers. They regulate rated voltage from
10% raise (boost) to 10% lower (buck) in 32 approximately
5/8 percent steps.
The 65 °C rise insulation system and the sealed-tank
construction allow for a bonus capacity 12% above the
55 °C nominal rating without loss of normal insulation life.
The bonus capacity is stated on the nameplate (such as
167/187 kVA for a nominal 167 kVA regulator).
Unit construction, which suspends the internal assembly
from the cover, allows for ease of inspection and mainte-
nance.
There are three types of step-voltage regulators: source-
side series winding (Type B), load-side series winding (Type
A), and series transformer. Cooper regulators are usually
equipped with an equalizer winding. The nameplates locat-
ed on the tank and control box define the power circuit.
Cooper Power Systems regulators are supplied with the
following standard features:
• Dual-rated 55/65 °C rise
• ADD-AMP capability
• Sealed-tank construction
• Pressure relief device
• 18" minimum-creep bushings with clamp-type
connectors
• MOV-type external series arrester
• Shunt-arrester mounting bosses
• Two aluminum, laser-etched nameplates
• Oil sight gauge
• Upper filter press connection
• Drain valve and oil-sampling device
• CE mark compliant control
• Control cable quick disconnect
Available Options
Available options include:
• Long-length, quick-connect cable (see Figure 2), 10 to
50 feet, 10 foot increments, factory installed
• Armored cable
• Shielded cable
• Adjustable galvanized-steel elevating structure
• Supplemental external fusing to prevent damage from
reverse polarity connection to the voltmeter terminals
• Shunt surge arresters
• Oil thermometer with or without alarm contacts
• Oil-level gauge with or without alarm contacts
• Pressure and vacuum gauge
• Rapid pressure-rise relay
• Stainless steel tank and cover
• Envirotemp FR3 fluid
• Tank and control enclosure ground connectors
• Alternate top-coat color
• External stainless steel hardware
• Stainless steel control enclosure
• Stainless steel nameplates
• Substation base, below 167 kVA
• Pole-mounting brackets, on 333 kVA
• Bird guards
• 4-hole NEMA spade bushing connectors
VR-32 Voltage Regulator Installation, Operation, and Maintenance Instructions
4
Figure 2.
Quick connect/disconnect cable.

5
S225-10-30
!
SAFETY
FOR LIFE
Figure 3.
External features of the VR-32 voltage regulator.
Pole-Mounting Bracket
(Units up to 250 kVA.)
Bushing Connectors
MOV-Type Series
Arrester
Threaded-Stud
Bushing Terminals
Ground Bosses
Substation Base
(available in units
167 kVA and above)
Bushings
Drain Valve and
Oil-Sampling Device
Control
with Tap-Changer
Motor Capacitor
Junction Box
Hand-Hole Cover
Cover
Position Indicator
Automatic
Pressure-Relief Device
Control Cable with
Quick-Disconnect Plug
Lockable Control
Enclosure
Bolt-Down Provisions (4)
Internal Assembly
Lifting Eyes
Upper Filter Press
Connection
Regulator Lifting Lugs
Shunt-Arrester
Mounting Bosses
Laser-Etched
Nameplates (2)
(second name-
plate on control
enclosure door)
Ball-Type
Oil Sight Gauge
Ground
Boss

Pre-installation Inspection
Before connecting the regulator to the line, make the fol-
lowing inspection:
1. Check oil sight gauge. Look for visible signs of oil leak-
age.
2. Examine series arrester for damage. If damaged, install
a new arrester of same voltage rating.
3. Inspect porcelain bushings for damage or leaking
seals.
4. If there is a suspicion that moisture has entered the
unit, remove the hand-hole cover and inspect for evi-
dence of moisture such as rust or water tracks in oil. If
moisture has entered the tank, dry regulator and filter
oil before putting unit in service. See Tables 5 and 6 for
values that oil should meet. Be sure to properly replace
hand-hole cover.
5. Check position indicator for damage. When cleaning
the faceplate, do NOT use solvent or fuel.
6. If the regulator has been stored for some time, test the
dielectric strength of the oil according to Tables 5 and
6.
7. Regulator may be energized at rated voltage (with cau-
tion) and an operational check can be performed. (This
procedure is optional.)
8. A high-potential test may be done to ensure adequate
electrical clearances to ground. (This procedure is
optional.)
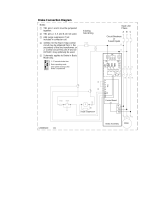
Systems Connections
A regulator can regulate a single-phase circuit or one
phase of a three-phase wye (star) or delta circuit. Two
regulators connected phase-to-phase in open delta or
three regulators connected phase-to-phase in closed delta
can regulate a three-phase, three-wire circuit. When con-
nected in wye, three regulators can regulate a three-phase,
four-wire, multi-grounded wye circuit. Three regulators
should not be connected directly in wye on three-phase,
three-wire circuits because of the probability of neutral
shift, unless the neutral is connected to the neutral of a
wye-connected bank of distribution transformers or to the
substation transformer secondary neutral. Typical connec-
tion diagrams are illustrated in Figures 4—8. Refer to the
Shunt Arresters section of this manual for information on
shunt arrester application.
NOTE: Individual switches are shown for the bypass and dis-
connect functions. However, a regulator-bypass-discon-
nect switch can be used in each phase to perform the
bypassing and disconnecting operations in sequence.
Each of these switches replaces one bypass and two
disconnect switches shown in the diagrams.
VR-32 Voltage Regulator Installation, Operation, and Maintenance Instructions
6
Figure 4.
Regulating a single-phase circuit.
Shunt
Arresters
Series
Arrester
Disconnects
Bypass Switch
Ø
N
SL
Load
Source
S
L
INSTALLATION
WARNING: Hazardous Voltage. Connect the "S"
bushing to the source, the "L" bushing to the load.
For Wye connections, connect the "SL" bushing to neu-
tral. For Delta connections, connect the "SL" bushing
to the appropriate phase. Inaccurate connections may
cause excessively high or low voltage on the load side
of the regulator and can cause death or severe personal
injury and equipment damage. VR-T219.0

7
S225-10-30
!
SAFETY
FOR LIFE
Figure 5.
Regulating one phase of a three-phase, four-wire
circuit regulator.
Shunt
Arresters
Series
Arrester
Disconnects
Bypass Switch
A
B
C
N
SL
Load
Source
S
L
Figure 6.
Regulating a three-phase, three-wire circuit with
two regulators (Open Delta).
Shunt
Arrester
Series
Arrester
Disconnects
Bypass Switches
A
B
C
S
L
1
2
SL
SL
Load
Source
S
L
Figure 7.
Regulating a three-phase, four-wire, multi-grounded wye (star) circuit with three regulators (Wye).
Series
Arrester
Shunt
Arrester
Disconnects
Bypass Switch
Bypass Switch
Bypass Switch
A
B
C
N
1
2
3
SL
SL
SL
Load
Source
S
L
S
L
S
L
Figure 8.
Regulating a three-phase, three-wire circuit with three regulators (Closed Delta).
Shunt
Arrester
Disconnects
Bypass Switch
Bypass Switch
Bypass Switch
A
B
C
1 2 3
SL
Load
Source
SL
SL
S
L
S
L
S
L
Series
Arrester

Nameplates
Two anodized aluminum nameplates are provided as stan-
dard; refer to Figures 9 and 10. One nameplate is placed
on the regulator tank. The other is placed on the control
in case the control is removed at a later date. Nameplates
provide a substantial amount of information necessary for
proper control function. Information such as CT ratio, PT
ratio, regulator type, and tap-changer type can be found on
the nameplates and are normally factory pre-programmed
into the control. It is recommended that this information
be verified prior to placing the control and regulator into
service. When calling Cooper Power Systems for service
or support-related issues, please obtain the catalog num-
ber and serial number found on the nameplate in order for
the factory to reference the proper drawings and support
information.
Mounting
A regulator can be mounted on a pole, a cross-arm plat-
form, or an elevating structure. Regulators are normally
provided with either pole-mounting brackets or a substa-
tion base according to their rating. An elevating structure
can be provided to simplify substation installation of regula-
tors requiring a specific live part-to-ground clearance.
The regulator control can be mounted on the regulator tank
or at a point remote from the unit. Rubber-covered cable is
available in 3.04 m (10 ft) incremental lengths from 3.04 m
(10 ft) to 15.20 m (50 ft) for interconnection between the
control and the regulator.
VR-32 Voltage Regulator Installation, Operation, and Maintenance Instructions
8
Figure 9.
Typical nameplate, domestic 60 Hz design.
WA341B2006AF
0737XXXXXX
2075
4485 210
QD8
122 122

9
S225-10-30
!
SAFETY
FOR LIFE
Figure 10.
Typical nameplate, international 50 Hz design.
WAN22B2006AN
0737XXXXXX
692
1384
490
QD5

Placing Regulator into Service
Refer to Service Information S225-11-1 Voltage
Regulators, CL-6 Series Control Installation, Operation,
and Maintenance Instructions for information on the CL-6
voltage regulator control, including placing the control into
service and initial programming. Perform an operational
check of the control before installing the regulator. With
the control programmed for basic operation, perform an
operational check of manual and automatic operation.
Regulators can be placed in service without interrupting
load continuity once bypass and disconnect switches are
installed.
Procedure A should be followed when one bypass switch
and two disconnect switches are used. Procedure B
should be followed when a regulator bypass-disconnect
switch is used.
A ground pad tapped for 1/2 inch 13 NC thread is provided
on the side of the control cabinet.
When energizing the control from an external source, use
only a 120 V ac source, unless the control is set up for
240 V, indicated by a decal adjacent to the terminals.
VR-32 Voltage Regulator Installation, Operation, and Maintenance Instructions
10
WARNING: Hazardous Voltage. To protect per-
sonnel from surges while operating the control,
follow these control enclosure grounding procedures:
a) If the enclosure is attached to the regulator tank or is
remote from the tank but only accessible with a ladder,
connect the enclosure to the regulator-to-ground rod
conductor; b) If the enclosure is accessible by personnel
standing on the ground, connect the enclosure directly
to a ground mat and ground rod. Failure to comply can
result in severe personal injury or death. VR-T202.0
CAUTION: Be mindful of polarity when using an external
source. Polarity reversal will result in control damage.
VR-T201.0
DANGER: Explosion Hazard. During bypass
switching, the regulator must be in the neutral
position. Prior to bypass switching: 1) The regulator
must be placed in the neutral position; 2) Tap-changer
operation must be disabled during the bypass switch-
ing. If the regulator is in any other position, part of the
series winding will be shorted when the bypass switch
is closed, resulting in high circulating current. Failure to
comply will result in death or severe personal injury and
equipment damage. VR-T205.0
CAUTION: Equipment Damage. Only an ac power sup-
ply is to be used to energize the control externally. Do
not use a dc-to-ac voltage inverter. Failure to comply can
cause excessive harmonics to be generated and result in
damage to the front panel. VR-T204.1
Figure 11.
Control back-panel connections.
V
1
V
6
C

Procedure A: One Bypass Switch and
Two Disconnect Switches
1. Verify from regulator nameplate that control circuit is
connected for proper regulated system voltage.
2. Set power switch to OFF and control switch to OFF.
3. Knife switches on back panel should be set with V
1
(potential switch) (and V
6
if present) closed (pushed
in) and C (CT shorting switch) open (pulled out). See
Figure 11.
4. Close source-load (SL) disconnect switch if available.
5. Close source (S) disconnect switch.
6. Set power switch to INTERNAL and control switch to
MANUAL.
7. Lift raise-lower switch to operate tap-changer two or
three steps, then depress raise-lower switch to return
tap-changer to the neutral position. (These steps verify
that the mechanism is functional.) When on neutral, the
neutral light will glow continuously and position indica-
tor will point to zero (Neutral).
8. With regulator in neutral position, set control switch to
OFF, set power switch to OFF, open V
1
knife switch
(and V
6
if present), and remove 6 A motor fuse.
9. Close load (L) disconnect switch.
10. Open bypass switch. The regulator is now energized.
11. Replace 6 A motor fuse, close V
1
knife switch, and set
power switch to INTERNAL.
12. Refer to Service Information S225-11-1 Voltage
Regulators, CL-6 Series Control Installation, Operation,
and Maintenance Instructions for information on the
CL-6 voltage regulator control, including placing the
control into service and initial programming.
P ro c e d ure B : Regul a t o r B y p ass-
Disconnect Switch
1. Verify from regulator nameplate that control circuit is
connected for proper regulated system voltage.
2. Set control switch to MANUAL and power switch to
EXTERNAL.
3. Knife switches on back panel should be set with V
1
(potential switch) (and V
6
if present) open (pulled out)
and C (CT shorting switch) closed (pushed in). See
Figure 11.
4. Apply 120 V (or other voltage as indicated by the decal)
to external source terminals, if available. If not, proceed
to Step 7, below.
5. Lift raise-lower switch to operate tap-changer two or
three steps, then depress raise-lower switch to return
tap-changer to neutral position. (These steps verify
that the mechanism is functional.) When on neutral, the
neutral light will glow continuously and position indica-
tor will point to zero (Neutral).
6. Remove the voltage from external source terminals.
7. With regulator in the neutral position, set control switch
to OFF, set power switch to OFF, and remove 6 A
motor fuse.
8. For Delta applications only: Close source-load (SL)
disconnect switch.
9. Close regulator bypass-disconnect switch. The regula-
tor is now energized.
10. Replace 6 A motor fuse, close V
1
knife switch (and V
6
if present), open C knife switch, and set power switch
to INTERNAL.
11
S225-10-30
!
SAFETY
FOR LIFE

Sett i n g the M a nual ( H a rd ) Lim i t
Switches
Refer to the CONSTRUCTION AND OPERATION:
Position Indicator and ADD-AMP Capability section of
this manual for a complete discussion of these features.
Before setting the manual limit switches, be sure the new
settings will not conflict with the present tap-changer posi-
tion; see Figure 12. Do not set the switches below the
indicated tap-changer position. For example, if the main
hand is at step 12 and the change to be made is from plus
or minus 10% (step 16) to plus or minus 5% (step 8), run
the tap-changer back to step 7 or less, manually. Then set
the limit switches for plus or minus 5% regulation.
Limit switches should be set in anticipation of the maxi-
mum deviation of primary voltage. For example, on a
circuit where 7200 V is to be maintained, plus or minus
10% will permit voltages between 6480 V and 7920 V to
be regulated effectively. For voltages outside this range,
the regulator will not be able to return the voltage to the
preselected level (7200 V). Five percent regulation would
accommodate circuit voltages between 6840 and 7560 V,
maintaining 7200 V for all voltages in this range.
To set the limit switches, follow this procedure:
1. Unlatch the captive bezel and swing the cover open.
2. Lift the limit-switch adjustment lever free of the detent
and slide it to the new setting allowing the lever to snap
into the detent stop.
NOTE: If the ADD-AMP limits have been programmed into the
control (soft ADD-AMP) and the limit switches have not
been set, it is possible to manually step the tap-changer
beyond the soft ADD-AMP limit. If the unit is switched
back to automatic mode, the control will step the regula-
tor back to within the soft ADD-AMP limits as set in the
control.
VR-32 Voltage Regulator Installation, Operation, and Maintenance Instructions
12
Figure 12.
Position indicator.

Removal from Service
Determining Neutral Position
Return the regulator to neutral. Only a regulator in the neu-
tral position can be safely removed from service without
interrupting load continuity. It is recommended to use more
than one method to determine the neutral position.
Return the Regulator to Neutral
1. Use the Raise/Lower switch to bring the regulator to
neutral position.
2. When in neutral, the Neutral Light will be continuously
lit and the position indicator will point to zero (Neutral).
3. Verifying the neutral position of the regulator using four
methods:
A. Verify that the neutral indicator light on the control
is indicating the neutral position. Neutral is indicat-
ed only when the light is continuously illuminated.
B. Verify the tap position of the control indicates neu-
tral.
C. Verify that the position indicator on the regulator is
in the neutral position.
D. Using an acceptable method, verify that there is
no voltage difference between the source and load
bushings.
4. When the regulator has been placed in the neutral
position, but prior to bypassing, additional safety action
must be taken to ensure that the tap-changer will not
inadvertently switch to an off-neutral position. This can
be accomplished by doing the following:
A. Place the CONTROL FUNCTION switch in the Off
position.
B. Remove the motor fuse.
C. Place control POWER switch in the Off position.
D. Open V
1
knife switch (and V
6
if present) located on
control back panel (see Figure 11).
De-energizing the Regulator
Once it has been established that the regulator is on neu-
tral, immediately proceed with the following steps:
1. Place CONTROL FUNCTION switch in the Off posi-
tion.
2. Place control POWER switch in the Off position.
3. Open V
1
knife switch (and V
6
if present) located on
control back panel (see Figure 11).
4. Remove the 6 A motor fuse.
5. Close bypass switch.
6. Open load (L) disconnect switch.
7. Open source (S) disconnect switch.
8. Open source-load (SL) disconnect switch, if available.
NOTE: If a regulator bypass disconnect is used in place of three
separate switches, steps 5, 6 and 7 are carried out in one
operation.
13
S225-10-30
!
SAFETY
FOR LIFE
WARNING: Explosion Hazard. To stop the reg-
ulator on the neutral position, the CONTROL
FUNCTION switch should be returned to Off during the
switching operation from positions 1R or 1L to position
Neutral. Switching to Off prior to reaching the neutral
position prevents overshoot. Failure to comply can result
in death or severe personal injury and equipment dam-
age. VR-T208.0
WARNING: Explosion Hazard. Always use the
CONTROL FUNCTION switch (labeled Auto/
Remote, Off, Manual and Raise or Lower) to operate the
regulator, not the power switch. Failure to comply can
result in the tap-changer stepping off of neutral immedi-
ately upon being energized, causing personal injury and
equipment damage. VR-T207.0
DANGER: Explosion Hazard. During bypass
switching, the regulator must be in the neutral
position. Prior to bypass switching: 1) The regulator
must be placed in the neutral position; 2) Tap-changer
operation must be disabled during the bypass switch-
ing. If the regulator is in any other position, part of the
series winding will be shorted when the bypass switch
is closed, resulting in high circulating current. Failure to
comply will result in death or severe personal injury and
equipment damage. VR-T205.0
WARNING: Explosion Hazard. After placing the
regulator in the neutral position for bypass switch-
ing, always disable the motor to prevent a tap change
during bypassing which can result in the tap-changer
stepping off of neutral. Failure to comply can cause
death or severe personal injury and equipment damage.
VR-T209.0
WARNING: Explosion Hazard. Bypass a regula-
tor with the line energized only if both the position
indicator and the neutral light indicate neutral. If both do
not indicate neutral, the line should be de-energized to
avoid shorting part of the series winding and resultant
high circulating current. Failure to comply can result in
death or personal injury and equipment damage.
VR-T206.0

The Cooper Power Systems VR-32 Voltage Regulators are
designed, manufactured, and tested in accordance with
IEEE Standard C57.15-1999™. The regulators are rated
and name-plated for 55/65 °C average winding rise.
The regulators are furnished with ANSI Type II mineral oil
per ASTM D-3487, containing less than 1 part per million
PCBs, at time of manufacture, as stated on the regulator
nameplate. Envirotemp FR3 fluid is available as an option.
Standard Pole-Mounted Regulator
External Features
The BIL rating of the bushings is compatible with the BIL
of the regulator, and all ratings, 25 kVA and below, have
bushings with a minimum creep distance of 18 inches.
The bushing designations (S, L, and SL) are permanently
marked on the regulator cover adjacent to the bushings.
The S, L, and SL bushings are interchangeable with each
other.
For regulators rated 1200 A and below, each bushing
includes a threaded 1.125" - 12 UNF-2A stud. For regula-
tors rated 1201 to 2000 A, each bushing includes a 1.5"-
12 UNF-2A stud. Connectors are not integral to the bush-
ing. Refer to Table 1 for standard terminals.
The threaded studs and connectors of the standard ter-
minals are plated bronze. Four-hole spade terminals are
available as an option for all current ratings.
All regulators are provided with an external UltraSIL, Heavy
Duty, VariGAP MOV-type bypass arrester connected
across the series winding. For units rated less than 22 kV,
the series arrester is rated 3 kV. For units rated 22 kV or
larger, the series arrester is rated 6 kV.
A fluid sight gauge indicates fluid color and level at 25 °C
ambient.
An external, corrosion-resistant position indicator indicates
the tap-changer position. The polymer-constructed posi-
tion indicator is mounted above the oil level and slanted
downward at a 45-degree angle for ease-of-reading when
the regulator is mounted above ground level.
Stainless steel mounting bosses are provided for the addi-
tion of lightning arresters adjacent to the source (S), load
(L), and source-load (SL) bushings. The bosses are fully
welded around their circumference.
All regulators have a 1" drain valve with sampling device
and a 1" upper filter press connection.
A hand-hole on the cover of the regulator provides access
for inspection purposes and to access terminals used to
reconnect the regulator for operation at system voltages as
shown in Tables 11 and 12 (see Appendix).
Regulators rated 250 kVA and below are provided with
welded-on hanger brackets. Regulators rated 167 kVA and
above are provided with a base suitable for securing them
to a pad or elevating structure. All regulators are capable
of being secured to elevating structures.
Regulators without a substation base are provided with
two stainless steel 1/2" –13 UNC welded ground bosses
located diagonally opposite from each other. Regulators
with a substation base have two stainless steel ground
pads located diagonally opposite from each other. Each
pad has two stainless steel 1/2"- 13 UNC ground provi-
sions. All grounding provisions are located near the base
of the regulator.
Each regulator has two laser-etched nameplates, one
mounted on the control enclosure and the other mounted
on the regulator tank. The nameplates have the manufac-
turer code and serial number bar-coded with "3 of 9" cod-
ing with a 0.25" minimum height.
The sealed-tank construction permits operation at 65 °C
rise without increasing the oxidation rate of the oil. A pres-
sure-relief device vents at approximately 5 psig.
The external parts of the tank and control enclosure are
painted light gray, ANSI 70 (Munsell 5BG7.0/0.4), and meet
the coating and security requirements of ANSI C57.12.28
and C57.12.31. Also, the inside of the tank and bottom of
the cover are primed and/or painted.
An external electrical connection between the cover and
tank allows the cover-suspended internal assembly and
tank to be grounded together to eliminate voltage differen-
tials during energizing.
Provisions for a tank thermometer are standard for all volt-
age regulators with substation bases (units 167 kVA and
above).
A multi-conductor neoprene 600 V, –50 °C to 105 °C cable
with disconnect plugs at each end provides the connection
between the internal circuitry of the voltage regulator and
the control.
An automatic, solid-state CT shorting device protects the
internal CT from high voltages due to the control cable
being disconnected or cut while the voltage regulator is
energized.
VR-32 Voltage Regulator Installation, Operation, and Maintenance Instructions
14
CONSTRUCTION AND OPERATION
TABLE 1
Standard Terminals
Rating (A) Standard Terminals
150 and below Clamp-type connectors for #6 to 250
MCM conductor
151-668 Clamp-type connectors for #6 to 800
MCM conductor
669-1200 1.125" - 12 UNF-2A stud only
1201-2000 1.5" - 12 UNF-2A stud only

Position Indicator and ADD-AMP
Capability
Regulators rated below 668 A include an ADD-AMP fea-
ture which permits additional current-carrying capabilities
at reduced regulation, as shown in Table 2, but not to
exceed 668 A. The ADD-AMP type adjustment is located
inside the position-indicator faceplate to prevent inadver-
tent adjustment. In addition, the SOFT-ADD-AMP feature
allows adjustment by way of the control keypad or inter-
face software. An optional ADD-AMP feature maximum
of 875 A is provided when specified for regulators rated
438–668 A.
The position indicator (see Figures 3 and 11) is mounted on
a junction box on the cover of the regulator and is directly
connected to the tap-changer by a flexible drive shaft
passing through the junction box and terminal board via a
sealing gland.
The indicator face is graduated in steps. Drag hands indi-
cate the maximum and minimum positions attained during
raise and lower operations. The drag hands are automati-
cally reset around the main hand position by operating the
drag-hand reset switch on the control front panel.
During forward power flow, the main hand of the position
indicator will be to the right of the neutral position when
the regulator is boosting. During reverse power flow, the
main hand will be to the left of the neutral position when
the regulator is boosting.
The ADD-AMP feature of VR-32 regulators allows increased
current capacity by reducing the regulation range. This is
accomplished by either setting limit switches in the position
indicator or enabling the SOFT-ADD-AMP feature (Function
Code 79) to prevent the tap-changer from traveling beyond
a set position in either raise or lower directions.
The limit switches have scales graduated in percent regula-
tion and are adjustable to specific values of 5, 6 1/4, 7 1/2,
8 3/4, and 10% regulation to alter the regulation range.
These percentages translate to tap position limitations of 8,
10, 12, 14, or 16 raise or lower. The five possible load cur-
rent ratings associated with the reduced regulation ranges
are summarized in Tables 13 and 14 (see Appendix). Higher
regulation ranges are realized in closed delta application.
When using the limit switches, a detent stop at each set-
ting provides positive adjustment. Settings other than
those stops are not recommended. The raise and lower
limits need not be the same value unless reverse power is
possible. The regulator will stay within the ADD-AMP limits
set forth by the control or the position indicator, whichever
limit is of a lower regulation percentage.
NOTE: If the ADD-AMP limits have been programmed into the
control (soft ADD-AMP) and the limit switches have not
been set, it is possible to manually step the tap-changer
beyond the ADD-AMP limit. If the unit is switched back to
automatic mode, the control will step the regulator back
to within the ADD-AMP limits set in the control.
See also the TROUBLESHOOTING section of this manual
for position indicator replacement instructions.
Surge Protection
Series Arrester
All VR-32 Regulators are equipped with a bypass arrester
connected across the series winding between the source
(S) and load (L) bushings. This arrester limits the volt-
age developed across the series winding during lightning
strikes, switching surges, and line faults. The series surge
arrester can be seen in Figure 3. A heavy-duty MOV-type
series surge arrester of 3 kV offers series winding protection
on all regulators except those rated 22,000 V and greater,
which have a 6 kV MOV-type series surge arrester.
Shunt Arresters
A shunt arrester is a recommended accessory on the
VR-32 regulator for protection of the shunt winding. The
shunt arrester is a direct-connected arrester mounted on
the tank and connected between the bushing and ground
(earth). It is recommended that arresters be applied to all
non-grounded bushings.
For best results, locate these arresters on the mounting
pads provided on the tank near the bushing. Connect the
arrester and the regulator tank to the same ground con-
nection using the shortest cable possible. Shunt arrester
application data is listed in Table 3.
15
S225-10-30
!
SAFETY
FOR LIFE
TABLE 2
ADD-AMP Adjustments
Regulation (%) Current (%)
± 10.0 100
± 8.75 110
± 7.5 120
± 6.25 135
± 5.0 160
Recommended Recommended
MOV Shunt MOV Shunt
Regulator Arrester Regulator Arrester
Voltage Ratings Voltage Ratings
Rating (kV) Rating (kV)
2500 3 14400 18
5000 6 15000 21
6600 9 19920 27
7620 10 22000 27
8660 12 33000 36
11000 15 34500 36
13800 18
TABLE 3
Typical Shunt Arrester Application Data*
* Contact factory for specific shunt arrestor application ratings.

Internal Construction & Wiring
The regulators are designed such that they can be partially
or completely untanked for inspection and maintenance
without disconnecting any internal electrical or mechanical
connections. (External connections must be disconnect-
ed.) The military specification-style, quick-disconnect
circular connector has a solid-state automatic current-
transformer shorting device.
The Quik-Drive tap-changing mechanism is completely
fluid-immersed. The tap-changer, in the manual position,
operates from –16L to +16R in less than 10 seconds.
Refer to the Quik-Drive Tap-Changer section of this
manual for more information.
An electrical feedback circuit, monitoring motor current,
is incorporated with the tap-changer motor circuit and
control to ensure accurate indication of tap position and
number of operations.
The regulator main coil, reactor, and potential transformer
include thermally upgraded insulation to permit operation
up to 65 °C rise without loss of life to the insulating system.
At 65 °C rise, the regulator provides 12% extra current
capacity over the base current rating.
A suitably patterned, epoxy-coated insulation paper is
used in all windings. Prior to assembly of the main core
and coil assembly, the windings are baked with sufficient
mechanical pressure exerted on the sides of the coil wind-
ing to maximize a complete bonding of the insulation to
improve its short-circuit current withstand capabilities.
The main core and coil assemblies are of the shell-form
configuration. The series winding on the input (source) side
of the regulator (Figure 13) allows all windings (control,
shunt and series) to be located in one coil assembly. The
load voltage is monitored by the control winding.
Regulators that have the series winding on the output
(load) side (Figure 14) have a separate potential transform-
er installed on the load side in lieu of a control winding.
The control winding or separate potential transformer sup-
plies a voltage for the tap-changer motor and the control
sensing circuit. Additional taps are available on them for
line voltages lower than rated voltage.
Most regulators, depending upon the rating, have an
equalizer winding. This winding improves contact life for
high-current applications.
Figure 15 shows a typical regulator power circuit with a
series transformer. This design is utilized when the load
current rating exceeds the tap-changer rating. In this type
of design, the series transformer winding losses are a func-
tion of the load alone and are independent of the tap posi-
tion. Because of this, limiting the range of voltage regula-
tion does not reduce losses and, therefore, the ADD-AMP
feature is not applicable.
The bridging reactor is a core-form design, consisting of
a coil on each leg of one core. The inside half of one coil
is connected to the outside half of the other coil and vice
versa, providing equal current in each half of the reactor
winding.
VR-32 Voltage Regulator Installation, Operation, and Maintenance Instructions
16
Figure 13.
Power circuit — series winding located on the source-side (ANSI Type B).
S
SL
L
Reactor
Equalizer Winding
Series Winding
Reversing
Switch
Polarity
Marker
Current
Transformer
Load Bushing
N
1 2 3 4 5 6 7 8
VR VL
Source-Load
Bushing
Shunt
Winding
Control Winding
G
G
V1
C2 C1
E1
E2
E3
JBB-G
JBB-S2
JBB-C2 JBB-C1
C
O
N
T
R
O
L
Load
Source
Source
Bushing

This interlacing of the two coils reduces the interwinding
leakage reactance to a very low value. The reactor is com-
pletely isolated from ground by stand-off insulators since
the reactor coil is at line voltage above ground. The reactor
core, core clamps, and other associated parts approach
this level.
The current transformer is a toroid, through which the
load current passes. It furnishes a current proportional to
load current for the line-drop compensator and metering
features.
The tap-changer enables the regulator to provide regula-
tion in smooth, accurately proportioned steps at a con-
trolled speed that minimizes arcing and extends contact
life. Figures 26 and 27 (see Appendix) illustrate the typical
internal wiring schemes. Most of the wiring is on the tap-
changer itself. The terminal board inside the junction box
on the cover connects the internal tank wiring to the posi-
tion indicator and control. The junction box wiring is shown
in Figure 28 (see Appendix).
17
S225-10-30
!
SAFETY
FOR LIFE
Figure 15.
Power circuit — series transformer (similar characteristics to Type A).
S
SL
L
N
1
2
3
4
5
6
7
8
G
G
V1
C2 C1
E1
E2
E3
JBB-G
JBB-S2
C
O
N
T
R
O
L
Source
VL
VR
Source
Bushing
Shunt
Transformer
Series
Transformer
Reactor
Equalizer Winding
Source-Load
Bushing
Polarity
Marker
JBB-C2 JBB-C1
Load Bushing
Current Transformer
Load
Potential
Transformer
Load
Reversing
Switch
Figure 14.
Power circuit — series winding located on the load-side (ANSI Type A).
S
SL
L
Reactor
Equalizer Winding
Series Winding
Reversing
Switch
Polarity
Marker
Current
Transformer
Load Bushing
N
1 2 3
4
5 6 7 8
VR VL
Source-Load
Bushing
Shunt
Winding
G
G
V1
C2 C1
E1
E2
E3
JBB-G
JBB-S2
JBB-C2 JBB-C1
Control
Load
Source
Source
Bushing
Load-
Potential
Transformer

Voltage Circuits
All Cooper Power Systems VR-32 regulators have provi-
sions for operation at system voltages lower than the
nameplate rating, as listed in Tables 11 and 12 (see
Appendix). This is accomplished by providing taps on the
control winding or PT. The taps are brought to a terminal
board located on top of the tap-changer assembly, under
oil, and are marked E
1
, E
2
, etc. (See Figure 16.) The con-
nections are made with push-on terminals and are easily
accessed through the hand hole.
If an additional voltage transformer is required for a Reverse
Power Flow application or indication of the unregulated
voltage supply, the "P" taps are located on the voltage
transformer itself or on the tap-changer terminal board.
The tapped potential winding cannot always provide
adjustment of the voltage fine enough for control or motor
use. A tapped autotransformer is therefore used for fine
voltage adjustment. This transformer, the Ratio Correcting
Transformer (RCT
1
), has input taps at 104, 110, 115, 120,
127, and 133 V. The output tap to the control and motor
is set as 120 V. RCT
1
is located on the control back panel
(see Figure 11).
To operate a regulator on a system other than its rating,
the appropriate selection must be made for the internal tap
and RCT
1
tap (and RCT
2
if provided) and the control must
be programmed properly at Function Code 43 (System
Line Voltage) and Function Code 44 (Overall PT Ratio). The
nameplate provides these values for common system volt-
ages (see Figures 9 and 10).
The internal voltage supply is brought from the tap-changer
terminal board to the junction box terminal board through
the control cable, into the enclosure, terminating at the
knife switch labeled V
1
(and V
2
, V
6
if provided). Opening
this knife switch provides a visible means of removing all
power to the control and motor circuits. From the knife
switch, the voltage is ratio corrected by RCT
1
as previ-
ously described. The motor circuit is routed directly to the
control front panel and the sensing potential is brought
back to the top terminal strip through a series of removable
jumpers and then to the front panel. This scheme allows for
the complete interchangeability with all the prior CL-series
controls and accompanying accessories.
Most voltage regulators are installed in circuits with well-
defined power flow from source to load. However, some
circuits have interconnections or loops in which the direc-
tion of power flow through the regulator may change. For
optimum utility system performance, a regulator installed
on such a circuit should have the capability of detecting
reverse power flow and of sensing and controlling the
voltage, regardless of the power flow direction. The CL-6
control has full reverse power capabilities.
Refer to Service Information S225-11-1 Voltage
Regulators, CL-6 Series Control Installation, Operation,
and Maintenance Instructions for more information on the
CL-6 control, reverse power operation, and source-side
voltage calculation.
On the front panel, the three potentials (V
s
, sensing volt-
age; V
7
, differential voltage; V
m
, motor voltage) are all
brought directly to the power switch. Without an optional
source-side supply, the V
7
terminal is connected to the V
s
terminal on the control back panel and the control software
then recognizes that the V
7
voltage is not present.)
The power switch has three positions: internal, off, and
external. The internal position powers the control and
motor from the regulator sensing winding, and the external
position permits an external supply for the same purpose.
When the power switch is in the external position, the
internal supply is disconnected to prevent accidentally
energizing the high-voltage winding and bushings. The
external-source terminals are prominently located adjacent
to the voltmeter test terminals.
VR-32 Voltage Regulator Installation, Operation, and Maintenance Instructions
18
Figure 16.
Internal tap terminals.
E Taps

The voltmeter terminals allow the monitoring of the volt-
age that is applied to the circuit board. This is the voltage
output from RCT
1
and the voltage displayed at Function
Code 47 (Voltage Calibration). During forward power flow,
the voltage at these terminals is the output voltage. During
reverse power flow, the voltage at these terminals is the
source-side voltage.
From the 6 A fuse, the motor potential provides power
to the auto/manual selector switch, the drag-hand reset
solenoid, the neutral light, and the holding switch (alternate
motor source) circuits.
Current Circuit
All VR-32 regulators are designed with an internal current
transformer (see Figure 17) to provide a current source for
the line-drop compensation calculations and for metering
functions. Table 4 provides the application information for
the various CTs used on the Cooper Power Systems regu-
lators. These CTs provide 200 mA output for the rated CT
primary current.
The current developed by the CT is brought to the terminal
board inside the junction box, through the control cable,
into the enclosure, terminating at the knife switch labeled
C. Closing the knife switch provides a visible means of
shorting the CT, thus allowing the operator to work safely
on the current circuitry. (For additional safety measures, the
V
1
and V
6
knife switches should also be opened.) For all
regulators with the quick-disconnect connector (Figure 3),
an automatic solid-state CT shorting device is located in
the junction box. This solid-state device will automatically
short the CT when the cable is disconnected.
At this knife switch, one side of the CT is connected to the
equipment ground and is also routed to the front panel for
termination on the circuit board. The "high" side of the cur-
rent circuit is brought to the top terminal board through two
removable jumpers and then to the front panel for connec-
tion to the circuit board. Once this current signal is deliv-
ered to the circuit board, it is transformed into a voltage
signal and converted into a digital format for processing.
Motor Circuit
The motor circuit power is brought from the 6 A fuse to the
circuit board through a set of back-to-back diodes to the
control (auto/manual) switch. When this switch is set for
automatic operation, motor power is applied to the relays.
An appropriate relay closure then applies this power to
the tap-changer motor, after first passing through the limit
switch contacts in the position indicator. When the switch
is set for manual operation, the power is transferred to
the momentary toggle switch labeled Raise/Lower. By
actuating this switch in one direction or the other, power
is applied through the limit switch contacts, directly to
the tap-changer motor, completely bypassing the circuit
board.
Also included as a part of the motor circuit is an alternate
feed to the motor called the holding switch circuit. Located
on the tap-changer is a switch or switches which oper-
ate off of the tap-changing mechanism. Motor rotation
causes switch closure (one direction or the other) and
establishes a complete circuit for motor current until the
rotation is complete and the cam drops out. During the
time the holding switch is closed, motor current is moni-
tored by way of an input on the circuit board that permits
the control to detect that a tap change is in process. The
microprocessor uses this information in its decision-making
process, as described under Control Operating Modes in
Service Information S225-11-1 Voltage Regulators, CL-6
Series Control Installation, Operation, and Maintenance
Instructions.
Two other circuits that share the 6 A motor source are
the drag-hand reset and neutral light circuits. The drag-
hand reset function is accomplished simply by operating
a momentary toggle switch, which applies power to the
reset solenoid in the position indicator. The neutral light is
energized from a neutral light switch (located on the tap-
changer) when in the neutral tap position.
19
S225-10-30
!
SAFETY
FOR LIFE
Figure 17.
Internal bushing-mounted current transformer.
Regulator Current
Ratings
CT
Primary Current
25
50
75
25
50
75
100
150
167, 200
100
150
200
219, 231, 250
289, 300
328, 334, 347, 400
250
300
400
418, 438, 463, 500
548, 578, 656, 668
833, 875, 1000, 1093
500
600
1000
1332, 1665 1600
TABLE 4
Current Transformer Applications (50 & 60 Hz)

Quik-Drive Tap-Changers
The present load tap-changer product offering consists of
three Quik-Drive tap-changers (see Figures 18—20). Each
device is sized for a specific range of current and voltage
applications and share many similarities in their construc-
tion. The primary benefits of Quik-Drive tap-changers
are: direct motor drive for simplicity and reliability; high-
speed tap selection for quicker serviceability; and proven
mechanical life (one million operations). Quik-Drive load
tap-changers meet IEEE
®
and IEC standards for mechani-
cal, electrical, and thermal performance.
Co mmo n Qu ik- Dr ive Tap- Ch ang er
Features
• Neutral Light Switch – A switch is triggered to close by
the Reversing Switch Assembly or the Main Contact
Assembly to indicate to the Control that the tap-changer
is in the Neutral position.
• Position Indicator Drive – A common indexing mecha-
nism is shared between the tap-changers for driving
the Position Indicator.
• Safety Switches – In addition to the limit switches in the
Position Indicator, microswitches are employed on the
tap-changers to interrupt power to the motor so that
they cannot be powered beyond the 16 Raise or 16
Lower positions. These Safety Switches are triggered by
a cam that is driven from the Main Contact Assembly.
• Logic Switches (Back-Off Switches) – The Logic
Switches are used in parallel with the Safety Switches,
based on the polarity of the Reversing Switch, to
ensure proper operation of the tap-changer.
Quik-Drive Tap-Changer Mechanism
A tap change is initiated by the Control. After some rota-
tion of the drive gear connected to the motor, a holding
switch energizes the motor through a separate circuit until
the indexing motion is completed. The indexing occurs
very quickly. The total elapsed time to complete the action
is approximately 250 milliseconds from the time the index-
ing signal is started by the control. Each full turn of the
Geneva drive gear rotates the main Geneva/contact drive
assembly one tap position, which is 20 degrees.
Reversing Switch
The reversing switch function changes the polarity of the
tapped winding. When a Quik-Drive tap-changer is in the
neutral position, the reversing switch is open.
The reversing switch motion on the Quik-Drive tap-changer
occurs as the main movable contacts enter or leave the
neutral position. The Main Contact Assembly engages the
Reversing Switch either directly or through a linkage when
the main switch is in the neutral position. The first tap step
in either direction rotates the Reversing Switch Assembly
to engage the appropriate contacts.
Additionally, the Main Contact Assembly, or its drive, and
the Reversing Switch Arm provide a mechanical stop
located 320° on either side of the neutral position so that
the tap-changers cannot be moved past 16 Lower or 16
Raise.
Quik-Drive Motors Drive Systems
Either AC Synchronous Motors or Induction Motors are
used on Quik-Drive tap-changers. The motor uses a
Holding Switch Circuit that is activated after the Control
signals for a tap change. The Holding Switch is engaged
throughout the duration that the movable contacts are in
motion to ensure that the tap change cycle is complete.
Because of differences in rotational speed and braking
characteristics, the AC Synchronous Motor uses a cam of
different timing duration than the Induction Motor to acti-
vate the holding switch. The cam on the AC Synchronous
Motor is engaged for 270° of rotation while the induction
motor cam is engaged for 105° of rotation.
The AC Synchronous Motor utilizes a phase-shifting net-
work, consisting of a capacitor and a resistor, to operate
properly when powered by a single-phase source. This
motor has a permanent magnet rotor that arrests the
inertia of the system once power to the motor is removed;
therefore, no braking mechanism is required. The AC
Synchronous Motor uses a 12 µF capacitor for 60 Hz
applications and a 15 µF capacitor for 50 Hz applications.
Induction Motors use a phase-shifting capacitor and
require a friction-type brake to stop the motor between
tap changes. Brakes use various means to interrupt the
braking action while the movable contacts are in motion
so that full motor torque is dedicated to completing the tap
change. Induction Motors use a 50 µF capacitor for 50 and
60 Hz operation.
VR-32 Voltage Regulator Installation, Operation, and Maintenance Instructions
20
Figure 18.
QD-3 Quik-Drive tap-changer.
/