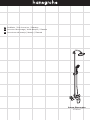
Hansgrohe Croma Showerpipe 271431 Serie Installation guide
- Category
- Sanitary ware
- Type
- Installation guide
This manual is also suitable for
Page is loading ...

2
Technical Information
Recommended water pressure 15 - 75 PSI
Max. water pressure 145 PSI
Recommended hot water temp. 120° - 140° F*
Max. hot water temp 176°F*
Flow rate - showerhead 2.0 GPM max.
Flow rate - handshower 1.85 GPM max.
Flow rate - tub filler 5.3 GPM@ 44 PSI
*Please know and follow all applicable local plumbing
codes when setting the temperature on the water heater.
English
Installation Considerations
• For best results, Hansgrohe recommends that
this unit be installed by a licensed, professional
plumber.
• Please read over these instructions thoroughly be-
fore beginning installation. Make sure that you
have all tools and supplies needed to complete
the installation.
• The installation dimensions shown in this
installation instruction are ideal for people of
approximately 6' in height. The dimensions can
be changed if required. In this case, the minimum
ceiling height of 86⅜" from the standing surface,
and all other measurements, must be changed.
• The installer must ensure that the entire area of
the wall to which the mounting plate is to be
mounted, is flat (no protruding grout joints or
tiles). He should also make sure that the wall is
strong enough to support the showerpipe.
This unit meets or exceeds the following:
• ASME A112.18.1
• CSA B125.1
• Listed by IAPMO for use in the US
and Canada
• The enclosed screws and anchors are suitable for
a solid surface wall. If installing in a fiberglass or
acrylic shower unit, install header boards at the
mounting points.
• This showerpipe requires showerpipe rough
16181181(not included).
• This showerpipe is for use with shower heads
rated at 1.7 GPM (6.4 l/min) or higher.
• To prevent scald injury, the maximum output tem-
perature of the shower valve must be no higher
than 120°F. In Massachusetts, the maximum out-
put temperature can be no higher than 112° F.
• Keep this booklet and the receipt (or other proof
of date and place of purchase) for this product in
a safe place. The receipt is required should it be
necessary to request warranty parts.
Page is loading ...
Page is loading ...
Page is loading ...

6
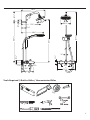
* Please know and follow all
applicable local plumbing codes
regarding the air gap between
the tub spout and the flood level
of the tub.
* Vous devez connaître et respect-
er tous les codes de plomberie
locaux applicables en installant ce
robinet.
* Debe conocer y cumplir todos
los códigos locales aplicables al
instalar este chorro.
62⅛"
81⅛"
85⅜"
min. 86⅜"
max. 4"
23⅝"
Suggested Installations / Suggestions d'installation / Sugerencias de instalación

7
English Français Español
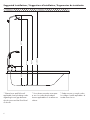
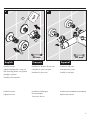
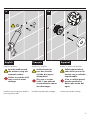
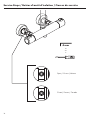
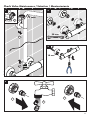
The showerpipe must be installed
with showerpipe rough set
16181181 (not included).
To insure correct opera-
tion of the thermostatic
mixing valve, the hot
supply must be on the
left and the cold supply
must be on the right.
Turn the water off at the main.
Remove the spacing jig, nuts, and
plugs.
Le showerpipe doit être installé
avec l’ensemble de pièce
intérieure pour tuyau de douche
16181181 (non inclus).
Pour vous assurer que
le mélangeur thermo-
statique fonctionne cor-
rectement, installez la
conduite d’eau chaude
à gauche et la conduite
d’eau froide à droite.
Fermez l'eau à la valve principale.
Retirez le gabarit d’espacement,
les écrous et les bouchons.
El showerpipe debe ser instalado
con un juego de piezas interiores
del tubo de ducha 16181181 (no
incluido).
Para que la válvula mez-
cladora termostática
funcione correctamente,
el suministro de agua
caliente debe estar a la
izquierda y el de agua
fría a la derecha.
Cierre el paso del agua en la
entrada del suministro.
Retire la plantilla espaciadora, las
tuercas y los tapones.
Installation / Installation / Instalación
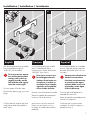
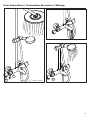
Confirm that the nipples are level
in all planes and are parallel to
each other.
Assurez-vous que les raccords
filetés sont au niveau sur tous
les plans et installés de manière
parallèle.
Confirme que los niples estén
nivelados en todos los planos y
paralelos entre sí.
1
2
3
5⅞"
1 2

8
English Français Español
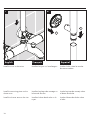
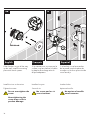
Mark a point on each nipple ¾"
from the surface of the finished
wall
Carefully cut the nipple at this
point.
Faites une marque sur chaque rac-
cord fileté à ¾ po de la surface
du mur fini.
Coupez soigneusement le raccord
fileté sur cette marque.
Marque un punto en cada niple
de ¾" desde la superficie de la
pared terminada.
Corte cuidadosamente el niple en
este punto.
Seal the wall around
the nipples with water-
proof sealant.
Install the escutcheon mounting
plates.
Wrap the nipples with plumbers'
tape.
Scellez le mur autour
des raccords filetés
à l'aide d'un agent
d’étanchéité.
Installez les plaques de montage
pour les écussons.
Enveloppez les raccords filetés
avec du ruban de plombier.
Selle la pared alrede-
dor de los niples con un
sellador impermeable.
Instale las piezas de montaje para
los escudos.
Envuelva los niples con cinta de
plomero.
¾"
¾"
1
2
3 4
1
2
3

9
English Français Español
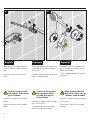
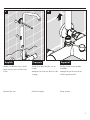
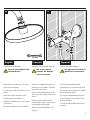
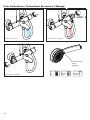
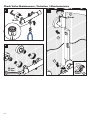
Install the stops.
Lightly lubricate the o-rings on
the mounting plates using white
plumbers' grease.
Install the escutcheons.
Installez les boitiers de service.
Lubrifiez les joints toriques.
Installez les écussons.
Instale las válvulas.
Lubriquez las juntas.
Instale los escudos.
Install the mixer.
Tighten the nuts
Installez le mélangeur
thermostatique.
Serrez les écrous.
Instale la mezcladora termostática.
Apriete las tuercas.
3
22 mm
1
2
5 6
30 mm

10
English Français Español
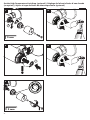
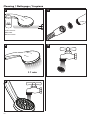
Install the riser on the mixer.
Install the mounting piece on the
shower arm.
Install the shower arm on the riser.
Installez la tuyau sur le mélangeur.
Installez la plaque de montage sur
le bras de douche.
Installez le bras de douche sur le
tuyau.
Instale el tubo sobre la mezcla-
dora termostática.
Instale la pieza de montaje sobre
el brazo de ducha.
Instale el brazo de ducha sobre
el tubo.
7 8
1
2

11
English Français Español
Make sure that the riser is level.
Mark the positions of the screw
holes.
Remove the riser.
Veillez à ce que la tuyau soit au
niveau.
Marquez les positions des trous de
vissage.
Enlevez la tuyau.
Verifique que el tubo quede
nivelada.
Marque las posiciones de los
orificios para tornillos.
Quite el tubo.
109
1
2

12
English Français Español
Remove the mounting piece.
Drill the screw holes.
Enlevez la plaque de montage.
Percez les trous.
Quite la pieza de montaje.
Perfore los orificios para tornillos.
11
12

13
English Français Español
Install the anchors.
Seal the wall around
the anchors using wa-
terproof sealant.
Failure to seal the wall
may result in water
damage.
Install the mounting piece and the
mounting piece seal.
Installez les chevilles.
Scellez le mur au-
tour des chevilles
à l'aide d'un agent
d'étanchéité.
Si le mur n’est pas
scellé, l’eau pourrait
éventuellement causer
des dommages.
Installez la plaque de montage.
Instale los pernos de anclaje.
Selle la pared alred-
edor de los pernos de
anclaje con un sellador
impermeable.
Si no se sella la pared,
pueden producirse
daños por acción del
agua.
Instale la pieza de montaje.
14a
13
1
2

14
English Français Español
If the tile does not go all the way
up the wall, install the mounting
piece with the tile spacer.
Install the riser on the mixer.
Tighten the screw.
Do not over-tighten the
screw.
Over-tightening the
screw may result in
product damage.
Si les carreaux ne couvrent pas la
surface jusqu’au plafond, installez
la plaque de montage avec le
disque adaptateur.
Installez le tuyau.
Serrez le vis.
Ne serrez pas les vis
excessivement.
Si el azulejo no va hasta arriba
de la pared, instale la placa de
montaje con el disco que coincida
con el azulejo.
Instale el tubo.
Apriete el tornillo.
No apriete el tornillo
excesivamente.
95239xx0
14b
15
1
2
3
3 mm

15
English Français Español
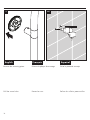
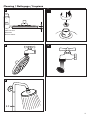
Install the showerhead.
Do not over-tighten the
showerhead.
Place the hose washer in the short
hose end connection.
Connect this end of the hose to the
mixer.
Place the screen washer in the
long hose end connection.
Install the handshower on this end
of the hose.
Rest the handshower in the holder.
Installez le pomme de douche.
Ne serrez pas le
pomme de douche
excessivement.
Placez la rondelle de tuyau en
caoutchouc noir dans l’une des
extrémités du tuyau.
Vissez cette extrémité du tuyau
à la sortie pour douchette sur la
valve.
Placez le tamis dans l’autre
extrémité du tuyau. Vissez cette
extrémité à la douchette.
Placez la douchette dans son
support.
Instale la ducha cabezal.
No apriete la ducha ca-
bezal excesivamente.
Coloque la arandela de la
manguera en un extremo de esta.
Enrosque este extremo a la salida
de la ducha de mano.
Coloque la arandela de filtro en
el otro extremo y conéctelo a la
ducha de mano.
Coloque la ducha de mano en el
soporte.
17 mm
16 17
1
2
Page is loading ...

17
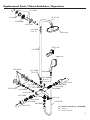
Replacement Parts / Pièces détachées / Repuestos
xx = Colors / Couleurs / Acabados
00 = Chrome
82 = Brushed Nickel
04083xx0
98915xx0
98282000
98283000
98916000
94246000
97651xx0
95137xx0
96770xx0
98915xx0
28274xx0
96737000
95692xx0
96922000
95688000
98916000
96157xx0
98131000
(15x2.5)
98214000
(12x2)
98131000
(15x2.5)
98137000
(17x1.5)
04342xx0
95239000
98913000
96466xx0
96512xx0
94077000
98913000
96179000
94074000
98340xx0
98341xx0
Page is loading ...
Page is loading ...
Page is loading ...

21
Cleaning / Nettoyage / Limpieza
1
2
3
1
2
> 1 min
scale remover
détartrant
desincrustante

22
Cleaning / Nettoyage / Limpieza
> 1 min
1
2
1
2
scale remover
détartrant
desincrustante
3
Page is loading ...
Page is loading ...

25
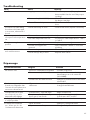
Fault Cause Remedy
Insufficient water - Supply pressure inadequate - Check water pressure (If a pump has
been installed check to see if the pump is
working).
- Filters are dirty (96922000) - Clean filters in front of the mixer and on
the thermo cartridge
- Shower filter seal dirty - Clean filter seal between shower and
hose
Crossflow: hot water being
forced into cold water pipe,
or vice versa, when mixer is
closed
- Check valves dirty or worn - Clean check valves, replace if necessary
Spout temperature does not
correspond with temperature
set
- Thermostat has not been adjusted - Adjust thermostat
- Hot water temperature too low - Increase hot water temperature to 120 ºF
to 140 ºF
Temperature regulation not
possible
- thermo cartridge dirty or worn - Replace thermo cartridge
- hot and cold supplies are
reversed
- NOT A PRODUCT DEFECT: correct the
plumbing
Instantaneous heater didn't
work with thermostat
- Filters are dirty - Clean the filter / replace filter
- Check valve(s) dirty or worn - Replace check valves
Dysfonctionnement Origine Solution
Pas assez d´eau - Pression d´alimentation insuffisante - Contrôler la pression
- Filtres encrassés (96922000) - Nettoyer les filtres devant le mitigeur
thermostatique et sur la cartouche
(96922000)
- Joint-filtre de douchette encrassé - Nettoyer le joint-filtre entre la douchette
et le flexible
Circulation opposée, l´eau
chaude est comprimée dans
l´arrivée d´eau froide et vice
versa avec robinet fermé
- Clapet anti-retour encrassé ou
défectueux
- Nettoyer le clapet anti-retour ou le
changer éventuellement
La température à la sortie
ne correspond pas à la
température de réglage
- Le thermostat n´a pas été réglé - Régler le thermostat
- Température d’eau chaude trop
basse, pas d´eau froide
- Augmenter la température d´eau
chaude entre 42ºC et 65ºC
Le réglage de la température
n´est pas possible
- Cartouche thermostatique entartrée - Changer la cartouche thermostatique
Le chauffe-eau instantané
ne s´allume pas lors de
l´utilisation du thermostat
- Filtres encrassés - Nettoyez / changez les filtres
- Clapet anti-retour bloque - Changez le clapet antiretour
Dépannage
Troubleshooting
Page is loading ...

27
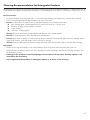
Cleaning Recommendation for Hansgrohe Products
Modern bathroom faucets, kitchen faucets and shower products are made from different materials to comply with the needs
of the market with regard to design and functionality. To avoid damage to the product, it is necessary to take proper care of
it.
For best results:
• Prevent the buildup of mineral scale and /or soap residue by cleaning your Hansgrohe product(s) when needed.
• Select a cleaning agent specifically intended for the type of product.
• Do not use these types of cleaners as they will cause damage to your Hansgrohe product:
Any cleaning agent containing hydrochloric acid, formic acid, lye, or acetic acid.
Abrasive cleaning powders, pads, or brushes.
Steam cleaners.
“No rinse” cleaning agents.
• Always follow the instructions provided by the manufacturer of the cleaning agent.
• Do not mix cleaning agents, unless directed by the manufacturer.
• Do not spray cleaners directly onto the product as drops could enter openings and gaps and cause damage. When
using spray cleaners, spray the cleaner onto a soft cloth or sponge.
• Always rinse your Hansgrohe product thoroughly with clear water and polish dry with a soft cloth after cleaning.
Important
• Residue from soaps and shampoos can cause damage. Rinse the product with clean water after each use.
• Residue from basin/tub/tile cleaner can cause damage to faucets and fittings. Immediately rinse any overspray from
the Hansgrohe product.
• Damage to the product caused by improper care or the use of improper cleaning agents is not
covered by the warranty.
• If a component of the product is damaged, replace it, as there is risk of injury.
Page is loading ...
Page is loading ...

30
Limited Consumer Warranty
This product has been manufactured and tested to the highest quality standards by Hansgrohe, Inc. (“Hansgrohe”).
This warranty is limited to Hansgrohe products that are purchased by a consumer in the United States or Canada after
March 1, 1996, and installed in either in the United States or in Canada.
WHO IS COVERED BY THE WARRANTY
This warranty extends to the original purchaser only. This warranty is non-transferable.
WHAT IS COVERED BY THE WARRANTY
The warranty covers only your Hansgrohe manufactured product. Hansgrohe warrants this product against defects in
material or workmanship as follows:
Hansgrohe will replace at no charge for parts only or, at its option, replace any product or part of the product that proves
defective because of improper workmanship and/or material, under normal installation, use, service and maintenance. If
Hansgrohe is unable to provide a replacement and repair is not practical or cannot be made in timely fashion, Hansgrohe
may elect to refund the purchase price in replace for the return of the product.
LENGTH OF WARRANTY
Replacement or repaired parts of products will be covered for the term of this warranty, as stated in the following two
sentences. If you are a consumer who purchased the product for use primarily for personal, family or household purposes,
this warranty extends for as long as you own the product and the home in which the product is originally installed. If you
purchased the product for use primarily for any other purpose, including, without limitation, a commercial purpose, this
warranty extends only (i) for 1 year, with respect to Hansgrohe & Commercial products, and (ii) for 5 years, with respect to
Axor products.
THIS WARRANTY DOES NOT COVER, AND HANSGROHE WILL NOT PAY FOR:
A. Conditions, malfunctions or damage not resulting from defects in material or workmanship.
B. Conditions, malfunctions or damage resulting from (1) normal wear and tear, improper installation, improper
maintenance, misuse, abuse, negligence, accident or alteration; (2) the use of abrasive or caustic cleaning agents or “no-
rinse” cleaning products, or the use of the product in any manner contrary to the product instructions; or (3) conditions in
the home such as excessive water pressure or corrosion.
C.Labor and other expenses for disconnection, deinstallation, or return of the product for warranty service
(including but not limited to proper packaging and shipping costs), or for installation or reinstallation of the product.
D. Accessories, connected materials and products, or related products not manufactured by Hansgrohe.
E. Any Hansgrohe or Axor product sold for display purposes.
F. Rubbed Bronze finish is subject to a 3-year limited warranty. Chrome and all PVD finishes are covered by the limited
lifetime warranty.
G. Hansgrohe Water Filtration System is subject to a 1-year limited warranty. Warranty does not include replacement
filters.
TO OBTAIN WARRANTY PARTS OR INFORMATION
Contact your Hansgrohe retailer, or contact Technical Service at:
Hansgrohe, Inc.
1492 Bluegrass Lakes Parkway
Alpharetta, GA 30004
Toll-free 800-334-0455
In requesting warranty service, you will need to provide:
1. The sales receipt or other evidence of the date and place of purchase.
2. A description of the problem.
3. Delivery of the product or the defective part, postage prepaid and carefully packed and insured, to:
Hansgrohe, Inc.
1492 Bluegrass Lakes Parkway
Alpharetta, GA 30004
Toll-free 800-334-0455
When warranty service is completed, any repaired or replacement product or part will be returned to you postage prepaid.

31
EXCLUSIONS AND LIMITATIONS
REPAIR OR REPLACEMENT (OR, IN LIMITED CIRCUMSTANCES, REFUND OF THE PURCHASE PRICE) AS
PROVIDED UNDER THIS WARRANTY IS THE EXCLUSIVE REMEDY OF THE PURCHASER. HANSGROHE
NEITHER ASSUMES NOR AUTHORIZES ANY PERSON TO CREATE FOR IT ANY OTHER OBLIGATION OR
LIABILITY IN CONNECTION WITH THIS PRODUCT. HANSGROHE SHALL NOT BE LIABLE TO PURCHASER
OR ANY OTHER PERSON FOR ANY INCIDENTAL, SPECIAL OR CONSEQUENTIAL DAMAGES, ARISING OUT
OF BREACH OF THIS WARRANTY OR ANY IMPLIED WARRANTY (INCLUDING BUT NOT LIMITED TO ANY
IMPLIED WARRANTY OF MERCHANTABILITY).
Some States do not allow the exclusion or limitation of incidental or consequential damages, so the above limitation or
exclusion may not apply to you. This warranty gives you specific legal rights, and you may also have other rights that vary
from state to state.
TO THE EXTENT PERMITTED BY LAW, ANY IMPLIED WARRANTIES OF MERCHANTABILITY AND FITNESS
FOR A PARTICULAR PURPOSE, ARE LIMITED TO THE DURATION OF THE EXPRESS WARRANTY.
Some states do not allow limitations on how long an implied warranty may last, so the above limitations may not apply to
you. You may be required by law to give us a reasonable opportunity to correct or cure any failure to comply before you
can bring any action in court against us under the Magnuson-Moss Warranty Act.
PRODUCT INSTRUCTIONS AND QUESTIONS
Upon purchase or prior to installation, please carefully inspect your Hansgrohe product for any damage or visible defect.
Prior to installing, always carefully study the enclosed instructions on the proper installation and the care and maintenance of
this product. If you have questions at any time about the use, installation or performance of your Hansgrohe product, or this
warranty, please write us or call us toll-free at 800-334-0455.

Hansgrohe, Inc. • 1490 Bluegrass Lakes Parkway • Alpharetta, GA 30004
Tel. 800-334-0455 • Fax 770-360-9887
www.hansgrohe-usa.com
US - Installation Instructions • Part No. 90494122 • Revised 8/2015
-
 1
1
-
 2
2
-
 3
3
-
 4
4
-
 5
5
-
 6
6
-
 7
7
-
 8
8
-
 9
9
-
 10
10
-
 11
11
-
 12
12
-
 13
13
-
 14
14
-
 15
15
-
 16
16
-
 17
17
-
 18
18
-
 19
19
-
 20
20
-
 21
21
-
 22
22
-
 23
23
-
 24
24
-
 25
25
-
 26
26
-
 27
27
-
 28
28
-
 29
29
-
 30
30
-
 31
31
-
 32
32


Hansgrohe Croma Showerpipe 271431 Serie Installation guide
- Category
- Sanitary ware
- Type
- Installation guide
- This manual is also suitable for
Ask a question and I''ll find the answer in the document
Finding information in a document is now easier with AI
in other languages
Related papers
-
Hansgrohe 27169001 Installation guide
-
-
GROHE 26478821 Owner's manual
-
-
-
Hansgrohe 14113001 Installation guide
-
Hans Grohe Pressure Balance Showerpipe 04530 Series Installation guide
-
-
-
Other documents
-
Barclay 4023-PL-CP Dimensions Guide
-
Axor 11041001 Urquiola Assembly Instruction
-
-
Axor 10100801 User manual
-
-
-
EZ-FLO 11126 Installation guide
-
-
-