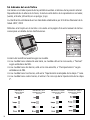
Microlife BP3NA1-1X Operating instructions
- Category
- Blood pressure units
- Type
- Operating instructions

Instruction Booklet for
Model # BP3NA1-1X
Ref #867

1
Automatic Blood Pressure Monitor - Instruction Manual
Table of contents
1. Introduction
1.1. Features of your blood pressure monitor
1.2. Important information about self measurement
2. Important Information on Blood Pressure and its Measurement
2.1. How does high/low blood pressure arise?
2.2. Which values are normal?
2.3. What can be done if regular high/low values are obtained?
3. Components of your Blood Pressure Monitor
4. Using your Monitor for the First Time
4.1. Installing the batteries
4.2. Setting the date and time
4.3. Cuff tube connection
4.4. Select the user
5. Measurement Procedure
5.1. Before measurement
5.2. Common sources of error
5.3. Fitting the cuff
5.4. Measuring procedure
5.5. Irregular Heartbeat Detector
5.6. Traffic Light Indicator
5.7. Memory - Displaying the last 99 measurements
5.8. Discontinuing a measurement
5.9. Setting the Medication Reminder
5.10. Battery Charge Indicator
5.11. Using the AC Adapter
6. Software Functions
6.1. Installation and data transmission
7. Error Messages/Troubleshooting
8. Care and Maintenance
8.1. Accuracy test
9. Warranty
10. Certifications
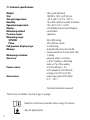
11. Technical Specifications
12. Contacts for Support

2
1. Introduction
1.1.Features of your Automatic Blood Pressure Monitor
Your blood pressure monitor with Irregular Heartbeat Detection, and PC Link Blood
Pressure Analyzer Software is a fully automatic digital blood pressure measuring device
for use by adults on the upper arm at home or in your doctor’s/nurse’s office. It enables
very fast and reliable measurement of systolic and diastolic blood pressure as well as
pulse through the oscillometric method. This device offers clinically proven accuracy and
has been designed to be user friendly.
Before using, please read this instruction manual carefully and then keep it in a safe
place. Please contact your doctor for further questions on the subject of blood pressure
and its measurement.
Attention!
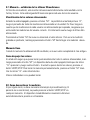
1.2.Important information about self-measurement
• Self-measurement means control, not diagnosis or treatment. Unusual values must
always be discussed with your doctor. Under no circumstances should you alter
the dosages of any drugs prescribed by your doctor.
• The pulse display is not suitable for checking the frequency of heart pacemakers!
• In cases of irregular heartbeat, measurements made with this instrument should only
be evaluated after consultation with your doctor.
Electromagnetic interference:
The device contains sensitive electronic components. Avoid strong electrical or electro-
magnetic fields in the direct vicinity of the device (e.g. mobile telephones, microwave
ovens). These can lead to temporary impairment of the measuring accuracy.
2. Important Information on Blood Pressure and its Measurement
2.1. How does high or low blood pressure arise?
Your level of blood pressure is determined in the circulatory center of the brain and
adjusts to a variety of situations through feedback from the nervous system. To adjust
blood pressure, the strength and speed of the heart (Pulse), as well as the width of circu-
latory blood vessels is altered. Blood vessel width is controlled by fine muscles in the
blood vessel walls.
Your level of arterial blood pressure changes periodically during heart activity: During the
“blood ejection” (Systole) the value is highest (systolic blood pressure value). At the end
of the heart’s “rest period” (Diastole) pressure is lowest (diastolic blood pressure value).

3
Blood pressure values must lie within certain normal ranges in order to prevent particular
diseases.
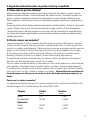
2.2. Which values are normal?
Blood pressure is very high if your diastolic pressure is above 100 mmHg and/or your
systolic blood pressure is over 160 mmHg, while at rest. In this case, please con-
sult your physician immediately. Long-term values at this level endanger your health
due to continual damage to the blood vessels in your body.
If your systolic blood pressure values are between 140 mmHg and 159mmHg and/or
the diastolic blood pressure values between 90 mmHg and 99mmHg, consult your
physician. Regular self-checks are necessary.
If you have blood pressure values that are too low, (i.e., systolic values under
105mmHg and/or diastolic values under 60 mmHg), consult your physician.
Even with normal blood pressure values, a regular self-check with your blood pres-
sure monitor is recommended. You can detect possible changes in your values early
and react appropriately.
If you are undergoing medical treatment to control your blood pressure, keep a
record of values along with time of day and date. Show these values to your physi-
cian. Never use the results of your measurements to independently alter the
drug doses prescribed by your physician.
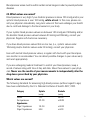
Which values are normal?
The following standards for assessing high blood pressure (without regard to age)
have been established by the U.S. National Institutes of Health JNC7, 2003.
Category Systolic Diastolic
(mmHg) (mmHg)
Normal <120 and <80
Pre-Hypertension 120-139 or 80-89
Hypertension
Stage 1 Hypertension 140-159 or 90-99
Stage 2 Hypertension
≥160 or ≥100

4
☞ Further information
• If your values are mostly normal under resting conditions but exceptionally high under
conditions of physical or psychological stress, it is possible that you are suffering from
so-called “labile hypertension.” Consult your doctor.
• Correctly measured diastolic blood pressure values above 120mmHg require
immediate medical treatment.
2.3. What can be done if regular high or low values are obtained?
a) Consult your doctor.
b) Increased blood pressure values (various forms of hypertension) are associated with
considerable health risks over time. Arterial blood vessels in your body are endangered
due to constriction caused by deposits in the vessel walls (Arteriosclerosis). A deficient
supply of blood to important organs (heart, brain, muscles) can result from arterioscle-
rosis. Furthermore, the heart will become structurally damaged with increased blood
pressure values.
c) There are many different causes of high blood pressure. We differentiate between the
common primary (essential) hypertension, and secondary hypertension. The latter
group can be ascribed to specific organ malfunctions. Please consult your doctor for
information about the possible origins of your own increased blood pressure values.
d) There are measures which you can take to reduce and even prevent high blood pres-
sure. These measures must be permanent lifestyle changes.
A) Eating habits
• Strive for a normal weight corresponding to your age. See your doctor for your ideal
weight.
• Avoid excessive consumption of common salt.
• Avoid fatty foods.
B) Previous illnesses
• Consistently follow all medical instructions for treating illness such as:
• Diabetes (Diabetes mellitus or sugar diabetes)
• Fat metabolism disorder
• Gout
C) Habits
• Give up smoking completely.
• Drink only moderate amounts of alcohol.
• Restrict your caffeine consumption (coffee, tea, chocolate).

5
D) Your physical condition
• After a medical examination, and with your doctor’s approval and direc-
tion; exercise.
• Choose sports which require stamina and avoid those which require strength.
• Avoid reaching the limit of your performance.
• With previous illnesses and/or an age of over 40 years, please consult your doctor
before beginning your exercise routine. Speak with your doctor regarding the type
and extent of exercise that is appropriate for you.
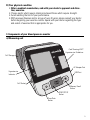
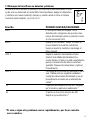
3. Components of your blood pressure monitor
a) Measuring unit
Cuff Socket
Card Showing JNC7
Hypertension Guidelines
Time/Date
Button
START/STOP
Button
Memory Recall
Button
Hypertension
Indicator
AC Adapter Port
Cuff Storage
USB Port

b) Wide Range Rigid Cuff:
For arm circumference 22cm - 46 cm (8.7” - 18.1”)
If you ever need to buy a replacement cuff, use only Microlife
brand cuffs. Call Microlife customer service at 1-800-568-4147
for information.
Please Note:
Arm circumference should be measured with a measuring tape in the middle of the relaxed
upper arm. Do not force cuff connection into the opening. Make sure the cuff connection is
not pushed into the AC adapter port. If the cuff is too small, call 1-800-568-4147 for further
information. You may prefer to use one of our wrist type monitors.
4. Using your Monitor for the First Time
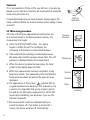
4.1 Installing the batteries
Insert batteries immediately after unpacking the unit. The
battery compartment is located on the bottom of the device.
a) Remove cover.
b) Insert the batteries (4 x size AA 1,5V),
observing the indicated polarity.
c) If a battery warning appears in the display,
the batteries are discharged and must be replaced.
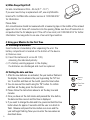
4.2 Setting the date and time
1. After the new batteries are activated, the year number flashes in
the display. You can advance the year by pressing the "M" but-
ton. To confirm and then set the month, press the time button.
2. You can now set the month using the “M” button. To confirm
and then set the day, press the time button.
3. Please follow the instructions above to set the day, hour and
minutes.
4. Once you have set the last minute and pressed the time button,
the date and time are set and the time is displayed.
5. If you want to change the date and time, press and hold the time
button down for approx. 3 seconds until the user icon starts to
flash. Release and press the time button once more and the
year will begin flashing. Now you can enter the new values as
described above.
TIME PM
Memory
Button
Time/Date
Button
6

7
4.3. Cuff tube connection
Insert the cuff tube into the opening on the side of
the monitor indicated by the drawing of a cuff.
4.4. Select the User
This blood pressure monitor is designed to store 99 measurements
for each of two users. Before taking a measurement, be certain that
the correct user has been selected.
a) With the unit off, press and hold the TIME button for 3 sec-
onds until the user icon in the upper left corner of the LCD
screen flashes.
b) Press the “M” button to toggle between users.
c) Press the START button to make your selection.

5. Measurement Procedure
Please note: You should always be seated before and during measurement.
5.1. Before measurement:
• Avoid eating and smoking as well as all forms of exertion directly before measure-
ment. These factors influence the measurement result. Find time to relax by sitting
in an armchair in a quiet atmosphere for about ten minutes before taking a meas-
urement.
• Remove any garment that fits closely to your upper arm.
• Always measure on the same arm (normally left).
• Always compare measurements taken at the same time of day, since blood pressure
changes during the course of the day, as much as 20-40 mmHg.
5.2. Common sources of error:
Note: Comparable blood pressure measurements always require the same
conditions! Conditions should always be quiet.
•All efforts by the user to support the arm can increase blood pressure. Make sure
you are in a comfortable, relaxed position and do not flex any of the muscles in the
measurement arm during the measurement. Use a cushion for support if necessary.
•If the arm artery lies considerably lower or higher than the heart, an erroneously high
or low blood pressure will be measured! Each 15cm (6 inch) difference in height
between your heart and the cuff results in a measurement error of 10 mmHg!
•Cuffs that are too narrow or too short result in false measurement values. Selecting
the correct cuff is extremely important. Cuff size is dependent upon the circumfer-
ence of the arm (measured in the center). The permissible range is printed on the
cuff. If this is not suitable for your use, please call 1-800-568-4147.
Note: Only use clinically approved Microlife cuffs!
•A loose cuff or a sideways protruding air pocket causes false measurement values.
•With repeated measurements, blood accumulates in the arm, which can lead to false
results. Consecutive blood pressure measurements should be repeated after a 1
minute pause or after your arm has been held up in order to allow the accumulated
blood to flow away.
8

9
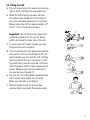
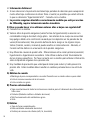
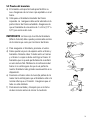
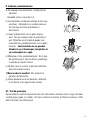
5.3. Fitting the Cuff
a) The cuff is pre-formed for easier use. Remove
tight or bulky clothing from your upper arm.
b) Wrap the cuff around your upper left arm.
The rubber tube should be on the inside of
your arm extending downward to your hand.
Make certain the cuff lies approximately 1/2”
to 3/4” (1 to 2 cm) above the elbow.
Important! The red strip on the edge of the
cuff (Artery Mark) must lie over the artery
which runs down the inner side of the arm.
c) To secure the cuff, wrap it around your arm
and press the velcro together.
d) There should be little free space between the
arm and the cuff. You should able to fit 2 fin-
gers between your arm and the cuff. Clothing
must not restrict the arm. Any piece of cloth-
ing which does, must be removed. Cuffs that
don’t fit properly result in false measurement
values. Measure your arm circumference if
you are not sure of proper fit.
e) Lay your arm on a table (palm upward) so the
cuff is at the same height as your heart.
Make sure the tube is not kinked.
f) Remain seated quietly for at least two
minutes before you begin the measurement.
3
/
4
”-1”

Comment:
If it is not possible to fit the cuff to your left arm, it can also be
placed on your right arm. However, all measurements should be
made using the same arm.
Comparable blood pressure measurements always require the
same conditions (Relax for several minutes before taking a meas-
urement).
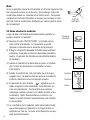
5.4. Measuring procedure
After the cuff has been appropriately positioned on the
arm and connected to the blood pressure monitor, the
measurement can begin:
a) Press the ON/OFF/START button. The pump
begins to inflate the cuff. In the display, the
increasing cuff pressure is continually displayed.
b) After automatically reaching an individual pressure,
the pump stops and the pressure slowly falls. The cuff
pressure is displayed during the measurement.
c) When the device has detected your pulse, the heart
symbol in the display begins to blink.
d) When the measurement has been concluded, a long
beep tone sounds. The measured systolic and diastolic
blood pressure values, as well as the pulse are now
displayed.
e) The appearance of this symbol signifies that an
irregular heartbeat was detected. This indicator is only
a caution. It is important that you be relaxed, remain
still and do not talk during measurements. NOTE: We
recommend contacting your physician if you see this
indicator frequently.
f) The measurement results are displayed until you
switch the device off. If no button is pressed for 1
minute, the device switches off automatically.
Cuff on
right arm
Pumping
Pressure
Measuring
Measurement
complete
Systolic
Diastolic
Pulse
10

11
5.5. Irregular Heartbeat Detector
This symbol indicates that certain pulse irregularities were
detected during the measurement. In this case, the result may devi-
ate from your normal basal blood pressure – repeat the measure-
ment. In most cases, this is no cause for concern. However, if the
symbol appears on a regular basis (e.g. several times a week with
measurements taken daily), we advise you to tell your doctor.
Please show your doctor the following explanation:
Information for the doctor on frequent appearance of the Irregular Heartbeat Symbol
This instrument is an oscillometric blood pressure monitor device that also analyzes pulse
frequency during measurement. The instrument is clinically tested.
If pulse irregularities occur during measurement, the irregular heartbeat symbol is dis-
played after the measurement. If the symbol appears more frequently (e.g. several times
per week on measurements performed daily) or if it suddenly appears more often than
usual, we recommend the patient to seek medical advice.
The instrument does not replace a cardiac examination, but serves to detect pulse irregu-
larities at an early stage.

12
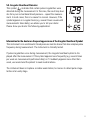
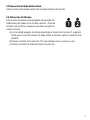
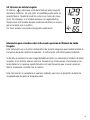
5.6. Traffic Light Indicator
The bars on the left-hand edge of the display show you the range within which the indi-
cated blood pressure value lies. Depending on the height of the bar, the readout value is
either within the normal (green), borderline (yellow) or danger (red) range.
The classification is based on standards established by the National Institutes of Health
JNC7, 2003.
Refer to the card on the front of the monitor or the chart in section 2.2 of this instruction
manual for details of the classifications.
The traffic light bar raises according to your measurement.
• If your measurement has only one bar, your measurement is in the green zone, or
“Normal” according to NIH standards.
• If your measurement has two bars, it is in the yellow zone, or “Pre-Hypertension”
according to NIH standards.
• If your measurement has three bars, it is in the orange “Stage 1 Hypertension” zone.
• If your measurement has four bars, it is in the red “Stage 2 Hypertension” zone.
Indication of a
“Normal” Blood
Pressure
Indication of a “Pre-
Hypertension” Blood
Pressure
Indication of a “Stage 1
Hypertension” Blood
Pressure
Indication of a “Stage 2
Hypertension” Blood
Pressure

13
5.7. Memory – Displaying the last 99 Measurements
At the end of a measurement, this monitor automatically stores each result with date and
time. This unit stores 99 memories for each of 2 users.
Viewing the stored values
With the unit off, press the "M" button. The display first shows "A", then shows an average of
all measurements stored in the unit. Please note: Measurements for each user are
averaged and stored separately. Be certain that you are viewing the measurements
for the correct user.
Pressing the "M" button again displays the previous value. To view a particular stored memo-
ry, press and hold the “M” button to scroll to that stored reading.
Memory full
When the memory has stored 99 results a new measured value is stored by overwriting the
oldest value.
Clear all values
If you are sure that you want to permanently remove all stored values, hold
down the "M" button (the instrument must have been switched off before-
hand) until "CL" appears and then release the button. If you do not want to
clear the values, press the START/STOP button. To permanently clear the
memory, press the "M" button while "CL" is flashing.
Individual values cannot be cleared.
5.8. Discontinuing a Measurement
If it is necessary to interrupt a blood pressure measurement for any reason
(e.g the patient feels unwell), the START/STOP button can be pressed at any
time. The device then immediately lowers the cuff pressure automatically.
1

14
5.9. Setting the Medication Reminder
This instrument allows you to set two alarm times at which an alarm signal will then be trig-
gered. This can be a useful aid, for instance as a reminder to take medication or to remind you
to take your blood pressure at the same time each day.
1. To set an alarm time, press the time button (the instrument
must have been switched off beforehand) and immediately
afterwards the "M" button and hold both down until the bell
symbol appears in the bottom left of the display. Then release
both buttons. The flashing "1" in the display indicates that the
first alarm time can now be set.
2. Press the time button to set the hours – the hours display flash-
es and pressing the "M" button allows you to set the alarm
hour. To confirm, press the time button.
3. The minute display will now flash. The minutes can be set using
the "M" button. To confirm, press the time button again.
4. The bell symbol will now flash. Use the "M" button to select
whether the alarm time is to be active (bell) or inactive (crossed-
out bell). To confirm, press the time button.
To set a second alarm time, proceed as above but if the "1"
flashes, press the "M" button to select "2" and confirm with
the time button.
• An active alarm time is indicated by the bell symbol in the display.
• The alarm sounds at the set time every day.
• To switch-off the alarm when it is sounding, press the START/STOP but-
ton.
• To permanently switch-off the alarm, proceed as above (steps 1-4)
and select the crossed-out bell symbol. This will then disappear from
the display.
• The alarm times must be re-entered each time the batteries are replaced.
T
IME PM

15
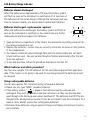
5.10. Battery Charge Indicator
Batteries almost discharged
When the batteries are approximately 75% used the battery symbol
will flash as soon as the instrument is switched on (if at least one of
the batteries still has some charge). Although the instrument will con-
tinue to measure reliably, you should obtain replacement batteries.
Batteries discharged– replacements required
When the batteries are discharged, the battery symbol will flash as
soon as the instrument is switched on. You cannot take any further
measurements and must replace the batteries.
1. Open the battery compartment at the back of the instrument by pushing inward at the
two arrows and pulling it out.
2. Replace the batteries – ensure they are correctly connected, as shown on the symbols
in the compartment.
3. The memory retains all values although date and time (and possibly also set alarm
times) must be reset - the year number therefore flashes automatically after the bat-
teries are replaced.
4. To set date and time, follow the procedure described in Section 4.2.
Which batteries and which procedure?
Use four new, longlife 1.5V AA batteries. Do not use batteries beyond their expiration
date. If the monitor is not going to be used for a prolonged period the batteries should
be removed.
Using rechargeable batteries
You can also operate this instrument using rechargeable batteries.
• Please use only type "NiMH" reusable batteries!
• If the battery symbol ( ) appears, the batteries must be removed and
recharged! They must not remain inside the instrument, as they may become dam-
aged through total discharge even when switched off. The batteries must NOT be dis-
charged in the blood pressure monitor! If you do not intend to use the instrument for a
week or more, always remove the rechargeable batteries!
• Recharge these batteries using an external charger and follow manufacturer’s instruc-
tions carefully.

16
5.11. Using the AC Adapter
You may also operate this monitor using the included AC Adapter (output 6V DC/600 mA
with DIN plug).
Use only the included AC Adapter to avoid damaging the unit.
1. Ensure that the AC adapter and cable are not damaged.
2. Plug the adapter cable into the AC Adapter port on the
blood pressure monitor.
3. Plug the adapter into your electrical outlet.
When the AC adapter is connected, no battery current is consumed.
Note: No power is taken from the batteries while the AC Adapter is connected to the moni-
tor. If electrical power is interrupted, (e.g., by accidental removal of the AC adapter from
the outlet) the monitor must be reset by removing the plug from the socket and reinserting
the AC adapter connection. Please consult Microlife if you have any questions regarding
the AC adapter by calling 1-800-568-4147.
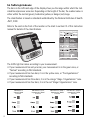
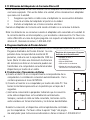
6. Software Functions
This unit can be used in connection with your
personal computer (PC) running the PC Link
Blood Pressure Analyzer software. Your PC will
allow a capacity of monitoring 80 patients, each
with 1000 data (note: overuse will lower system
efficiency). The memory data can be transferred
to the PC by connecting the monitor via the
included USB cable with your PC. Note: The
software does not work with Mac computers.
6.1. Installation and Data Transmission
a) Insert CD into CD ROM drive of your PC. The installation will start
automatically. If not, click on SETUP.EXE.
b) Connect the monitor via USB cable with the PC. Three horizontal
bars will appear on the display and last for 3 seconds.
c) The bars will then flash to indicate that the connection between
computer and device is successfully made. As long as the cable is
plugged, the bars will keep flashing and the buttons are disabled.
During the connection, the device is completely controlled by the
computer. Please refer to the ‘help’ file in the software for detailed
instructions or call 1-800-568-4147.
1
---
1
---
• Windows XP, Vista, 7

17
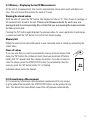
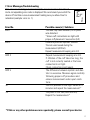
7. Error Messages/Troubleshooting
If an error occurs during a measurement, the measurement is discontinued
and a corresponding error code is displayed. We recommend you switch the
device off and take a new measurement making sure you allow time for
relaxation (example: error no. 1).
Repeat measurement keeping arm still.
If inflation of the cuff takes too long, the
cuff is not correctly seated or the hose
connection’s not tight.
Check connections and repeat.
The difference between systolic and dias-
tolic is excessive. Measure again carefully
following proper cuff procedures and
ensure measurement under quiet condi-
tions.
Error No. Possible cause(s) / Solutions
ERR 1 The tube may have loosened, or no pulse
was detected.
*Ensure cuff connections are tight with
proper cuff placement. See section (5.3)
ERR 2 Unnatural pressure impulses. Reason:
The arm was moved during the
measurement (Artifact).
Repeat measurement keeping arm still.
ERR 3
ERR 5
The cuff pressure is too high. Relax for 5
minutes and repeat the measurement.*
HI
The pulse is too low (less than 40).
Repeat the measurement.*
LO
*If this or any other problem occurs repeatedly, please consult your doctor.

18
Other possible errors and their solutions
If problems occur when using the device, the following points should be checked:
Malfunction Remedy
• Check battery installation or AC adapter con-
nection is correct and wall outlet is working.
• If the display is unusual, remove the batteries
and then exchange them for new ones.
Check polarity.
• Check the connection of the cuff tube and
connect properly.
1. Ensure the cuff fits properly. (see 5.3)
2. Before starting measurement make sure
that the cuff is not too tight and that clothing
is not exerting pressure on the arm. Take
articles of clothing off if necessary.
3. Measure blood pressure again in complete
peace and quiet.
• Please read the following information and
the points listed under “Common sources of
error”.(5.2) Repeat the measurement.
• Blood pressure changes constantly. The
observed readings may accurately reflect
your pressure.
• Record daily values and consult your doctor.
• Pressure readings in your doctor’s office may
be higher due to anxiety.
• Check cuff connections.
Ensure the unit has not been tampered with.
The display remains blank when the instrument
is switched on although the batteries are in
place.
The pressure does not rise although the pump
is running.
The device frequently fails to measure,
or the values measured are too low or high.
Every measurement results in different values,
although the device functions normally and
normal values are displayed.
Blood pressure values differ from those meas-
ured by my doctor.
After the instrument has inflated the cuff the
pressure falls very slowly, or not at all. (No rea-
sonable measurement possible).

19
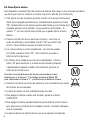
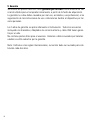
8. Care and Maintenance
a) Do not expose the device to either extreme
temperatures, humidity, dust or direct sunlight.
b) The cuff contains a sensitive air-tight bubble.
Handle this cuff carefully and avoid all types of
stress through twisting or buckling.
c) Clean the device with a soft, dry cloth. Do not
use gas, thinners or similar solvents. Spots on
the cuff can be removed carefully with a damp
cloth and soapsuds. The cuff with bladder
must not be washed in a dishwasher,
clothes washer, or submerged in water.
d) Handle the tube carefully. Do not pull on it. Do
not allow the tubing to kink and keep it away
from sharp edges.
e) Do not drop the monitor or treat it roughly in
any way. Avoid strong vibrations.
f) Never open the monitor! This invalidates the
manufacturer’s warrantee.
g) Batteries and electronic instruments must be
disposed of in accordance with the locally appli-
cable regulations, not with domestic waste.
8.1. Accuracy test
Sensitive measuring devices must be checked for accuracy from time to time.
We recommend a periodical inspection of your unit by an authorized dealer every 2 years.
Your factory authorized dealer would be pleased to provide more information regarding
accuracy checks. Call 1-800-568-4147 for more information.
Page is loading ...
Page is loading ...
Page is loading ...
Page is loading ...
Page is loading ...
Page is loading ...
Page is loading ...
Page is loading ...
Page is loading ...
Page is loading ...
Page is loading ...
Page is loading ...
Page is loading ...
Page is loading ...
Page is loading ...
Page is loading ...
Page is loading ...
Page is loading ...
Page is loading ...
Page is loading ...
Page is loading ...
Page is loading ...
Page is loading ...
Page is loading ...
Page is loading ...
Page is loading ...
Page is loading ...
Page is loading ...
-
 1
1
-
 2
2
-
 3
3
-
 4
4
-
 5
5
-
 6
6
-
 7
7
-
 8
8
-
 9
9
-
 10
10
-
 11
11
-
 12
12
-
 13
13
-
 14
14
-
 15
15
-
 16
16
-
 17
17
-
 18
18
-
 19
19
-
 20
20
-
 21
21
-
 22
22
-
 23
23
-
 24
24
-
 25
25
-
 26
26
-
 27
27
-
 28
28
-
 29
29
-
 30
30
-
 31
31
-
 32
32
-
 33
33
-
 34
34
-
 35
35
-
 36
36
-
 37
37
-
 38
38
-
 39
39
-
 40
40
-
 41
41
-
 42
42
-
 43
43
-
 44
44
-
 45
45
-
 46
46
-
 47
47
-
 48
48


Microlife BP3NA1-1X Operating instructions
- Category
- Blood pressure units
- Type
- Operating instructions
Ask a question and I''ll find the answer in the document
Finding information in a document is now easier with AI
in other languages
Related papers
-
Microlife BP3GR1-3P User manual
-
Microlife BP3GQ1-3P User manual
-
-
Microlife BP3MY1-1P User manual
-
-
Microlife bp3gx1-5x Owner's manual
-
-
-
-
Other documents
-
CVS 800824 Operating instructions
-
 MedeScan BPS01 Fully Automatic Upper Arm Smart Blood Pressure Monitor User manual
-
ADC Advantage 6023 User manual
-
A&D UA-787 User manual
-
LifeSource UA-789 User manual
-
ReliOn BP200W User manual
-
-
-
-
