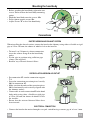
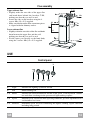
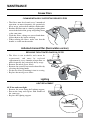
Zanussi ZHC64ALU is a cooker hood designed to eliminate kitchen smells and maintain a clean and fresh environment while cooking. It features a powerful motor with three speed settings, allowing you to adjust the extraction power based on your cooking needs. The hood is equipped with metal grease filters that capture grease particles, and an activated charcoal filter for recirculation mode, which removes odors and purifies the air. Additionally, the ZHC64ALU has LED lighting to illuminate your cooking area, providing both functionality and ambiance.
Zanussi ZHC64ALU is a cooker hood designed to eliminate kitchen smells and maintain a clean and fresh environment while cooking. It features a powerful motor with three speed settings, allowing you to adjust the extraction power based on your cooking needs. The hood is equipped with metal grease filters that capture grease particles, and an activated charcoal filter for recirculation mode, which removes odors and purifies the air. Additionally, the ZHC64ALU has LED lighting to illuminate your cooking area, providing both functionality and ambiance.


-
 1
1
-
 2
2
-
 3
3
-
 4
4
-
 5
5
-
 6
6
-
 7
7
-
 8
8
-
 9
9


Zanussi ZHC64ALU is a cooker hood designed to eliminate kitchen smells and maintain a clean and fresh environment while cooking. It features a powerful motor with three speed settings, allowing you to adjust the extraction power based on your cooking needs. The hood is equipped with metal grease filters that capture grease particles, and an activated charcoal filter for recirculation mode, which removes odors and purifies the air. Additionally, the ZHC64ALU has LED lighting to illuminate your cooking area, providing both functionality and ambiance.
Ask a question and I''ll find the answer in the document
Finding information in a document is now easier with AI
in other languages
- français: Zanussi ZHC64ALU Manuel utilisateur
Related papers
Other documents
-
Juno-Electrolux JDK4531E User manual
-
-
Electrolux EFC9500X/T User manual
-
-
Rangemaster RMHDT100SS User guide
-
Smeg KSEV97X User manual
-
Smeg KFV92DN-2 Owner's manual
-
-
-