Page is loading ...
GB
REFRIGERATOR/FREEZER COMBINATION
Contents
Installation, 2
Positioning and connection
Aqua Care function
Description of the appliance, 3-4
Control panel
Overall view
Accessories, 5
Start-up and use, 6-7
Starting the appliance
Chiller system
Using the refrigerator to its full potential
Using the freezer to its full potential
Holiday function
Maintenance and care, 8
Switching the appliance off
Cleaning the appliance
Avoiding mould and unpleasant odours
Replacing the light bulb
Replacing the l Odour filter
Replacing the Aqua Care filter
Precautions and tips, 9
General safety
Disposal
Respecting and conserving the environment
Troubleshooting, 10-11
Assistance, 12
Operating Instructions
Français, 13
Türkçe, 37
English, 1
GB
F
TR
MBL 1901 FA T
Espanol, 25
E
2
GB
Installation
! Before placing your new appliance into operation
please read these operating instructions carefully. They
contain important information for safe use, for
installation and for care of the appliance.
! Please keep these operating instructions for future
reference. Pass them on to possible new owners of the
appliance.
Positioning and connection
Positioning
1. Place the appliance in a well-ventilated humidity-free
room.
2. Do not obstruct the rear fan grills. The compressor
and condenser give off heat and require good
ventilation to operate correctly and save energy.
3. Leave a space of at least 10 cm between the top part
of the appliance and any furniture above it, and at
least 5 cm between the sides and any furniture/side
walls.
4. Ensure the appliance is away from any sources of
heat (direct sunlight, electric stove, etc.).
5. In order to maintain the correct distance between the
appliance and the wall behind it, fit the spacers
supplied in the installation kit, following the
instructions provided.
Levelling
1. Install the appliance on a level and rigid floor.
2. If the floor is not perfectly horizontal, adjust the
refrigerator by tightening or loosening the front feet.
Electrical connections
After the appliance has been transported, carefully
place it vertically and wait at least 3 hours before
connecting it to the electricity mains. Before inserting
the plug into the electrical socket ensure the following:
• The appliance is earthed and the plug is compliant
with the law.
• The socket can withstand the maximum power of the
appliance, which is indicated on the data plate located
on the bottom left side of the fridge (e.g. 150 W).
• The voltage must be in the range between the values
indicated on the data plate located on the bottom left
side (e.g. 220-240V).
• The socket is compatible with the plug of the
appliance.
If the socket is incompatible with the plug, ask an
authorised technician to replace it (
see Assistance
).
Do not use extension cords or multiple sockets.
! Once the appliance has been installed, the power
supply cable and the electrical socket must be easily
accessible.
! The cable must not be bent or compressed.
! The cable must be checked regularly and replaced by
authorised technicians only (see Assistance).
! The manufacturer declines any liability should
these safety measures not be observed.
Connection of the water supply
To carry this out, use the kit provided which contains all
the necessary elements for connection to the water
supply.
To improve the performance of the Aqua Care, we
recommend that you fit a tap with a filter on the pipe for
the connection to the water system: in this way it will be
possible to manually interrupt the water supply during
long periods in which Aqua Care is not used.
! The water pressure inside the water system must be
between 0.8 bar and 8 bar.
! The appliance must only be connected to a water
supply suitable for drinking.
Aqua Care function
The refrigerator you have purchased is fitted with the
Aqua Care system which, thanks to an advanced filter
system with active carbons, provides your household
with fresh, filtered water.
! To improve the system’s performance, we recommend
that you follow the instructions contained in this manual
and in the assembly diagram provided with the kit.
Starting Aqua Care
After connecting it to the water system, installing the
filter (see Replacing Aqua Care filter) and switching on
the refrigerator (See Starting the appliance), it is
necessary to remove any air from the Aqua Care
system:
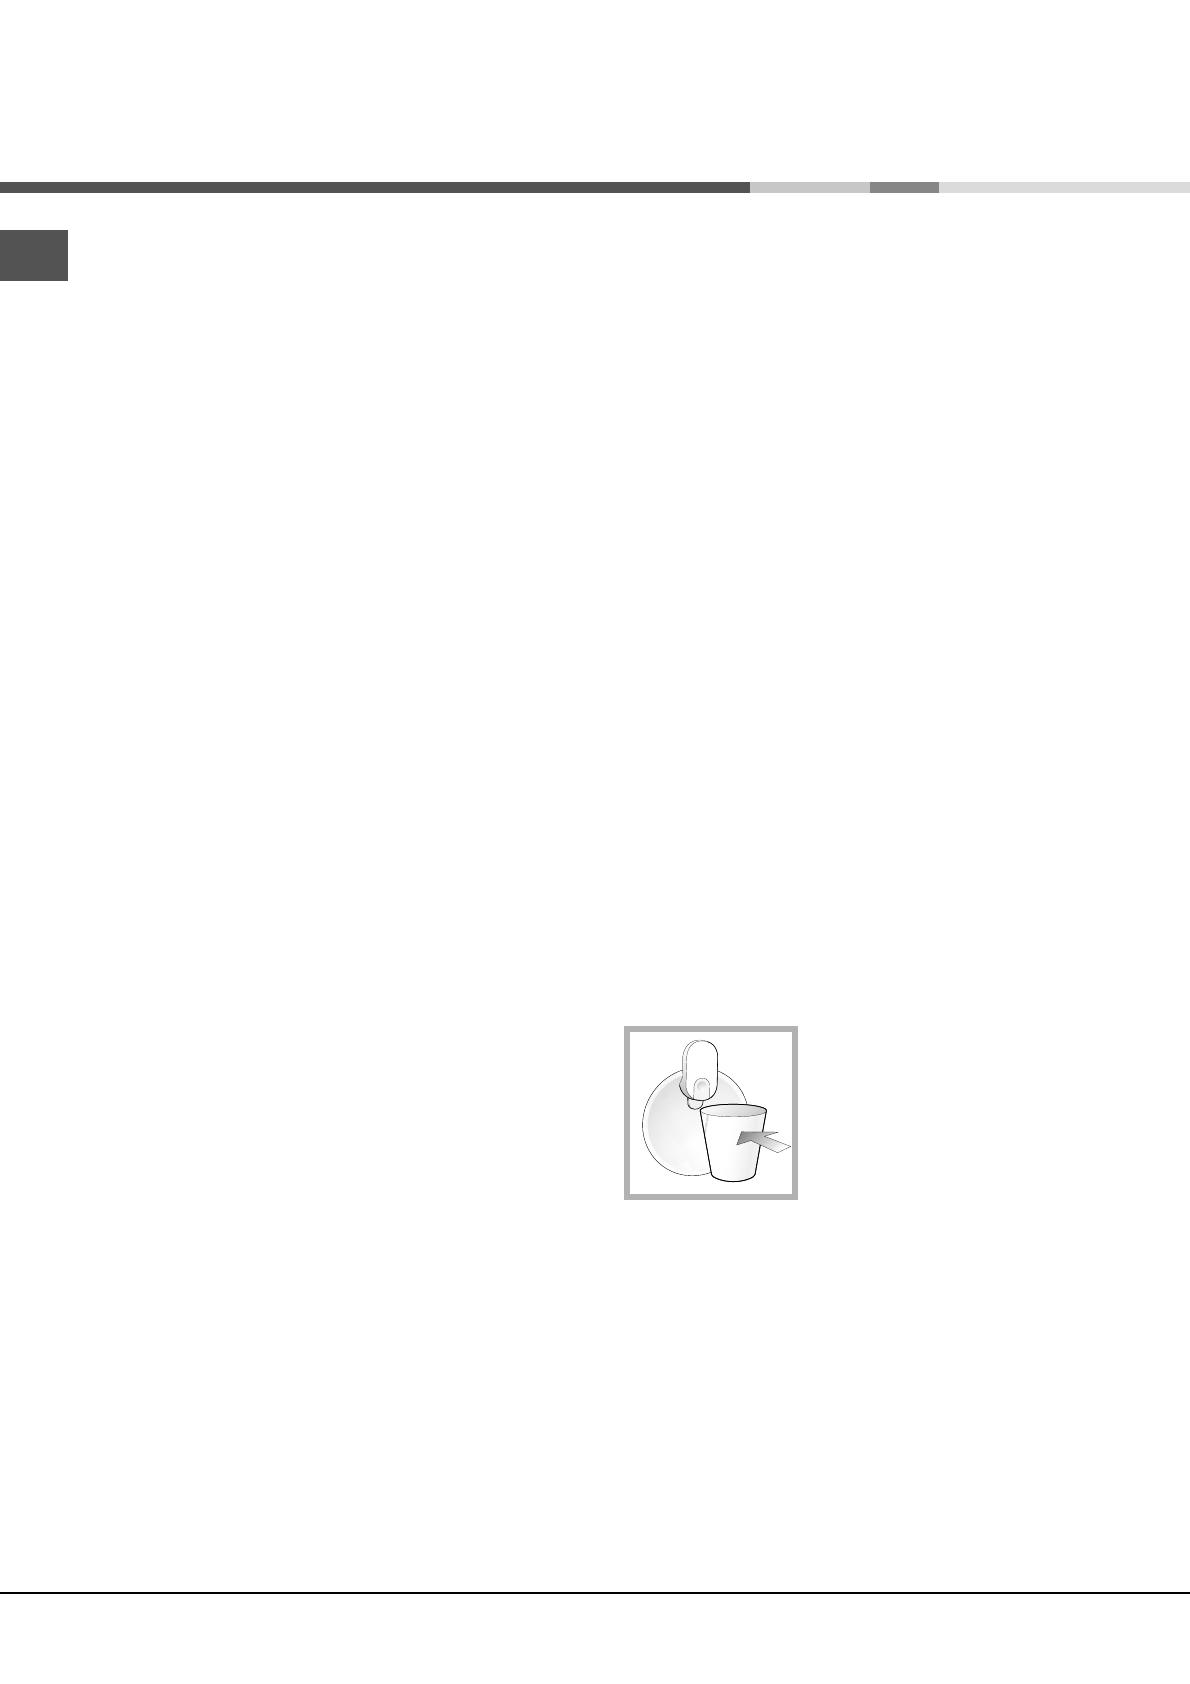
1. Activate the AQUA CARE
function by pressing the correct
button (see Control panel).
2. Place a container under the
dispenser.
3. Hold the button down until the
water is dispensed.
4. Drain and discard three litres
of water.
! When using for the first time and each time the Aqua
Care system is not used for more than 1 week, it will be
necessary to drain and discard three litres of water.

GB
3
Description of the
appliance
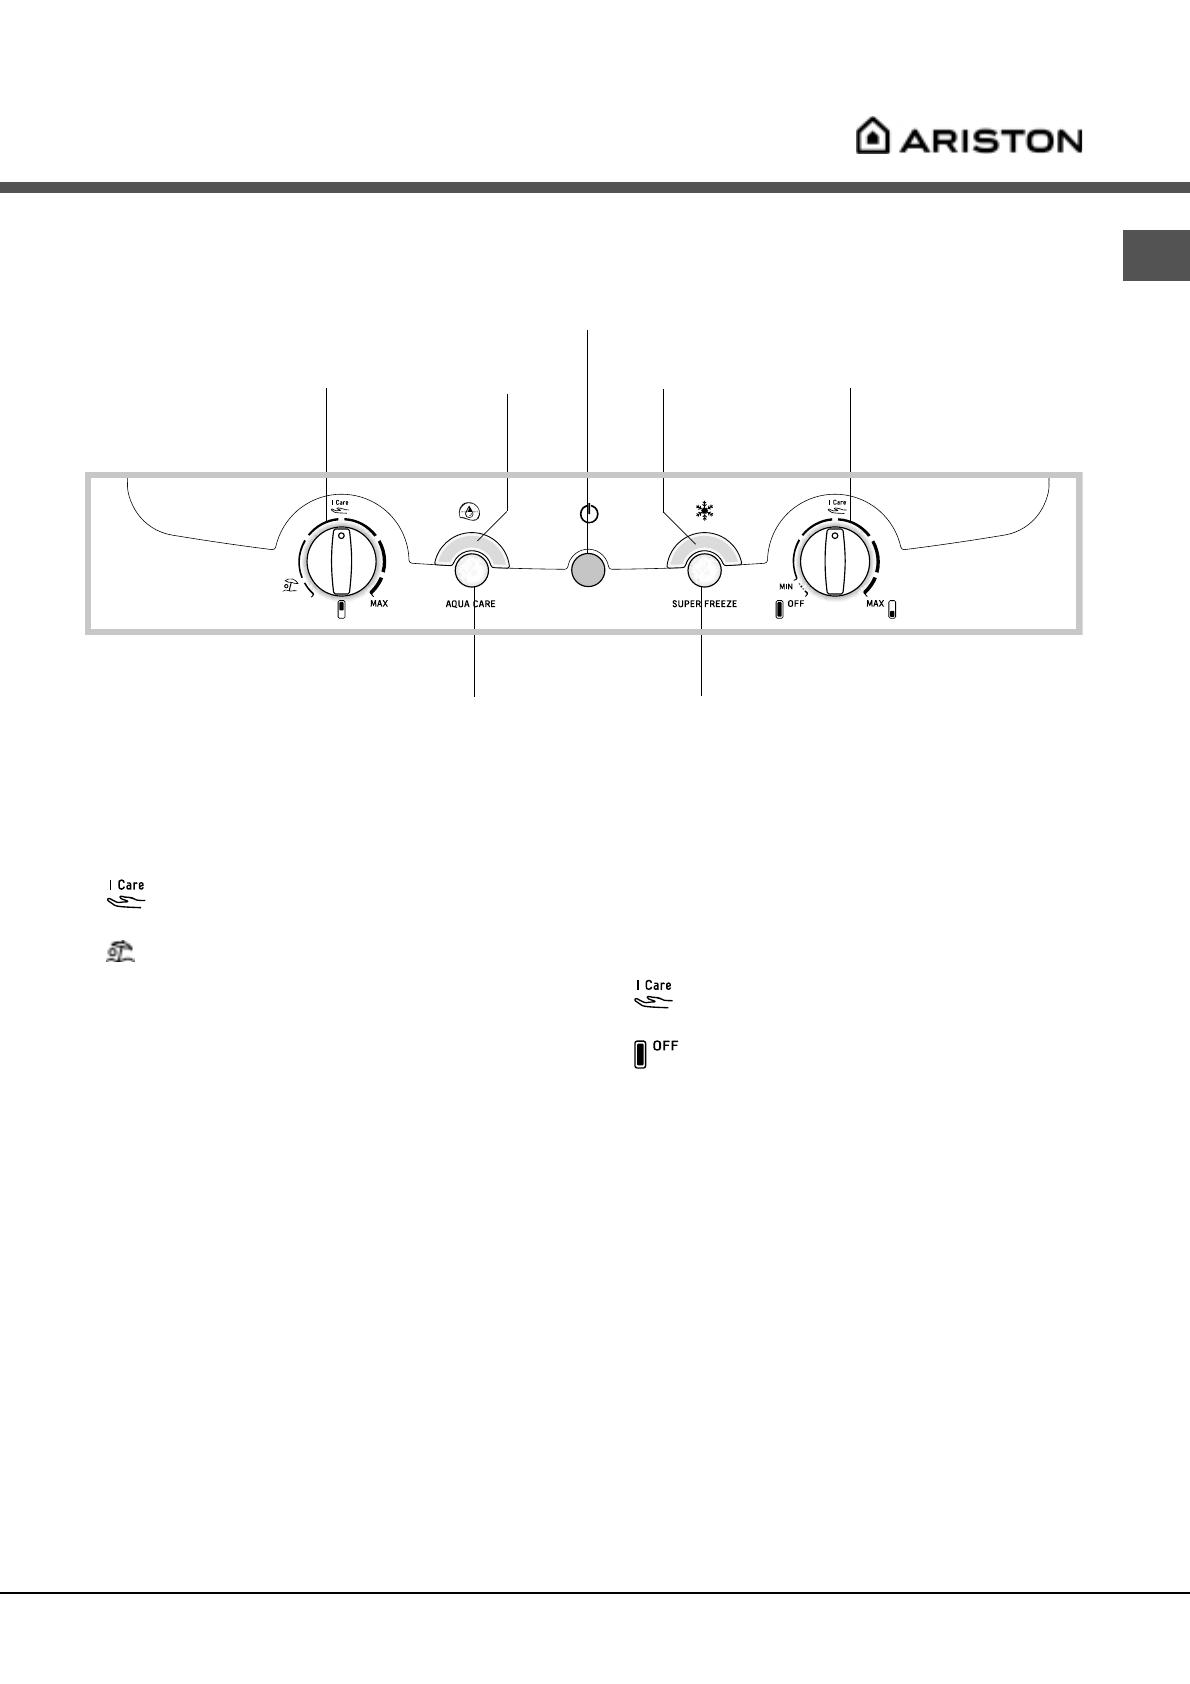
Control panel
• REFRIGERATOR OPERATION Knob
to regulate the temperature of the refrigerator
compartment.
is the optimal temperature for energy saving
levels.
is the holiday function (
see Maintenance and
care
).
• AQUA CARE
provides your household with fresh,
filtered water. When it is pressed, the AQUA CARE
indicator light illuminates (
see Start-up and use
).
• AQUA CARE Yellow indicator light illuminates when
the AQUA CARE button is pressed.
• POWER Indicator light illuminates when the
appliance is connected to the electricity network.
• SUPER FREEZE button (rapid freezing) to freeze fresh
food. When it is pressed, the SUPER FREEZE indica-
tor light illuminates (
see Start-up and use
).
• SUPER FREEZE Yellow indicator light (rapid
freezing) illuminates when the SUPER FREEZE
button is pressed.
• FREEZER OPERATION Knob
to regulate the temperature of the freezer
compartment.
is the optimal temperature for energy saving
levels.
switches the appliance off, including the
refrigerator.
! The indicator lights are also used to indicate an
unusual temperature increase in the freezer
compartment (
see Troubleshooting
).
SUPER FREEZE
Button
REFRIGERATOR
OPERATION
Knob
AQUA CARE
Button
AQUA CARE
Indicator light
SUPER FREEZE
Indicator light
POWER
Indicator light
FREEZER
OPERATION
Knob
4
GB
Description of the
appliance
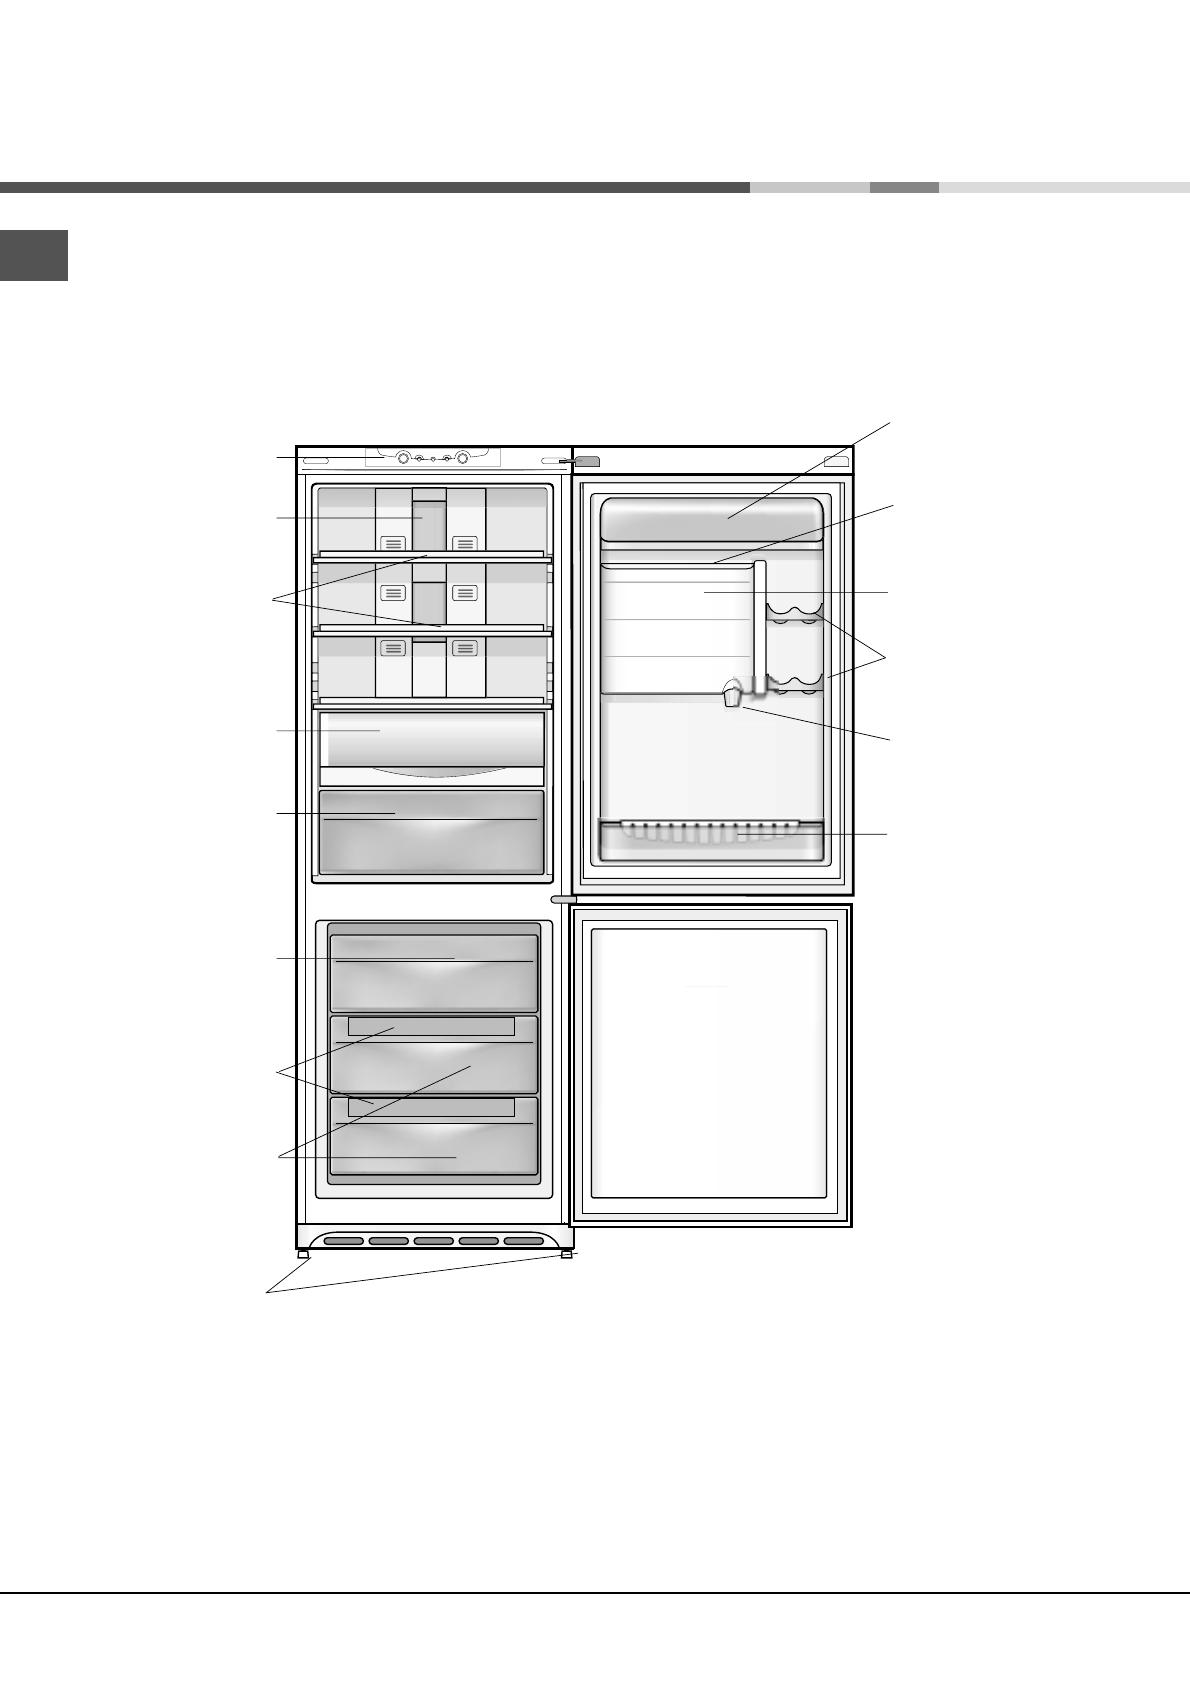
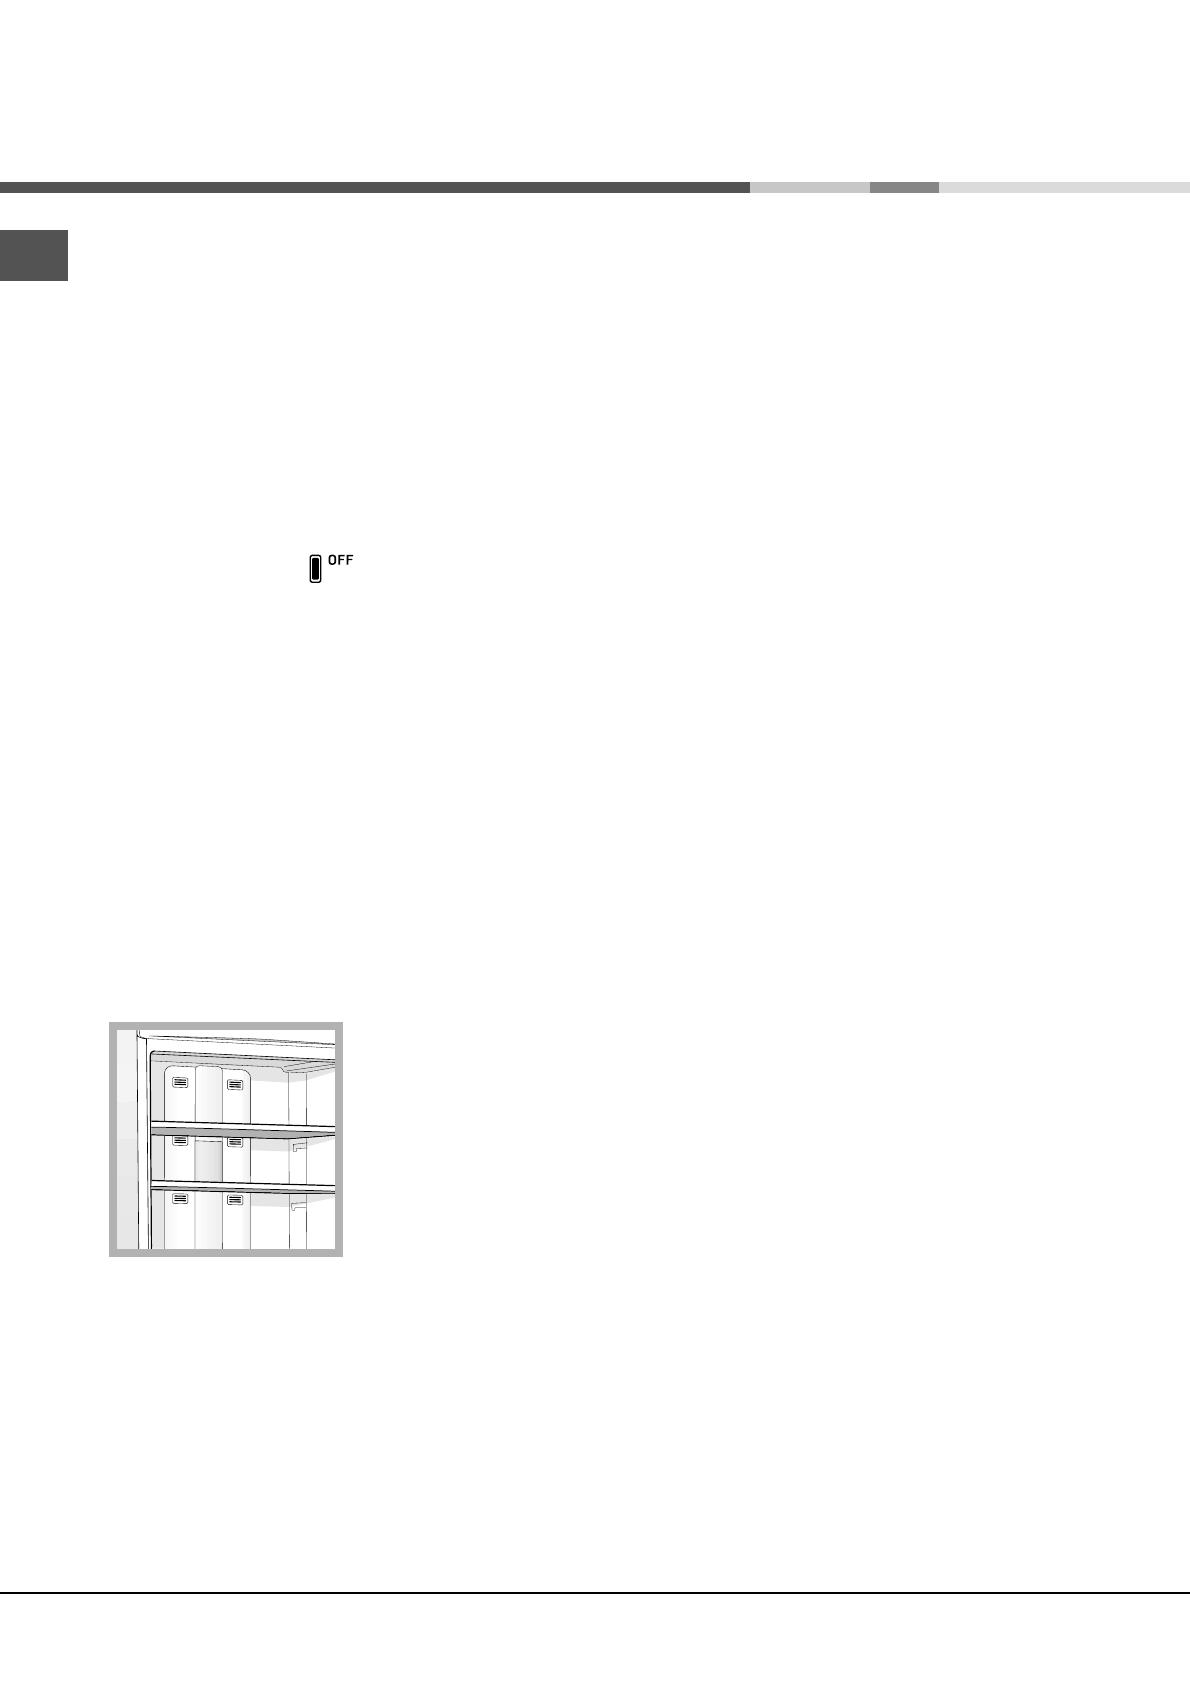
Overall view
The instructions contained in this manual are applicable to different model refrigerators. The diagrams may not
directly represent the appliance purchased. For more complex features, consult the following pages.
Varies by number and/or position.
*
Available only on certain models.
Removable lidded
shelf with EGG TRAY
BOTTLE shelf
CAN RACK
shelves
Control panel
LAMP
(
see Maintenance
)
SHELVES
FRUIT and
VEGETABLE
bin
FRESH BOX
Compartment
*
FREEZER and
STORAGE
compartment
STORAGE
compartment
STORAGE
compartment
ICE CARE ice tray
AQUA CARE filter
AQUA CARE tank
Removable
multipurpose
SHELVES
GB
5
Accessories
Refrigerator compartment
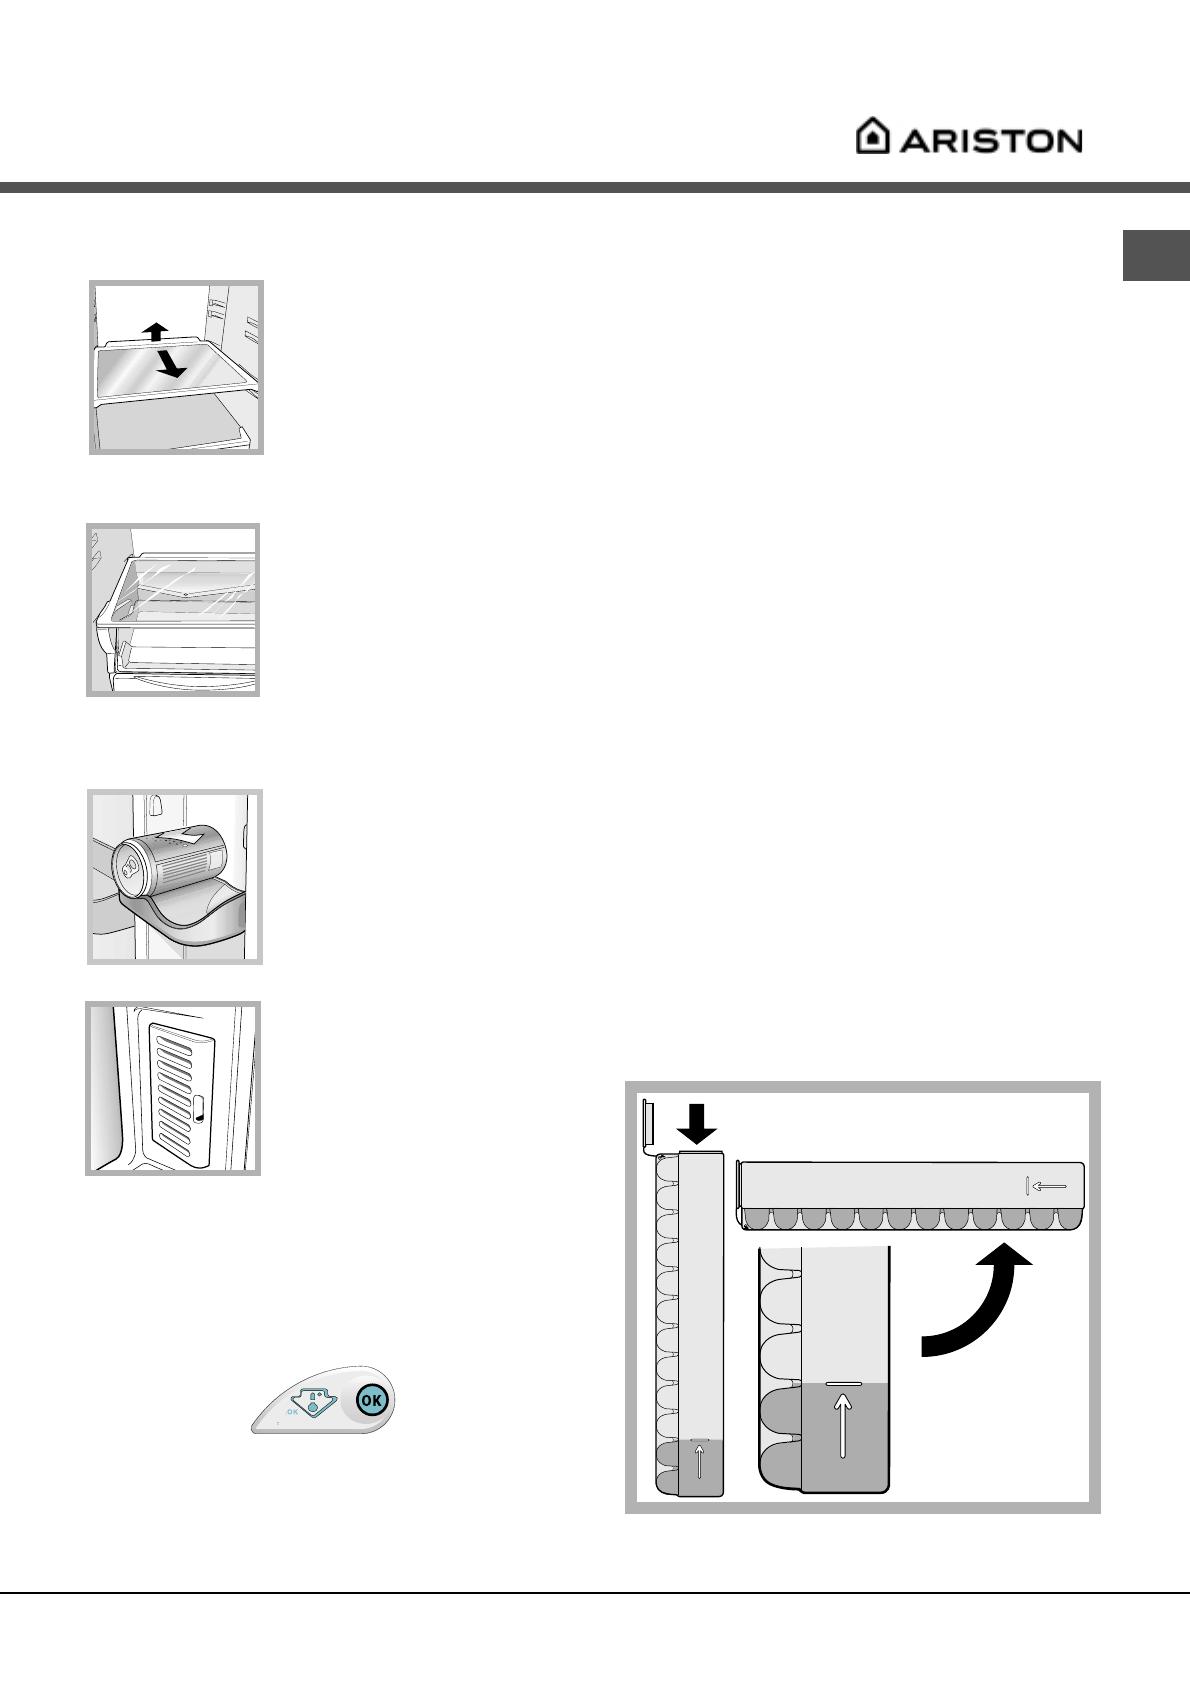
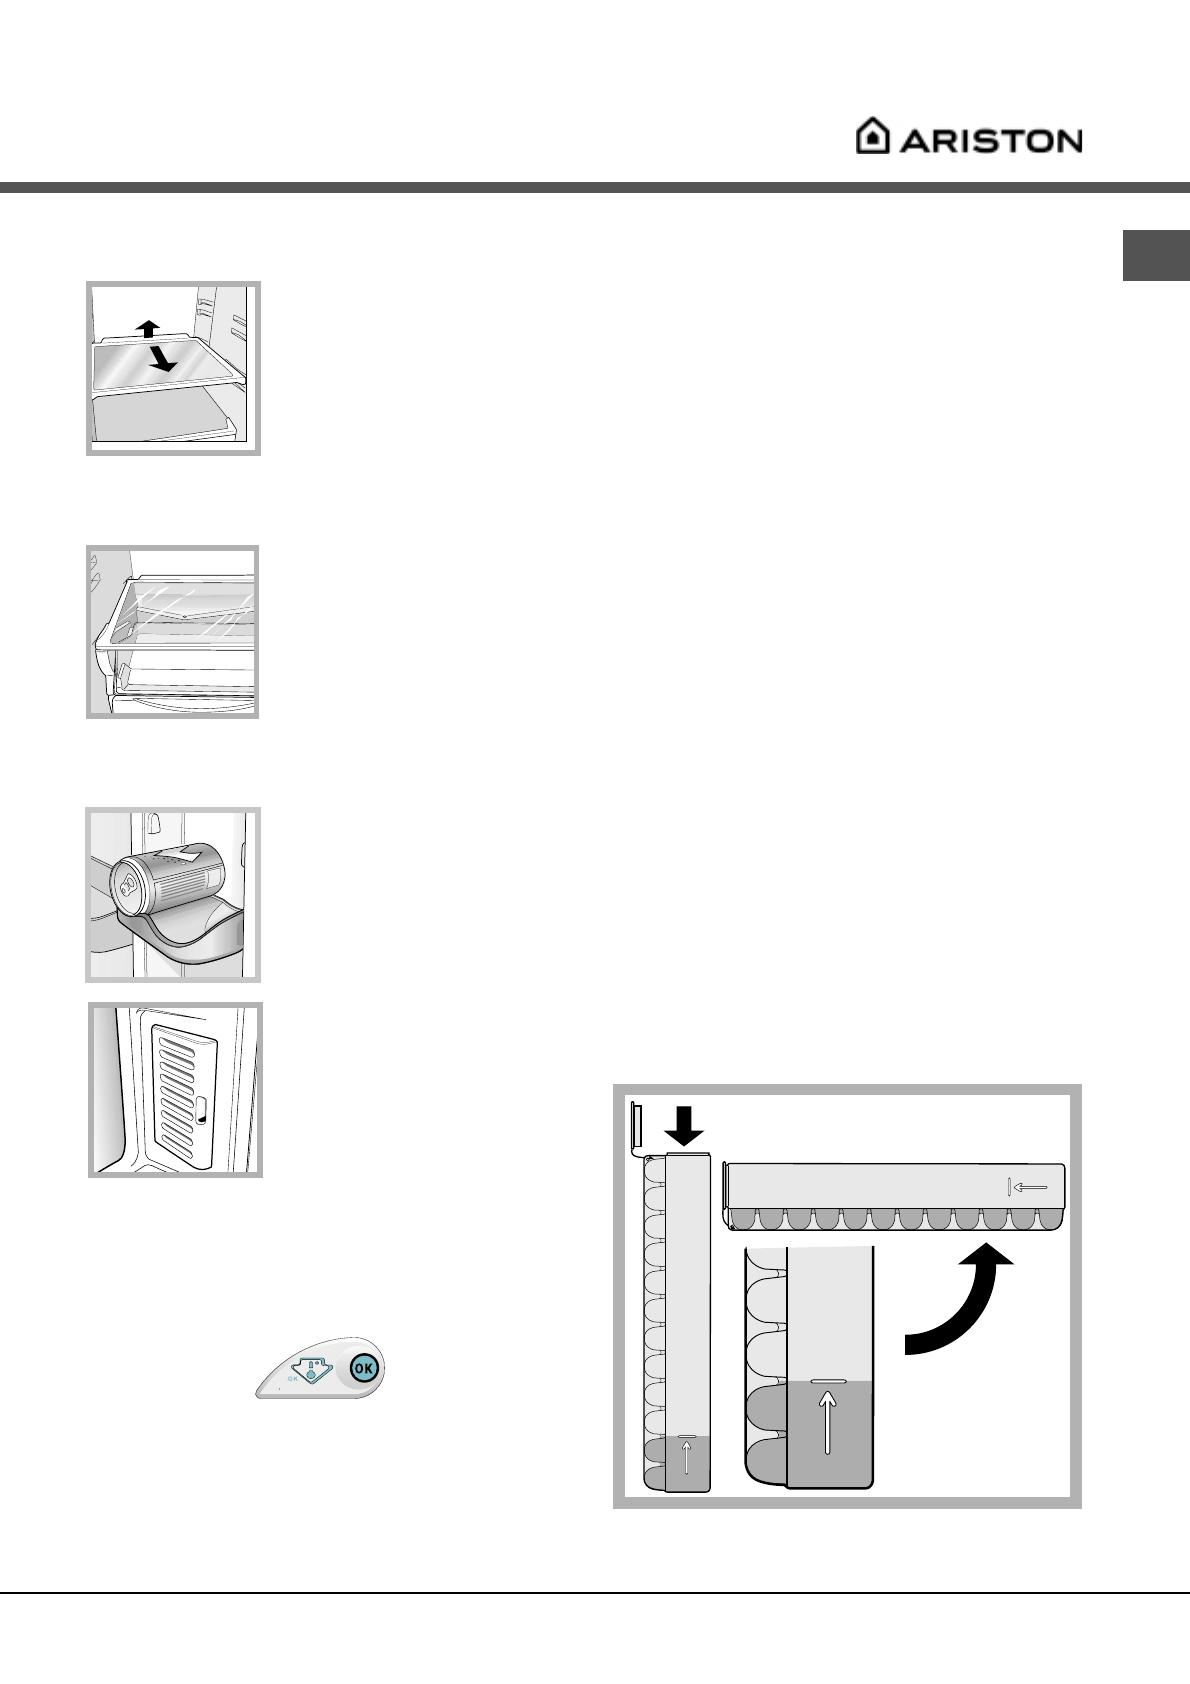
SHELVES: with or without grill.
Due to the special guides the
shelves are removable and the
height is adjustable (
see
diagram
), allowing easy
storage of large containers
and food. Height can be
adjusted without complete
removal of the shelf.
FRESH BOX: for fresh meat
and fish. Due to the
compartment’s low temperature
(the coldest in the refrigerator)
and to the clear door that
provides protection against
oxidation and blackening, food
can be stored for even up to
one week. It can also be used
for “cold meals.”
CAN RACK shelf: stores cans
horizontally (
see diagram
).
Yoghurt, butter or general
containers may also be stored
here.
ODOUR FILTER: Some
models are fitted with a new
odour filter with active
carbons, which ensures better
air quality inside the
refrigerator.
The filter is located on the
bottom right-hand side, inside
the ventilation opening.
TEMPERATURE Indicator light: to identify the coldest
area in the refrigerator.
1. Check that OK appears clearly on the indicator light
(
see diagram
).
vert
noir
consulter la notice
2. If the indicator light is completely black it means
that the temperature is too high: adjust the
REFRIGERATOR OPERATION knob to a higher
position (colder) and wait approximately 10 hours
until the temperature has been stabilised.
1
2
WATER LEVEL
MAX
WATER LEVEL
MAX
WATER LEVEL
MAX
3. Check the indicator light again: if necessary, readjust
it following the initial process. If large quantities of
food have been added or if the refrigerator door has
been opened frequently, it is normal for the indicator
not to show OK. Wait at least 10 hours before
adjusting the REFRIGERATOR OPERATION knob to a
higher setting.
Freezer compartment
ICE CARE tray
The fact that they are situated on the top part of the
freezer drawers ensures greater cleanliness: the ice no
longer comes into contact with the food placed inside
the freezer compartment; furthermore, the dripping of
the water during filling is avoided (a lid to cover up the
hole after filling with water is also provided).
1. Pull out the tray by pushing it up.
Check that the tray is ompletely empty and fill it with
water through the opening provided.
2. Take care not to exceed the level indicated (MAX
WATER LEVEL). Excess water prevents the ice cubes
from dispensing (if this happens, wait for the ice to
melt and empty the tray).
3. Turn the tray 90°: due to the connected compartments
each mould fills with water (
see diagram
).
4. Close the opening with the lid provided and put the
tray back.
5. When the ice has formed (minimum time
approximately 8 hours) knock the tray against a hard
surface and wet the outside so that the ice cubes
come loose and take them out through the opening.

6
GB
Start-up and use
Starting the appliance
! Before starting the appliance, follow the
installation instructions (
see Installation
).
! Before connecting the appliance, clean the
compartments and accessories well with lukewarm
water and bicarbonate.
! The appliance comes with a motor protection control
system which makes the compressor start
approximately 8 minutes after being switched on. The
compressor also starts each time the power supply is
cut off whether voluntarily or involuntarily (blackout).
1. Set the FREEZER OPERATION knob on
.
2. Insert the plug into the socket and ensure that the
green POWER indicator light illuminates.
3. Turn the REFRIGERATOR OPERATION knob to an
average value. After a few hours you will be able to
put food in the refrigerator.
4. Turn the FREEZER OPERATION knob to an average
value and press the SUPER FREEZE button (rapid
freezing): the SUPER FREEZE indicator light will
illuminate. Once the refrigerator has reached the
optimal temperature, the indicator light goes out and
you can begin food storage.
Chiller system
No Frost
The No Frost system circulates
cold air continuously to collect
humidity and prevent ice and
frost formation. The system
maintains an optimal humidity
level in the compartment,
preserving the original quality of
the food, preventing the food
from sticking together and
making defrosting a thing of the past. Do not block the
aeration cells by placing food or containers in direct
contact with the refrigerating back panel. Close bottles
and wrap food tightly.
Using the refrigerator to its full potential
• Use the REFRIGERATOR OPERATION knob to adjust
the temperature (
see Description
).
• Place only cold or lukewarm foods in the compartment,
not hot foods (
see Precautions and tips
).
• Remember that cooked foods do not last longer than
raw foods.
• Do not store liquids in open containers. They will
increase humidity in the refrigerator and cause
condensation to form.
Food hygiene
1. Once you have bought your food, remove all
external packaging made of paper/cardboard or
other wrappers, which could introduce bacteria or
dirt inside your refrigerator.
2. Protect the food, (especially easily perishable items
and those that have a strong smell), in order to avoid
contact between them, thereby removing both the
possibility of germ/bacteria contamination as well as
the diffusion of strong odours inside the fridge.
3. Store all food in such a way as to ensure air can
circulate freely between different items.
4. Keep the inside of your fridge clean, taking care not
to use oxidiser or abrasive products.
5. Remove all food past its expiry date from the
refrigerator.
6. For the correct preservation of food, all easily
perishable items (soft cheeses, raw fish, meat, etc.)
should be stored in the coldest zone of the fridge
compartment, i.e. just above the salad crisper where
the temperature indicator is situated.
GB
7
Using the freezer to its full potential
• Use the FREEZER OPERATION knob to adjust the
temperature (
see Description
).
• Do not re-freeze food that is defrosting or that has already
been defrosted. These foods must be cooked and eaten
(within 24 hours).
• Fresh food that needs to be frozen must not come into
contact with food that has already been defrosted. Fresh
food must be stored in the top FREEZER and STORAGE
compartment where the temperature drops below -18°C
and guarantees rapid freezing.
• Do not place glass bottles which contain liquids, and
which are corked or hermetically sealed in the freezer
because they could break.
• The maximum quantity of food that may be frozen daily is
indicated on the plate containing the technical properties
located on the bottom left side of the refrigerator
compartment (for example: Kg/24h: 4).
• To freeze (if the freezer is already operating):
press the rapid freezing SUPER FREEZE button
(corresponding yellow indicator light illuminates), insert
the food and close the door. The function is disabled
automatically after 24 hours or when optimal
temperatures have been reached (indicator light goes
out);
! to avoid blocking the air circulation inside the freezer
compartment, it is advisable not to obstruct the
ventilation holes with food or containers.
! Do not open the door during freezing.
! If there is a power cut or malfunction, do not open the
freezer door. This will help maintain the temperature inside
the freezer, ensuring that foods are conserved for at least
9 -14 hours.
Holiday function
To minimise energy usage when on holiday, it is not
necessary to switch the appliance off. The appliance
has a function which allows it to maintain the
temperature of the refrigerator compartment at
approximately 15°C (which can also be used to
conserve make-up and beauty products). The freezer
temperature must be set to the minimum value in order
to preserve the food.
To enable the function: set the REFRIGERATOR
OPERATION knob on
.
A double acoustic signal informs you when it has been
enabled. A single acoustic signal informs you when it
has been disabled.

8
GB
Maintenance and care
Switching the appliance off
During cleaning and maintenance it is necessary to
disconnect the appliance from the electricity supply:
1. set the FREEZER OPERATION knob on
2. pull the plug out of the socket
! If this procedure is not followed, the alarm may sound.
This alarm does not indicate a malfunction. To restore
normal operation, it is sufficient to set the FREEZER
OPERATION knob on the desired value. To disconnect
the appliance, follow point 1 and 2.
Cleaning the appliance
• The external and internal parts, as well as the rubber
seals may be cleaned using a sponge that has been
soaked in lukewarm water and bicarbonate of soda
or neutral soap. Do not use solvents, abrasive
products, bleach or ammonia.
• The removable accessories may be soaked in warm
water and soap or dishwashing liquid. Rinse and dry
them carefully.
• The back of the appliance may collect dust which
can be removed by delicately using the hose of a
vacuum cleaner set on medium power. The
appliance must be switched off and the plug must be
pulled out before cleaning the appliance.
Avoiding mould and unpleasant odours
• The appliance is manufactured with hygienic materials
which are odour free. In order to maintain an odour
free refrigerator and to prevent the formation of stains,
food must always be covered or sealed properly.
• If you want to switch the appliance off for an
extended period of time, clean the inside and leave
the doors open.
Replacing the light bulb
To replace the light bulb in the
refrigerator compartment, pull
out the plug from the electrical
socket. Follow the instructions
below.
Access the light bulb by
removing the cover as indicated
in the diagram.
Replace it with a similar light
bulb within the power range indicated on the cover
(15W or 25W).
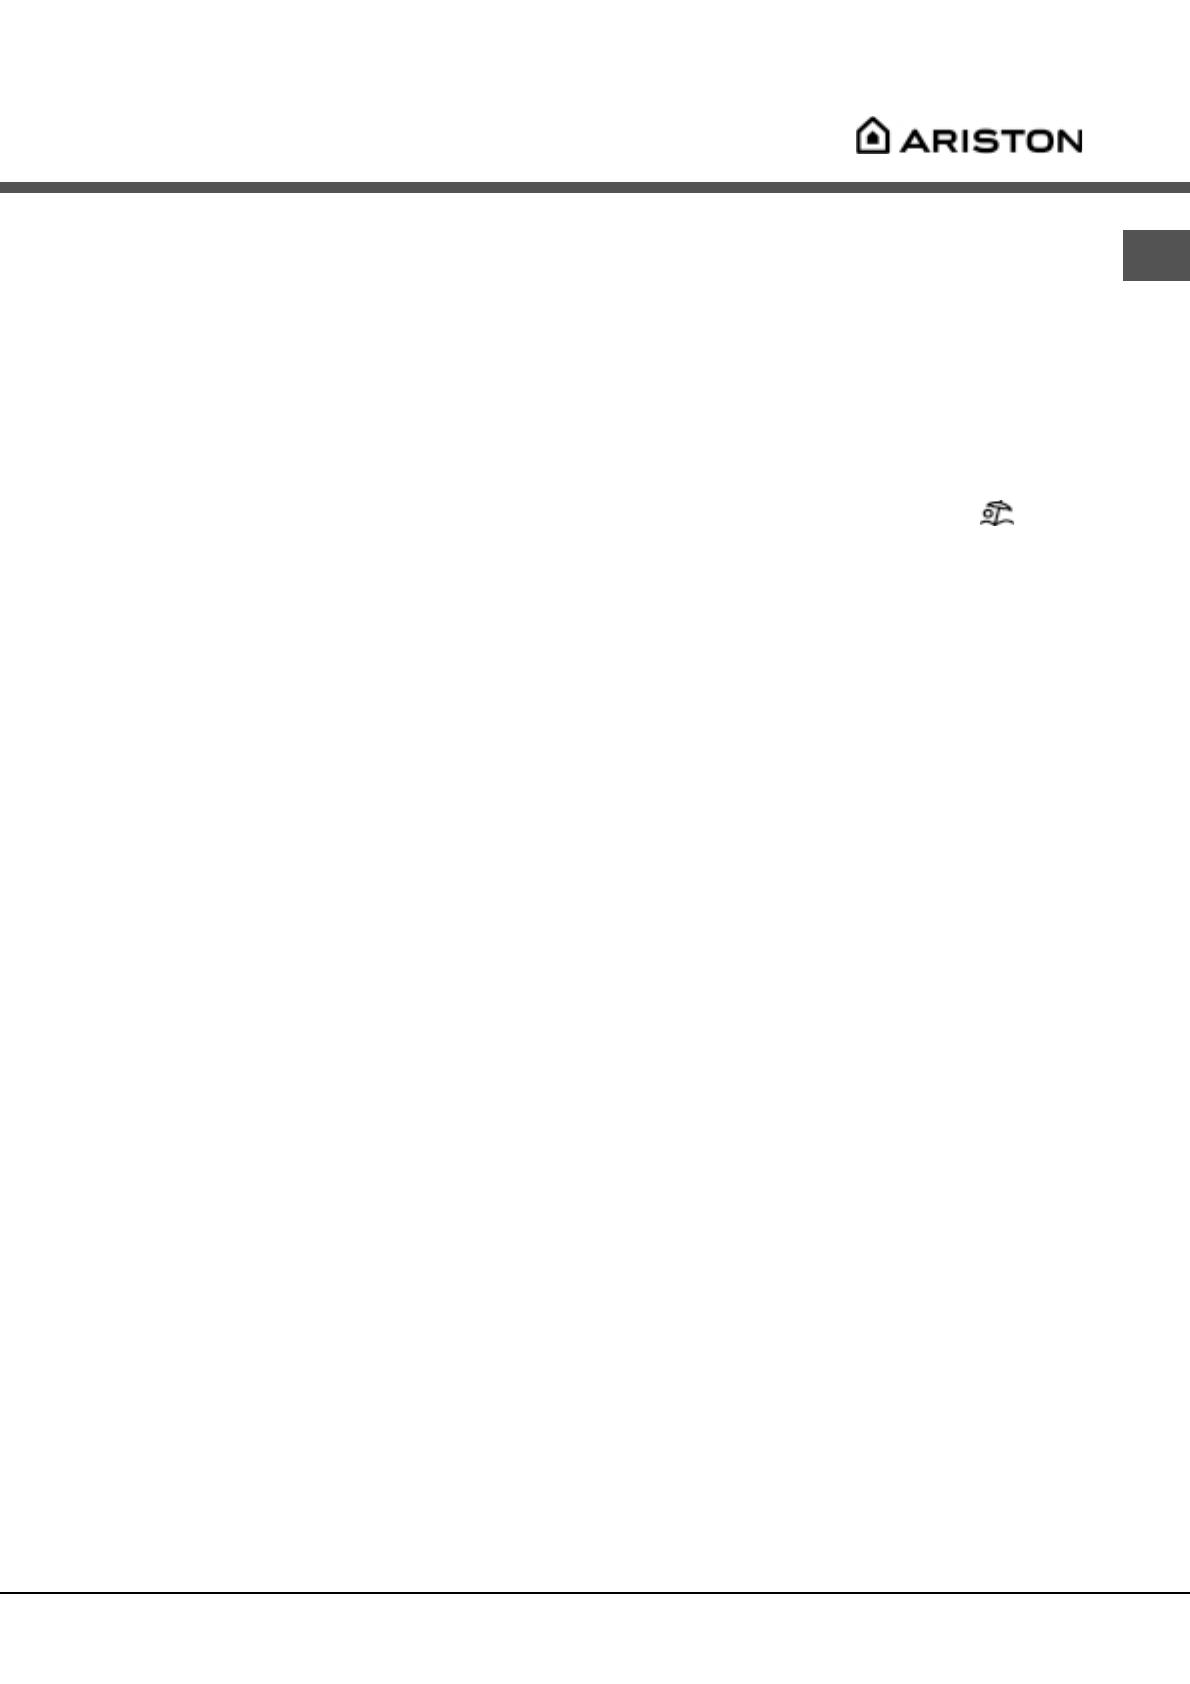
Replacing the l Odour filter
The filter should be replaced after approximately 6-8
months from when it is activated. This period may vary
depending on the type of food that is stored. For information
on where a replacement filter may be purchased, contact
Assistance (
see Assistance
). To replace the filter, follow the
instructions (
see diagrams A and B
).
B
A
Replacing the Aqua Care filter
The Aqua Care system is fitted with an internal meter
which guarantees filtering safety. The filter is
guaranteed for a maximum volume of 1500 l of water,
although this may vary according to the condition and
pressure of the water supply. Once this limit has been
reached, the water supply will stop, the corresponding
alarms are activated (see Troubleshooting) and the filter
must be replaced.
! The filter must always be replaced 6 months after it
has been installed.
! If the filter is replaced before the exhausted filter
alarm indicates the necessity, press the AQUA CARE
button for approximately ten seconds before performing
the replacement.
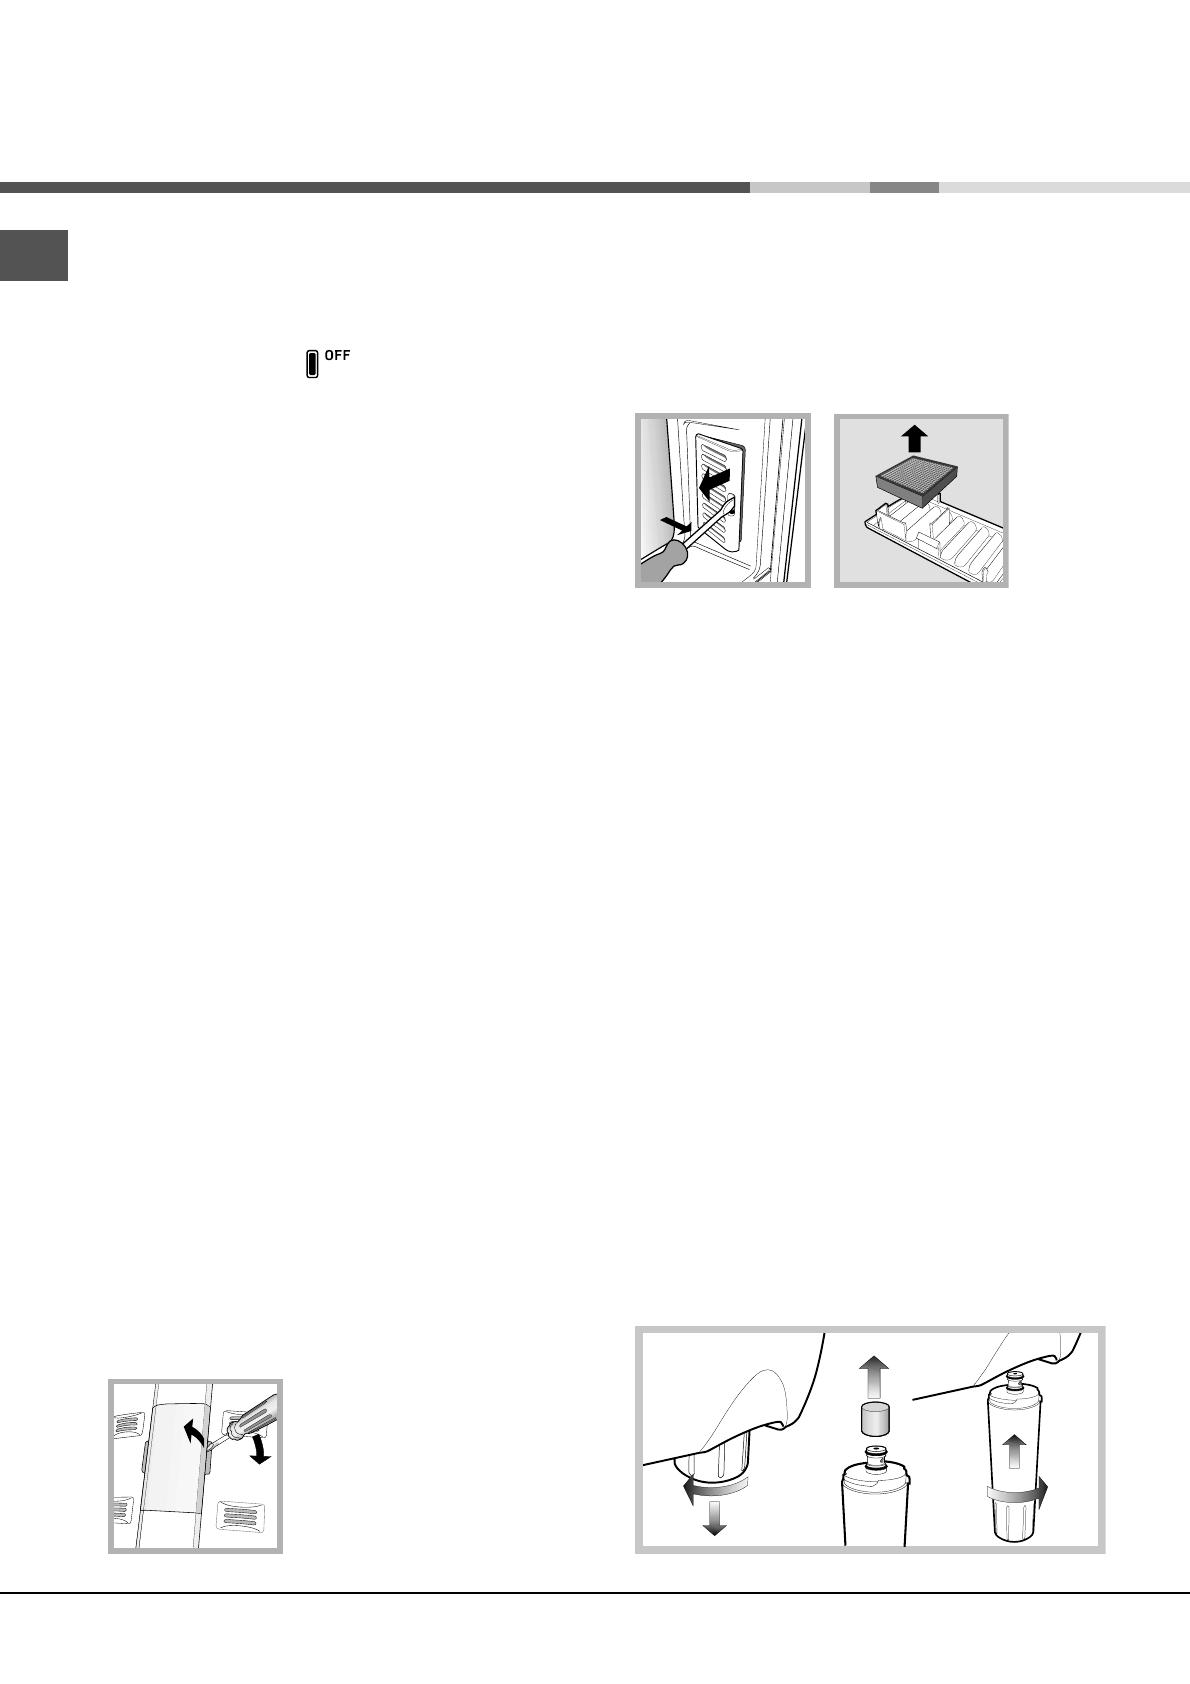
Replacing the filter:
1. Deactivate the Aqua Care function (see Control panel)
2. Unscrew the filter, turning it in an anticlockwise
direction (1/4 turn)
3. After removing the red cap, screw on the new filter by
turning it in a clockwise direction (1/4 turn)
4. Press the AQUA CARE button for approximately five
seconds if the filter alarm has activated (see
Troubleshooting)
5. Activate the Aqua Care function (see Control panel)
90˚
90˚
GB
9
Precautions and tips
! The appliance was designed and manufactured in
compliance with international safety standards. The
following warnings are provided for safety reasons and
must be read carefully.
This appliance complies with the following
Community Directives:
- 73/23/EEC of 19/02/73 (Low Voltage) and
subsequent amendments;
-89/336/EEC of 03.05.89 (Electromagnetic
Compatibility) and subsequent amendments;
- 2002/96/CE..
General safety
• The appliance was designed for domestic use inside the
home and is not intended for commercial or industrial
use.
• The appliance must be used to store and freeze food
products by adults only and according to the
instructions in this manual.
• The appliance must not be installed outdoors, even in
covered areas. It is extremely dangerous to leave the
appliance exposed to rain and storms.
• Do not touch the appliance with bare feet or with wet or
moist hands and feet.
• Do not touch the internal cooling elements: this could
cause skin abrasions or frost/freezer burns.
• When unplugging the appliance always pull the plug
from the mains socket, do not pull on the cable.
• Before cleaning and maintenance, always switch off the
appliance and disconnect it from the electrical supply. It
is not sufficient to set the temperature adjustment knobs
on OFF (appliance off) to eliminate all electrical contact.
• In the case of a malfunction, under no circumstances
should you attempt to repair the appliance yourself.
Repairs carried out by inexperienced persons may
cause injury or further malfunctioning of the appliance.
• Do not use utensils other than the scraper provided, or
electrical equipment which is not of the type specified
by the manufacturer, inside the frozen food storage
compartments.
• Do not put ice cubes taken directly from the freezer into
your mouth.
• Do not allow children to tamper with the controls or play
with the appliance. Under no circumstance should they
be allowed to sit on the bins or to hang from the door.
• Keep packaging material out of the reach of children! It
can become a choking or suffocation hazard.
Disposal
• Observe local environmental standards when
disposing packaging material for recycling
purposes.
• The European Directive 2002/96/EC on Waste
Electrical and Electronic Equipment (WEEE), requires
that old household electrical appliances must not be
disposed of in the normal unsorted municipal waste
stream. Old appliances must be collected separately
in order to optimise the recovery and recycling of the
materials they contain and reduce the impact on
human health and the environment. The crossed out
“wheeled bin” symbol on the product reminds you of
your obligation, that when you dispose of the
appliance it must be separately collected.
Consumers should contact their local authority or
retailer for information concerning the correct
disposal of their old appliance.
Respecting and conserving the
environment
• Install the appliance in a fresh and well-ventilated
room. Ensure that it is protected from direct sunlight
and do not place it near heat sources.
• Try to avoid keeping the door open for long periods
or opening the door too frequently in order to
conserve energy.
• Do not fill the appliance with too much food:
cold air must circulate freely for food to be preserved
properly. If circulation is impeded, the compressor
will work continuously.
• Do not place hot food directly into the refrigerator.
The internal temperature will increase and force the
compressor to work harder and will consume more
energy.
• Defrost the appliance if ice forms (
see Maintenance
).
A thick layer of ice makes cold transference to food
products more difficult and results in increased
energy consumption.
• Regularly check the door seals and wipe clean to
ensure they are free of debris and to prevent cold air
from escaping (
see Maintenance
).

10
GB
Troubleshooting
Malfunctions:
The green POWER indicator light does
not illuminate.
The motor does not start.
The indicator lights are on but the light
is dim.
a) The alarm sounds.
b) The alarm sounds and the two
yellow indicator lights flash.
c) The alarm sounds and the two
yellow indicator lights as well as the
green one flash.
The AQUA CARE LED flashes slowly
The blocked water is drained and the
AQUA CARE LED flashes quickly
The blocked water is drained, the
AQUA CARE LED is switched off and
the alarm sounds
The green POWER indicator light
flashes.
The refrigerator and the freezer do not
cool well.
The food inside the refrigerator is
beginning to freeze.
Possible causes / Solutions:
• The plug has not been inserted into the electrical socket, or not far
enough to make contact, or there is no power in the house.
• The appliance comes with a motor protection control (
see Start-up and use
).
• Pull out and reverse the plug before putting it back in the socket.
a) The refrigerator door has remained open for more than two minutes (the
buzzer will stop sounding when you shut the door) or the correct
switching-off procedure was not followed (
see Maintenance
).
b) The temperature in the freezer is too high. Check the quality of the food
products and dispose if necessary.
c) The temperature in the freezer has reached a dangerous level. The
food must be disposed immediately.
b/c) In both these cases the freezer will maintain a temperature of about
0°C so that the food does not re-freeze.
To turn off the acoustic signal open and close the refrigerator door.
To restore normal operation bring the FREEZER OPERATION knob
setting to
(off) and turn the appliance on again.
• The Aqua Care filter is about to wear out
• The Aqua Care filter is worn out and needs to be replaced (see
Maintenance and care)
• The Aqua Care safety blocking system has been activated due to
prolonged supply (5 consecutive minutes). To reset the alarm, simply
release the dispenser button. To silence the alarm, open and close the
door.
• The appliance is not operating correctly. Contact the Technical
Assistance Centre.
• The doors do not close properly or the seals are damaged.
• The doors are opened too frequently.
• The OPERATION knobs are not on the correct setting (
see Description
).
• The refrigerator or the freezer have been over-filled.
• The REFRIGERATOR OPERATION knob is not on the correct setting
(
see Description
).
• The food is in contact with the back inside wall of the refrigerator.
+ buzzer
Heating
danger
+ buzzer
Heating
is excessive

GB
11
Malfunctions:
The motor runs continuously.
The appliance makes a lot of noise.
The back wall of the refrigerator unit
is covered in frost or droplets of
water
Possible causes / Solutions:
• The SUPER FREEZE button has been pressed (rapid freezing): the yellow
SUPER FREEZE light is on or flashing (
see Description
).
• The door is not closed properly or is continuously opened.
• The outside ambient temperature is very high.
• The thickness of the frost exceeds 2-3 mm (
see Maintenance
).
• The appliance has not been installed on a level surface (
see Installation
)
.
• The appliance has been installed between cabinets that vibrate and make
noise.
• The internal refrigerant makes a slight noise even when the compressor is
off. This is not a defect, it is normal.
• This shows the appliance is operating normally.

12
GB
195055919.00
05/2006
Assistance
Before calling for Assistance:
•
Check if the malfunction can be solved on your own (
see Troubleshooting
).
• If after all the checks, the appliance still does not operate or the problem persists, call the nearest Service
Centre
Communicating:
• type of malfunction
• appliance model (Mod.)
• serial number (S/N)
This information can be found on the data
plate located on the bottom left side of the
refrigerator compartment.
Never call on unauthorized technicians and always refuse spare parts which are not originals.
Mod.
RG 2330
TI
Cod.
93139180000 S/N 704211801
220 - 240 V- 50 Hz 150 W
W
Fuse
A
Max 15 w
Total
Gross
Bruto
Brut
Compr.
Kompr.
Syst.
R 134 a
kg 0,090
Gross
Bruto
Brut
340
Net
Util
Utile
Gross
Bruto
Brut
Freez. Capac
Poder de Cong
75
Made in Italy 13918
Test
P.S-I.
Pressure
HIGH-235
LOW 140
kg/24 h
4,0
Class
Clase
N
Classe
model serial number

F
COMBINE REFRIGERATEUR/CONGELATEUR
Mode demploi
Sommaire
Installation, 14
Mise en place et raccordement
Fonction Aqua Care
Description de lappareil, 15-16
Tableau de bord
Vue d’ensemble
Accessoires, 17
Mise en marche et utilisation, 18-19
Mise en service de l’appareil
Système de refroidissement
Pour profiter à plein de votre réfrigérateur
Pour profiter à plein de votre congélateur
Fonction holiday
Entretien et soins, 20
Mise hors tension
Nettoyage de l’appareil
Contre la formation de moisissures et de mauvaises
odeurs
Remplacement de l’ampoule d’éclairage
Remplacement du filtre anti-odeurs
Remplacement du filtre Aqua Care
Précautions et conseils, 21
Sécurité générale
Mise au rebut
Economies et respect de l’environnement
Anomalies et remèdes, 22-23
Assistance, 24
Français, 13
Türkçe, 37
English, 1
GB
F
TR
MBL 1901 FA T
Espanol, 25
E

14
F
Installation
! Conservez ce mode d’emploi pour pouvoir le consulter
à tout moment. En cas de vente, de cession ou de
déménagement, veillez à ce qu’il suive l’appareil pour
informer le nouveau propriétaire sur son fonctionnement
et lui fournir les conseils correspondants.
! Lisez attentivement les instructions : elles contiennent
des conseils importants sur l’installation, l’utilisation et la
sécurité de votre appareil.
Mise en place et raccordement
Mise en place
1. Placez l’appareil dans une pièce bien aérée et non
humide.
2. Ne bouchez pas les grilles d’aération arrière : le
compresseur et le condensateur produisent de la
chaleur et exigent une bonne aération pour bien
fonctionner et réduire la consommation d’électricité.
3. Prévoir au moins 10 cm entre le haut de l’appareil et
les meubles installés au-dessus et au moins 5 cm
entre les côtés et les meubles/parois latérales.
4. Installez l’appareil loin de sources de chaleur (rayons
directs du soleil, cuisinière électrique).
5. Pour maintenir une distance optimale entre le produit
et la paroi arrière, montez les cales d’espacement
comprises dans le kit d’installation et suivez les
instructions de la notice spécialement prévue.
Mise à niveau
1. Installez l’appareil sur un sol plat et rigide.
2. Si le sol n’est pas parfaitement horizontal, vissez ou
dévissez les petits pieds avant pour bien niveler l’appareil.
Raccordement électrique
Après le transport, placez l’appareil à la verticale et
attendez au moins 3 heures avant de le raccorder à
l’installation électrique. Avant de brancher la fiche dans
la prise de courant, assurez-vous que :
• la prise est bien munie d’une terre conforme à la loi;
• la prise est bien apte à supporter la puissance
maximale de l’appareil, indiquée sur la plaquette
signalétique placée à l’intérieur du compartiment
réfrigérateur en bas à gauche (ex. 150 W);
• la tension d’alimentation est bien comprise entre les
valeurs indiquées sur la plaquette signalétique,
placée en bas à gauche (ex.220-240 V);
• la prise est bien compatible avec la fiche de l’appareil.
En cas d’incompatibilité, faites remplacer la fiche par
un technicien agréé (
voir Assistance
); n’utilisez ni
rallonges ni prises multiples.
! Après installation de l’appareil, le câble électrique et la
prise de courant doivent être facilement accessibles.
! Le câble ne doit être ni plié ni excessivement écrasé.
! Il doit être contrôlé prériodiquement et ne peut être
remplacé que par un technicien agréé (voir Assistance).
! Nous déclinons toute responsabilité en cas de non
respect des normes énumérées ci-dessus.
Raccordement au réseau de leau
Pour effectuer cette opération utilisez le kit spécial
contenant toutes les pièces nécessaires au
raccordement au réseau d’eau potable.
Pour améliorer le rendement du système Aqua Care,
nous conseillons de monter le robinet équipé d’un
filtre sur le tuyau de raccordement au réseau d’eau
potable : vous pourrez ainsi couper manuellement
l’alimentation de l’eau pendant les longues périodes
d’inactivité du système Aqua Care.
! La pression de l’eau du réseau doit être comprise
entre 0,8 et 8 bar.
! L’appareil ne doit être raccordé qu’au réseau d’eau
potable.
Fonction Aqua Care
Le réfrigérateur que vous venez d’acheter est équipé
du système Aqua Care qui vous permet, grâce à un
système pointu de filtrage au charbon actif, de
toujours avoir chez vous de l’eau fraîche et filtrée.
! Pour améliorer le rendement du système, nous vous
conseillons de vous conformer aux instructions
fournies dans cette notice et dans le schéma de
montage fourni avec le kit.
Mise en service de Aqua Care
Après son raccordement au réseau d’eau potable, à
l’installation du filtre (voir paragraphe Remplacement
filtre Aqua Care) et à la mise en service du
réfrigérateur (Voir mise en service de l’appareil), il faut
purger l’air contenu dans le système Aqua Care :
1. Activez la fonction AQUA
CARE à l’aide de la touche
prévue.
2. Placez un récipient sous le
distributeur.
3. Appuyez sur la touche
jusqu’à ce que l’eau
commence à couler.
4. Débitez trois litres d’eau et
jetez-les.
! Lors de sa première mise en service et chaque fois
que le système Aqua Care reste inutilisé pendant plus
d’une semaine, laissez couler trois litres d’eau que
vous jetterez.
F
15
Description de
lappareil
Tableau de bord
Touche
SUPER FREEZE
Bouton
FONCTIONNEMENT
REFRIGERATEUR
Touche
AQUA CARE
Voyant
AQUA CARE
Voyant
SUPER FREEZE
Voyant
ALIMENTATION
Bouton
FONCTIONNEMENT
CONGELATEUR
• Bouton FONCTIONNEMENT REFRIGERATEUR
pour régler la température à l’intérieur du
compartiment réfrigérateur.
est la température optimale avec une faible
consommation d’électricité.
est la fonction holiday (
voir Entretien et soins
).
• Touche AQUA CARE
de toujours avoir chez vous
de l’eau fraîche et filtrée. Si elle est enfoncée, le
voyant AQUA CARE s’allume(
voir Mise en marche et
utilisation
).
• Voyant jaune AQUA CARE (refroidissement rapide):
il s’allume dès que vous appuyez sur la touche
AQUA CARE.
• Voyant VERT ALIMENTATION il s’allume quand
l’appareil est branché au réseau d’alimentation.
• Touche SUPER FREEZE (congélation rapide) pour
congeler des aliments frais. Si elle est enfoncée, le
voyant SUPER FREEZE s’allume (
voir Mise en marche
et utilisation
).
• Voyant jaune SUPER FREEZE (congélation rapide):
il s’allume dès que vous appuyez sur la touche
SUPER FREEZE .
• Bouton FONCTIONNEMENT CONGELATEUR
pour régler la température à l’intérieur du
compartiment congélateur.
est la température optimale avec une faible
consommation d’électricité.
éteint l’appareil, réfrigérateur inclus.
! Les voyants servent aussi à signaler toute
augmentation anormale de la température à l’intérieur
du compartiment congélateur (
voir Anomalies et
remèdes
).

16
F
Description de
lappareil
Vue densemble
Leur nombre et/ou leur emplacement peut varier.
* N’existe que sur certains modèles.
Balconnet amovible à
abattant contenant
un SUPPORT A
OEUFS
Balconnet
BOUTEILLES
Balconnets
PORTE-CANETTES
Tableau de bord
AMPOULE
DÉCLAIRAGE
(voir Entretien)
CLAYETTES
Bac FRUITS
et LEGUMES
Compartiment
FRESH BOX
*
Compartiment
CONGELATION et
CONSERVATION
Compartiments
CONSERVATION
PIEDS de
réglage
Bacs à GLAÇONS
Ice Care
•
Filtre AQUA CARE
Réservoir
AQUA CARE
Balconnet
PORTE-OBJETS
F
17
Accessoires
Compartiment réfrigérateur
CLAYETTES: pleines ou
grillagées.
Elles sont amovibles et
réglables en hauteur grâce à
des glissières spéciales (
voir
figure
), pour le rangement de
récipients ou d’aliments de
grande dimension. Pour régler
la hauteur, pas besoin de sortir la clayette
complètement.
FRESH BOX: pour viandes et
poissons frais. Ce compartiment
sert à prolonger la durée de
conservation jusqu’à une
semaine, grâce à sa température
très basse – la plus froide du
réfrigérateur – et à son volet
transparent qui protège contre
les phénomènes d’oxydation et de noircissement. Il peut
aussi être utilisé pour conserver des “plats froids”.
Balconnet PORTE-CANETTES :
pour ranger horizontalement
plusieurs canettes (
voir figure
).
Vous pouvez aussi y ranger vos
yaourts, votre beurre ou d’autres
récipients.
FILTRE ANTI-ODEURS:
Certains modèles possèdent
un filtre anti-odeurs à charbon
actif qui améliore sensiblement
la qualité de l’air à l’intérieur
du réfrigérateur.
Le filtre est situé en bas à
droite, à l’intérieur de
l’ouverture d’aération.
Indicateur de TEMPERATURE: pour repérer la zone
la plus froide à l’intérieur du réfrigérateur.
1. Contrôler que l’indicateur affiche bien OK (
voir figure
).
vert
noir
consulter la notice
2.
Si le message OK n’est pas affiché, c’est que la
température est trop élevée : régler le bouton
FONCTIONNEMENT REFRIGERATEUR sur un
numéro plus élevé (plus froid) et attendre environ
10 h jusqu’à ce que la température se stabilise.
1
2
3. Contrôler l’indicateur une nouvelle fois : si nécessaire,
procéder à un nouveau réglage. Si de grosse
quantités d’aliments ont été stockées ou si la porte du
réfrigérateur est ouverte très souvent, il est normal
que l’indicateur n’indique pas OK. Attendre au moins
10 h avant de régler le bouton FONCTIONNEMENT
REFRIGERATEUR sur un chiffre plus élevé.
Compartiment congélateur
Bac à glaçons ICE CARE.
Placés dans la partie supérieure des tiroirs du
compartiment freezer, ils sont plus ergonomiques et
garantissent davantage de propreté: en effet, les
glaçons ne touchent plus aux aliments stockés dans
le freezer; de plus, fini l'eau qui dégouline lorsque
vous rangez votre bac (un couvercle est fourni pour
boucher le récipient après l'avoir rempli).
1. Pour sortir le bac, poussez-le vers le haut .
Vérifiez que le bac est bien vide avant de le remplir en
introduisant l’eau par l’ouverture prévue.
2. Attention à ne pas dépasser le niveau indiqué (MAX
WATER LEVEL). Une trop grande quantité d’eau gêne
la sortie des glaçons (si celase produit, attendez que la
glace fonde et videz le bac).
3. Faites pivoter le bac de 90° : l’eau envahit les cavités
selon le principe des vases communicants (
voir figure
).
4. Bouchez l’ouverture à l’aide du couvercle fourni,
remettez le bac à sa place.
5. Une fois que la glace s’est formée (il faut compter au
moins 8 heures) tapez le bac contre une surface dure
et mouillez-le à l’extérieur pour détacher les glaçons
que vous ferez sortir par l’ouverture prévue.
WATER LEVEL
MAX
WATER LEVEL
MAX
WATER LEVEL
MAX
18
F
Mise en marche et
utilisation
Mise en service de lappareil
! Avant de mettre lappareil en service, suivez bien
les instructions sur l’installation (
voir Installation
).
! Avant de brancher votre appareil, nettoyez bien les
compartiments et les accessoires à l’eau tiède
additionnée de bicarbonate.
! Cet appareil est équipé d’un système protège-moteur
qui ne fait démarrer le compresseur que 8 minutes
après son branchement. C’est ce qui se passera aussi
après toute coupure de courant, volontaire ou
involontaire (panne d’électricité.
1. Amenez le bouton FONCTIONNEMENT
CONGELATEUR sur
.
2. Branchez la fiche dans la prise et contrôlez que le
voyant vert ALIMENTATION ELECTRIQUE s’allume.
3. Amenez le bouton FONCTIONNEMENT
REFRIGERATEUR sur une valeur intermédiaire. Au
bout de quelques heures, vous pourrez commencer
à stocker des aliments dans le réfrigérateur.
4. Amenez le bouton FONCTIONNEMENT
CONGELATEUR sur une valeur intermédiaire et
appuyez sur la touche SUPER FREEZE (congélation
rapide) : le voyant jaune SUPER FREEZE s’allumera. Il
ne s’éteindra que quand le congélateur aura atteint sa
température optimale : vous pourrez alors introduire
les aliments.
Système de refroidissement
No Frost
Le No Frost gère un flux
continu d’air froid qui
absorbe l’humidité et
empêche la formation de
glace et de givre : il
maintient un niveau
d’humidité adéquat à
l’intérieur du compartiment
réfrigérateur et, grâce à
l’absence de givre, il
préserve les qualités
originaires des aliments; dans le compartiment
congélateur il évite la formation de glace, il n’y a par
conséquent plus besoin de dégivrer et les aliments ne
collent plus entre eux. Ne placez pas d’aliments ou de
récipients contre la paroi refroidissante arrière pour ne pas
boucher les trous d’aération et éviter une formation rapide
d’eau condensée. Fermez bien les bouteilles et emballez
les aliments.
Pour profiter à plein de votre
réfrigérateur
• Pour régler la température, utilisez le bouton
FONCTIONNEMENT REFRIGERATEUR (
voir
Description
).
• N’introduisez que des aliments froids ou à peine tièdes,
jamais chauds (
voir Précautions et conseils
).
• Les aliments cuits contrairement à ce que l’on croit ne
se conservent pas plus longuement que les aliments
crus.
• N’introduisez pas de récipients non fermés contenant
des liquides : ces derniers entraîneraient une
augmentation de l’humidité et la formation d’eau
condensée.
L'hygiène alimentaire
1. Après achat, les aliments doivent être débarrassés
de leur emballage extérieur en papier/carton ou
autre qui pourrait véhiculer des bactéries ou des
saletés à l’intérieur du réfrigérateur.
2. Protégez les aliments (notamment ceux qui se
détériorent rapidement et ceux qui dégagent une
forte odeur ) pour éviter tout contact entre eux et
éliminer ainsi toute possibilité de contamination de
germes/bactéries et la diffusion d’odeurs
particulières à l’intérieur du réfrigérateur.
3. Rangez les aliments de manière à ce que l’air
puisse circuler librement entre eux.
4. Veillez à ce que l’intérieur du réfrigérateur soit
toujours propre. Attention : ne pas utiliser de
produits oxydants ou abrasifs pour son nettoyage.
5. Sortez les aliments du réfrigérateur dès qu’ils
dépassent leur durée limite de conservation.
6. Pour une bonne conservation, les aliments
facilement périssables (fromages à pâte molle,
poisson cru, viande, etc.) doivent être placés dans
la zone plus froide où est situé l’indicateur de
température.
F
19
Pour profiter à plein de votre congélateur
• Pour régler la température, utilisez le bouton
FONCTIONNEMENT CONGELATEUR (
voir
Description
).
• Ne recongelez pas des aliments décongelés ou en
cours de décongélation; il faut les faire cuire et les
consommer (dans les 24 heures).
• Les aliments frais à congeler ne doivent pas être
placés au contact d’aliments déjà congelés; il faut les
stocker dans le compartiment supérieur
CONGELATION et CONSERVATION où la température
qui descend au-dessous de -18°C garantit une vitesse
de congélation adéquate.
• Ne stockez pas dans votre congélateur des
bouteilles en verre contenant des liquides, bouchées
ou fermées hermétiquement, elles pourraient se briser.
• La quantité journalière maximale d’aliments pouvant
être congelée est indiquée sur l’étiquette des
caractéristiques, placée dans le compartiment
réfrigérateur en bas à gauche (exemple : 4 Kg/24h).
• Pour congeler (si le congélateur est déjà en
service): appuyez sur la touche SUPER FREEZE
(congélation rapide) (allumage du voyant jaune
correspondant), introduisez les aliments et fermez la
porte. Cette fonction se désactive automatiquement
au bout de 24 heures ou dès que les températures
optimales sont atteintes (voyant éteint);
! Evitez d’ouvrir la porte pendant la phase de
congélation.
! En cas de coupure de courant ou de panne,
n’ouvrez pas la porte du congélateur : les produits
surgelés et congelés se conserveront ainsi sans
problème pendant 9 - 14 heures environ.
! pour éviter d’empêcher la circulation de l’air à
l’intérieur du congelateur, nous recommandons de ne
pas boucher avec des aliments ou des récipients les
trous d’aération
Fonction holiday
Si vous partez en vacances, pas besoin d’éteindre votre
appareil car il est équipé d’une fonction spéciale qui
permet, avec une faible consommation d’électricité, de
maintenir une température d’environ 15°C dans le
compartiment réfrigérateur (pour protéger de la chaleur
vos produits de beauté et de maquillage); réglez dans
ce cas la température du congélateur sur une valeur
minimale, indispensable à la conservation des aliments.
Pour activer la fonction amenez le bouton
FONCTIONNEMENT REFRIGERATEUR sur
(
voir
figure
). Deux bips confirment son activation; sa
désactivation est signalée par un seul bip.
20
F
Entretien et soin
Mise hors tension
Pendant les opérations de nettoyage et d’entretien,
débranchez l’appareil du réseau d’alimentation :
1. amenez le bouton FONCTIONNEMENT
CONGELATEUR sur
;
2. débranchez la fiche de la prise de courant.
! Si cette procédure n’est pas respectée, l’alarme peut
se déclencher : ceci ne dénote pas une anomalie.
Pour rétablir le fonctionnement correct de l’appareil, il
suffit d’amener le bouton FONCTIONNEMENT
CONGELATEUR sur la valeur souhaitée. Pour isoler
l’appareil, procédez comme indiqué aux points 1 et 2.
Nettoyage de lappareil
• Nettoyez l’extérieur, l’intérieur et les joints en
caoutchouc à l’aide d’une éponge imbibée d’eau
tiède additionnée de bicarbonate de soude ou de
savon neutre. N’utilisez pas de solvants, de
produits abrasifs, d’eau de Javel ou d’ammoniaque.
• mettez tremper les accessoires amovibles dans de
l’eau chaude additionnée de savon ou de liquide
vaisselle. Rincez-les et essuyez-les soigneusement.
• Le dos de l’appareil a tendance à s’empoussiérer,
pour éliminer la poussière avec délicatesse, après
avoir éteint l’appareil et débranché la fiche, servez-
vous d’un aspirateur montant un accessoire
adéquat et réglé sur une puissance intermédiaire.
Contre la formation de moisissures et
de mauvaises odeurs
• Cet appareil est fabriqué dans des matériaux
hygiéniques qui ne transmettent pas d’odeur. Pour
sauvegarder cette caractéristique, veillez à bien
emballer et couvrir vos aliments. Vous éviterez par
la même occasion la formation de taches.
• Si vous devez laisser votre appareil éteint pendant
une période de temps prolongée, nettoyez-le bien
l’intérieur et laissez les portes ouvertes.
Remplacement de lampoule déclairage
Pour remplacer l’ampoule d’éclairage du
compartiment réfrigérateur, débranchez la fiche de la
prise de courant. Suivez les indications fournies ci-
dessous. Pour pouvoir remplacer l’ampoule, démontez
le couvercle de protection
comme illustré (voir figure).
Remplacez-la par une ampoule
semblable dont la puissance
doit correspondre à celle
indiquée sur le couvercle de
protection (10 W).
Remplacement du filtre anti-odeurs
l vaudrait mieux changer le filtre 6-8 mois après son
activation, ce délai peut varier selon le type d’aliments
stockés. Pour savoir où acheter un filtre de rechange,
adressez-vous au service d’Assistance (
voir
Assistance
). Pour remplacer le filtre, agissez comme
illustré par les figures (
voir figures A et B
).
B
A
Remplacement du filtre Aqua Care
Aqua Care dispose d’un compteur intérieur qui
garantit un filtrage sûr. Le bon fonctionnement du filtre
est garanti pour un volume maximal de 1500 litres
d’eau, cette donnée peut varier en fonction des
conditions et de la pression du réseau. Une fois que
cette limite est atteinte, l’arrivée d’eau est coupée, les
alarmes correspondantes se déclenchent (voir
Anomalies et remèdes) et il faut changer le filtre.
! Le filtre doit toujours être remplacé 6 mois après son
installation.
! Si le remplacement du filtre a lieu sans attendre le
déclenchement de l’alarme signalant que le filtre est
épuisé ou presque, appuyer dix secondes de suite
sur la touche AQUA CARE.
Remplacement du filtre:
1. Désactivez la fonction Aqua Care (voir Tableau de
bord).
2. Dévissez le filtre en le tournant vers la gauche (1/4
de tour).
3. Après avoir enlevé le bouchon rouge, vissez le
nouveau filtre en le tournant vers la droite (1/4 de tour).
4. Appuyez sur la touche RESET ALARM pendant cinq
secondes environ si l’alarme filtre épuisé ou presque
épuisé était activé (voir Anomalies et Remèdes).
5. Activez la fonction Aqua Care (voir Tableau de
bord
).
90˚
90˚
/