Page is loading ...

Digital Wall Clock with Temperature &
Humidity, 6 Time Zones,
Auto Ambient Light Display
Model: CL030052WH - CL030052BK - CL030052GG
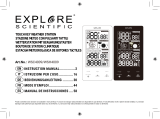
PRODUCT OVERVIEW
CLOCK
1. [ TIME SET ] button
2. [ ALARM SET ] button
3. [ + ] button
4. [ - ] button
5. [ SNOOZE ] button
6. < OFF / HI / LO >
slide switch
7. Wall mounting holder
8. < °C / °F > button
9. [ RCC ] button
10. [ RESET ] button
11. Battery door
12. Table stand
1
6
2
11 12
3
87
4
9
5
10
DISPLAY
Normal time mode
1. AM/PM (12 Hour format) 2. Time
3. DST 4. Time zone indicator
5. RCC signal strength indicator 6. Month-Date / Year
7. Day of the week 8. Temperature
9. Humidity
Alarm time mode
10. Alarm time 11. Alarm icon / Alarm on
12. Alarm mode indicator
1
6
012 3
7
114
8
215
9
GETTING STARTED
- Remove the battery door.
- Insert 2 new C batteries (included) according to the “+/-” polarity
marks in the battery compartment.
- Once the batteries are inserted, full segments of the LCD will be
shown before entering the radio controlled time reception mode.
- The radio controlled (RC) clock will automatically start scanning
for the radio controlled (RC) time signal within 8 seconds.
NOTE:
If no display appears on the LCD after inserting the batteries, press
the [ RESET ] button by using a pointed instrument.
In some cases, you may not receive the signal immediately.
Due to atmospheric disturbance, the best reception often occurs
during nighttime.
DAYLIGHT SAVING TIME (DST)
The clock will automatically advance the time by one hour in the
spring and back an hour in the fall, provided that the DST function is
not turned off.
DST function is set to AUTO by default.
RECEPTION OF RADIO CONTROLLED SIGNAL
This RC clock includes a built-in receiver which picks up the RC
signal from the WWVB station in Colorado, USA. Therefore, the clock
automatically sets the time, date and weekday.
- The clock automatically carries out four periodic synchronization
procedures (at 2:00 AM, 8:00 AM, 2:00 PM and 8:00 PM daily) with
the RC signal to correct any deviations to the exact time.
- Once the unit synchronizes successfully to the RC signal, the
signal icon “
” will show up. Each synchronization process will
take between 6 to 16 minutes.
NOTE:
- The strength of the radio-controlled time signal from the transmitter
tower may be affected by geographical location or surrounding
buildings.
- Always place the unit away from interfering sources such as a TV,
computer, etc.
- Avoid placing the unit on or next to metal.
- Closed areas such as airports, basements, highrise blocks, or
other large structures will interfere with the RC signal.
SIGNAL RECEPTION INDICATOR
The signal indicator displays signal strength in 4 levels. Wave
segment fl ashing means time signals are being received. The signal
quality could be classifi ed into 4 types:
No signal quality Weak signal quality
Acceptable signal quality Excellent signal quality
TIME ZONE SETTING
Your clock is designed to display time for different time zones. Please
refer to the SETTING THE TIME AND CALENDAR section to set
your desired time zone in following order:
PST (Pacific)
MST (Mountain) CST (Central) EST
(Eastern)
AST (Atlantic) NST (Newfoundland)
DISABLE / ENABLE RCC SIGNAL RECEPTION
- Press and hold [ RCC ] button for 8 seconds to disable the reception.
- Press and hold [ RCC ] button for 8 seconds to enable automatic
RCC reception.
RC OFF RC ON
Thank you for purchasing this radio controlled clock with temperature
and humidity display. Utmost care has gone into the design and
manufacture of the clock. Please read the instructions carefully and
keep this manual for future reference.
MANUAL ENGLISH
1
C8469A-PD15426M Marathon A4_01.27.2016.indd 1 2016-01-27 10:30 AM

to either or positions. Slide it to the position to <OFF>
turn off the night light function.
Night light sensor
BATTERY REPLACEMENT
When the low battery indicator “
” displays, it indicates that the
battery power is low. Replace batteries with (new) 2x C size
batteries at once.
ATTENTION:
- If the clock is not used for a long time, please remove the batteries.
- Batteries should not be exposed to excessive heat such as sunshine,
fire, etc. Please dispose of used unit or batteries in an ecologically
safe manner.
SPECIFICATIONS
Radio control signal: WWVB version
TEMPERATURE
Display range: -40°F~158°F (-40°C~70°C)
Operating range: 32°F~113°F ( 0°C~45°C)
Accuracy: 3°F~32°F +/-4°F ( -5°C~-0.1°C +/-2°C)
33°F~86°F +/-2°F ( 0°C~40°C +/-1°C)
87°F~122°F +/-4°F( 40.1°C~50°C +/-2°C
HUMIDITY
Display range: 20%~90%
Accuracy : 20% RH~40% RH: +/-7% RH
41% RH~70% RH: +/-5% RH
71% RH~90% RH: +/-7% RH
POWER
2x C batteries (Alkaline recommended)
DIMENSIONS
245(L) x 160(H) x 45(D) mm
SETTING THE TIME AND CALENDAR
- In normal time mode, press and hold [ TIME SET ] button for 2
seconds until the 12/24 Hr fl ashes.
- Press [ +/- ] button to set 12/24 Hour format.
- Press [ TIME SET ] button again to enter the Time Zone setting
mode .
- Repeat above operations to set the time and calendar in this
sequence: 12/24Hr
Time Zone Hour Minute
Second Year Month Date +/-23 Hour offset
Language DST auto/off.
- Press [ TIME SET ] button to save the setting and return to normal
time mode. Or the clock will automatically exit the setting mode
after 1 minute without pressing any buttons.
NOTE:
- When setting seconds, press [ +/- ] button to set the value to 00.
- 7 selectable languages and setting orders: EN(English)
FR(French) DE(German) ES(Spanish) IT(Italian)
NL(Dutch) RU(Russian)
SETTING THE ALARM TIME
- In normal time mode, press and hold [ ALARM SET ] button for 2
seconds until Hour digit flashes.
- Press [ +/- ] button to set its value.
- Press [ ALARM SET ] button again to move to Minutes setting.
Press [ +/- ] button to set its value.
- Press [ ALARM SET ] button to save the setting and return to
normal time mode. Or the clock will automatically exit the setting
mode after 1 minute without pressing any buttons.
NOTE:
After pressing [ +/- ] buttons, alarm function is automatically turned
on and the “
” icon is displayed.
USING THE ALARM AND SNOOZE
- In normal time mode, press [ ALARM SET ] button to enter alarm
time mode. Press [ ALARM SET ] button again to turn on ( icon
”
displays) or turn off alarm function.
If the alarm is turned on, alarm beeps at the set alarm time.
Alarm beeping can be stopped by:
- Auto stop if no button is pressed during alarm sound beeping.
Alarm beeping lasts for 2 minutes.
- Press [ SNOOZE ] button to stop the current alarm and enter
snooze. Alarm icon will be fl ashing continuously. The alarm will
sound again in 5 minutes. Snooze can be operated continuously
over 24 hours.
- Press [ ALARM ] button to turn off alarm function.
TEMPERATURE AND HUMIDITY DISPLAY
Slide the <°C/°F> switch to select the temperature unit °C or °F.
The temperature and humidity will display “Hi/Lo/---” on the conditions
in the following chart:
Area Condition Display
Temperature
Temperature<-40°C LO
Temperature>70°C HI
Humidity
OL%02<ytidimuH
IH%09>ytidimuH
Temperature<0°C or >60°C --
USING THE NIGHT LIGHT FUNCTION
The backlight will automatically turn on in dim & dark environments
as detected by the light sensor.
The brightness of the night light can be adjusted by sliding the switch
<HI> <LO>
MANUAL ENGLISH
2
“
Designed in Canada / Conçu au Canada
Made in China / Fabriqué en Chine
C8469A-PD15426M Marathon A4_01.27.2016.indd 2 2016-01-27 10:30 AM
/