Streamline N100BL-CH Installation guide

Category
Sanitary ware
Type
Installation guide
Owners Manual & Installation Guide
Clawfoot Bathtubs
Please read all instructions carefully before proceeding with
installation.
Due to the complexity of the installation procedure a professional
plumber is required.
Specications and directions may change without notice.
Table of Contents:
2
2. External Drain Configuration
3
1
1.Installation GuideApplicable Bathtub Models
4
6. Clawfeet Configuration, Installation, and Replacement
4.Internal Drain Configuration
6
7. Deck Mount Faucet Capability
5
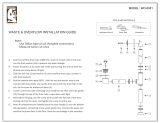
3.External Drain and Overflow Installation
5.Internal Drain Installation
7
8.Bathtub Installation
8
9.Product Care and Maintenance
9
Product Care and Maintenance
In order to clean the bathtub, please only use soft cotton cloth or
soft sponge.
Never use acidic, alkali, or any products that state on their label that
they are not suitable for use on Acrylic, ABS, Polystyrene or Plastic to
clean the bathtub.
To clean inside, fill it with warm water and add a couple of squirts of
dish liquid. Allow it to sit for 30 minutes. Let the bathtub drain and wipe
away the residue. You can also use cleaning products in aerosol cans
or solvents, including acetone to deep clean.
To remove light marks / scratches apply toothpaste to the area and
scrub with soft cloth/sponge.
9
Bathtub Installation
Installation Guide Applicable Bathtub Models
Drain Models N-DWF-GLD and N-DWF-CH are used with below bathtub models
Measurement
Level Bar
Wrench
Clawfoot Bathtub
Model:N-DWF-GLD
N-DWF-CH
Drain Models A1840-0 are used with below bathtub models
1.Lift the bathtub and fit the drain pipe with the floor waste drain.
2.Pull the waste pipe and put it into floor drain.
3.Pull the flange to cover the floor drain.
4.Adjust the leveling feet to level the tub with the floor.
N480-61FSHW-FM
Model:A1840-0
8
1
2
No
ITEM
Qty
External Drain Configuration
1
2
3
4
5
6
7
8
9
10
11
12
13
14
15
16
17
18
19
Cover
Cover gasket
Cartridge
Strainer
Connector
Coupling nut
Nut
Washer
Tee
Pipe
Overflow body
Tapered rubber gasket
Overflow upper gasket
Overflow plate
Pin bolt
Taic piece
Flange
1
1
1
1
1
1
1
1
1
3
3
1
1
1
1
1
1
1
1
Model:N-DWF-GLD
7
Step 1:
If your tub does not have faucet holes use 1" hole saw and drill holes in the
deck centered across the overow hole on 8" centers.
Step 2:
Insert faucet though holes in tub rim with #20 seal washer above the deck
and secure with #21 lock nut.
Deck Mount Faucet Capability
These Bathtubs are Deck Mount Faucet Capable with Additional Alterations:
Waste uppergasket
Waste lowergasket
Note:
Faucet is not provided. These instructions simply show how to prepare your bathtub
for deck mount faucet if it has that capability.
Please ensure all local plumbing and building codes are observed when installing
these faucets.
Water supply lines must be roughed in at 8" centers.
N-DWF-CH
N-100-60CFWH-DM
External Drain and Overflow Installation
Hexagon Spanner
Silicone Wrench
3
Model:N-DWF-GLD
Hexagon Spanner
Applicable models:
N-CFL11601-CH
N-CFL11601-BL
N-CFL11601-GLD
N-CFL11601-WH
Applicable models :
No.
Qty
ITEM
2
3
Nut
3 1
Claw feet
4 1
Bolt
5
2
Washer
6
2
Nut
7 4
Washer
8
1
Metal plate
Adjustable feet
1
1
9 4
Washer
8 1
Claw feet
7
2
Nuts
6
4
Nut
5
4
Washer
4
1
Bolt
3
1
Metal plate
2
3
Nut
Adjustable feet
1
1
No.
Qty
ITEM
Wrench
Clawfeet Configuration, Installation, and Replacement
6
N-CFL1775-CH
N-CFL1775-BL
N-CFL1775-GLD
N-CFL1775-WH
N-CFL1912-CH
N-CFL1912-BL
N-CFL1912-GLD
N-CFL1912-WH
1
2
3
4
5
6
7
8
1
2
3
4
5
6
7
8
9
Bathtub is pictured upside down Bathtub is pictured upside down
2
4
3
1
7
6
5
No.
ITEM
Qty
Pop-up cover
O ring
Strainer
Rubbergasket
Flatrubbergasket
Cartridge
7
Connector
4
Internal Drain Configuration
Wrench
Internal Drain Installation
5
A1840-0
Model:A1840-0
Strainer
Rubbergasket
Flatrubbergasket
7
Connector
1. PutRubber gasket (Part 4) onto Strainer (Part 3).
2. Put Rubber gasket and Strainer through the pre-drilled drain hole.
3. Put Flat rubber gasket (Part 5) on the Connector (Part 7).
4. Connect Connector with the Flat Rubber Gasket with the Strainer and
Rubber Gasket and tighten them by hand. Then use a wrench to tighten
the Connector (Part 7).
  • Page 1 1
  • Page 2 2
  • Page 3 3
  • Page 4 4
  • Page 5 5
  • Page 6 6

Streamline N100BL-CH Installation guide

Category
Sanitary ware
Type
Installation guide

Ask a question and I''ll find the answer in the document

Finding information in a document is now easier with AI