
For Models: 78136
Tools
Maintenance
Your new bathtub faucet is designed for years of trouble-free performance.
Keep it looking new by cleaning it periodically with a soft cloth. Avoid
abrasive cleaners, steel wool and harsh chemicals as these will dull the finish
and void your warranty.
Adjustable wrench
knife
Pipe tape
Phillips screwdriver
• If you use soldering for the installation of the faucet, the seats,
and
washers
will have to be removed before using flame. Otherwise,
warranty will be
void on these parts.
• Protect your eyes with safety glasses when cutting or soldering water
supply line.
•Cover your drain to avoid losing parts.
SatetyTips
Important Points
Prior to beginning installation, turn off the cold and hot water lines and open the old
faucet to release built-up pressure. When installing your new faucet,turn the connector
nuts finger-tight, then use one wrench to anchor the fitting and a second wrench to
tighten the nut one additional turn. Connections that are too tight will reduce the
integrity of the system. Wrap all threaded connections with Teflon tape available at
your local hardware or plumbing supply store.Always wrap in a clockwise direction.
The fittings should be installed by the State-licensed plumber.
All installations can vary depending on how your previous faucet was installed.
Necessary supplies to install your faucet are not all included; however, they are
available wherever plumbing supplies are sold. When choosing your installation
supplies, make sure they are IAPMO and/or CSA approved products.
Things You May Need
Spirit level
F OR F REE STA N D I N G T UBFI LLER F A U C E T

Preparation/
Assembl
y
3
1
Steps
1-3
2
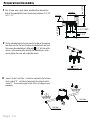
Shut off main water supple before installation.Then determine the
depth of the embedded hole.Ensure the hole deep in between 2 12/ 25”
to 5 11/14”.
Put the embedded part into the hole,draw the location of the mounting
holes.Make sure that
the level of location of embedded with
spirit level .
Then remove the
embedded part ,drilling with Φ2/5” drill and put the
setscrew in the mounting holes and place the embedded part on the
setscrew,tighten the screws with a
adjustable wrench.
5 3/10”
max 5 11/14“
2/5”
Connect the hot & cold tubehot tube be Connected to the hot water
inlet is marked “H” , cold tube be Connected to the cold water inlet is
marked “C”. Turn on water supply to check if there is leakage for every
components.
Cold tube
Hot tube
ΦΦFinish floor
ΦΦFinish floor
min 2 12/25“
2-<3/4”-14NPT>

Preparation/Assembly
6
4
Steps
4-6
5
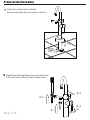
Cut the plastic shield so that it extends 3/8" above the
surface of the finished floor.
Loosen the lock screwsset aside Then remove the sealing test plug.
5-1
5-2
6-2
6-3
6-4
Get the faucet from the packing and push up the escutcheon.Connecting
the faucet with the embedded part .Then adjust the direction of faucet
and tighten the screws using an 6 mm Allen wrench.
6-1
Make sure the slot side be directed at arrow when you install the faucet

Steps
7-8
7
Seal the floor around the plastic shield with
waterproof sealant,push down the escutcheon to the floor.
Preparation/Assembly
8
Connect the hose and the hand shower ,then rest the hand shower
in the holder.Turn on on-off valve to test the situation of water.
7-1
7-2
8-2
8-1
8-3
8-4
ON
OFF
OFF
ON
-
 1
1
-
 2
2
-
 3
3
-
 4
4


LaToscana 78CR136 Installation guide
- Type
- Installation guide
- This manual is also suitable for
Ask a question and I''ll find the answer in the document
Finding information in a document is now easier with AI
Other documents
-
Symmons 262BRBODY Installation guide
-
John Wood JW6F507 User manual
-
Belle Foret OB-WHUS5661 Installation guide
-
American Water Heater 318281-000 User manual
-
Kenmore 153589400 Owner's manual
-
Lochinvar Residential Electric water heater User manual
-
-
State Deluxe Systems User manual
-
US Water Traxx Mini Water Softener User manual
-