Page is loading ...

M-ROCK Traditional Stone
INSTALLATION OF TRADITIONAL STONE
(REQUIRES MORTAR)
READ
• Read the instructions and become familiar with the stone.
• Adhere to your local building codes.
• Ensure that you have all the tools and supplies you will need.
• We are here to help, just call customer service 866-896-7625.
PREPPING THE SURFACE
Most M-Rock Stone products are typically installed by a qualied
mason, however, even someone with basic masonry skillls can install
manufactured rock.
The following is a sampling of procedures for the installation of M-ROCK’s
Traditional stone products. It is recommended to check building codes for
requirements and/or restrictions. Verify structural and surface integrity of
existing wall prior to installation.
SUPPLIES YOU WILL/MAY NEED:
Along with your Traditional Flats/Corner Stones
• S-Type Mortar and sand
• Wheelbarrow and hoe
• Hammer
• Staple gun
• Mason’s Hock and Margin trowels
• Level
• Masonry, circular or table saw or grinder with
carborundum or diamond blade
• Safety glasses and dust mask
• Grout bag
• Hatchet to trim stone
• Whisk broom for cleaning nished stone areas
• Weather-resistant barrier
(code approved building paper)
• Code-approved galvanized metal lath
• Galvanized nails, staples and concrete nails
• Masonry sealer (only if required)
• Large sponge
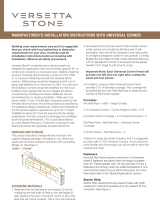
RIGID BACKWALL EXISTING MASONRY SURFACES OPEN STUDS
Including wallboard, plywood, paneling,
wall sheathing, concrete board,
polystyrene insulation board.
• Cover sheathing with 2 layers of 30#
felt or weather-resistant barrier, lapping
joints 4” shingle fashion.
• In accordance with local building
codes, lap and install lath or galvanized
mesh using galvanized nails or staples
vertically 6” on center, penetrating studs
a minimum of 1”.
• Continue to wrap weather resistant
barrier and lath a minimum of 16”
around all outside and inside corners.
Surface must be evaluated for mortar
and face integrity and must be free of
dirt, waterproong, paint, or any other
substance that could inhibit the mortar
bond. Most masonry and stucco wall
surfaces do not require preparation.
Surfaces may be cleaned by pressure
washing, acid washing, sand/bead
blasting, or a combination of these
methods to achieve a bondable surface. If
the surface cannot be cleaned, attach lath
before applying the mortar scratch coat.
Open studs, non-rigid sheathing and metal
siding must be prepared with 30# paper
backed lath with a minimum ½ inch thick
scratch coat and allowed to cure for a
minimum of 48 hours prior to installation
Five Common Mistakes To Avoid:
•
Not wrapping your corners with lath
• Mud and dirt stains from splashing
• Hazing of the stone
• Leaving voids behind the stones
• Extreme conditions (too hot or cold)
Rigid Backwall
Waterproof
Barrier
Metal
Lath
M-Rock
Stone
Concrete Surface
M-Rock
Stone
Open Studs
Waterproof
Barrier
Metal
Lath
M-Rock
Stone

FLAT STONES:
• Calculate the total area for each wall by
multiplying the width by the height.
• Subtract the area for windows, doors and/or
other openings from each wall’s area.
CORNER STONES:
• Measure the height of each outside corner to
get your total linear feet.
• Inside corners do not require corner
stones, as at stones meet to create a
natural corner.
•
ADJUST NUMBERS
• Multiply the corner stone linear feet (height)
by 50% Coverage will vary by texture.
• Subtract this amount from the total at
stone area.
ESTIMATE FRONT OF HOUSE
Wall A Lower: Width = 20’, Height = 10’
Area: 20x10 = 200 sq. ft.
Wall A Top: Width = 20’, Height = 5’
Area: 20x5÷2 = 50 sq. ft.
Window A: Width = 4’, Height = 2’
Area: 2x4 = 8 sq. ft.
Window B: Width = 3’, Height = 2’
Area: 2x3 = 6 sq. ft.
Door: Width = 3’, Height = 7’
Area: 3x7 = 21 sq. ft.
Wall A Flat Stone Coverage:
Wall A Lower = 200 sq. ft.
+ Wall A Top = 50 sq. ft.
- Windows and Doors = 35 sq. ft.
Total Stone Needed = 215 sq. ft.
Window A
2’x3’
Window B
2’x4’
Door
3’x7’
Wall A Lower
10’ H x20’ W
Wall A Top
5’ H x20’ W
ESTIMATING YOUR PRODUCT TO SURFACE COVERAGE NEEDS
M-Rock Stone is available in at stones to be applied to the wall surface and corner stones to t around 90 degree outside corners.
INSTALLATION
STEP 1: LAYING OUT YOUR STONE
Open several boxes and lay out approximately 25 sq. ft. of stone varying the sizes, shapes, and colors. Allowing for variety
and contrast in the design to achieve the desirable nished project. This is recommended to help you avoid patterns and voids.
Break up long horizontal and vertical lines with stones of varying height and length.
STEP 2: CORNERS FIRST
Apply corner pieces rst if corners are required. Alternate long and short legs in opposite directions. Once the corner pieces
are in place, apply at pieces, working toward wall center.
TIP: Working from the top down may help avoid splashing previously applied stone with dripping mortar. Ledgestone and
drystack types should be installed from the bottom up.
STEP 3: APPLYING THE MORTAR AND STONE
The back of each stone should be entirely buttered with mortar to a thickness of 1/2”. The stone should be rmly worked
onto surface and slid slightly back and forth or with a slight rotating motion to set the stone. Achieve mortar squeeze out in a
volume which results in a full setting bed which covers the substrate completely. With the proper mortar mix, moisture content,
and suface preparation, the installer will feel the mortar start to grab within a few seconds. At this point, no further movement
of the stone should be made as bonding will be broken.
TIP: Care must be taken to avoid smearing mortar on surface of stone. Accidental smears or mortar droppings should be
removed using a whisk broom only after mortar has become crumbly.
MORTAR MIX:
• 1 part S-Type Masonry Cement
• 2.25 parts Sand
• Potable water

DRY STACK/LEDGE STONE: NO GROUT LINES
If using tight t/drystack method, it is important to make sure backing has been covered completely. Conceal the backing
and prevent pockets from forming behind stones that could trap water. When installing, the backs of all these components
must be noticeably damp, but free from surface water. Install all these products with tight-tted joints. Generally, components
should be placed butting each other and aligned for level and plumb. Mortar can be tinted to match the color of the stone you
are installing to help conceal the joint lines. Using a trowel, strike off the excess mortar around the edges of the component
prior to placing the next component. This will allow the next adjacent component to t tightly. Check for level and plumb.
GROUTED STONE: FIELDSTONE AND RIVERSTONE
Place the individual stones close together, creating uniform joints between them.
Stones can be cut and shaped with a hatchet to create a natural appearance. Cut and
trim as required to achieve consistent width in the mortar joints. Then trim and t small
pieces into any remaining voids. For best appearance, coat cut or broken edges with
mortar. Position cut edges away from eye level. Always use safety glasses when
cutting and trimming.
Grouting the joints should be completed only after there is sufcient cure time of the
installed stone; when mild contact will not break the bonding. Grouting may be done
with a grout bag, lling joints to the desired depth, ensuring that mortar is forced into
all voids. Grout should be “thumbprint hard” before raking the joints. This curing time
before the grout is ready will vary signicantly with temperature and humidity. Use
pointed tool to rake the joints to the desired depth. Extra precaution should be taken
while raking so the surface of the stone is not damaged. Clean off remaining grout
debris on the stone surface with a dry, soft-bristled brush.
STEP 4: FINISHING IT OFF
Remove any unwanted mortar from stones only after mortar has become crumbly. Use a whisk broom or dry bristle brush to
remove. Never use water, a wet brush or wire brush as staining or damage may occur.
/