Page is loading ...

IMPORTANT SAFETY INSTRUCTIONS
LIGHTED BULB IS HOT!
WARNING: To reduce the risk of FIRE or INJURY TO PERSON:
• Turnoffandallowtocoolbeforereplacingbulb.
• BulbgetsHOTQUICKLY!Contactswitchonlywhenturningoff.
• DONOTremaininlightifskinfeelswarm.(Lightisintense,
maycause“sunburn”)
• DONOTlookdirectlyatlightedbulb.
• Keepmaterialsawayfrombulbthatmayburn.
• UseONLYwithwattagespeciedorlower.
• DONOTtouchbulbatanytime,useasoftcloth.Oilfromskin
maydamagebulb.
• DONOToperatexturewithmissingordamagedglass.
1) TURN OFF POWER.
IMPORTANT:Beforeyoustart,NEVERattemptanywork
withoutshuttingofftheelectricityuntiltheworkisdone.
a) Gotothemainfuse,orcircuitbreaker,boxinyour
home.Placethemainpowerswitchinthe“OFF”
position.
b) Unscrewthefuse(s),orswitch“OFF”thecircuitbreaker
switch(s),thatcontrolthepowertothextureorroom
thatyouareworkingon.
c) Placethewallswitchinthe“OFF”position.Ifthexture
tobereplacedhasaswitchorpullchain,placethosein
the“OFF”position.
2) Findtheappropriatethreadedholesonmountingstrap.
Assemblemountingscrewsintothreadedholes.
3) Attachmountingstraptooutletbox.(Screwsnotprovided).
Mountingstrapcanbeadjustedtosuitpositionofxture.
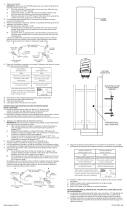
4) Groundinginstructions:(SeeIllus.AorB).
A) Onxtureswheremountingstrapisprovidedwithahole
andtworaisedimples.Wrapgroundwirefromoutlet
boxaroundgreengroundscrew,andthreadintohole.
B) Onxtureswhereacuppedwasherisprovided.Attach
groundwirefromoutletboxundercuppedwasherand
greengroundscrew,andthreadintomountingstrap.
Ifxtureisprovidedwithgroundwire.Connectxture
groundwiretooutletboxgroundwirewithwireconnector.
(Notprovided.)Afterfollowingtheabovesteps.Neverconnect
groundwiretoblackorwhitepowersupplywires.
5) Makewireconnections(connectorsnotprovided.)Reference
chartbelowforcorrectconnectionsandwireaccordingly.
6) Pushxturetowall,carefullypassingmountingscrews
throughholesincanopy.
7) Screwthreadedballsontoendsofmountingscrews.
Tightenthreadedballstosecurexturetowall.
8) Setglassthenspacerdownoversocket.
9) Threadsocketringontosocket.(DONOTovertighten.)
10) Insertrecommendedbulb.CAUTION: DONOTtouchbulb
withbarehands.Ifthishappens,cleanbulbwithdenatured
alcoholandalintfreecloth.
11) Lowerglasssleevedownoverbulb.Carefullythreadglass
sleeveontosocket.(DONOTovertighten.)
DateIssued:1/11/13 IS-45038-US
GREEN GROUND
SCREW
CUPPED
WASHER
A
B
OUTLET BOX
GROUND
FIXTURE
GROUND
DIMPLES
WIRE CONNECTOR
(NOT PROVIDED)
OUTLET BOX
GROUND
GREEN GROUND
SCREW
FIXTURE
GROUND
Connect Black or
Red Supply Wire to:
Connect
White Supply Wire to:
Black White
*Parallel cord (round & smooth) *Parallel cord (square & ridged)
Clear, Brown, Gold or Black
without tracer
Clear, Brown, Gold or Black
with tracer
Insulated wire (other than green)
with copper conductor
Insulated wire (other than green)
with silver conductor
*Note: When parallel wires (SPT I & SPT II)
are used. The neutral wire is square shaped
or ridged and the other wire will be round in
shape or smooth (see illus.)
Neutral Wire
FIXTURE
ARTEFACTO
GLASS
VIDRIO
SEE OTHER SIDE FOR SPANISH TRANSLATIONS.
VEA EL OTRO LADO DE TRADUCCIONES AL ESPAÑOL.
MOUNTINGSTRAP
PLANCHAPARA
MONTAR
THREADEDBALL
BOLAROSCADO
BULB
BOMBILLA
GLASSSLEEVE
CAMISADEVIDRIO
SOCKETRING
ANILLODELCASQUILLO
We’re here to help 866-558-5706
Hrs: M-F 9am to 5pm EST
SPACER
ESPACIADOR

IMPORTANT SAFETY INSTRUCTIONS
LIGHTED BULB IS HOT!
WARNING: To reduce the risk of FIRE or INJURY TO PERSON:
• Turnoffandallowtocoolbeforereplacingbulb.
• BulbgetsHOTQUICKLY!Contactswitchonlywhenturningoff.
• DONOTremaininlightifskinfeelswarm.(Lightisintense,
maycause“sunburn”)
• DONOTlookdirectlyatlightedbulb.
• Keepmaterialsawayfrombulbthatmayburn.
• UseONLYwithwattagespeciedorlower.
• DONOTtouchbulbatanytime,useasoftcloth.Oilfromskin
maydamagebulb.
• DONOToperatexturewithmissingordamagedglass.
1) TURN OFF POWER.
IMPORTANT:Beforeyoustart,NEVERattemptanywork
withoutshuttingofftheelectricityuntiltheworkisdone.
a) Gotothemainfuse,orcircuitbreaker,boxinyour
home.Placethemainpowerswitchinthe“OFF”
position.
b) Unscrewthefuse(s),orswitch“OFF”thecircuitbreaker
switch(s),thatcontrolthepowertothextureorroom
thatyouareworkingon.
c) Placethewallswitchinthe“OFF”position.Ifthexture
tobereplacedhasaswitchorpullchain,placethosein
the“OFF”position.
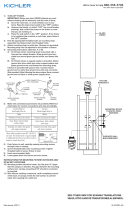
2) Findtheappropriatethreadedholesonmounting
strap.Assemblemountingscrewsintothreadedholes.
3) Attachmountingstraptooutletbox.(Screwsnotprovided).
Mountingstrapcanbeadjustedtosuitpositionofxture.
4) Makewireconnections(connectorsnotprovided.)Reference
chartbelowforcorrectconnectionsandwireaccordingly.
5) Pushxturetowall,carefullypassingmountingscrews
throughholesincanopy.
6) Screwthreadedballsontoendsofmountingscrews.
Tightenthreadedballstosecurexturetowall.
7) Setglassthenspaceroversocket.
8) Insertrecommendedbulb.CAUTION: DONOTtouchbulb
withbarehands.Ifthishappens,cleanbulbwithdenatured
alcoholandalintfreecloth.
9) Lowerglasssleevedownoverbulb.Carefullythreadglass
sleeveontosocket.(DONOTovertighten.)
IMPORTANTES CONSIGNES DE SÉCURITÉ
UNE AMPOULE ALLUMÉE EST BRÛLANTE !
AVERTISSEMENT: Pour réduire les risques D’INCENDIE ou DE
BLESSURE:
• Éteindreetlaisserrefroidiravantderemplacerl’ampoule.
• LesampouleschauffentTRÈSRAPIDEMENT!N’éteindrequ’à
l’aidedel’interrupteur.
• NEPASresterdanslalumièresiunesensationdechaleurest
ressentiesurlapeau.(Lalumièreestintenseetpeutprovoquer
descoupsdesoleil).
• NEJAMAISregarderdirectementuneampouleallumée.
• Tenirlesmatériauxàl’écartd’uneampoulepouréviterqu’ils
nebrûlent.
• UtiliserUNIQUEMENTdesampoulesàlapuissancenominale
indiquée(watts)ouàunepuissanceinférieure.
• NEJAMAIStoucherl’ampouleàmainnue,seservird’untissu
doux.L’huiledelapeaupeutendommagerl’ampoule.
1) COUPERLECOURANT.
IMPORTANT:TOUJOURScouperl’électricitéavantde
commencerletravail.
a) Localiserlecoffretàfusiblesouledisjoncteurdu
domicile.Mettrel’interrupteurprincipalenposition
d’Arrêt.
b) Dévisserleoulesfusibles(oumettreledisjoncteursur
Arrêt)quicontrôlentl’alimentationversleluminaireoula
piècedanslaquelleletravailesteffectué.
Connect Black or
Red Supply Wire to:
Connect
White Supply Wire to:
Black White
*Parallel cord (round & smooth) *Parallel cord (square & ridged)
Clear, Brown, Gold or Black
without tracer
Clear, Brown, Gold or Black
with tracer
Insulated wire (other than green)
with copper conductor
Insulated wire (other than green)
with silver conductor
*Note: When parallel wires (SPT I & SPT II)
are used. The neutral wire is square shaped
or ridged and the other wire will be round in
shape or smooth (see illus.)
Neutral Wire
DateIssued:1/11/13 IS-45038-CB
INSTRUCTIONS
For Assembling and Installing Fixtures in Canada
Pour L’assemblage et L’installation Au Canada
THREADEDBALL
BOULEFILETE
c) Mettrel’interrupteurmuralenpositiond’Arrêt.Sileluminaire
àremplacerestdotéd’uninterrupteuroud’unechaîne
connectéeàl‘interrupteur,placercesélémentsen
positiond’Arrêt.
2) Trouverlestrousletésappropriéssurlabarrettedemontage.
Vissezlesvisdemontagedanslestrousletés.
3) Visserlabarrettedemontageàlaboitedejonction.(Vis
nonfournies).Labarrettedemontagepeutetreajustéepour
conveniràlapositiondel’applique.
4) Connecterlesls(connecteursnonfournis).Sereporterau
tableauci-dessouspourfairelesconnexions.
5) Plaquezleluminairecontrelemur,enpassantsoigneusement
lesvisdemontagedanslestrousdanslecache.
6) Visserlesboulesletéesdanslesextrémitésdesvisdemontage.
Serrerlesboulesletéespourxerleluminaireaumur.
7) Placerleverrepuisl’entretoisesurladouille.
8) Introduirel’ampoulerecommandée.ATTENTION:NEPAS
toucherl’ampouleàmainnue.Silapeauentreencontact
avecl’ampoule,nettoyerl’ampouleavecdel’alcooldénaturé
etuntissunonpelucheux.
9) Passerlemanchondeverresurlalampe.Visserdélicatement
lemanchondeverredansladouille.(NEPASserreravec
excès).
MOUNTINGSTRAP
COLLLIERDEFIXATION
Connecter le fil noir ou
rouge de la boite
Connecter le fil blanc de la boîte
A Noir A Blanc
*Au cordon parallèle (rond et lisse)
*Au cordon parallele (à angles droits el strié)
Au bransparent, doré, marron, ou
noir sans fil distinctif
Au transparent, doré, marron, ou
noir avec un til distinctif
Fil isolé (sauf fil vert) avec
conducteur en cuivre
Fil isolé (sauf fil vert) avec
conducteur en argent
*Remarque: Avec emploi d’un fil paralléle
(SPT I et SPT II). Le fil neutre est á angles
droits ou strié et l’autre fil doit étre rond ou
lisse (Voir le schéma).
Fil Neutre
GLASS
VERRE
BULB
L’AMPOULE
GLASSSLEEVE
MANCHONDEVERRE
SOCKETRING
ANNEAUDELADOUILLE
SPACER
ENTRETOISE
We’re here to help 866-558-5706
Hrs: M-F 9am to 5pm EST
/