Page is loading ...

MediaFlex 7211 802.11n
Indoor/EXT Smart Wi-Fi Gateway
Quick Setup Guide
This Quick Setup Guide provides step-by-step instructions
for setting up your Ruckus Wireless MediaFlex 7211
802.11n Indoor/EXT Smart Wi-Fi Gateway.
After completing the steps described in this Guide, you will
be able to use the Smart Wi-Fi Gateway to connect your
computer or wired network to your service provider’s
Wireless Broadband Network.
BEFORE YOU BEGIN
Before deploying your Ruckus Wireless device, please
check the Ruckus Wireless Web site for the latest software
and release documentation.
• Release Notes are available at
http://support.ruckuswireless.com/documents
.
• User Guides are available at
http://support.ruckuswireless.com/documents
.
• Software Upgrades are available at
http://support.ruckuswireless.com/software
.
• Open Source information is available at
http://support.ruckuswireless.com/open_source
.
PACKAGE CONTENTS
• MF7211-Indoor or MF7211-EXT unit
• Power adapter
• One CAT5 Ethernet cable
• A packet that contains the side cover and two screws
•This Quick Setup Guide
SETUP REQUIREMENTS
• A computer with a Web browser
• One CAT5 Ethernet cable (supplied with the device)
• Your service provider’s Wireless Broadband Network
SSID and security settings. You will need to enter these
settings on the device’s Web interface to enable it to
connect to the Wireless Broadband Network service.
STEP 1: PREPARE THE ADMINISTRATIVE COMPUTER
The administrative computer is the computer that you will
be using to access the device’s Web interface. To access
the Web interface, the administrative computer must be
configured to obtain an IP address automatically.
1 Power on your computer.
2 Go to the network connection settings.
• On Windows 2000, click Start > Settings >
Network, and then click Dialup Connections.
• On Windows XP, click Start > Settings > Control
Panel > Network Connections.
3 Double-click the icon for Local Area Connection.
4 In the Local Area Connection Properties window, select
Internet Protocol (TCP/IP), and then click Properties.
5 Select Obtain an IP address automatically, and then
click OK to exit the TCP/IP Properties window.
6 Click OK to exit the Local Area Connection Properties
window.
STEP 2: CONNECT THE DEVICE TO A POWER
S
OURCE AND THE ADMIN COMPUTER
1 Take out the power adapter that was shipped with the
device.
2 Connect the power jack to the DC IN port on the side
panel, and then connect the power adapter to a power
source or to a surge protector that is plugged into a
power source.
3 Take out the CAT5 Ethernet cable. Connect one end of
the CAT5 Ethernet cable to the Ethernet port on your
computer, and then connect the other end to the
Ethernet port on the device (see Figure 1
).
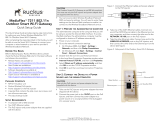
Figure 1. Side panel of Indoor/EXT Smart Wi-Fi Gateway
STEP 3: CONFIGURE THE DEVICE USING THE QUICK
S
TART WIZARD
Before you start this step, make sure you have already
obtained the Wireless Broadband Network SSID and
security settings from your service provider.
1 On your computer, open a Web browser window.
2 In the address or location bar, enter 192.168.30.1.
3 When the login screen appears, type super as the user
name and sp-admin as the password.
Ethernet port
Reset button
External antenna
connector (EXT
model only)
DC IN port
4Gon www.4Gon.co.uk [email protected] Tel: +44 (0)1245 808295 Fax: +44 (0)1245 808299

Figure 2. Web interface login page
4 Click the Login button. The Web interface welcome
page appears and asks you if you want to use the quick
start wizard to set up the device.
5 Click YES I want to use the wizard. The first page of
the Quick Start Wizard appears.
Figure 3. First page of the Quick Start Wizard
6 Select the topology that best describes your network
setup, and then click Next. The two topology options
include:
• connect your wireless computer(s) to a Metro
Wi-Fi network (Router mode)
• connect your home router to a Metro Wi-Fi
network (Bridge mode)
The device checks for available wireless networks with
which it can associate and displays these networks on
the next page.
7 Complete the remaining steps for the topology option
that you selected:
• If You Selected Router Mode
• If You Selected Bridge Mode
If You Selected Router Mode
1 Click the option button for the wireless network with
which you want the device to associate. If that wireless
network is using encryption or authentication, type the
security settings in the boxes that appear.
2 Click Next. The Wireless 1 configuration page appears.
Wireless 1 is one of your two home WLANs. Wireless
clients on your home network will need to associate
with this WLAN to gain access to the Internet (via your
service provider’s Wireless Broadband Network).
Figure 4. Wireless 1 configuration page
3 Configure your home WLAN settings by answering the
following questions:
• What is your network name? (SSID): Type a name
that you want to assign to this WLAN. This is the
WLAN name that wireless clients will connect to.
• What type of security are you using?: Select the
type of wireless security that you want to use.
Options include Open (no security), WEP, and
WPA. If you select WEP or WPA, you must type a
password in the box provided.
WEP passwords must consist of either 5 or 13
characters. WPA passwords must be between 8 and
63 characters.
When users connect to this WLAN, they will be
prompted for this password before they are allowed
access to the wireless network.
4 Click Finish. A summary of the settings that you have
configured appears.
5 Click Reboot to apply your changes. A popup message
appears, informing you that the reboot process may
take a few minutes.
6 Click OK. When the reboot process is complete, a
popup message appears and prompts you to click the
OK button to reconnect to the Web interface.
7 Click the OK button.
You have completed configuring the device using the
Quick Start Wizard.
If You Selected Bridge Mode
1 Click the option button for the wireless network with
which you want the device to associate. If that wireless
network is using encryption or authentication, type the
security settings in the boxes that appear.
2 Click Next. A summary of the settings that you have
configured appears.
3 Click Reboot to apply your changes. A popup message
appears, informing you that the reboot process may
take a few minutes.
4 Click OK. When the reboot process is complete, a
popup message appears and prompts you to click the
OK button to reconnect to the Web interface.
5 Click the OK button.
You have completed configuring the device using the
Quick Start Wizard.
STEP 4: VERIFY THAT YOUR COMPUTER CAN
C
ONNECT TO THE INTERNET
After you complete the Quick Start Wizard, your computer
should be able to connect to the Internet via the device.
Perform these steps to check.
1 On your computer, open a browser window.
2 In the address or location bar, type
www.ruckuswireless.com. If the Ruckus Wireless
Web site loads in your browser, you are able to connect
to the Internet.
Congratulations! Your wireless network is now active and
ready for use.
FOR MORE INFORMATION
For more information and advanced configuration
instructions, refer to the following documents:
• Online Help: Accessible from the Web interface
• User Guide: Downloadable from the Ruckus Wireless
Support site
4Gon www.4Gon.co.uk [email protected] Tel: +44 (0)1245 808295 Fax: +44 (0)1245 808299
/