
13DNX_IM366_Ref_K_En_03 (K/K2/R)© 2013 JVC KENWOOD Corporation
DNX890HD
DNX7700BT
DNX690HD
DNX570HD
DNX570TR
DNX5080EX
DNX5700BT
GPS NAVIGATION SYSTEM
INSTRUCTION MANUAL
Take the time to read through this instruction manual.
Familiarity with installation and operation procedures will help you obtain the best performance from your new
GPS Navigation System.
For your records
Record the serial number, found on the back of the unit, in the spaces designated on the warranty card, and in the space
provided below. Refer to the model and serial numbers whenever you call upon your Kenwood dealer for information or
service on the product.
Model DNX890HD/ DNX7700BT/ DNX690HD/ DNX570HD/ DNX570TR/ DNX5080EX/ DNX5700BT Serial number
US Residence Only
Register Online
Register your Kenwood product at www.Kenwoodusa.com
Before reading this manual, click the button below to check the latest edition and the
modified pages.
Check the latest edition

1
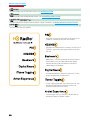
What Do You Want To Do?
Thank you for purchasing the KENWOOD GPS NAVIGATION SYSTEM.
In this manual, you will learn various convenient functions of the system.
Click the icon of the media you want to play.
With one-click, you can jump to the section of each media!
iPod USB
VCD
DVD VIDEO
Music CD
Disc Media
BT Audio
Pandora
iHeartRadio
aha
Tuner
HD Radio
SiriusXM

22
Before Use 4
2 WARNING _______________________ 4
How to Read this Manual 5
Basic Operations 6
Functions of the Buttons
on the Front Panel _________________ 6
Turning on the Unit _________________ 10
How to Play Media __________________ 13
Operating with the Top Menu Screen ___ 14
Common Operations ________________ 16
Navigation Operation ________________ 18
OEM Features Operation _____________ 20
DVD/Video CD (VCD)
Operation 22
DVD/VCD Basic Operation ____________ 22
DVD Disc Menu Operation ____________ 25
Zoom Control For DVD And VCD _______ 26
DVD Setup ________________________ 28
CD/Audio and Visual Files/
iPod Operation 32
Music/Video/Picture Basic Operation ___ 32
Search Operation ___________________ 38
Movie Control ______________________ 43
PANDORA® Internet Radio Operation ___ 44
Aha Operation _____________________ 48
iHeartRadio Operation _______________ 52
USB/iPod/DivX Setup ________________ 56
Radio and HD Radio™ Tuner
Operation 58
Radio/HD Radio™ Tuner Basic Operation 58
Memory Operation __________________ 61
Selecting Operation _________________ 62
Traffic Information __________________ 64
Receive Mode _____________________ 64
iTunes Tagging _____________________ 65
Bookmark _________________________ 66
SiriusXM® Operation 68
SiriusXM® Basic Operation ____________ 68
Selecting Operation _________________ 71
iTunes Tagging _____________________ 73
Song, Artist and Game Alerts _________ 74
SiriusXM Replay™ ___________________ 74
SiriusXM Setup _____________________ 75
Bluetooth Control 82
Registering And
Connecting Bluetooth Unit __________ 82
Playing Bluetooth Audio Device _______ 85
Using Hands-Free Unit _______________ 86
Smartphone Link ___________________ 92
Hands-Free Setup ___________________ 92
Setting Up 94
Monitor Screen Setup _______________ 94
View Camera Control
________________ 95
System Setup ______________________ 95
Display Setup ______________________ 99
Navigation Setup ___________________ 103
Camera Setup ______________________ 104
Software Information ________________ 105
AV Input Setup _____________________ 106
AV Output Interface Setup ____________ 107
External Device Control
______________ 107
Contents

3
Controlling Audio 108
Setting Audio ______________________ 108
Controlling General Audio ____________ 112
Equalizer Control ___________________ 113
Zone Control _______________________ 115
Sound Effect ______________________ 116
Listening Position __________________ 118
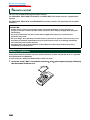
Remote control 120
Battery Installation __________________ 120
Functions of the Remote control Buttons 121
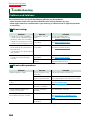
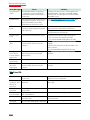
Troubleshooting 124
Problems and Solutions ______________ 124
Error Messages _____________________ 125
Resetting the Unit __________________ 127
Appendix 128
Playable Media and Files _____________ 128
Status Bar Indicator Items ____________ 131
Region Codes in the World ____________ 133
DVD Language Codes _______________ 134
Specifications ______________________ 135
About this Unit _____________________ 138

44
Return to the Top page
Before Use
2 WARNING
To prevent injury or fire, take
the following precautions:
• Topreventashortcircuit,neverputor
leaveanymetallicobjects(suchascoinsor
metaltools)insidetheunit.
• Donotwatchorfixyoureyesontheunit’s
displaywhenyouaredrivingforany
extendedperiod.
• Ifyouexperienceproblemsduring
installation,consultyourKenwooddealer.
Precautions on using this unit
• Whenyoupurchaseoptionalaccessories,
checkwithyourKenwooddealertomake
surethattheyworkwithyourmodelandin
yourarea.
• Youcanselectlanguagetodisplaymenus,
audiofiletags,etc.SeeLanguage setup
(P.97).
• TheRadioDataSystemorRadioBroadcast
DataSystemfeaturewon’tworkwhere
theserviceisnotsupportedbyany
broadcastingstation.
Protecting the monitor
Toprotectthemonitorfromdamage,donot
operatethemonitorusingaballpointpenor
similartoolwiththesharptip.
Cleaning the unit
Ifthefaceplateofthisunitisstained,wipeit
withadrysoftclothsuchasasiliconcloth.
Ifthefaceplateisstainedbadly,wipethe
stainoffwithaclothmoistenedwithneutral
cleaner,thenwipeitagainwithacleansoft
drycloth.
¤
• Applying spray cleaner directly to the unit
may affect its mechanical parts. Wiping the
faceplate with a hard cloth or using a volatile
liquid such as thinner or alcohol may scratch
the surface or erase screened print.
Lens fogging
Whenyouturnonthecarheaterincold
weather,deworcondensationmayform
onthelensinthediscplayeroftheunit.
Calledlensfogging,thiscondensationon
thelensmaynotallowdiscstoplay.Insuch
asituation,removethediscandwaitforthe
condensationtoevaporate.Iftheunitstill
doesnotoperatenormallyafterawhile,
consultyourKenwooddealer.
Precautions on handling discs
• Donottouchtherecordingsurfaceofthe
disc.
• Donotsticktapeetc.onthedisc,orusea
discwithtapestuckonit.
• Donotusedisctypeaccessories.
• Cleanfromthecenterofthediscandmove
outward.
• Whenremovingdiscsfromthisunit,pull
themouthorizontally.
• Ifthedisccenterholeoroutsiderimhas
burrs,usethedisconlyafterremovingthe
burrswithaballpointpenetc.
• Discsthatarenotroundcannotbeused.
• 8-cm(3inch)discscannotbeused.
• Discswithcoloringontherecording
surfaceordiscsthataredirtycannotbe
used.
• ThisunitcanonlyplaytheCDswith
.
Thisunitmaynotcorrectlyplaydiscswhich
donothavethemark.
• Youcannotplayadiscthathasnotbeen
finalized.(Forthefinalizationprocesssee
yourwritingsoftware,andyourrecorder
instructionmanual.)
Before Use

5
Return to the Top page
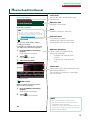
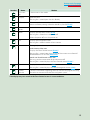
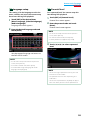
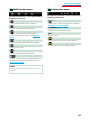
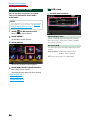
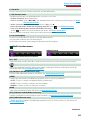
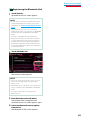
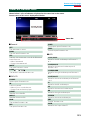
How To Read This Manual
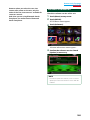
How to Read this Manual
27
Return to the Top page
CD, Disc, iPod, USB device
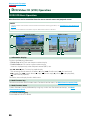
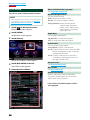
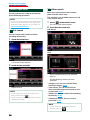
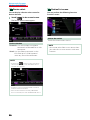
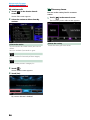
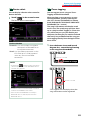
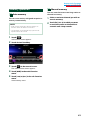
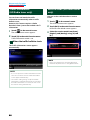
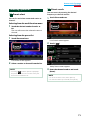
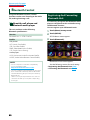
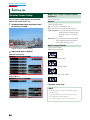
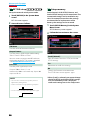
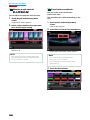
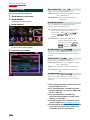
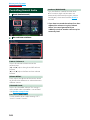
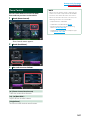
Search Operation
You can search the music, video, or picture
file by some operations.
NOTE
• If you use a remote controller, you can jump
directly to the desired track/file with entering the
track/folder/file number, play time, etc. For details,
see “Direct search mode” (p.81).
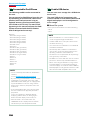
List search
You can search tracks, folders, and files
according to hierarchy.
For USB devices and iPods, you can list and
search files in the device by using playlist.
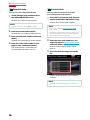
1
Press the <MENU> button during
playback.
Simple Control screen appears.
2
Touch [ ].
List Control screen appears.
3
Touch desired track/file.
Playback starts.
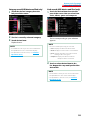
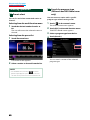
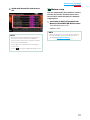
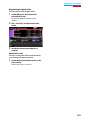
Other search
When you want to narrow the list down,
there are other search ways.
1
Press the <MENU> button during
playback.
Simple Control screen appears.
2
Touch [ ].
The search type screen appears.
NOTE
• The screens and panels shown in this
manual are examples used to provide clear
explanations of the operations.
For this reason, they may be different from the
actual screens or panels used, or some display
patterns may be different.
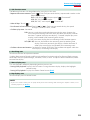
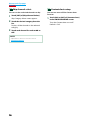
Link header
You can refer each section or top page
with one-click.
Reference mark
Displayed in blue notes.
With one-click, you can jump to the
article related to the current section.
Screen shot
Shows some screen shots displayed during
operation for reference.
The area or keys to touch are surrounded
with a red frame.
Operation procedure
Explains necessary procedures to
achieve the operation.
< >: Indicates the name of panel
buttons.
[ ]: Indicates the name of touch
keys.
Operation title
Introduces the function.
NOTE
Introduces some tips, notes, etc.

66
Return to the Top page
Basic Operations
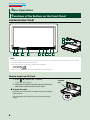
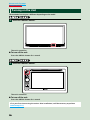
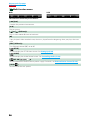
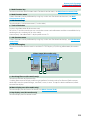
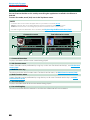
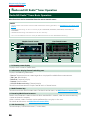
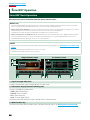
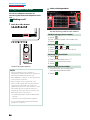
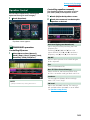
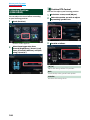
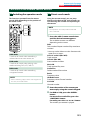
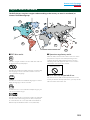
Functions of the Buttons on the Front Panel
DNX890HD/DNX7700BT
1
2
3
4
5
6
7
8
9
11
10
NOTE
• The panels shown in this guide are examples used to provide clear explanations of the operations. For this reason,
they may be different from the actual panels.
• In this manual, each model name is abbreviated as follows.
DNX890HD:
DNX7700BT:
If above icon is showed, read the article applicable to the unit you use.
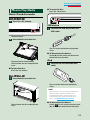
How to insert an SD Card
1) Press
8
<0> button for 1 second.
The panel fully opens.
2) Hold the SD card as the illustration in the right
and insert it into the slot until it clicks.
To eject the card:
Push the card until it clicks and then remove your finger
from the card.
The card pops up so that you can pull it out with your
fingers.
Basic Operations
0
Labelled
side

7
Return to the Top page
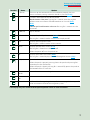
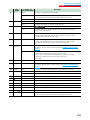
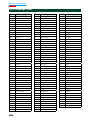
Basic Operations
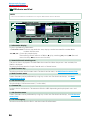
Number Name Motion
1
fi (Reset)
•If the unit or the connected unit fails to operate properly, the unit
returns to factory settings when this button is pressed (P.127).
2
AT T •Switches attenuation of the volume on/off.
•North America Sales area: Pressing for 1 second stores the tag data
of the current music from HD Radio broadcast or SiriusXM (P.65,
P.73).
•Central and South America sales area: Pressing for 1 second turns the
screen off.
3
∞, 5 (Vol)
Adjusts volume.
4
AUD •Displays Graphic Equalizer screen (P.143).*
•Pressing for 1 second switches camera view display on/off.
5
NAV •Displays the navigation screen.
•Pressing for 1 second switches AV out sources.
6
MENU •Displays the Top Menu screen (P.14).
•Pressing for 1 second turns the power off.
•When the power off, turns the power on.
7
TEL • Displays the Hands Free screen (P.86).
•Pressing for 1 second displays the Voice Recognition screen. (P.91)
8
0 (Eject)
•Ejects the disc.
•When the panel is opened, pressing closes the panel and pressing for 1
second ejects the disc forcibly.
•When the panel is closed, pressing for 1 second fully opens the panel to
the location of the SD card slot.
9
Remote
Sensor
Receives the remote control signal.
10
Disc insert
slot
A slot to insert a disc media.
11
SD card slot An SD card slot for upgrading the map. For how to upgrade the map, refer
to the instruction manual of the navigation system.
*ThedisplaymaynotswitchtotheGraphicEqualizerscreeninsomeconditions.

88
Return to the Top page
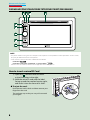
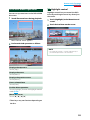
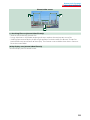
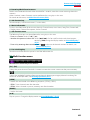
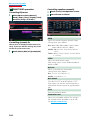
Basic Operations
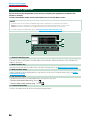
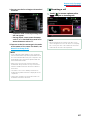
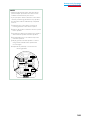
DNX690HD/DNX570HD/DNX570TR/DNX5700BT/DNX5080EX
4
3
1
2
5
6
9
7
8
NOTE
• The panels shown in this guide are examples used to provide clear explanations of the operations. For this reason,
they may be different from the actual panels.
• In this manual, each model name is abbreviated as follows.
DNX690HD:
DNX570HD, DNX570TR, DNX5080EX, and DNX5700BT:
If above icons are showed, read the article applicable to the unit you use.
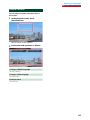
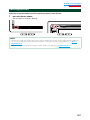
How to insert a microSD Card
1) Open the
9
microSD card slot cover
as the illustration in the right.
2) Hold the microSD card with the label
facing up and the notched section right,
and insert it into the slot until it clicks.
To eject the card:
Push the card until it clicks and then remove your
finger from the card.
The card pops up so that you can pull it out with
your fingers.

9
Return to the Top page
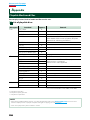
Basic Operations
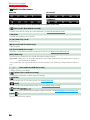
Number Name Motion
1
Disc insert
slot
A slot to insert a disc media.
2
0 (Eject)
•Ejects the disc.
•Pressing for 1 second ejects the disc forcibly.
3
fi (Reset)
•If the unit or the connected unit fails to operate properly, the unit
returns to factory settings when this button is pressed (P.127).
4
Remote
Sensor
Receives the remote control signal.
5
MENU •Displays the Top Menu screen (P.14).
•Pressing for 1 second turns the power off.
•When the power off, turns the power on.
6
NAV •Displays the navigation screen.
•Pressing for 1 second switches AV out sources.
7
Volume Knob •Turning adjusts volume up or down.
North America Sales area
•Displays the Tone Control screen (P.144).*
•Pressing for 1 second stores the tag data of the current music from HD
Radio broadcast or SiriusXM (P.65, P.73).
Central and South America sales area
•Pressing switches attenuation of the volume on/off.
•Pressing for 1 second displays the Tone Control screen (P.144).*
8
TEL • Displays the Hands Free screen (P.86).
•Pressing for 1 second displays the Voice Recognition screen. (P.91)
9
microSD
card slot
A microSD card slot for upgrading the map. For how to upgrade the map,
refer to the instruction manual of the navigation system.
*ThedisplaymaynotswitchtotheToneControlscreeninsomeconditions.

1010
Return to the Top page
Basic Operations
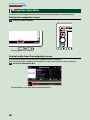
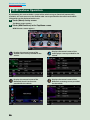
Turning on the Unit
Themethodofturningonisdifferentdependingonthemodel.
Press the <MENU> button.
Theunitisturnedon.
To turn off the unit:
Pressthe<MENU>buttonfor1second.
Press the <MENU> button.
Theunitisturnedon.
To turn off the unit:
Pressthe<MENU>buttonfor1second.
Ifitisyourfirsttimeturningtheunitonafterinstallation,itwillbenecessarytoperform
Initial setup (P.11).
1
1

11
Return to the Top page
Basic Operations
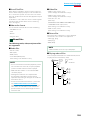
Initial setup
Performthissetupwhenyouusethisunitfirsttimeorwhenyouresettheunit(P.127).
Set each item as follows.
Language
Select the language used for the control screen and setting items. Default is “American English (en)”.
1 Touch [SET].
2 Touch [2] or [3] to select the desired language.
3 Touch [Enter].
For detailed operation, see Language setup (P.97).
Angle
Adjust the position of the monitor. Default is “0”.
1 Touch [SET].
2 Touch desired angle number and [
].
For detailed operation, see Monitor angle control (P.100).
iPod AV Interface Use
(DNX570HD, DNX5080EX, DNX5700BT)
Set the terminal which your iPod is connected to. Default is “iPod”.
1 Touch [iPod] or [AV-IN2].
AV-IN SETUP (DNX570TR)
Select the source connected to AV-IN.
1 Touch [SET].
2 For AV-IN Interface, touch [Rear Camera] or [AV-IN] to select the source.
3 For AV-IN Name, touch [2] or [3] to select the name.
Select the source connected to AV-IN2.
1 Touch [SET].
2 For AV-IN2 Interface, touch [iPod] or [AV-IN2] to select the source.
3 For AV-IN2 Name, touch [2] or [3] to select the name.
For detailed operation, see AV Input Setup (P.106).
1
Continued

1212
Return to the Top page
Basic Operations
Color
Set the screen and button illumination color. You can select whether to allow color scan operation or
select a fixed color for operation.
1 Touch [SET].
2 Touch [ON] or [OFF] of [Panel Color Scan].
3 If you want to change color, touch [SET] of [Panel Color Coordinate].
4 Touch your desired color and [
].
For detailed operation, see Panel color coordinate (P.100).
EXT SW
Control the external devices.
1 Touch [SET].
2 Set device name, output pattern, and pulse set for each device. Then, touch [
].
For detailed operation, see EXT SW setup (P.98).
Camera
Set the parameters for the camera.
1 Touch [SET].
2 Set each item and touch [
].
For detailed operation, see Camera Setup (P.104).
OEM SETUP (North America Sales area only)
This function requires a commercial adaptor.
Consult your Kenwood dealer for details.
Touch [Finish].
NOTE
• These settings can be set from the SETUP menu. See Setting Up (P.94).
2

13
Return to the Top page
Basic Operations
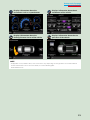
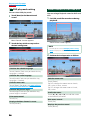
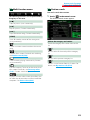
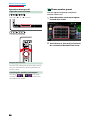
How to Play Media
Music CD and disc media
Press the <0> button.
Thepanelopens.
Insert the disc into the slot.
Thepanelclosesautomatically.
Theunitloadsthediscandplayback
starts.
To eject the disc:
Pressthe<0>button.
Insert the disc into the slot.
Theunitloadsthediscandplayback
starts.
To eject the disc:
Pressthe<0>button.
USB device
Connect the USB device with the
USB cable.
Theunitreadsthedeviceandplayback
starts.
To disconnect the device:
Touch[0]onthescreenanddisconnect
thedevicefromthecable.
iPod
Connect the iPod with the iPod
cable.
TheunitreadstheiPodandplayback
starts.
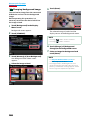
NOTE
• When an iPod is connected while an application
other than Music, Pandora, AhaRadio, and
iHeartAuto applications has started, the unit
automatically enters the App mode of iPod
source. See Multi function menu (P.36).
To disconnect the device:
Touch[ ]onthescreenandthentouch
[0].DisconnecttheiPodfromthecable.
1
2
1
1
1

1414
Return to the Top page
Basic Operations
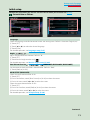
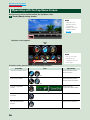
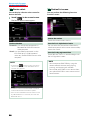
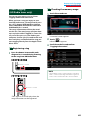
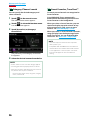
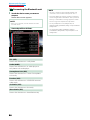
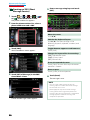
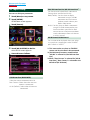
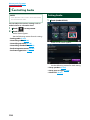
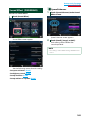
Operating with the Top Menu Screen
MostfunctionscanbeperformedfromtheTopMenuscreen.
Touch [Menu] on any screen.
NOTE
• If [Menu] is not
displayed during
video/picture
playback, press the
<MENU> button.
(P.6, P.8)
TopMenuscreenappears.
NOTE
• You can select the
hiding icon by
scrolling the screen
left or right.
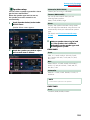
Fromthisscreen,youcanperformthefollowingfunctions.
Function Icon Operation
Switch the audio source
etc.
Touch the icon of the
desired source.
Enter setup mode
etc.
Touch the icon of the
desired setup function.
Display navigation
screen
or
Touch [NAV] or
navigation information.
Turn off all audio
function
Touch [STANDBY].
Vehicle information
display
Touch [OEM Features].
1


1616
Return to the Top page
Basic Operations
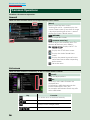
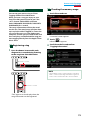
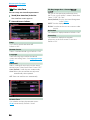
Common Operations
Introducesthecommonoperations.
General
Therearesomefunctionswhichcanbeoperatedfrommostscreens.
[Menu]
Returns to the Top Menu screen.
Touching for at least 1 second displays the
Screen Control screen. (Even when an image
is dispalyed, touching for at least 1 second
displays the Screen Control screen.)
(RETURN)
Returns to previous screen.
(common menu key)
Touch to display the common menu. The
contents of the menu are as follows.
: Displays the EXT SW
Control screen.
: Displays the SETUP Menu screen.
: Displays the Audio Control Menu
screen.
: Displays the control screen of current
source. Icon feature differs depending
on the source.
: Closes the menu.
List screen
Therearesomecommonfunctionkeysinthelistscreensofmostsources.
(Scroll)
Scrolls the displayed text.
etc.
Touch keys with various functions are
displayed here.
Displayed keys differ depending on the
current audio source, status, etc.
For examples of functions of each key, refer
to the table below.
Key Function
Lists all the music in the lower hierarchy.
Moves to the upper hierarchy.
Displays current category folder.
Displays music/picture/movie file list.


1818
Return to the Top page
Basic Operations
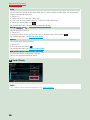
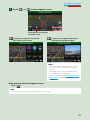
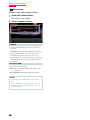
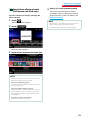
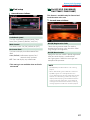
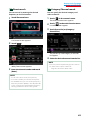
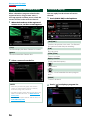
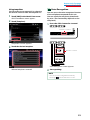
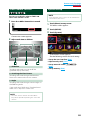
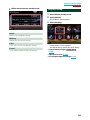
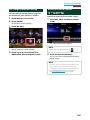
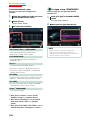
Navigation Operation
Fordetailsonthenavigationfunction,pleaserefertotheNavigationInstructionManual.
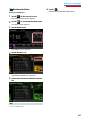
Display the navigation screen
Press the <NAV> button.
Thenavigationscreenappears.
Control audio from the navigation screen
Youcancontrolaudiosourceswhilethenavigationscreenisdisplayed.
Also,youcanviewthenavigationinformationwhilethesourcecontrolscreenisdisplayed.
Touch the information bar.
Thenavigationscreenwithaudioinformationappears.
1
1

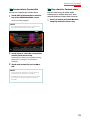
19
Return to the Top page
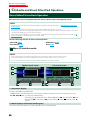
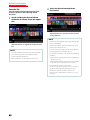
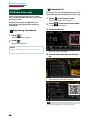
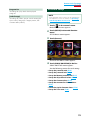
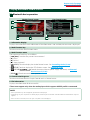
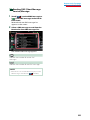
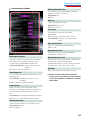
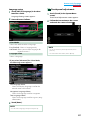
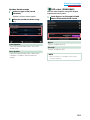
Basic Operations
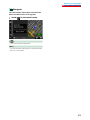
Touch [ ] or [ ] in the navigation screen.
Touchingthisareadisplays
theaudioscreen.
:Displaysthenavigationandcontrol
keysofthecurrentsource.
:Displaysthenavigationandcurrent
video/pictureplaybackdisplay.
NOTE
• The screen switches between playback screen
and camera view each time the viewing area is
touched.
• Touching the source icon in the bottom of the
screen displays the full audio screen.
• If you select "Navigation" at AV Output Interface
Setup (P.107) the playback screen is not
displayed.
To return to the full navigation screen:
Touch[ ].
NOTE
• For details on control keys, refer to the instructions in each section.
2
Page is loading ...
Page is loading ...
Page is loading ...
Page is loading ...
Page is loading ...
Page is loading ...
Page is loading ...
Page is loading ...
Page is loading ...
Page is loading ...
Page is loading ...
Page is loading ...
Page is loading ...
Page is loading ...
Page is loading ...
Page is loading ...
Page is loading ...
Page is loading ...
Page is loading ...
Page is loading ...
Page is loading ...
Page is loading ...
Page is loading ...
Page is loading ...
Page is loading ...
Page is loading ...
Page is loading ...
Page is loading ...
Page is loading ...
Page is loading ...
Page is loading ...
Page is loading ...
Page is loading ...
Page is loading ...
Page is loading ...
Page is loading ...
Page is loading ...
Page is loading ...
Page is loading ...
Page is loading ...
Page is loading ...
Page is loading ...
Page is loading ...
Page is loading ...
Page is loading ...
Page is loading ...
Page is loading ...
Page is loading ...
Page is loading ...
Page is loading ...
Page is loading ...
Page is loading ...
Page is loading ...
Page is loading ...
Page is loading ...
Page is loading ...
Page is loading ...
Page is loading ...
Page is loading ...
Page is loading ...
Page is loading ...
Page is loading ...
Page is loading ...
Page is loading ...
Page is loading ...
Page is loading ...
Page is loading ...
Page is loading ...
Page is loading ...
Page is loading ...
Page is loading ...
Page is loading ...
Page is loading ...
Page is loading ...
Page is loading ...
Page is loading ...
Page is loading ...
Page is loading ...
Page is loading ...
Page is loading ...
Page is loading ...
Page is loading ...
Page is loading ...
Page is loading ...
Page is loading ...
Page is loading ...
Page is loading ...
Page is loading ...
Page is loading ...
Page is loading ...
Page is loading ...
Page is loading ...
Page is loading ...
Page is loading ...
Page is loading ...
Page is loading ...
Page is loading ...
Page is loading ...
Page is loading ...
Page is loading ...
Page is loading ...
Page is loading ...
Page is loading ...
Page is loading ...
Page is loading ...
Page is loading ...
Page is loading ...
Page is loading ...
Page is loading ...
Page is loading ...
Page is loading ...
Page is loading ...
Page is loading ...
Page is loading ...
Page is loading ...
Page is loading ...
Page is loading ...
Page is loading ...
Page is loading ...
Page is loading ...
Page is loading ...
Page is loading ...
Page is loading ...
-
 1
1
-
 2
2
-
 3
3
-
 4
4
-
 5
5
-
 6
6
-
 7
7
-
 8
8
-
 9
9
-
 10
10
-
 11
11
-
 12
12
-
 13
13
-
 14
14
-
 15
15
-
 16
16
-
 17
17
-
 18
18
-
 19
19
-
 20
20
-
 21
21
-
 22
22
-
 23
23
-
 24
24
-
 25
25
-
 26
26
-
 27
27
-
 28
28
-
 29
29
-
 30
30
-
 31
31
-
 32
32
-
 33
33
-
 34
34
-
 35
35
-
 36
36
-
 37
37
-
 38
38
-
 39
39
-
 40
40
-
 41
41
-
 42
42
-
 43
43
-
 44
44
-
 45
45
-
 46
46
-
 47
47
-
 48
48
-
 49
49
-
 50
50
-
 51
51
-
 52
52
-
 53
53
-
 54
54
-
 55
55
-
 56
56
-
 57
57
-
 58
58
-
 59
59
-
 60
60
-
 61
61
-
 62
62
-
 63
63
-
 64
64
-
 65
65
-
 66
66
-
 67
67
-
 68
68
-
 69
69
-
 70
70
-
 71
71
-
 72
72
-
 73
73
-
 74
74
-
 75
75
-
 76
76
-
 77
77
-
 78
78
-
 79
79
-
 80
80
-
 81
81
-
 82
82
-
 83
83
-
 84
84
-
 85
85
-
 86
86
-
 87
87
-
 88
88
-
 89
89
-
 90
90
-
 91
91
-
 92
92
-
 93
93
-
 94
94
-
 95
95
-
 96
96
-
 97
97
-
 98
98
-
 99
99
-
 100
100
-
 101
101
-
 102
102
-
 103
103
-
 104
104
-
 105
105
-
 106
106
-
 107
107
-
 108
108
-
 109
109
-
 110
110
-
 111
111
-
 112
112
-
 113
113
-
 114
114
-
 115
115
-
 116
116
-
 117
117
-
 118
118
-
 119
119
-
 120
120
-
 121
121
-
 122
122
-
 123
123
-
 124
124
-
 125
125
-
 126
126
-
 127
127
-
 128
128
-
 129
129
-
 130
130
-
 131
131
-
 132
132
-
 133
133
-
 134
134
-
 135
135
-
 136
136
-
 137
137
-
 138
138
-
 139
139
-
 140
140
-
 141
141
-
 142
142
-
 143
143


Kenwood DNX5080EX User manual
- Category
- Car media receivers
- Type
- User manual
Ask a question and I''ll find the answer in the document
Finding information in a document is now easier with AI
Related papers
-
Kenwood DNX5310BTM User manual
-
-
-
Kenwood DNX7700BT User manual
-
-
-
-
Kenwood DPX300U User manual
-
Kenwood MONITOR User manual
-
Other documents
-
OEM H-ANDROID PLUS NEW Owner's manual
-
Ricatech RC1600 Specification
-
Jensen CADNAV1 Owner's manual
-
Advent In-Dash Navigation Radio Quick start guide
-
Scion C-HR Owner's manual
-
Audiovox VX4020 Owner's manual
-
Dual AMB600W User manual
-
Scion 86 Owner's manual
-
Nakamichi NA6810 User manual
-
Wings FHT90RMB User manual