Kenwood FP210 User manual
- Category
- Food processors
- Type
- User manual
This manual is also suitable for
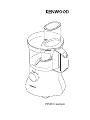
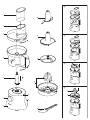
Kenwood FP210 series empowers you in the kitchen with its versatile capabilities. Effortlessly make shortcrust pastry, yeast dough, and one-stage cakes. Chop meat, vegetables, and nuts to perfection. Create smooth purees and dips, and emulsify egg whites and cream. Slice and shred firm and soft ingredients. Extract fresh citrus juice with the citrus press attachment.
Kenwood FP210 series empowers you in the kitchen with its versatile capabilities. Effortlessly make shortcrust pastry, yeast dough, and one-stage cakes. Chop meat, vegetables, and nuts to perfection. Create smooth purees and dips, and emulsify egg whites and cream. Slice and shred firm and soft ingredients. Extract fresh citrus juice with the citrus press attachment.


-
 1
1
-
 2
2
-
 3
3
-
 4
4
-
 5
5
-
 6
6
-
 7
7
-
 8
8


Kenwood FP210 User manual
- Category
- Food processors
- Type
- User manual
- This manual is also suitable for
Kenwood FP210 series empowers you in the kitchen with its versatile capabilities. Effortlessly make shortcrust pastry, yeast dough, and one-stage cakes. Chop meat, vegetables, and nuts to perfection. Create smooth purees and dips, and emulsify egg whites and cream. Slice and shred firm and soft ingredients. Extract fresh citrus juice with the citrus press attachment.
Ask a question and I''ll find the answer in the document
Finding information in a document is now easier with AI
Related papers
Other documents
-
Philips HR7633/10 User manual
-
Philips HR7633/10 User manual
-
Cookworks 2 BLADE ELECTRIC KNI User manual
-
Cookworks Food Processor User manual
-
Carlton C72FPW09 User manual
-
Morphy Richards Blender Compact Food Processor User manual
-
Livoo DOP222 User manual
-
Magimix Compact 3200 XL Operating instructions
-
Andrew James Multifunctional Processor User manual
-
Prince Castle CW-Series User manual