Page is loading ...

Users Manual
CP-427-USB
Enjoy the Show!™
PLEASE READ THIS MANUAL CAREFULLY BEFORE OPERATING THIS UNIT


HAVE A PROBLEM?
IF YOU EXPERIENCE ANY PROBLEMS WITH THIS DVD
PLAYER, PLEASE CALL CLEARPLAY AT 888 4253270 OR
VISIT CUSTOMER SUPPORT AT WWW.CLEARPLAY.COM.
WE WILL BE GLAD TO ASSIST YOU.
PLEASE DO NOT CONTACT THE RETAILER OR STORE
WHERE IT WAS PURCHASED.
IMPORTANT INFORMATION
IMPORTANT INFORMATION


- 1 -
LIMITED 90-DAY WARRANTY
This warranty gives you specic legal rights. You may also have other rights, which vary from state to state.
ClearPlay warrants this product to the original purchaser to be free from defects in material and workmanship, under normal conditions, for
a period of 90 days from the date of the original purchase.
ClearPlay agrees, during the warranty period, at our option, to repair any defect in material or workmanship, or to furnish an equal, new or
renewed product in exchange without charges, subject to verication of the defect or malfunction.
During the 90-day Warranty Period: For the rst ninety (90) days from the date of purchase, if your product becomes defective or
inoperative, it will be replaced with a new, renewed or comparable product (whichever is deemed necessary). Your cost is limited to the
prepaid cost of shipping the product to the customer service center. Replacement products are warranted for the balance of the original
warranty period.
Who is covered? This warranty is extended to the original retail purchaser for products purchased from Authorized Dealers in the 48
continental states of the U.S.A.
Limitations: The 90-Day Warranty period is limited to defective or malfunctioning products. Products damaged while in the possession of
the consumer by unreasonable use, improper handling, lack of maintenance, acts of nature (such as but not limited to lightning damage),
or due to improper packaging and shipping are not covered under Warranty. Products that are used for commercial purposes, or have been
modied or repaired by anyone other than ClearPlay, are not covered under Warranty.
REPAIR OR REPLACEMENT AS PROVIDED UNDER THIS WARRANTY IS THE EXCLUSIVE REMEDY OF THE CONSUMER. CLEARPLAY INC. SHALL
NOT BE LIABLE FOR INCIDENTAL OR CONSEQUENTIAL DAMAGES RESULTING FROM THE USE OF THIS PRODUCT OR ARISING OUT OF ANY
BREACH OF ANY EXPRESS OR IMPLIED WARRANTY ON THIS PRODUCT. THIS DISCLAIMER OF WARRANTIES AND LIMITED WARRANTY ARE
GOVERNED BY THE LAWS OF THE STATE OF UTAH. EXCEPT TO THE EXTENT PROHIBITED BY APPLICABLE LAW, ANY IMPLIED WARRANTY OF
MERCHANTABILITY OR FITNESS FOR A PARTICULAR PURPOSE ON THIS PRODUCT IS LIMITED TO THE APPLICABLE WARRANTY PERIOD SET
FORTH ABOVE.
THE WARRANTY STATED ABOVE IS THE ONLY WARRANTY APPLICABLE TO THIS PRODUCT. ALL OTHER WARRANTIES, EXPRESS OR IMPLIED
(INCLUDING ALL IMPLIED WARRANTIES OF MERCHANTABILITY OR FITNESS FOR A PARTICULAR PURPOSE) ARE HEREBY DISCLAIMED. NO
VERBAL OR WRITTEN INFORMATION GIVEN BY CLEARPLAY INC., IT’S AGENTS OR EMPLOYEES SHALL CREATE A GUARANTY OR IN ANY WAY
INCREASE THE SCOPE OF THIS WARRANTY.
What to do?
Before contacting Customer Service, please check your instruction booklet and the FAQ section at www.clearplay.com. A slight 1.
adjustment of the custom controls may save you a service call.
If you require additional assistance, please contact Customer Service at www.clearplay.com/support or (888) 425-3270.2.
Defective products must be returned to the retail store where the product was purchased for returns or exchanges, in accordance 3.
with the store’s return policy.
Defective products that are not within the retail store’s return period can be shipped to Customer Service. Carefully package the 4.
product and ship prepaid to the Customer Service address listed below. Proof of purchase dated within 90 days of the return date is
required.
Describe your problem in writing and include your name, return address, daytime telephone number, and a copy of the store 5.
receipt.
When the product is received, it will be replaced with a new or renewed product, which meets ClearPlay high quality standards, and 6.
shipped back.
How to get service on your product after the 90-Day Warranty?
Out-of-Warranty service can be obtained at a nominal cost for replacement and handling under the following arrangement:
Contact Customer Service as listed above to obtain the cost of an out-of-warranty replacement for your product.1.
Carefully package the product and ship prepaid to the Customer Service address listed above. Include a check or money order made 2.
payable to ClearPlay for the service fee.
Describe your problem in writing and include your name, return address, daytime telephone number, and check or money order 3.
made payable to ClearPlay for the service fee.
When the product is received, it will be replaced with a new or renewed product, which meets ClearPlay high quality standards, and 4.
shipped back.
ClearPlay Customer Support
5284 South 320 West Suite C134
Salt Lake City, UT 84107, U.S.A.
Tel: (888) 425-3270
Web: www.clearplay.com/support

LASER:
Type: Dual semiconductor laser GaAiAs
Wavelength: 650nm and 780nm
Output Power: 7mW
Beam Divergence: 60 degrees
CLASS 1
LASER PRODUCT
To ensure proper use of this product, please read this owner manual carefully and
retain for future reference. Should the unit require maintenance, contact an autho-
rized service location.
- 2 -
SAFETY
RISK OF ELECTRIC SHOCK
DO NOT OPEN
CAUTION
WARNING:
DO NOT STARE INTO BEAM. Avoid direct exposure to laser beam.
To prevent direct exposure to laser beam, do not try to open the enclosure.
WARNING:
To reduce the risk of re or electric shock, do not expose this appliance to rain or
moisture.
DO NOT REMOVE COVER or OPEN THE CABINET. Dangerous high voltages are present
inside the enclosure. No user serviceable parts inside. Refer servicing to qualied
personnel only.
Use of controls or adjustments or performance of procedures other than those
specied may result in hazardous radiation exposure.
INVISIBLE LASER RADIATION WHEN OPEN OR INTERLOCK
FAILED OR DEFEATED.
The lightning ash with arrowhead symbol, within an equilateral triangle, is
intended to alert user to the presence of un-insulated “dangerous voltage”
within the products enclosure that may be of sucient magnitude to
constitute a risk of electric shock to persons.
The exclamation point within an equilateral triangle is intended to alert the
user to the presence of important operating and maintenance (servicing)
instruction in the literature accompanying the appliance.

- 3 -
Read these instructions.•
Keep these instructions.•
Heed all warnings.•
Follow all instructions.•
Do not use this apparatus near water.•
Clean only with dry cloth.•
Do not block any ventilation openings. Install in accordance •
with the manufacturer’s instructions.
Do not install near any heat sources such as radiators, heat •
registers, stoves, or other apparatus (including ampliers)
that produce heat.
Do not defeat the safety purpose of the polarized or •
grounding-type plug. A polarized plug has two blades, one
wider than the other. A grounding type plug has two blades
and a third grounding prong. The wide blade or the third
prong is provided for your safety. If the provided plug does
not t into your outlet, consult an electrician for replace-
ment of the obsolete outlet.
Protect the power cord from being walked on or pinched •
particularly at plugs, convenience receptacles and the point
where they exit from the apparatus.
Only use attachments/accessories specied by the manu-•
facturer.
Unplug this apparatus during lightning storms or when •
unused for long periods of time.
Use only with a cart, stand, tripod, bracket or table specied •
by the manufacturer, or sold with the apparatus. When a
cart is used, use caution when moving the cart/apparatus
combination to avoid injury from tip-over.
Refer all servicing to qualied service personnel. Servicing •
is required when the apparatus has been damaged in
any way, such as when the power supply cord or plug is
damaged, liquid has been spilled or objects have fallen into
the apparatus, the apparatus has been exposed to rain or
moisture, does not operate normally, or has been dropped.
Apparatus shall not be exposed to dripping or splashing •
and no objects lled with liquids, such as vases, shall be
placed on the apparatus.
Disc Tray •
Keep your ngers well clear of the disc tray as it is closing. It
may cause serious personal injury.
IMPORTANT SAFETY INSTRUCTIONS
CAUTION: RETAIN THIS BOOKLET FOR FUTURE REFERENCE.
This DVD player has been designed and manufactured to assure personal safety. Improper use can
result in electric shock or re hazard. The safeguards incorporated in this unit will protect you if you
observe the following procedures for installation, use and servicing. This unit does not contain any
parts that can be repaired by the user.
Burden •
Do not place a heavy object on, or step on the product. The
object may fall, causing serious personal injury and serious
damage to the product.
Disc •
Do not use a cracked, deformed, or repaired disc. These
discs are easily broken and may cause serious personal
injury and product malfunction.
Damage Requiring Service •
Unplug this product from the wall outlet and refer
servicing to qualied service personnel under the following
conditions:
a) When the power-supply cord or plug is damaged.
b) If liquid has been spilled, or objects have fallen into the
product.
c) If the product has been exposed to rain or water.
d) If the product does not operate normally by following
the operating instructions. Adjust only those controls
that are covered by the operating instructions.
Improper adjustment of other controls may result in
damage and will often require extensive work by a
qualied technician to restore the product to its normal
operation.
e) If the product has been dropped or damaged in any
way.
f) When the product exhibits a distinct change in
performance - this indicates a need for service.
Servicing •
Do not attempt to service this product yourself as opening
or removing covers may expose you to dangerous voltage
or other hazards. Refer all servicing to qualied service
personnel.
Replacement Parts •
When replacement parts are required, be sure the service
technician has used replacement parts specied by the
manufacturer or have the same characteristics as the
original part. Unauthorized substitutions may result in re,
electric shock, or other hazards.
Safety Check •
Upon completion of any service or repairs to this product,
ask the service technician to perform safety checks
to determine that the product is in proper operating
condition.
USA & Canada versions comply with ETL requirements.•
S3125A
PORTABLE
CART
WARNING

- 4 -
CONTENTS
PACKAGE
Limited 90-day Warranty
Safety
Important Safety Instructions
Contents & Package
Installation
Remote Control
Front Panel
Display
Rear Panel
Connections
System Setup Menu
Playing DVD / VCD Disc
Playing MP3 / JPEG Disc
ClearPlay Operation
Formats You Can Play
Problems
Frequently Asked Questions on ClearPlay Functions
ClearPlay EULA
1
2
3
4
5
6
7
7
7
8
10
13
14
16
26
27
28
29
NOTE:
This equipment has been tested and found to comply with the limits for a Class B digital device, pursuant to part 15 of
the FCC Rules. These limits are designed to provide reasonable protection against harmful interference in a residential
installation. This equipment generates, uses and can radiate radio frequency energy and, if not installed and used
in accordance with the instructions, may cause harmful interference to radio communications. However, there is no
guarantee that interference will not occur in a particular installation. If this equipment does cause harmful interference
to radio or television reception, which can be determined by turning the equipment o and on, the user is encouraged
to try to correct the interference by one or more of the following measures:
Reorient or relocate the receiving antenna. -
Increase the separation between the equipment and receiver. -
Connect the equipment to a supply outlet dierent from that to which the receiver is connected. -
Consult the dealer or an experienced radio/TV technician for help. -
Software Licence and Copyright Notice
All software that is supplied as part of this equipment is
protected by copyright laws and international copyright treaties,
as well as other intellectual property laws and treaties. This
software is licensed, not sold and is intended for use on this
device only.
You may not reverse engineer, de-compile, or disassemble this
software for any purpose. No part of this software may be copied,
reproduced, loaned, rented, leased or transmitted in any form
or by any means electronic or mechanical, without the express
written permission of ClearPlay Inc. Also see the ClearPlay End
User License Agreement on page 29.
ClearPlay patent # 6,898,799 and others pending.
This product incorporates copyright protection technology that is protected by U.S. patents and
other intellectual property rights. Use of this copyright protection technology must be authorized
by Macrovision, and is intended for home and other limited viewing uses only unless otherwise
authorized by Macrovision. Reverse engineering or disassembly is prohibited.
U.S. Patent Nos. 4,631,603; 4,819,098; 4,907,093; 5,315,448; and 6,516,132.
See the ClearPlay End User License Agreement on page 29.
Manufactured under license from Dolby Laboratories. “Dolby” and the double-D symbol are
trademarks of Dolby Laboratories.
Consumers should note that not all high denition television sets are fully compatible with this
product and may cause artifacts to be displayed in the picture. In case of 525 or 625 progressive
scan picture problems, it is recommended that the user switch the connection to the “standard
denition” output. If there are questions regarding our TV set compatibility with this model 525p
and 625p DVD player, please contact our customer service center.
Examine the contents of the box for your DVD player.
There should be the following:
DVD Player with attached power cord•
Remote Control•
2 batteries•
A/V Cable•
Instruction Book•

- 5 -
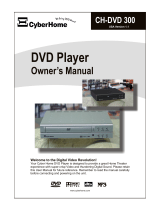
Single-sided DVD
Single-sided discs usually have the
title printed on the top side while
the bottom is the playing side.
Double-sided DVD
Double-sided discs have only a
thin title strip. The title you want
to view should be on the top.
INSTALLATION
DVD DISCS
CLEANING DISCS
1
Region 1
Player Zones
Anti-Copy Disc Protection
For the purpose of distribution of DVD Discs, the world has been
separated into 6 zones. The zone your unit is intended for is
indicated on the Zone Label. This should be the same as the label on
discs available in your region. If you have any diculties in playing a
disc, make sure that the disc is for the same zone as your player.
Some DVD discs have anti-copying devices.
With these discs the playback on a television will give the highest
quality picture, however you will not be able to record this signal
on a VCR.
Install your unit on a stable at surface. There must be •
sucient room in front of the unit for the drawer to be
opened and the unit should be positioned so that it can
see the remote control.
Do not expose your unit to extremes of temperature or •
humidity.
Avoid placing unit on a hot surface such as on top of other •
hot running equipment and ensure that there is adequate
ventilation to the unit.
Caution:
Do not install this equipment in conned space such
as a book case or similar unit!
Title side facing up Title side facing up
Playing side down Playable on both sides
Disc Type
Single-sided
Single-sided with 2-layers
Double-sided
Double-sided with 2-layers on each side
Approximate Play Time
2 Hours
4 Hours
4 Hours
8 Hours
There are several types of DVD Discs:
DVD discs have Titles and Chapters:
There can be several Titles on one disc and each Title can contain •
several Chapters. Titles and Chapters are numbered, e.g. Title 1, Title
2, Chapter 1 etc.
Usually Title one will show the disc publisher and studio logos. The •
next Title will be the lm. Other Titles contain trailers for other lms,
production notes, or alternative endings for the lm. There are
many possibilities with Digital Versatile Disc.
Chapters within the main Title allow you to search quickly for a spe-•
cic point on the disc. Many discs have a Chapter Menu sometimes
called Scene Index or Scene Menu that displays the rst shot from
each Chapter, which allows you to select a shot and play the disc
from that point onwards.
DVD discs can be PAL or NTSC. This player can play both types
(if the player zone is correct).
DVD discs allow up to 8 Languages and 32 subtitles on a single disc. You
can select and change the language and subtitle to suit yourself and play
the whole disc or just part of it and view it from dierent angles.
Picture freezing & sound skipping or repeating can occur if the
disc inside the player is dirty.
When a disc becomes dirty, clean it with a cleaning cloth. Wipe the •
disc from the center out.
Do not wipe in a circular motion. Circular scratches can cause picture •
distortion or render the disc un-playable.
Caution:
Do not use solvents, commercially available cleaners, or
anti-static spray intended for analog discs.
C
le
a
n
e
r

- 6 -
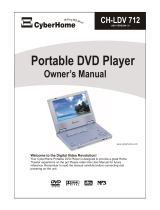
REMOTE CONTROL
POWER ON/STANDBY1.
Switches the player between Standby and On.
MUTE 2.
Mutes and unmutes sound output.
AUDIO 3.
Switches between the dierent Audio modes during DVD
playback.
SUBTITLE 4.
Switches between the dierent Subtitle options during
DVD playback.
CLEAR 5.
- Exits menus and Active Navigation mode.
- Deletes the last selection in Program mode.
- Deletes the current Filter in the Parental Control Menu.
VIEW ANGLE SELECTION & ROTATE6.
- Displays angle menu if present on discs.
- Rotates images on JPEG discs.
REPEAT7.
Press to repeat a title, chapter, track or all content.
ACTIVE NAVIGATION KEYS 8.
Advance in the indicated directions for making selections
in menus and Active Navigation mode.
MENU9.
Access DVD menu during playback.
FAST SEARCH FORWARD & REVERSE10.
Plays backward and forward quickly.
STOP11.
Press to Stop playback
TITLE12.
Press to display Titles menu, if present on the disc.
VOLUME13.
Raises and lowers the sound output.
BROWSE14.
Press to browse inserted FilterStik™ or Flash Memory.
OPEN/CLOSE 15.
Opens or closes the disc loading tray.
NUMERIC KEYS 16.
0 - 9 are used for direct access of title, chapter, track and
time.
GOTO 17.
Advance to a certain time during DVD playback.
A-B18.
Mark a segment beginning and end time to repeat.
ZOOM19.
Press to enlarge the image during DVD playback.
OK20.
Press to conrm current selection.
PAUSE/STEP21.
Pause playback, or advance 1 frame.
DISPLAY22.
Display time elapsed during playback.
PLAY23.
Press to begin playback
SKIP FORWARD/BACK24.
-Press advance to the next chapter or track.
-Press to page up or down in Filter Selection.
CLEARPLAY MENU25.
Press to access ClearPlay menu.
1
3
4 6
7 9
1
3
4 6
7
2
5
8
0
2
5
8
0
9
OK
+
-
Enjoy the Show !
™
POWER
MUTE
AUDIO
VIDEO
SUBTITLE
CLEAR GOTO
ANGLE
REPEAT
A-B
EQ
ZOOM
MENU
VOL TITLE RETURN SETUP
CLEARPLAY
MENU
LOADBROWSE
PAUSE/STEP DISPLAY
OPEN/CLOSE
1 15
16
17
18
19
20
21
22
23
24
25
26
27
28
3
2
4
5
6
7
8
9
10
12
11
14
13
CP-427-USB

- 7 -
FRONT PANEL
LED DISPLAY
REAR PANEL
On/O1.
Disc loading tray2.
Open/Close disc loading tray3.
Infrared receiver window4.
LED display area5.
Start playback6.
VCD playback indicator1.
MP3 playback indicator2.
Play status indicator3.
Pause status indicator4.
Current Chapter/Track5.
Current Time6.
Dolby Digital indicator7.
Power Cord1.
Component Video Outputs2.
Composite Video Output3.
S-Video Output4.
Stop playback 7.
Move playback to previous chapter8.
Move payback to next chapter9.
USB ash reader (for your FilterStik™)10.
Analog Left/Right Audio Output5.
Coaxial Digital Audio Output6.
Optical Digital Audio Output7.
1
2 3 6 7 8 9
4 5
10
USB
DVD Player
MP3
VCD
88 8:88:88
2 4 76
1 3 5
D
1 2 3 4
5 6 7
Video Connections Audio Connections

- 8 -
CONNECTIONS
Video Connections
The way in which you connect your DVD player and the kinds of cabling you choose can make a no-
ticeable dierence in picture and sound quality. Before you select one of the options, please make sure
that your other equipment (e.g. TV, receiver) has the required input/output channel.
Use either of the options below:
Notes on Progressive Scan:
If your TV can accept Progressive Scan 1.
feeds, your video connections should be
done as in the picture on the left to obtain
best possible picture quality from the
player.
Once connected see page 10 to set the 2.
connection type for the DVD Player.
Your TV may need adjustment to accept 3.
Progressive Scan feeds.
Do not substitute a component Video 4.
cable with an Audio/Video cable.
Although these types of cables do look
alike, the actual wires inside the cable in
which the signal passes along are very
dierent. Substituting cables will result in
poor picture quality and could damage
your equipment.
AUDIO COMPONENT
LR
COMPOSITE
S-VIDEO
Y P
b
P
r
TV
COMPOSITE VIDEO CABLE
(Included)
AUDIO COMPONENT
LR
COMPOSITE
S-VIDEO
Y P
b
P
r
TV
S-VIDEO CABLE
(Not Included)
For better picture quality, use
S-VIDEO CABLE (not included)
For good picture quality, use
COMPOSITE VIDEO CABLE (included)
AUDIO
COMPONENT
LR
COMPOSITE
S-VIDEO
Y P
b
P
r
TV
COMPONENT VIDEO CABLE
(Not Included)
For best picture quality, use
COMPONENT VIDEO cables (not included)

- 9 -
Audio Connections
Before you select one of the options, make sure that your other equipment (e.g. TV, receiver) has the
required input/output channel.
Use either options below:
Connecting a 5.1 Channel Receiver
Do not connect the Composite Stereo Cables Audio sockets to the TV (in case the Composite Stereo
Cables connections are made, you need to set the TV volume control to zero.)
Connect the Digital Audio Out socket from the DVD to the Input socket of your 5.1 Ch. Receiver. Use an
Optical or Coaxial Audio Cable. (not included)
AUDIO
COMPONENT
LR
COMPOSITE
S-VIDEO
Y P
b
P
r
TV
COMPOSITE STEREO CABLES
(Included)
For good sound quality, use COMPOSITE STEREO CABLES
Rear
Left
Front
Left
Center Subwoofer
Front
Right
Rear
Right
5.1 Channel Receiver
Digital Optical
Input
Digital Coaxial
Input
Rear Left
Front Left
Front Right
Rear Right
TV
Center
Subwoofer
DIGITAL COAXIAL AUDIO
CABLE (Not Included)
For better sound quality, use DIGITAL
COAXIAL AUDIO CABLE (not included)
Rear
Left
Front
Left
Center Subwoofer
Front
Right
Rear
Right
5.1 Channel Receiver
Digital Optical
Input
Digital Coaxial
Input
Rear Left
Front Left
Front Right
Rear Right
TV
Center
Subwoofer
DIGITAL OPTICAL AUDIO
CABLE (Not Included)
For best sound quality, use DIGITAL
OPTICAL AUDIO CABLE (not included)

- 10 -
SYSTEM SETUP MENU
You may access your DVD players settings menu at any time by pressing the SETUP button on your remote control. If
pressed during playback the video will be paused. The setup menu consists of 6 categories displayed across the top
of the window. To switch between categories press the
button until the current category is highlighted, then
press
or
to change categories. Press the SETUP button again to exit the menu.
SYSTEM
CLEARPLAY
Enters the ClearPlay Main Menu (see page 16 for more
information.) To access the ClearPlay menu you must
rst activate your player at www.ClearPlay.com/427.
TV SYSTEM
Sets the formatting for your television.
PAL - Most European televisions.
NTSC (Default) - Most American televisions.
AUTO - Attempts to automatically detect the best option.
AUTO PLAY
Sets whether or not the player will automatically play
the disc when inserted into the disc tray.
ON (Default) - Player will automatically play inserted disc.
OFF - User will have to press PLAY to start playback.
VIDEO
Selects between Progressive and Interlaced playback.
Progressive Scan playback requires a supported
television and the use of of component or S-Video
cables.
INTERLACE-YUV - Standard interlaced playback.
P-SCAN YPBPR - High quality progressive scan playback.
S-VIDEO (Default) - Used with an S-Video cable.
LANGUAGE SETUP
OSD LANGUAGE
AUDIO LANG
SUBTITLE LANG
MENU LANG
........
SYSTEM SETUP
CLEARPLAY
TV SYSTEM
AUTO PLAY
VIDEO
TV TYPE
PASSWORD
BLOCKING
DEFAULT
........
AUDIO SETUP
AUDIO OUT
KEY
........
VIDEO SETUP
BRIGHTNESS
CONTRAST
HUE
SATURATION
SHARPNESS
........
TV TYPE
Sets how the image will be formatted onto your
television.
4:3PS (Default) - Designed for most standard denition
televisions. If the DVD Supports it, this mode will
automatically zoom in on the video frame (cutting o the
sides) and pan and scan when appropriate.
4:3LB - Designed for most standard denition televisions.
This mode will maintain the full aspect ratio of the original
video (adding black bars to the top and bottom of the
frame.
16:9 - Designed for widescreen televisions. This mode
will give proper aspect ratio when using a widescreen
television.
PASSWORD
Allows a password to be set to protect the blocking
feature. The default password is 0000.
BLOCKING
Allows DVDs to be blocked based on the rating
encoded on the disc. Some movies will not have a
rating on the disc, in these cases they will be blocked
at level 8.
DEFAULT
RESTORE - Restores DVD Player to default factory
settings.

- 11 -
LANGUAGE
AUDIO
VIDEO
OSD LANGUAGE
Sets the language used in the DVD Player SETUP and
CLEARPLAY menus.
AUDIO LANG
Sets the default language used for DVD Audio tracks (if
available).
SUBTITLE LANG
Sets the default language used for DVD subtitle tracks
(if available).
MENU LANG
Sets the default language used for DVD menus (if
available).
AUDIO OUT
Sets options for digital audio output.
SPIDF/OFF - Turns output o.
SPIDF/RAW (Default) - Attempts to use the raw audio
stream.
SPIDF/PCM - Attempts to use the PCM compressed audio
stream.
KEY
Changes the pitch of audio output during playback.
BRIGHTNESS
Adjust to brighten or darken video playback.
CONTRAST
Adjust the visual dierence between colors.
HUE
Adjust to increase or decrease the green tones.
SATURATION
Adjust the intensity of colors.
SHARPNESS
Adjust the sharpness of the picture detail.
LANGUAGE SETUP
OSD LANGUAGE
AUDIO LANG
SUBTITLE LANG
MENU LANG
........
AUDIO SETUP
AUDIO OUT
KEY
........
VIDEO SETUP
BRIGHTNESS
CONTRAST
HUE
SATURATION
SHARPNESS
........

- 12 -
SPEAKER
DIGITAL
DOWNMIX
Selects how audio is mixed for output.
LT/RT - Maintains original mixing. Used for Dolby Digital.
STEREO (Default) - Channels are downmixed into left and
right channels.
VSS - Stands for Virtual Surround System. This mode
simulates a surround sound system.
DYNAMIC RANGE
Causes audio to normalize, this will lower the volume
when a sound would normally be very loud (such as
an explosion) and increase the volume when it would
be quiet (such as a person whispering). Full will cause
the audio peak to be lower, where O will disable the
feature.
DUAL MONO
Selects which audio channels to output during
playback.
STEREO - Output both channels to each speaker.
MONO L - Output left channel to all speakers.
MONO R - Output right channel to all speakers.
MIX MONO - Mix the channels together and output to all
speakers.
SPEAKER SETUP
DOWNMIX
........
DIGITAL SETUP
DYNAMIC RANGE
DUAL MONO
........

- 13 -
PLAYING DVD / VCD DISCS
OPEN/CLOSE1.
Opens or closes the disc loading tray.
PLAY2.
Press to begin playback
PAUSE/STEP3.
Pause playback, or advance 1 frame.
FAST SEARCH FORWARD & REVERSE4.
Plays backward and forward quickly.
SKIP FORWARD/BACK5.
Press advance to the next chapter or track.
Press to page up or down in Filter Selection.
STOP6.
Press to Stop playback.
REPEAT7.
Press to repeat a title, chapter, track or all content.
AUDIO 8.
Switches between the dierent Audio modes.
SUBTITLE9.
Switches between the dierent Subtitle options.
VIEW ANGLE SELECTION10.
Displays angle menu if present on discs.
A-B11.
Mark a segment beginning and end time to repeat.
ZOOM12.
Press to enlarge the image during DVD playback.
DISPLAY13.
Display time elapsed during playback.
GOTO 14.
Advance to a certain time during DVD playback.
NUMERIC KEYS 15.
0 - 9 are used for direct access of title, chapter, track and
time.
CLEAR16.
Exits menus and Active Navigation mode.
Deletes the last selection in Program mode.
Deletes the current Filter in the Parental Control Menu.
MENU 17.
Access the DVD menu.
MUTE18.
Mutes and unmutes sound output.
VOLUME19.
Raises and lowers the sound output.
TITLE20.
Press to display Titles menu, if present on the disc.
1
3
4 6
7 9
1
3
4 6
7
2
5
8
0
2
5
8
0
9
OK
+
-
Enjoy the Show !
™
POWER
MUTE
AUDIO
VIDEO
SUBTITLE
CLEAR GOTO
ANGLE
REPEAT
A-B
EQ
ZOOM
MENU
VOL TITLE RETURN SETUP
CLEARPLAY
MENU
LOADBROWSE
PAUSE/STEP DISPLAY
OPEN/CLOSE
1
15
14
11
12
3
13
2
5
8
18
9
16
10
7
17
4
20
6
19
CP-427-USB

- 14 -
PLAYING MP3 / AUDIO / JPEG DISCS
OPEN/CLOSE1.
Opens or closes the disc loading tray.
PLAY2.
Press to begin playback / slideshow.
PAUSE/STEP3.
Pause playback / slideshow.
FAST SEARCH FORWARD & REVERSE4.
Plays backward and forward quickly.
SKIP FORWARD/BACK5.
Press advance to the next track / image.
STOP6.
Press to Stop playback / slideshow.
ZOOM 7.
Press to enlarge the image.
ACTIVE NAVIGATION KEYS8.
Pans the current image when zoomed.
DISPLAY9.
Display time elapsed / current image number.
MUTE10.
Mutes and unmutes sound output.
VOLUME11.
Raises and lowers the sound output.
1
3
4 6
7 9
1
3
4 6
7
2
5
8
0
2
5
8
0
9
OK
+
-
Enjoy the Show !
™
POWER
MUTE
AUDIO
VIDEO
SUBTITLE
CLEAR GOTO
ANGLE
REPEAT
A-B
EQ
ZOOM
MENU
VOL TITLE RETURN SETUP
CLEARPLAY
MENU
LOADBROWSE
PAUSE/STEP DISPLAY
OPEN/CLOSE
1
7
3
9
2
5
10
8
4
6
11
CP-427-USB

- 15 -

- 16 -
CLEARPLAY OPERATION
To use the ClearPlay feature, it must rst be activated. To activate visit www.ClearPlay.com/427.
Your DVD player has the ClearPlay technology that allows you to watch your favorite movies free of
content you may consider oensive. With ClearPlay, you can load a ClearPlay Filter™ for each DVD
movie and then skip or mute objectionable content based on dierent Filter settings that you can
customize to your preference. For example, you can watch your favorite action movie without having
to hear oensive language or having to see dierent types of violence.
The Parental Control feature allows you to congure ClearPlay settings on your player, set movie
Blocking, and protect your settings with a password. See 24 27 for more details about Parental Control
options.
The ClearPlay menu has the following options:
Settings (Choose what content you want ltered, see page 20)•
Filters (View or delete ClearPlay Filters on the player, see page 23)•
Blocking (Blocks certain movies based on rating, see page 21)•
Password (Locks ClearPlay settings with a password, see page 21)•
For each movie you want to watch with ClearPlay ltering you will rst need to load a ClearPlay Filter
for that movie. For more information about how to receive new ClearPlay Filters, visit www.ClearPlay.
com or contact us at (888) 425-3270.
To watch your movies with ClearPlay ltering, just follow these simple steps:
Insert your FilterStik™* with the Filter for your DVD movie.1.
Insert your DVD movie.2.
Enjoy the Show!3.
(See more information on the following pages that explain each of these steps in detail).
*This player can use many types of USB ash drives and media cards to load new Filters, in place of the
ClearPlay FilterStik
Adding New ClearPlay Filters to your playerAccessing the ClearPlay Menu
Obtain New Filters from ClearPlay
ClearPlay has Filters available for thousands of DVD
movies. See www.ClearPlay.com/427 or call us at
(888) 425-3270 for pricing and other information about
downloading new Filters.
Your DVD player can use a ClearPlay FilterStik to easily
download Filters from the internet. Simply download
new ClearPlay Filters from www.ClearPlay.com to your
computer, and then add the new ClearPlay Filters to the
FilterStik. You can then insert the FilterStik into the DVD
player to add the ClearPlay Filters to the DVD player
memory.
Note: If you are unable to copy Filters to the FilterStik or a
USB ash drive from a computer, you can also add Filters
to the player using a CD.
The following pages will refer to options in the
ClearPlay menu. To access the ClearPlay menu you can
simply press the CLEARPLAY MENU button on your remote
control. Alternatively you can enter the SETUP menu
then press
on the CLEARPLAY option.
/