Skyworth LCD-22L19 is a versatile 22-inch LCD TV and monitor with a wide range of features for both home entertainment and PC use. Enjoy your favorite TV shows and movies with vivid colors and sharp images thanks to the high-definition display. Connect your PC or laptop via HDMI or VGA to experience stunning visuals and clear sound while working or gaming. With multiple input options, including AV, S-Video, and component, you can easily connect various devices like DVD players or gaming consoles.
Skyworth LCD-22L19 is a versatile 22-inch LCD TV and monitor with a wide range of features for both home entertainment and PC use. Enjoy your favorite TV shows and movies with vivid colors and sharp images thanks to the high-definition display. Connect your PC or laptop via HDMI or VGA to experience stunning visuals and clear sound while working or gaming. With multiple input options, including AV, S-Video, and component, you can easily connect various devices like DVD players or gaming consoles.


-
 1
1
-
 2
2
-
 3
3
-
 4
4
-
 5
5
-
 6
6
-
 7
7
-
 8
8
-
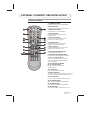 9
9
-
 10
10
-
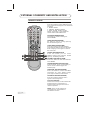
 11
11
-
 12
12
-
 13
13
-
 14
14
-
 15
15
-
 16
16
-
 17
17
-
 18
18
-
 19
19
-
 20
20


Skyworth LCD-22L19 is a versatile 22-inch LCD TV and monitor with a wide range of features for both home entertainment and PC use. Enjoy your favorite TV shows and movies with vivid colors and sharp images thanks to the high-definition display. Connect your PC or laptop via HDMI or VGA to experience stunning visuals and clear sound while working or gaming. With multiple input options, including AV, S-Video, and component, you can easily connect various devices like DVD players or gaming consoles.
Ask a question and I''ll find the answer in the document
Finding information in a document is now easier with AI
Related papers
Other documents
-
Changhong Electric LT1512E, LT1712E, LT2012E, LT2612E, LT3212E User manual
-
-
Haier LY22R1CWW1 User manual
-
Hyundai H-LCD4201 User manual
-
-
-
Technika LCD26-310 User manual
-
Hitachi L32VG08U Instructions For Use Manual
-
LG 42LC43 User manual
-
LG 32LC41-ZA User manual