
1
Personal Tracking System
User Manual
Copyright 2007
www.itrekgps.com

2
List of Contents
Introduction 3
Package Contents 3
GPS / GSM Tracker 4
Bluetooth Decoder 5
Setting up GPS / GSM Tracker 6
Tracking with Bluetooth Decoder 8
Tracking without Bluetooth Decoder 10
FAQs and Troubleshooting 11
Support and Warranty 11
Appendix 1: Technical Information 12
Appendix 2: Setting up SOS Dial Back Number 13
Appendix 3: Pairing Bluetooth Decoder to a Computer 14
Appendix 4: Pairing Bluetooth Decoder to a PDA 15
Appendix 5: Pairing Bluetooth Decoder to a Smart Phone 16

3
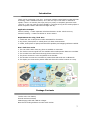
Introduction
Thank you for purchasing i.Trek TR-1, a real time tracking system based on GPS and GSM
technology. Unlike traditional tracker, TR-1 does not rely on call center or Internet to
operate. There is no monthly fee to pay and your privacy is completely protected. With
i.Trek TR-1, user can track any object globally in real time as long as the tracking object is
within cell phone network and has line of sight with sky.
Application Examples
Vehicle Tracking – Locate important vehicles and assist in stolen vehicle recovery.
Personal Tracking – Locate lost children or senior citizens.
Requirements for using i.Trek TR-1:
1. A SIM card with a valid phone number associated for the tracker.
2. Any phone (home phone or mobile phone) for data communication.
3. A PDA, smart phone or laptop with Bluetooth capability and mapping software installed.
How i.Trek TR-1 works
1. The user calls Tracker from any phone to establish a connection.
2. The Tracker receives signal from the satellite and encodes position data into voice data.
3. The encoded voice data travels through phone network as voice.
4. The phone receives the voice and passes to the decoder.
5. The decoder converts the voice back to position data and sends out via Bluetooth.
6. The display unit receives the position data and shows the tracker location on a map.
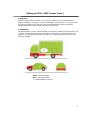
Package Contents
Tracker with Li-Ion battery
Decoder with Secure Strap
USB Charging Cable with USB Car Charger
Manual and Tracking Software CD with serial number
(1)
(2)
(4)
(3)
(5)
(6)

4
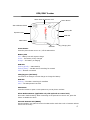
GPS/GSM Tracker
Power Button
Press the power button to turn on / off the GPS tracker
Battery LED
Red – Battery low and requires charge
Green – The battery is fully charged
Orange – The battery is charging
GSM LED
Flashing Quickly – GSM stand-by
Flashing Slowly – No SIM card or searching for network
Solid – Network connected
Charging port (mini1394)
Connects to car charger or home charger to charge the battery
GPS LED
Flashing – The GPS is searching for satellites
Solid – The GPS position has fixed
SOS Button
Press the button to report current position to pre-set phone numbers.
Alarm Release Button (Applicable only with optional car control unit)
Not used in default setting. When connecting to the optional car control unit, press the
button to disable the alarm.
External Antenna Jack (MMCX)
Recommended if user plans to mount the GPS tracker inside the trunk or locations without
direct view of the sky.
SOS Button
Alarm Release Button
MMCX External Antenna Jack
GPS LED
GSM LED
Battery LED
Power Button
Charging Port
Expansion Port

5
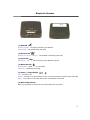
Bluetooth Decoder
(1) GPS LED
Flashing orange – The GPS is searching for satellites
Solid orange – The GPS position has fixed
(2) Decoder LED
Flashing red (4 sec. interval) – The decoder is decoding input data
(3) Input LED
Solid green – The decoder is receiving input data from phone
(4) Bluetooth LED
Flashing blue – Bluetooth not connected
Solid blue – Bluetooth connected
(5) Power / Output Switch
Left – Decoder is off
Middle – Decoder is on and the data is sent via wired connection (optional cable required)
Right – The coder is on and the data is sent via Bluetooth connection
(6) Built-in Microphone
Built-in microphone to receive the voice input data from the phone
(1)
(2) (3)
(4)
(5)
(6)

6
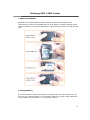
Setting up GPS / GSM Tracker
1. SIM Card Installation
SIM card slot is located inside the battery cabinet. Please open the battery cover
underneath the tracker to locate SIM card slot. If the battery is already installed, please
remove the battery to reveal the SIM card slot. Follow the figures below to install the SIM
card.
2. Charging Battery
It is recommended to charge the battery for overnight when you use the tracker for the
very first time. When the power is full, the battery LED will turn green. With subsequent
use, the battery will take about 3 – 4 hours to fully charge.

7
Setting up GPS / GSM Tracker (Cont.)
3. Switch On
Press the power button to switch on TR-1 tracker. Please make sure the GPS LED is
flashing indicating it is getting a fix from the satellites. This may take 1 –2 minutes when
you use the tracker for the first time. Also, the GSM LED also needs to be flashing
indicating SIM card is inserted and GSM network is stand by.
4. Installation
The high sensitivity of TR-1 tracker enables it to operate in challenging environments. TR-
1 tracker will work inside a vehicle, in glove box, under seats, or even inside the trunk.
However, it is always recommended to install TR-1 in places with best view of the sky
whenever possible.
Green – Recommended
Red – Not recommended
? – Experimentation required

8
Tracking with Bluetooth Decoder
1. Establish connection between Tracker and Bluetooth Decoder
From a telephone or mobile phone, dial the phone number of the SIM card inside the
tracker. Connect your phone to the decoder by placing the decoder microphone on the
phone speaker. The Bluetooth decoder will then convert the analog voice data back to
real-time GPS digital NEMA messages. Please set power switch to the right position
(Bluetooth) to use Blueooth connection.
2. Checking Decoder status
Solid orange LED ( ) followed by blinking red LED ( ) means that the data is valid
and you have a real time position data. If the orange LED is blinking, then it means the
tracker is not able to get enough satellite to provide real time position. The report position
will be at location where the tracker has the last fix. Solid green LED ( ) means the
voice from the phone is valid. If the green LED is not available, please check the cables
and make sure they are connected. Also, please turn up the volume if you are using the
included microphone cable.
3. Pairing Bluetooth Decoder to PDA, SmartPhone, or laptop
Bluetooth decoder can be connected to a Bluetooth enabled PDA, SmarPhone or laptop
through serial port profile (SPP). Please refer to the Bluetooth setup section (appendix) for
detail setup instruction for different devices. Solid blue LED ( ) means you have a
Bluetooth connection with the host device. With optional PDA or USB cable, it is also
possible to connect Bluetooth decoder to a PDA or Computer via direct wire connection.
4. Locate Tracker with any NMEA compatible mapping software
Using any NMEA compliant software such as Microsoft Street and Trips, iGuidance, or
TomTom Navigator, you can select the com port assigned by the Bluetooth manager as
outgoing comport and the tracker location will be displayed on the screen.
5. Installaing i.Trek Real Time Tracker software
i.Trek real time tracker software for Windows (2000, XP, Vista) is included on CD. Since
the tracker software is based on Google Map technology, it has the same coverage as
Google Map. From Windows Explorer, locate setup.exe on CD and double click on the
setup.exe to install the program to your computer. You will need a Gmail account and
software serial number (on CD) to complete the setup. After you install the software
successfully, the program icon will be available in the program file menu. Just click on the
icon to launch the program.

9
Tracking with Bluetooth Decoder (Cont.)
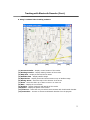
6. Using i.Trek Real Time Tracking software
(1) Current Location – Display current location of the tracker
(2) Starting Location – Display starting location of the tracker
(3) Map View – Display streets and street names
(4) Satellite View – Display satellite image
(5) Hybrid View – Display streets and street names on top of satellite image
(6) Moving Arrow – Scroll the map in the direction of the arrow
(7) Zoom – Move the slider up or down to zoom in or zoom out
(8) Date – Display the current date
(9) Position – Display longitude and latitude of the tracker
(10) Speed – Display the speed of the tracker
(11) Com Port – Select the com port which communicates with the Bluetooth decoder
(12) Connection – Connect or disconnect Bluetooth decoder from the program
(3) (4) (5)
(6)
(7)
(8) (9)
(10)
(11) (12)
(1)
(2)

10
Tracking without Bluetooth Decoder
It is also possible to locate the tracker without Bluetooth decoder. In this case, the data
will be sent to your mobile phone as short text message.
From a mobile phone, dial the phone number of the SIM card inside TR-1 tracker to
establish a connection. Press “71” and hang up the phone. In few seconds, the phone will
receive a short text message with coordinate information. You can visualize the position
by entering the coordinates into mapping software such as Google Earth.
Short Text Message Example
*SOS*V, N, 23” 51’ 15.6, E, 120” 38’ 09.6, 202.3, 359.9*
(1) Message Type
SMS = Short message dial back
SOS = SOS button dial back
ALARM = Anti-thief trigger dial back (only available with optional car control unit)
SENSOR = Moving sensor trigger dial back (only available with optional motion sensor)
(2) Position Information
V = GPS last location (Tracker has no fix and reports last fix position)
A = GPS current location (Tracker has fix and reports current location)
(3) Longitude
Longitude = North 23” 51’ 15.6
(4) Latitude
Latitude = East 120” 38’ 09.6
(5) Speed
Speed = 020.3 (Sea Mile)
(6) Direction
Direction = 359.9 (degrees)
1 2 3 4
5 6

11
FAQs and Troubleshooting
Is there a monthly fee for using i.Trek TR-1 Personal Tracking System?
There is no additional fee for using I.Trek TR-1 Tracking System besides your regular phone
call charge.
The position update on the map is jumpy
In order to display the position on the map, the tracker receives the information from the
satellite and sends the data through GSM network to the decoder. The decoder then sends
the data to your computer to be display on the map. Since there are several communication
layers and two modules, some delay is expected. The position update will very depending on
satellite location, network signal, and Bluetooth strength.
Does Bluetooth Decoder require driver?
No, Bluetooth Decoder does not require driver to run. As long as the host device supports
Bluetooth and serial profile, it will recognize BT Decoder through discovery mode.
The Bluetooth Decoder is successfully paired through Bluetooth Manager. However,
the GPS mapping software can not recognize the Bluetooth Decoder.
Please make sure you have assigned an outgoing com port on the Bluetooth manager and
select the same com port in the mapping software.
Will i.Trek TR-1 Personal Tracking System work in my country?
i.Trek TR-1 supports EGSM 900, GSM 1800, and GSM 1900. Please check with your mobile
phone provider and your GSM network is using one or more of these frequencies. For US
region, both AT&T (Cingular) and T-Mobile supports GSM network.
The tracker can not get a fix even outdoors?
If you have not used the tracker for long time, the satellite information stored in the built-in
memory may be outdated. Please remove the battery for 25 ~ 30 minutes to reset the
tracker.
Warranty and Support Information
The warranty information provided in this documentation applies to i.Trek TR-1 Personal
Tracking System sold to end-users by i.Trek authorized reseller:
If you have any difficulty using this product, please first consult the user manual to check
that you are using the product correctly, and then consult your reseller for guidance on
correcting the problem that you are experiencing. Any warranty claim must be made via
i.Trek authorized reseller who supplied the product.
The warranty period is one year from the date of purchase.
Support Phone number: (626) 574-0279
Support Email: support@itrekgps.com

12
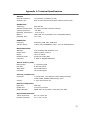
Appendix 1: Technical Specifications
Antenna
Receiver Frequency: 1575.42 MHz (L1 band) C/A code
Antenna Type: Built-in Active Antenna with MMCX external antenna jack
GPS Receiver
Technology: SiRF Star III
Satellite Measure Used: 20-channel parallel automatic selection
Tracking Sensitivity: -159 dBm
Operating Temperature: -10°C to 55°C
Battery: 1600 mAh user removable Li-Ion rechargeable battery
Operating Time: 15+ hours
GSM Module
Frequency: EGSM 900, GSM 1800, GSM 1900
Transmit Power: Class 4 (2W) at EGSM900; Class 1 (1W) at GSM1800/1900
Bluetooth Decoder
Standard: Fully compliant with Bluetooth V1.2
Output Power: 0dBm (Typical), Class II
Range: Up to 10 meters
Bluetooth Profile: Serial Port Profile (SPP)
Frequency: 2.4GHz~2.4835GHz ISM Band
Time to First Fix (TTFF)
Reacquisition: 0.1 seconds typical
Hot Start: 8 seconds typical
Warm Start: 38 seconds typical
Cold Start: 48 seconds typical
Accuracy of Position Fix
Horizontal: 3.0m 2D-RMS; <3m CEP(50%) without SA(horizontal);
DGPS (WAAS, EGNOS, MSAS, RTCM): 2.5m
Velocity: 0.1/sec 95% without SA
Receiver Configuration
Baud Rate: 4800 bps
Update rate: Once every seconds
Output Message: NMEA 0183 v3.01(Default: GGA, GSA, GSV, RMC
Physical Characteristics
Tracker Dimension: 84 x 60 x 29.5 mm
Decoder Dimension: 47.5 x 52 x 14 mm

13
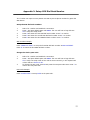
Appendix 2: Setup SOS Dial Back Number
TR-1 Tracker can report current position via SMS to pre-set phone numbers by press the
SOS button.
Setup the SOS dial back numbers:
1. Dial to TR-1 tracker and establish a connection.
2. Press * and press default pass code 0000. The user will hear a long dial tone
du to verify the setup mode.
3. Press 4 and enter the first SOS dial back number. Press * to confirm.
4. Press 5 and enter the second SOS dial back number. Press * to confirm.
5. Press 6 and enter the third SOS dial back number. Press * to confirm.
SOS number Example:
Press 4 800 123 4567* to setup the first SOS dial back number as 800 123 4567.
Press 4* to cancel the first SOS dial back number.
Change the device pass code:
1. Dial to TR-1 tracker and establish a connection.
2. Press * and press default pass code 0000. The user will hear a long dial tone
du to verify the setup mode. If the code is enter incorrectly, it will respond with
4 short dial tone du du du du.
3. To change the pass code: Press 0 and press the new pass code twice. Press * to
confirm the new pass code.
Pass code Example:
Press 0 1234 1234* to setup 1234 as the pass code.

14
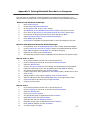
Appendix 3: Pairing Bluetooth Decoder to a Computer
The instruction is provided as a general guideline. The steps may be different on your
particular device. Please refer to user manual of each device for more detailed information.
Windows with XP Bluetooth Manager
1. Open Control Panel.
2. Double click on Bluetooth Devices.
3. On the Devices tab, click on Add… button.
4. The Welcome to the Add Bluetooth Devise Wizard will show on screen.
5. Put a check on My device is setup and ready to be found, and go Next.
6. From the list of Bluetooth devices found, select GPS and go Next.
7. Select Use the passkey found in the documentation
8. Enter 0000, then go Next.
9. Click Finish to complete the setup and take a note of the Outgoing Com port.
Windows with Widcomm/Broadcom Bluetooth Manager
1. From Desktop, click on My Bluetooth Places icon to open Bluetooth Manager.
2. Click on Search for devices in range to search all available Bluetooth devices.
3. Enter 0000 as passkey and BT GPS icon should be displayed.
4. Right click and select Connect SPP Slave.
5. The Bluetooth connection will be established and BT GPS icon will become green.
MAC OS X 10.3 or older
1. Go to System Preferences and click on the Bluetooth icon.
2. Click on settings to ensure BT is turned on and discoverable.
3. Select the Devices tab.
4. Click on set up new device and this brings up the Bluetooth Set Up Assistant.
5. Follow the instructions on the set up assistant and enter 0000 as passkey.
6. The device should be listed in the devices window.
7. Locate the BT serial utility application in the utilities folder, double click to open.
8. Click on new.
9. Assign the port a name, select outgoing, click on select device.
10. Select the Bluetooth GPS and highlight SPP slave in the right hand window.
11. Click select button and select the port type RS-232.
12. Click OK to finish setup.
MAC OS X 10.4
1. Go to System Preferences and click on the Bluetooth icon.
2. Click on settings to ensure BT is turned on and discoverable.
3. Select the Devices tab.
4. Click on set up new device.
5. The Introduction page is displayed and click Continue.
6. Select Any Device and click Continue.
7. Select BT GPS and click Passkey Options .
8. Bluetooth Device Setup is displayed and click Continue.
9. Enter 0000 as passkey and click Continue.
10. To finalize setup, click Quit.

15
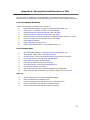
Appendix 4: Pairing Bluetooth Decoder to a PDA
The instruction is provided as a general guideline. The steps may be different on your
particular device. Please refer to user manual of each device for more detailed information.
Pocket PC WM2003/WM2003SE
* Make sure Bluetooth is enabled on the Pocket PC.
1. Open Bluetooth Manager by clicking on Bluetooth Manager icon.
2. Select New -> Connect! to start Connection Wizard.
3. Highlight Explore a Bluetooth device and click Next.
4. Select Tap here to choose a device and click Next.
5. Bluetooth wizard will search and display available Bluetooth devices on screen.
6. Click on BT GPS icon and available service will display.
7. Enter 0000 as passkey.
8. Select SPP Slave and click Next.
9. Select Finish and BT GPS is now available as short cut.
Pocket PC WM5/WM6
1. Open Bluetooth Manager by clicking on Bluetooth Manager icon.
2. In Mode tab, Please check Turn On Bluetooth.
3. In Devices tab, click on New Partnership to begin pairing of devices.
4. Click on the device found (BT GPS) and click Next.
5. Enter 0000 as passkey and click Next.
6. Check the Serial Port box and click Finish.
7. In COM Ports tab, click on New Outgoing Port.
8. Do not check Secure connection.
9. Tap Next when the new found device appeared and highlighted.
10. Select com port that is allowed by your PDA (ie COM7) and Click Finish.
Palm OS
1. Click on Bluetooth icon to start Bluetooth Manager.
2. Make sure Bluetooth is selected to On.
3. Click on Setup Devices and then click on Trusted Devices.
4. Click on Add Devices to search for available devices.
5. Click on Bluetooth GPS and enter 0000 as passkey.

16
Appendix 5: Pairing Bluetooth Decoder to a SmartPhone
The instruction is provided as a general guideline. The steps may be different on your
particular device. Please refer to user manual of each device for more detailed information.
Windows Mobile 2003 SmartPhone
Configure Bluetooth Serial COM Port
• Turn on Bluetooth GPS.
• Press Start.
• Press Setting.
• Press Configurations.
• Press BTSerialPortSetup.
• Check Outbound COM Port checkbox.
Pairing Bluetooth GPS Receiver
• Press Bluetooth and press Bluetooth again on next screen.
• Select On to enable Bluetooth.
• Press Menu > Devices.
• Press Menu > New.
• Press Select when BT GPS appears on the list.
• Enter 0000 as the passkey and press Done.
Symbian Series 60 SmartPhone
Turn Bluetooth On
• Press Connect.
• Press Bluetooth.
• Activate Bluetooth in offline mode? Press Yes.
Pairing Bluetooth GPS Receiver
• Press > to enter Paired devices screen and then press Options.
• Select New Paired Device.
• Select More Devices.
• When Bluetooth GPS appears in the list, press Select.
• Enter 0000 as passkey.
• Authorize device to make connection automatically? Press Yes.
-
 1
1
-
 2
2
-
 3
3
-
 4
4
-
 5
5
-
 6
6
-
 7
7
-
 8
8
-
 9
9
-
 10
10
-
 11
11
-
 12
12
-
 13
13
-
 14
14
-
 15
15
-
 16
16


Ask a question and I''ll find the answer in the document
Finding information in a document is now easier with AI
Related papers

Other documents
-
 T'nB ACGP03495 Datasheet
-
SpyGuy Outlander GPS Tracker User guide
-
Globalsat TR-600 User manual
-
-
adapt 8717568391656 Datasheet
-
iogear GBGPS201 User manual
-
MeiTrack P88L User manual
-
Shenzhen GPT26 User manual
-
 Trailer Vision Super i-track User manual
-
 Flaircomm Technologies GPSBT560 User manual


