Respironics 920M PLUS User manual
- Category
- Measuring, testing & control
- Type
- User manual
This manual is also suitable for
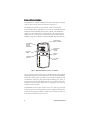
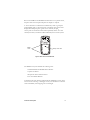
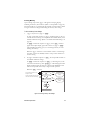
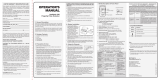
Respironics 920M PLUS is a digital handheld pulse oximeter that accurately measures and displays blood oxygen saturation and pulse rate. It features three LED digital displays – one for SpO2, one for pulse rate, and one for indicating pulse quality. The pulse quality indicator has three colors – blinking green for good pulse quality, blinking yellow for marginal pulse quality, and blinking red for inadequate pulse quality.
Respironics 920M PLUS is a digital handheld pulse oximeter that accurately measures and displays blood oxygen saturation and pulse rate. It features three LED digital displays – one for SpO2, one for pulse rate, and one for indicating pulse quality. The pulse quality indicator has three colors – blinking green for good pulse quality, blinking yellow for marginal pulse quality, and blinking red for inadequate pulse quality.


-
 1
1
-
 2
2
-
 3
3
-
 4
4
-
 5
5
-
 6
6
-
 7
7
-
 8
8
-
 9
9
-
 10
10
-
 11
11
-
 12
12
-
 13
13
-
 14
14
-
 15
15
-
 16
16
-
 17
17
-
 18
18
-
 19
19
-
 20
20
-
 21
21
-
 22
22
-
 23
23
-
 24
24
-
 25
25
-
 26
26
-
 27
27
-
 28
28
-
 29
29
-
 30
30
-
 31
31


Respironics 920M PLUS User manual
- Category
- Measuring, testing & control
- Type
- User manual
- This manual is also suitable for
Respironics 920M PLUS is a digital handheld pulse oximeter that accurately measures and displays blood oxygen saturation and pulse rate. It features three LED digital displays – one for SpO2, one for pulse rate, and one for indicating pulse quality. The pulse quality indicator has three colors – blinking green for good pulse quality, blinking yellow for marginal pulse quality, and blinking red for inadequate pulse quality.
Ask a question and I''ll find the answer in the document
Finding information in a document is now easier with AI
Related papers
-
Respironics 920M User manual
-
-
-
-
-
-
-
-
Other documents
-
Apex Digital MD300M User manual
-
Gima 80805 Owner's manual
-
Creative PC-66A User manual
-
elepho eCheck User manual
-
Insignia Pulse Oximeter User manual
-
-
-
-
-
 ChoiceMMed OxyWatch C20 User manual
