
GENERAL SAFETY RULES - FOR ALL BATTERY OPERATED TOOLS
WARNING! READ AND UNDERSTAND ALL INSTRUCTIONS.
Failure to follow all instructions listed below, may result in electric shock, fire and/or serious
personal injury.
SAVE THESE INSTRUCTIONS
Work Area
• Keep your work area clean and well lit. Cluttered benches and dark areas invite
accidents.
• Do not operate power tools in explosive atmospheres, such as in the presence of
flammable liquids, gases, or dust. Power tools create sparks which may ignite the dust or
fumes.
• Keep bystanders, children, and visitors away while operating a power tool.
Distractions can cause you to lose control.
Electrical Safety
• A battery operated tool with integral batteries or a separate battery pack must be
recharged only with the specified charger for the battery. A charger that may be suitable
for one type of battery may create a risk of fire when used with another battery.
• Use battery operated tool only with specifically designated battery pack. Use of any
other batteries may create a risk of fire.
Personal Safety
• Stay alert, watch what you are doing and use common sense when operating a power
tool. Do not use tool while tired or under the influence of drugs, alcohol, or
medication. A moment of inattention while operating power tools may result in serious
personal injury,
• Dress properly. Do not wear loose clothing or jewelry. Contain long hair. Keep your
hair, clothing, and gloves away from moving parts. Loose clothes, jewelry, or long hair
can be caught in moving parts.
• Avoid accidental starting. Be sure switch is in the locked or off position before
inserting battery pack. Carrying tools with your finger on the switch or inserting the battery
pack into a tool with the switch on invites accidents.
• Remove adjusting keys or wrenches before turning the tool on. A wrench or a key that
is left attached to a rotating part of the tool may result in personal injury.
• Do not overreach. Keep proper footing and balance at all times. Proper footing and
balance enable better control of the tool in unexpected situations.
• Use safety equipment. Always wear eye protection. Dust mask, non-skid safety shoes,
hard hat, or hearing protection must be used for appropriate conditions.
Tool Use and Care
• Use clamps or other practical way to secure and support the workpiece to a stable
platform. Holding the work by hand or against your body is unstable and may lead to loss of
control.
• Do not force tool. Use the correct tool for your application. The correct tool will do the
job better and safer at the rate for which it is designed.
• Do not use tool if switch does not turn it on or off. A tool that cannot be controlled with
the switch is dangerous and must be repaired.
• Disconnect battery pack from tool or place the switch in the locked or off position
before making any adjustments, changing accessories, or storing the tool. Such
preventive safety measures reduce the risk of starting the tool accidentally.
• Store idle tools out of reach of children and other untrained persons. Tools are
dangerous in the hands of untrained users.
• When battery pack is not in use, keep it away from other metal objects like: paper
clips, coins, keys, nails, screws or other small metal objects that can make a
connection from one terminal to another. Shorting the battery terminals together may
cause sparks, burns, or a fire.
• Maintain tools with care. Keep cutting tools sharp and clean. Properly maintained tools,
with sharp cutting edge are less likely to bind and are easier to control.
• Check for misalignment or binding of moving parts, breakage of parts, and any other
condition that may affect the tool’s operation. If damaged, have the tool serviced
before using. Many accidents are caused by poorly maintained tools.
• Use only accessories that are recommended by the manufacturer for your model.
Accessories that may be suitable for one tool may create a risk of injury when used on
another tool.
Service
• Tool service must be performed only by qualified repair personnel. Service or
maintenance performed by unqualified personnel may result in a risk of injury.
• When servicing a tool, use only identical replacement parts. Follow instructions in
the Maintenance section of this manual. Use of unauthorized parts or failure to follow
Maintenance Instructions may create a risk of shock or injury.
Specific Safety Rules
• Hold tool by insulated gripping surfaces when performing an operation where the
cutting tool may contact hidden wiring. Contact with a "live" wire will also make exposed
metal parts of the tool "live" and shock the operator.
First Aid Measures for Gel Components (PD600G Only)
If gel within the comfort grip becomes exposed and results in skin contact wash with soap and
water; for eye contact, flush with flowing water. If swallowed, seek medical attention.
Material Safety Data Sheet (MSDS) available from 1-800-544-6986.
The label on your tool may include the following symbols.
V ..........................volts A..........................amperes
Hz ........................hertz W ........................watts
min........................minutes ......................alternating current
......................direct current
n
o........................no load speed
..........................
Class II Construction
........................earthing terminal
........................safety alert symbol .../min ..................revolutions or
reciprocations
per minute
WARNING: Some dust created by power sanding, sawing, grinding, drilling, and other
construction activities contains chemicals known to cause cancer, birth defects or other
reproductive harm. Some examples of these chemicals are:
• lead from lead-based paints,
• crystalline silica from bricks and cement and other masonry products, and
• arsenic and chromium from chemically-treated lumber (CCA).
Your risk from these exposures varies, depending on how often you do this type of work. To
reduce your exposure to these chemicals: work in a well ventilated area, and work with
approved safety equipment, such as those dust masks that are specially designed to filter out
microscopic particles.
• Avoid prolonged contact with dust from power sanding, sawing, grinding, drilling,
and other construction activities. Wear protective clothing and wash exposed areas
with soap and water. Allowing dust to get into your mouth, eyes, or lay on the skin may
promote absorption of harmful chemicals.
WARNING: Use of this tool can generate and/or disburse dust, which may cause serious
and permanent respiratory or other injury. Always use NIOSH/OSHA approved respiratory
protection appropriate for the dust exposure. Direct particles away from face and body.
Safety Warnings and Instructions: Charging
1. This manual contains important safety and operating instructions.
2. Before using battery charger, read all instructions and cautionary warnings on battery
charger and product using battery. CAUTION: To reduce the risk of injury, use charger
only with this product. Batteries in other products may burst causing personal injury or
damage.
3. Do not expose charger to rain or snow.
4. Use of an attachment not recommended or sold by Black & Decker may result in a risk
of fire, electric shock, or injury to persons.
5. To reduce risk of damage to electric plug and cord, pull by plug rather than cord when
disconnecting charger.
6. Make sure cord is located so that it will not be stepped on, tripped over, or otherwise
subjected to damage or stress.
7. An extension cord should not be used unless absolutely necessary. Use of improper
extension cord could result in a risk of fire, electric shock or electrocution.
a. Two-wire cords can be used with 2-wire or 3-wire extension cords. Only round jacketed
extension cords should be used, and we recommend that they be listed by
Underwriters Laboratories (U.L.). If the extension is to be used outside, the cord must
be suitable for outdoor use. Any cord marked for outdoor use can also be used for
indoor work. The letters "W" or "WA" on the cord jacket indicate that the cord is suitable
for outdoor use.
b. An extension cord must have adequate wire size (AWG or American Wire Gauge) for
safety, and to prevent loss of power and overheating. The smaller the gauge number of
the wire, the greater the capacity of the cable; that is, 16 gauge has more capacity than
18 gauge. When using more than one extension to make up the total length, be sure
each extension contains at least the minimum wire size.
VEA EL ESPAÑOL EN LA CONTRAPORTADA.
SAVE THIS MANUAL FOR FUTURE REFERENCE.
INSTRUCTIVO DE OPERACIÓN, CENTROS DE SERVICIO Y PÓLIZA
DE GARANTÍA. ADVERTENCIA: LÉASE ESTE INSTRUCTIVO ANTES
DE USAR EL PRODUCTO.
INSTRUCTION MANUAL
CC
CC
OO
OO
RR
RR
DD
DD
LL
LL
EE
EE
SS
SS
SS
SS
SS
SS
CC
CC
RR
RR
EE
EE
WW
WW
DD
DD
RR
RR
II
II
VV
VV
EE
EE
RR
RR
Cat No. PD600, PD600G Form No. 5145342-00 (NOV-04) Copyright © 2004 Black & Decker Printed in China
1
2
3
4
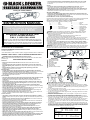
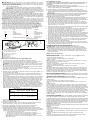
FEATURES
- Quick Release Collar
- Torque Control Collar
- LED Light
- Two Speed Switch
- Accessory Holder
- Pivot Button
- Charging Port
- Forward / Reverse Switch
A
BEFORE RETURNING THIS PRODUCT
FOR ANY REASON PLEASE CALL
1-800-544-6986
IF YOU SHOULD HAVE A QUESTION OR
EXPERIENCE A PROBLEM WITH YOUR
BLACK & DECKER PRODUCT,
CALL 1-800-544-6986
BEFORE YOU CALL, HAVE THE FOLLOWING INFORMATION AVAILABLE, CATALOG No.,
TYPE No., AND DATE CODE (e.g. 0130M). IN MOST CASES, A BLACK & DECKER REPRE-
SENTATIVE CAN RESOLVE YOUR PROBLEM OVER THE PHONE. IF YOU HAVE A SUGGES-
TION OR COMMENT, GIVE US A CALL. YOUR FEEDBACK IS VITAL TO BLACK & DECKER.
C
B
D
E
F
G
H
A
B
C
D
E
F
G
H
5
Minimum Gage for Cord Sets
Volts Total Length of Cord in Feet
120V 0-25 26-50 51-100 101-150
240V 0-50 51-100 101-200 201-300
Ampere Rating
More Not more American Wire Gage
Than Than
0-6 18 16 16 14
6 - 10 18 16 14 12
10 - 12 16 16 14 12
12 - 16 14 12 Not Recommended
Catalog No. PD600, PD600G

8. Use only the supplied charger when charging your tool. The use of any other charger
could damage the drill or create a hazardous condition.
9. Use only one charger when charging.
10. Do not attempt to open the charger. There are no customer serviceable parts inside.
Return to any authorized Black & Decker service center.
11. DO NOT incinerate the tool or batteries even if they are severely damaged or complete-
ly worn out. The batteries can explode in a fire.
12. Do not incinerate the batteries. They can explode in a fire. A small leakage of liquid
from the battery cells may occur under extreme usage, charging or temperature condi-
tions. This does not indicate a failure. However, if the outer seal is broken and this leak-
age gets on your skin:
a. Wash quickly with soap and water.
b. Neutralize with a mild acid such as lemon juice or vinegar.
c. If the battery liquid gets in your eyes, flush them with clean water for a minimum of 10
minutes and seek immediate medical attention. MEDICAL NOTE: The liquid is a 25-
35% solution of potassium hydroxide.
Charging Procedure
THE BATTERIES IN YOUR TOOL ARE NOT FULLY CHARGED AT THE FACTORY.
BEFORE ATTEMPTING TO CHARGE THEM, THOROUGHLY READ ALL OF THE SAFETY
INSTRUCTIONS.
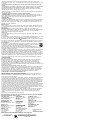
To charge your screwdriver, follow the steps below.
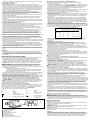
1. Plug the output cord of the charger into the socket in the bottom half of the screwdriver
handle as shown in Figure 1.
2. Plug the charger into any standard 120 Volt 60 Hz electrical outlet
3. Let the tool charge initially for 9 hours. After the initial charge, under normal usage, your
tool should be fully charged in 3 to 6 hours.
WARNING: When disconnecting the tool from the charger, be sure to unplug the charger
from the outlet first then disconnect the charger cord from the tool. Do not use the tool while
it is connected to the charger.
Important Charging Notes
1. After normal usage, your tool should be fully charged in 3 to 6 hours. If the batteries are
run-down completely, it may take up to 6 hours to become fully charged. Your tool was
sent from the factory in an uncharged condition. Before attempting to use it, it must be
charged for at least 9 hours.
2. DO NOT charge the batteries in an air temperature below 40°F (4,5 °C) or above 105°F
(+40,5 °C). This is important and will prevent serious damage to the batteries. Longest
life and best performance can be obtained if batteries are charged when air tempera-
ture is about 75°F.
3. While charging, the charger may hum and become warm to touch. This is a normal
condition and does not indicate a problem.
4. If the batteries do not charge properly—(1) Check current at receptacle by plugging in a
lamp or other appliance. (2) Check to see if receptacle is connected to a light switch
which turns power off when you turn out the lights. (3) Move charger and tool to a
surrounding air temperature of 40°F (4,5 °C) or above 105°F (+40,5 °C). (4) If the
receptacle and temperature are OK, and you do not get proper charging, take or send
the tool and charger to your local Black & Decker service center. See Tools Electric in
yellow pages.
5. The tool should be recharged when it fails to produce sufficient power on jobs which
were easily done previously. DO NOT CONTINUE using product with its batteries in a
depleted condition.
6. To prolong battery life, avoid leaving on charge for extended periods of time (over 30
days without use). Although overcharging is not a safety concern, it can significantly
reduce overall battery life.
7. The batteries will reach optimum performance after being cycled 5 times during normal
usage. There is no need to run the batteries down completely before recharging. Normal
usage is the best method of discharging and recharging the batteries.
Safety Warnings and Instructions: Drilling
1. Hold tool firmly to control its twisting action.
WARNING: Tool may stall (if overloaded or improperly used) causing a twist. Always
expect the stall. Grip the drill firmly to control the twisting action and prevent loss of control
which could cause personal injury. If a stall does occur, release the trigger immediately and
determine the reason for the stall before re-starting.
Operating Instructions
Inserting an Accessory
• Hold the screwdriver upright as shown in Figure 2 and pull down on the chuck sleeve .
• Insert a hex shank accessory into the holder.
• Release the sleeve.
NOTE: If bit does not fit into spindle, rotate the bit and re-insert it. Do not insert a bit tip
without a bit tip holder.
Removing an Accessory
• Hold the screwdriver upright as shown in Figure 2 and pull down on the chuck sleeve .
• Pull accessory straight out.
Switch
To turn the tool ON in a forward direction, press the top section of the rocker switch and the
tool will run. Release pressure from the switch and the tool will stop. To operate in reverse,
press the bottom section of the rocker switch. Without depressing the rocker switch the tool
is locked and will act as any conventional, non-powered screwdriver.
Angling the screwdriver
To convert the tool to an angled screwdriver, push in on the release button shown in Figure
3 and rotate the top portion of the tool until it locks into one of the remaining two positions.
Three Position Screwdriver Warnings:
• To avoid being pinched, hold the screwdriver as shown in Figure 3 when changing
positions.
• Do not use screwdriver as a pry bar in any position.
• To avoid screwdriver being turned on accidentally, do not carry in your pocket.
Torque Control
To set the tool’s torque, rotate the adjustable torque collar as shown in Figure 4. There are
12 clutch settings in all. These are indicated by screw icons depicted on the torque collar.
For light duty work when using small screws, set the collar to one of the smaller screw icon
settings. Each click in a clockwise direction means an increase in the torque produced. The
highest position is depicted by a drill bit icon which should be used when drilling with the
screwdriver. If you do not know the appropriate setting to use when tightening a screw,
begin at the lowest torque setting. If the clutch ratchets before the desired result is
achieved, increase the collar setting and continue tightening the screw. Repeat until you
reach the correct setting.
Two Speed Operation
The dual range feature of your screwdriver allows you to shift gears for greater versatility. To
select low speed, (high torque setting), turn tool off and permit to stop. Push the slide switch
located on the top of the tool to the left. Use low speed for screwdriving operations. To select
the high speed, (low torque setting), turn tool off and permit to stop. Slide gear shifter fully to
the right. Use high speed for drilling operations.
LED Light
To turn the light on, push the slide switch located on the underside of the screwdriver toward
the front of the tool.
Drilling
• Use sharp drill bits only.
• Support and secure work properly, as instructed in the safety Instructions.
• Use appropriate and required safety equipment, as instructed in the safety instructions.
• Secure and maintain work area, as instructed in the safety instructions.
• Run the drill very slowly, using light pressure, until the hole is started enough to keep
the drill bit from slipping out of it.
• Apply pressure in a straight line with the bit. Use enough pressure to keep the bit biting
but not so much as to stall the motor or deflect the bit.
• Hold the tool firmly with two hands to control its twisting action.
• DO NOT CLICK THE TRIGGER OF A STALLED DRILL OFF AND ON IN AN ATTEMPT
TO START IT. DAMAGE TO THE DRILL CAN RESULT.
• Minimize stalling on breakthrough by reducing pressure and slowly drilling through last
part of hole.
• Keep the motor running while pulling the bit out of a drilled hole This will help reduce
jamming.
•
Make sure switch turns drill on and off.
WARNING: It is important to support work properly and to hold the drill firmly to prevent
loss of control which could cause personal injury If you have questions on how to operate
tool, call: 1-800-544-6986.
Drilling in Wood
Holes in wood can be made with the same twist drill bits used for metal. These bits should
be sharp and should be pulled out frequently when drilling to clear chips from the flutes.
NOTE: This tool is not recommended for drilling in metal or masonry.
Maintenance
Use only mild soap and damp cloth to clean the tool. Never let any liquid get inside the tool;
never immerse any part of the tool into a liquid.
IMPORTANT: To assure product SAFETY and RELIABILITY, repairs, maintenance and
adjustment (other than those listed in this manual) should be performed by authorized
service centers or other qualified service organizations, always using identical replacement
parts.
Lubrication
Black & Decker tools are properly lubricated at the factory and are ready for use.
Accessories
Recommended accessories for use with your tool are available from your local dealer or
authorized service center. If you need assistance regarding accessories, please call:
1-800-54-HOW-TO. (800-544-6986) CAUTION: The use of any accessory or attachment
not recommended may be hazardous.
The following accessories should be used only in the sizes specified below:
BITS - WOOD DRILLING – Up to 1/4" (7 mm).
The RBRC™ Seal
The RBRC™ (Rechargeable Battery Recycling Corporation) Seal on the nickel-
cadmium battery (or battery pack) indicates that the costs to recycle the battery
(or battery pack) at the end of its useful life have already been paid by Black &
Decker. In some areas, it is illegal to place spent nickel-cadmium batteries in the
trash or municipal solid waste stream and the RBRC program provides an
environmentally conscious alternative.
RBRC in cooperation with Black & Decker and other battery users, has established
programs in the United States and Canada to facilitate the collection of spent nickel-
cadmium batteries. Help protect our environment and conserve natural resources by
returning the spent nickel-cadmium battery to an authorized Black & Decker service center
or to your local retailer for recycling. You may also contact your local recycling center for
information on where to drop off the spent battery, or call 1-800-8-BATTERY.
Battery Removal
Before attempting to disassemble this tool, turn it on and run it in either direction until it stops
to ensure a complete discharge of the batteries. Using a phillips screwdriver, remove the
screw in the product housing shown in Figure 5 and remove the cap from the end of the
tool. Lift the batteries out and pull off the terminal clips. See “Service Information” for battery
replacement.
Service Information
All Black & Decker Service Centers are staffed with trained personnel to provide customers
with efficient and reliable power tool service. Whether you need technical advice, repair, or
genuine factory replacement parts, contact the Black & Decker location nearest you. To find
your local service location, refer to the yellow page directory under "Tools—Electric" or call:
1-800-544-6986 or visit www.blackanddecker.com
Full Two-Year Home Use Warranty
Black & Decker (U.S.) Inc. warrants this product for two years against any defects in material
or workmanship. The defective product will be replaced or repaired at no charge in either of
two ways.
The first, which will result in exchanges only, is to return the product to the retailer from
whom it was purchased (provided that the store is a participating retailer). Returns should be
made within the time period of the retailer’s policy for exchanges (usually 30 to 90 days after
the sale). Proof of purchase may be required. Please check with the retailer for their specific
return policy regarding returns that are beyond the time set for exchanges.
The second option is to take or send the product (prepaid) to a Black & Decker owned or
authorized Service Center for repair or replacement at our option. Proof of purchase may be
required. Black & Decker owned and authorized Service Centers are listed under "Tools-
Electric" in the yellow pages of the phone directory and available on our website
www.blackanddecker.com.
This warranty does not apply to accessories. This warranty gives you specific legal rights
and you may have other rights which vary from state to state. Should you have any
questions, contact the manager of your nearest Black & Decker Service Center. This
product is not intended for commercial use.
FREE WARNING LABEL REPLACEMENT: If your warning labels become illegible or are
missing, call 1-800-544-6986 for a free replacement.
See ‘Tools-Electric’
– Yellow Pages –
for Service & Sales
Imported by
Black & Decker (U.S.) Inc.,
701 E. Joppa Rd.
Towson, MD 21286 U.S.A.
MANUEL DE L'UTILISATEUR
PP
PP
EE
EE
RR
RR
CC
CC
EE
EE
UU
UU
SS
SS
EE
EE
--
--
TT
TT
OO
OO
UU
UU
RR
RR
NN
NN
EE
EE
VV
VV
II
II
SS
SS
AVANT DE RETOURNER CE PRODUIT POUR UNE RAISON
QUELCONQUE, COMPOSEZ LE NUMÉRO SUIVANT :
1 800 544-6986
CONSERVER LE PRÉSENT GUIDE À TITRE DE RÉFÉRENCE
RÈGLES DE SÉCURITÉ CONCERNANT LES OUTILS À PILE –
GÉNÉRALITÉS
AVERTISSEMENT! LIRE, COMPRENDRE ET SUIVRE TOUTES LES DIRECTIVES
SUIVANTES,
y compris les consignes de sécurité pour éviter tout risque de choc électrique, d’incendie
ou de dommages corporels.
CONSERVEZ CES DIRECTIVES
ZONE DE TRAVAIL
• Garder la zone de travail propre et bien éclairée; les établis encombrés et les endroits
sombres sont propices aux accidents.
• Ne pas utiliser les outils électriques dans une atmosphère explosive, comme à proximité de
liquides, de gaz ou de poussières inflammables; le moteur peut créer des étincelles et
enflammer les vapeurs ou les poussières environnantes.
• Tenir les enfants, les visiteurs ou toute autre personne éloignés lorsqu’on utilise un outil
électrique; les distractions peuvent faire perdre la maîtrise de ce dernier.
MESURES DE SÉCURITÉ - ÉLECTRICITÉ
• Ne pas utiliser le cordon de manière abusive, ni transporter l’outil en le tenant par le cordon.
On doit tenir le cordon éloigné des sources de chaleur, de l’huile, des bords tranchants ou
des pièces mobiles. Remplacer immédiatement les cordons endommagés, car ces derniers
augmentent les risques d’incendie.
• Un outil à piles intégrées ou à bloc-pile externe doit être rechargé seulement au moyen du
chargeur approprié, car un chargeur destiné à une pile particulière pourrait entraîner un
risque d’incendie lorsqu’il est utilisé avec une autre.
Page is loading ...
Page is loading ...
Page is loading ...
Page is loading ...
-
 1
1
-
 2
2
-
 3
3
-
 4
4
-
 5
5
-
 6
6


BLACK DECKER 5145342-00 User manual
- Category
- Cordless combi drills
- Type
- User manual
Ask a question and I''ll find the answer in the document
Finding information in a document is now easier with AI
in other languages
Related papers
Other documents
-
Black & Decker CD18GSR User manual
-
-
-
-
-
-
-
-
-