Bosch KAD92HI31/06 User guide
- Category
- Fridge-freezers
- Type
- User guide
This manual is also suitable for
Page is loading ...

2
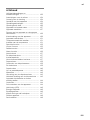
de Inhaltsverzeichnis ................................... 3
en Table of contents ................................... 32
fr Table des matières ................................ 62
it Indice ...................................................... 92
nl Inhoud ................................................... 121
Page is loading ...
Page is loading ...
Page is loading ...
Page is loading ...
Page is loading ...
Page is loading ...
Page is loading ...
Page is loading ...
Page is loading ...
Page is loading ...
Page is loading ...
Page is loading ...
Page is loading ...
Page is loading ...
Page is loading ...
Page is loading ...
Page is loading ...
Page is loading ...
Page is loading ...
Page is loading ...
Page is loading ...
Page is loading ...
Page is loading ...
Page is loading ...
Page is loading ...
Page is loading ...
Page is loading ...
Page is loading ...
Page is loading ...

en
32
en Table of contents
enInstallation instructions and instructions for useFridge-freezer
Safety and warning information ...................... 33
Information concerning disposal .................... 34
Scope of delivery ............................................... 35
Installing the appliance .................................... 35
Installation dimensions ..................................... 36
Door opening angle .......................................... 37
Aligning the appliance ...................................... 38
Connecting the appliance ................................ 38
Removing appliance doors and handles ...... 39
Getting to know your appliance ..................... 40
Switching on the appliance ............................. 42
Setting the temperature unit ............................ 42
Setting the temperature .................................... 42
Special functions ............................................... 43
Home Connect .................................................. 44
Sabbatical mode ............................................... 47
Alarm function .................................................... 47
Usable capacity ................................................. 48
Freezer compartment ....................................... 48
Freezing capacity .............................................. 48
Freezing fresh food ........................................... 49
Super freezing .................................................... 49
Thawing frozen food ......................................... 50
Refrigerator compartment ............................... 50
Super cooling ..................................................... 51
Ice and water dispenser .................................. 52
Water filter ........................................................... 53
Features of the freezer compartment ............ 54
Variable interior design .................................... 55
Switching off and disconnecting
the appliance ..................................................... 55
Defrosting ........................................................... 56
Cleaning the appliance .................................... 56
Light (LED) .......................................................... 57
Tips for saving energy ...................................... 58
Operating noises ............................................... 58
Eliminating minor faults yourself ..................... 59
Appliance self-test ............................................. 61
Customer service .............................................. 61

en
33
m Safety and warning
information
Before you switch ON the appliance
Please read the operating and installation
instructions carefully! They contain
important information on how to install, use
and maintain the appliance.
The manufacturer is not liable if you fail to
comply with the instructions and warnings.
Retain all documents for subsequent use or
for the next owner.
Technical safety
Fire hazard
The tubes of the refrigeration circuit
convey a small quantity of an
environmentally friendly but flammable
refrigerant (R600a). It does not damage the
ozone layer and does not increase the
greenhouse effect. If refrigerant escapes, it
may injure your eyes or ignite.
If damage has occurred
■ Keep naked flames and/or ignition
sources away from the appliance,
■ thoroughly ventilate the room for several
minutes,
■ switch off the appliance and pull out the
mains plug,
■ inform customer service.
The more refrigerant an appliance contains,
the larger the room must be in which the
appliance is situated. Leaking refrigerant
can form a flammable gas-air mixture in
rooms which are too small.
The room must be at least 1 m³ per 8 g
of refrigerant. The amount of refrigerant in
your appliance is indicated on the rating
plate inside the appliance.
When installing the appliance, ensure that
the mains cable is not trapped or damaged.
If the power cord of this appliance is
damaged, it must be replaced by the
manufacturer, Customer Service or a
similarly qualified person. Improper
installations and repairs may put the user at
considerable risk.
Repairs may be performed by the
manufacturer, customer service or a
similarly qualified person only.
Only original parts supplied by the
manufacturer may be used. The
manufacturer guarantees that only these
parts satisfy the safety requirements.
Do not use multiple sockets, extension
leads or adapters.
Fire hazard
Portable multiple outlets or power
supplies may overheat, causing a fire.
Never leave portable multiple outlets or
portable power supplies behind the
appliance.
Important information when using the
appliance
■ Never use electrical appliances inside the
appliance (e.g. heaters, electric ice
makers, etc.). Risk of explosion!
■ Never defrost or clean the appliance with
a steam cleaner! The steam may
penetrate electrical parts and cause a
short-circuit. Risk of electric shock!
■ Do not use additional means to
accelerate the defrosting process other
than those recommended by the
manufacturer. Risk of explosion!
■ Do not use pointed and sharp-edged
implements to remove frost or layers of
ice. You might damage the refrigerant
tubes.Leaking refrigerant may cause eye
injuries or ignite.
■ Do not store products which contain
flammable propellant (e.g. spray cans) or
explosive substances in the appliance.
Risk of explosion!
■ Do not stand on or lean heavily against
the base of the appliance, drawers,
doors, etc.
■ For cleaning pull out mains plug or switch
off fuse. Do not pull out the mains plug by
tugging on the power cord.
■ Store high-percentage alcohol tightly
sealed and in an upright position.
■ Keep plastic parts and the door seal free
of oil and grease. Otherwise, plastic parts
and the door seal will become porous.
■ Never cover or block the ventilation
openings of the appliance.

en
34
■ Avoiding placing children and
vulnerable people at risk:
At risk here are children, people who
have limited physical, mental or sensory
abilities, as well as people who have
inadequate knowledge concerning safe
operation of the appliance.
Check that children and vulnerable
people have understood the hazards.
A person responsible for safety must
supervise or instruct children and
vulnerable people who are using the
appliance.
Only children aged 8 years and above
may use the appliance.
Supervise children while the appliance is
being cleaned or maintained.
Never allow children to play with the
appliance.
■ Do not store bottled or canned liquids
(especially carbonated drinks) in the
freezer compartment.Bottles and cans
may burst!
■ Never put frozen food straight from the
freezer compartment in your mouth.
Risk of low-temperature burns!
■ Avoid prolonged touching of frozen food,
ice or the evaporator pipes, etc.
Risk of low-temperature burns!
Children in the household
■ Keep children away from packaging and
its parts.
Danger of suffocation from folding
cartons and plastic film!
■ Do not allow children to play with the
appliance!
■ If the appliance features a lock:
keep the key out of the reach of children!
General regulations
The appliance is suitable
■ for refrigerating and freezing food,
■ for making ice,
■ for dispensing drinking water.
This appliance is intended for use in
the home and the home environment.
The refrigeration circuit has been checked
for leaks.
This appliance complies with the relevant
safety regulations for electrical appliances
and is fitted with noise suppression.
This appliance is intended for use up to a
maximum height of 2000 metres above sea
level.
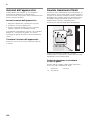
Information concerning
disposal
* Disposal of packaging
The packaging protects your appliance from damage
during transit. All utilised materials are environmentally
safe and recyclable. Please help us by disposing of the
packaging in an environmentally friendly manner.
Please ask your dealer or inquire at your local authority
about current means of disposal.
* Disposal of your old appliance
Old appliances are not worthless rubbish! Valuable raw
materials can be reclaimed by recycling old appliances.
m Warning
Redundant appliances
1. Pull out the mains plug.
2. Cut off the power cord and discard with the mains
plug.
3. Do not take out the trays and receptacles: children
are therefore prevented from climbing in!
4. Do not allow children to play with the appliance once
it has spent its useful life. Danger of suffocation!
Refrigerators contain refrigerant and gases
in the insulation. Refrigerant and gases must be
disposed of professionally. Ensure that tubing
of the refrigerant circuit is not damaged prior to proper
disposal.
This appliance is labelled in accordance with
European Directive 2012/19/EU concerning
used electrical and electronic appliances (waste
electrical and electronic equipment - WEEE). The
guideline determines the framework for the return
and recycling of used appliances as applicable
throughout the EU.

en
35
Scope of delivery
After unpacking all parts, check for any damage in
transit.
If you have any complaints, please contact the dealer
from whom you purchased the appliance or our
customer service.
The delivery consists of the following parts:
■ Free-standing appliance
■ Interior fittings (depending on model)
■ Bag containing installation materials
■ Operating instructions
■ Installation manual
■ Customer service booklet
■ Warranty enclosure
■ Information on the energy consumption and noises
Installing the appliance
Transporting
The appliance is heavy. Secure in position during
transportation and installation.
Due to the weight/dimensions of the appliance and to
minimise the risk of injury and damage to the appliance
at least two persons are necessary to set-up the
appliance safely.
Installation location
Install the appliance in a dry, well ventilated room.
The installation location should neither be exposed
to direct sunlight nor near a heat source, e.g. a cooker,
radiator, etc. If installation next to a heat source is
unavoidable, use a suitable insulating plate or observe
the following minimum distances to a heat source:
■ 3 cm to electric or gas cookers.
■ 30 cm to an oil or coal-fired cooker.
If installing the appliance next to another refrigerator
or freezer, ensure a minimum lateral distance of 25 mm
to prevent the formation of condensation.
If a panel or cupboard is installed above the appliance,
ensure that a gap of 30 mm is left so that the appliance
can be pulled out of the recess if required.
The air heated on the rear side of the appliance must
be allowed to escape unhindered.
Subsurface
m Caution
The appliance is very heavy.
The weight of the appliance may be up to 165 kg
depending on the model.
The floor of the installation location must not give way;
if required, reinforce floor.
To ensure that the doors can open all the way, observe
lateral minimum distances when installing
the appliance in a corner or recess (see chapter
“Installation dimensions”).
If the depth of the adjacent kitchen equipment is more
than 60 cm, observe lateral minimum distances
in order to utilise the full door opening angle (see
chapter “Door opening angle“).

en
36
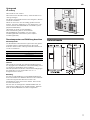
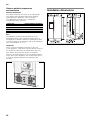
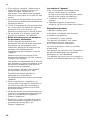
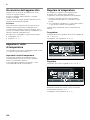
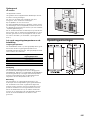
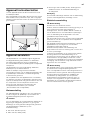
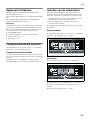
Observe ambient temperature
and ventilation
Ambient temperature
The climate class can be found on the rating plate.
The climate class indicates within which ambient
temperatures the appliance can be operated.
The rating plate is located in the refrigerator
compartment at the right side.
Note
The appliance is fully functional within the room
temperature limits of the indicated climatic class. If
an appliance of climatic class SN is operated at colder
room temperatures, the appliance will not be damaged
up to a temperature of +5 °C.
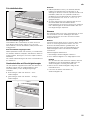
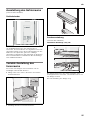
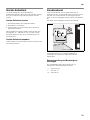
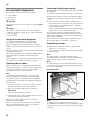
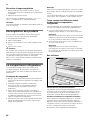
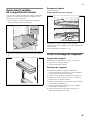
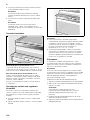
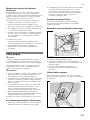
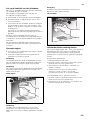
Ventilation
Never cover the ventilation openings on the rear
of the appliance. Conduction of the heated air must not
be obstructed. Otherwise, the refrigeration unit must
work harder. This increases power consumption.
Place the enclosed spacers in the designated holders
on the back of the appliance. This ensures that there is
a minimum distance between the appliance and
the wall.
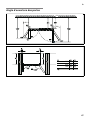
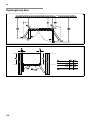
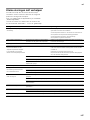
Installation dimensions
Climate class Permitted ambient temperature
SN +10 °C to 32 °C
N +16 °C to 32 °C
ST +16 °C to 38 °C
T +16 °C to 43 °C
Page is loading ...

en
38
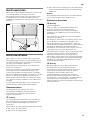
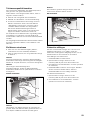
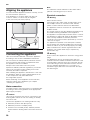
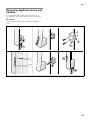
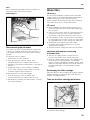
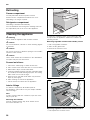
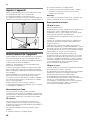
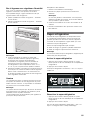
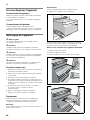
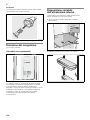
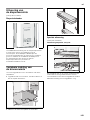
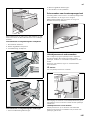
Aligning the appliance
To ensure that the appliance functions correctly, it must
be set level with a spirit level.
If the appliance is not level, water may flow out
of the ice maker, ice cubes may be irregular
or the doors may not close properly.
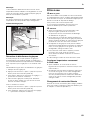
Connecting the appliance
Have a technician install and connect the appliance
according to the enclosed installation instructions.
Do not remove the transportation protection devices
from the shelves and storage compartments until
the appliance has been installed.
Always connect the water before the power.
Apart from statutory national regulations, you should
stick to the connection terms relating to the local
electricity and water companies.
After installing the appliance, wait at least 1 hour until
the appliance starts up. During transportation the oil
in the compressor may have flowed into
the refrigeration system.
Before switching on the appliance for the first time,
clean the interior of the appliance (see chapter
“Cleaning the appliance”).
Water connection
The water may be connected only by a competent fitter
according to the local regulations of the appropriate
water supply company.
m Caution
Use only the enclosed hose set for connection to the
drinking water mains. Do not use existing or already
used hose sets.
Connect the appliance to a drinking water line only:
■ Minimum pressure: 0.2 Mpa (2 bar)
■ Maximum pressure: 0.8 Mpa (8 bar)
■ Pressure over 0.8 MPa (8 bar): install a pressure
limiter between drinking water connection and hose
set
Note
The maximum outside diameter of the water mains
(without connecting pieces) is 10 mm.
Electrical connection
m Warning
Risk of electric shock!
If the length of the mains cable is inadequate, never
use multiple sockets or extension leads. Instead,
please contact Customer Service for alternatives.
The appliance must be connected to a permanently
installed socket.
The socket must be near the appliance and also freely
accessible following installation of the appliance.
The appliance complies with protection class I. Connect
the appliance to 220–240 V/50 Hz alternating current
via a correctly installed socket with protective
conductor. The socket must be protected by a 10 A to
16 A fuse or higher.
For appliances operated in non-European countries,
check whether the indicated voltage and current type
match the values of your electricity supply. The rating
plate is situated in the bottom right-hand side of the
appliance. The mains cable may be replaced by
a technician only.
m Warning
Never connect the appliance to electronic energy saver
plugs.
Our appliances can be used with mains and sine-
controlled inverters. Mains-controlled inverters are used
for photovoltaic systems which are connected directly
to the national grid. Sine-controlled inverters must be
used for isolated applications (e.g. on ships or in
mountain lodges) which are not connected directly to
the national grid.

en
39
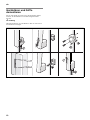
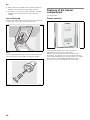
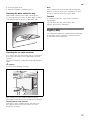
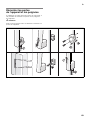
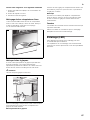
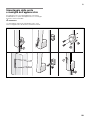
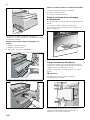
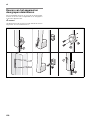
Removing appliance doors and
handles
If the appliance will not fit through the house door,
the appliance doors and handles can be unscrewed.
m Caution
Only customer service may unscrew the appliance
doors.

en
40
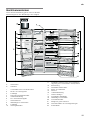
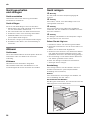
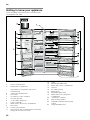
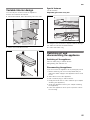
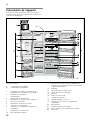
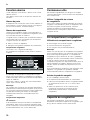
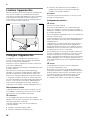
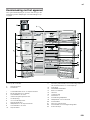
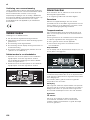
Getting to know your appliance
These operating instructions refer to several models.
The diagrams may differ.
* Not all models.
A Freezer compartment
B Refrigerator compartment
1 Light switch for refrigerator and freezer
compartments
2 Control and display panel
3 Door shelf
4 Ice maker/Ice cube container
5 Air outlet opening
6 Ice and water dispenser
7 Freezer calendar
8 Glass shelf in the freezer compartment
9 Door shelf
10 Frozen food container
11 Door shelf (2 star compartment) for short-term
storage of food and ice cream
12 Light
13 Particle filter/Water filter
14 Butter and cheese compartment
15 Camera
16 Air outlet opening
17 Bottle shelf *
18 Adjustable glass shelf
19 Glass shelf in the refrigerator
compartment
20 “Cool-fresh” container
21 Shelf for large bottles
22 Vegetable container with humidity
control
23 Height-adjustable feet

en
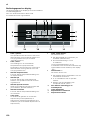
41
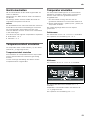
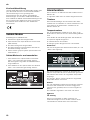
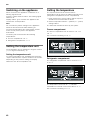
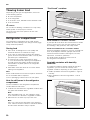
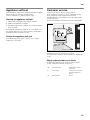
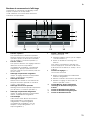
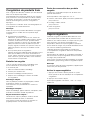
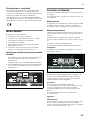
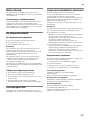
Control and display panel
The display panel and display panel on the door
consists of a touch pad.
Touch the keypad to actuate the corresponding
function.
1 “options” button
For selecting the special functions. Keep
pressing the button until the required function
is selected with an arrow (see chapter entitled
“Special functions”).
2 “select” button
For making settings in the different
temperature zones (freezer compartment,
refrigerator compartment). Keep pressing
the button until the required zone is marked
with an arrow.
3 Freezer compartment display
Indicates the current temperature setting
in the freezer compartment.
4 Time display
Displays the current time or the time
sequence when a special function
of the timer is activated.
5 Special functions display
Indicates the available special functions (see
chapter “Special functions”).
6 Refrigerator compartment display
Indicates the current temperature setting
in the refrigerator compartment.
7 Super button
This button is used to switch on the super
cooling (refrigerator compartment) or super
freezing (freezer compartment) functions (see
chapter entitled “Super cooling” or “Super
freezing”).
8 “alarm off/lock” button
The button is used to
■ switch off the warning signal (see chapter
“Alarm function”),
■ switch the button lock on and off.
To switch the button lock on and off, press
button for 5 seconds. When the function is
switched on, “lock” is indicated
on the display panel.
9 Setting buttons +/–
The buttons are used to
■ set the temperatures in the different
cooling zones,
■ switch the special functions on and off,
■ change the time setting of the “timer”
special function.
10 On/Off “light” button for ice and water
dispenser
11 Ice dispenser button
12 Dispenser button for crushed ice
13 Water dispenser button

en
42
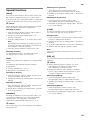
Switching on the appliance
When connected, the appliance is switched on. A
warning signal sounds.
Press the “alarm off/lock” button. The warning signal
switches off.
Display “alarm” goes out when the appliance has
reached the set temperature.
Note
Do not make any further settings on the appliance
within the first 30 seconds after switching on.
The preset temperatures are reached after several
hours. Do not put any food in the appliance
beforehand.
The factory has recommended the following
temperatures:
■ Freezer compartment: -18 °C
■ Refrigerator compartment: +4 °C
Setting the temperature unit
The temperature can be displayed in degrees Celsius
(°C) or degrees Fahrenheit (°F).
Setting the temperature unit
To set the temperature unit, simultaneously press the
“super” button and the “options” button for 5 seconds.
Depending on the previous setting, the display
switches to the other temperature unit.
Setting the temperature
The required area must be selected before
temperatures can be set for the different climatic zones
(refrigerator compartment, freezer compartment):
1. Keep pressing the “select” button until the required
climatic zone is marked with an arrow.
2. Set the temperature with the + (warmer) or - (cooler)
setting buttons.
The value last indicated is saved by the system.
Freezer compartment
The freezer compartment can be set from -16 °C to
-24 °C.
We recommend a setting of -18 °C.
Refrigerator compartment
The refrigerator compartment can be set from +2 °C
to +8 °C.
The temperature can be set at 1 °C intervals.
Perishable food should not be stored above +4 °C.
We recommend a setting of +4 °C.

en
43
Special functions
[timer]
You can use this function to set a period of time of 0-
99 minutes. A signal reminds you, e.g. when food is
to be taken out of the compartment after a certain time.
A value of 20 minutes has been preset at the factory.
m Caution
Drinks bottles may crack if they are stored for longer
than 20 minutes in the freezer compartment.
Switching on [timer]
1. Keep the Options button pressed until the [timer]
function is marked with an arrow.
2. Activate by pressing the setting button + or -
(function is framed).
3. Press the setting buttons +/- to set the desired time.
Note
Repeatedly press the button to change the time in
one-minute intervals. If the button is held down, the
time changes in 3-minute intervals.
4. Press the Options button to start the time cycle.
Switching off [timer]
To deactivate the function, simultaenously press
the setting buttons + and - for 3 seconds.
[eco]
This function switches the appliance to energy-saving
mode.
The appliance automatically sets the following
temperatures:
■ Freezer compartment: : -16 °C
■ Refrigerator compartment: +6 °C
Switching on the [eco]
1. Keep pressing the “options” button, until the [eco]
function is marked with an arrow.
2. Activate by pressing the setting button + (function is
framed).
Switching off the [eco]
1. Keep pressing the “options” button, until the [eco]
function is marked with an arrow.
2. Deactivate by pressing the setting button - (function
is no longer framed).
[vacation]
If leaving the appliance for a long period of time, you
can switch the appliance over to the energy-saving
vacation mode. The refrigerator compartment
temperature is automatically switched to +14 °C.
m Caution
Do not store any food in the refrigerator compartment
during this time!
Switching on the [vacation]
1. Keep pressing the “options” button, until
the [vacation] function is marked with an arrow.
2. Activate by pressing the setting button + (function is
framed).
Switching off the [vacation]
1. Keep pressing the “options” button, until
the [vacation] function is marked with an arrow.
2. Deactivate by pressing the setting button - (function
is no longer framed).
[clock]
The time is indicated on the time display panel. You
can set the time with the [clock] function.
Setting the time
1. Keep pressing the “options” button, until the [clock]
function is marked with an arrow.
2. Activate by pressing the setting button + (function is
framed).
3. Press the setting buttons +/- to set the required time.
4. Save the set time with the “options” button.
Note
If the [timer] function is switched on, the time is not
displayed.
[IWD off]
You can use this function to switch off the ice and water
dispenser.
m Caution
■ Before switching off the ice maker, it is most
important that you switch the water supply
to the appliance off for a few hours.
■ Empty and clean ice cube container. Re-attach
the ice cube container. Ensure that the ice cube
container engages with the support.
Switching on [IWD off]
1. Keep pressing the “options” button, until
the [IWD off] function is marked with an arrow.
2. Activate by pressing the setting button + (function is
framed).
Switching off [IWD off]
1. Keep pressing the “options” button, until
the [IWD off] function is marked with an arrow.
2. Deactivate by pressing the setting button - (function
is no longer framed).

en
44
[filter change]
After 6 months you are prompted via the [filter change]
display message to replace the filter cartridge.
Activating new filter cartridge
When the filter cartridge has been replaced,
the [filter change] function must be re-activated.
1. Change filter cartridge (see chapter “Water filter”).
2. Keep pressing the “options” button, until the [filter
change] function is marked with an arrow.
3. Activate by pressing the setting buttons +/-. [filter
change] display goes out.
Home Connect
This appliance is Wi-Fi-capable and can be remotely
controlled using a mobile device.
Note
Wi-Fi is a registered trade mark of the Wi-Fi Alliance.
In the following cases, the appliance functions like a
refrigerator without a network connection and can still
be manually operated via the controls:
■ The appliance is not connected to a home network.
■ Home Connect service is not available in the country
in which the appliance is set up. For an overview of
the countries in which Home Connect is available,
see www.home-connect.com.
Notes
■ Please observe the safety information in these
operating instructions and ensure that this is still
adhered to, even if you operate the appliance via the
Home Connect app and are not at home when doing
so.
You must also follow the instructions in the Home
Connect app.
■ If the appliance is being operated by means of the
controls on the appliance itself, this mode of
operation always has priority. During this time, it is
not possible to operate the appliance using the
Home Connect app.
The appliance has a wireless transmitting module, via
which the intelligent function of the appliance is
realized. The CMIIT ID of the appliance is shown in the
rating plate.
Setting up Home Connect
Notes
■ Observe the Home Connect supplementary sheet,
which is available for download under http://
www.bosch-home.com with the instructions. To do
so, enter the E-number of your appliance in the
search field.
■ After switching on the appliance, wait at least two
minutes until internal device initialisation is complete.
Only then start setting up Home Connect.
■ To implement settings with Home Connect, you must
have installed the Home Connect app on your
mobile device. Observe the supplied Home Connect
documents for this. Follow the steps specified by the
app to implement the settings.
■ The Home Connect menu will close automatically
when the appliance is not operated for a lengthy
period of time. You can find information on how to
open the Home Connect menu at the start of the
appropriate sections.
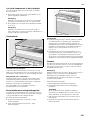
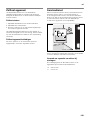
Automatic connection with the home network (WLAN)
If a WLAN router with WPS function is available, the
refrigerator can automatically connect to the home
network.
1. Press the Options button and the Alarm off/lock
button simultaneously.
"Cn" is shown in the freezer compartment display.
Note
Press both buttons simultaneously. The button
operation is locked if only the Alarm off/lock button
is pressed for an excessively long period.
2. Keep pressing the Options button until "AC" is shown
in the freezer compartment display and "OF" is
shown in the refrigerator compartment display.
3. Press the adjustment button +.
The appliance is ready for the automatic connection.
An animation is shown in the refrigerator
compartment display for 2 minutes.
The appliance is ready for the automatic connection
for as long as the animation is displayed.
4. Within those 2 minutes, activate the WPS function on
the home network router (e.g. using the WPS/WLAN
button; observe information on this topic in the router
documentation).
If the connection is successful, "On" flashes in the
refrigerator compartment display.
The refrigerator is ready to connect with the app.
Note
If "OF" is shown in the refrigerator compartment display,
it was not possible to establish a connection.
1. Check whether the refrigerator is located within the
range of the home network (WLAN).
2. Repeat the process or establish the connection
manually.
Manual connection with the home network (WLAN)
If the WLAN router present does not have a WPS
function, or if this is unknown, you can manually
connect the refrigerator with the home network.

en
45
1. Press the Options button and the Alarm off/lock
button simultaneously.
"Cn" is shown in the freezer compartment display.
Note
Press both buttons simultaneously. The button
operation is locked if only the Alarm off/lock button
is pressed for an excessively long period.
2. Keep pressing the Options button until "SA" is shown
in the freezer compartment display and "OF" is
shown in the refrigerator compartment display.
3. Press the adjustment button +.
The appliance is ready for the manual connection.
An animation is shown in the refrigerator
compartment display.
The appliance is ready for the manual connection for
as long as the animation is displayed.
4. The refrigerator has now set up its own WLAN
network with the network name "HomeConnect".
You can now access this network with your mobile
device.
5. Call up the WLAN settings in the settings menu of
the mobile device.
6. Connect the mobile device with the WLAN network
"HomeConnect".
Password: "HomeConnect"
It can take up to 60 seconds to establish the
connection.
7. After successfully connecting, open the Home
Connect app on the mobile device.
The app will search for the refrigerator.
8. As soon as the refrigerator has been found, enter the
network name "SSID" and the password "Key" of
your own home network (WLAN) into the
corresponding fields.
9. Confirm with the button Transfer to household
appliance.
■ If the connection is successful, "On" flashes in the
refrigerator compartment display.
You can now connect the refrigerator with the app.
■ If "OF" is shown in the refrigerator compartment
display, it was not possible to establish a
connection.
Check whether the refrigerator is located within
the range of the home network (WLAN).
Repeat the process.
Connecting your refrigerator to the Home Connect
app
1. Once the connection between the refrigerator and
the home network has been established, press
Options button and Alarm off/lock button at the
same time.
"Cn” is shown in the freezer compartment display.
Note
Press both buttons simultaneously. Button operation
is locked if only the Alarm off/lock button is pressed
for too long.
2. Keep pressing Options button until "PA" is shown in
the freezer compartment display and "OF" in the
refrigerator compartment display.
3. Press + adjustment button to connect the appliance
to the app.
An animation is shown in the refrigerator
compartment display.
As soon as the refrigerator and the app are
connected, the refrigerator compartment display
shows "On".
4. Open the app and wait until the refrigerator is
displayed.
Use Add to confirm the connection between the app
and the refrigerator.
If the refrigerator is not automatically displayed, click
on Add appliance in the app and follow the
instructions. As soon as your refrigerator is
displayed, add it with +.
5. Follow the instructions in the app until the process is
complete.
The freezer compartment display shows "PA" and the
refrigerator compartment display "On".
The refrigerator has been connected to the app.
If the connection has failed, please check whether
the mobile device is connected to the home network
(WLAN).
Then try to establish the connection again.
If "Er" appears on the refrigerator compartment
display, reset the Home Connect settings.
Note
On reset, all Home Connect settings are reset.
Activating the cameras
If your refrigerator is connected to both your home
network (Wi-Fi) and the Home Connect app you can
activate the cameras:
1. Press the Options button and the Alarm off/lock
button simultaneously.
“Cn” is shown on the freezer compartment display.
Note
Press both buttons simultaneously. The button
Operation is locked if only the Alarm off/lock button
is pressed for an excessively long period.
2. Press the Options button repeatedly until “CA” is
shown in the freezer compartment display and “OF”
is shown in the refrigerator compartment display.
3. Press the Adjustment button +.
The refrigerator compartment display shows
“On”.The cameras are activated.
Note
If the cameras are activated and the refrigerator
contents are interrogated frequently via the app, this will
result in increased data transfer.
Note
Uploading the photos takes up to three minutes.

en
46
Note
Various external factors in home networks and the
Internet can cause transmission problems and pictures
to be discarded. These have no effect on the
appliance’s basic functions.
Deactivating the cameras:
1. Press the Options button and the Alarm off/lock
button simultaneously.
“Cn” is shown on the freezer compartment display.
Note
Press both buttons simultaneously. Button Operation
will be locked if the Alarm off/lock button alone
remains pressed for too long.
2. Press the Options button repeatedly until “CA” is
shown in the freezer compartment display and “On”
is shown in the refrigerator compartment display.
3. Press the Adjustment button -.
The refrigerator compartment display shows
“OF”.The cameras are disabled.
Resetting Home Connect settings
If there is a problem when trying to establish a
connection or if you would like to register the appliance
in a different home network (WLAN), the Home Connect
settings can be reset:
1. Press the Options button and the Alarm off/lock
button simultaneously.
"Cn" is shown in the freezer compartment display.
Note
Press both buttons simultaneously. The button
operation is locked if only the Alarm off/lock button
is pressed for an excessively long period.
2. Keep pressing the Options button until "rE" is shown
in the freezer compartment display and "OF" is
shown in the refrigerator compartment display.
3. Press the adjustment button +.
An animation is shown in the refrigerator
compartment display for 15 seconds.
"OF" is subsequently shown in the refrigerator
compartment display.
The Home Connect settings have been reset.
Installing the Home Connect software
update
The refrigerator checks for updates to the Home
Connect software at regular intervals.
If an update is available, "UP" is shown in the
refrigerator compartment temperature display.
Press any button to return the display to the set
temperature.
Installing the update:
1. Press the Options button and the Alarm off/lock
button simultaneously.
"Cn" is shown in the freezer compartment display.
Note
Press both buttons simultaneously. The button
operation is locked if only the Alarm off/lock button
is pressed for an excessively long period.
2. Keep pressing the Options button until "UP" is shown
in the freezer compartment display and "OF" is
shown in the refrigerator compartment display.
3. Press the + button.
An animation is shown in the refrigerator
compartment display.
The update will be installed.
All buttons are locked during the installation.
■ If the installation has been completed
successfully, "On" is shown in the refrigerator
compartment display.
■ If the installation has not been completed
successfully, "Er" is shown in the refrigerator
compartment display.
Restart the update later on.
If the installation cannot be completed after
multiple attempts, notify Customer Service.
Customer Service access
If you contact Customer Service, they can access your
appliance and view its status after you have given your
consent. You need to have your appliance connected
to your home network for this.
Further information about Customer Service access
and its availability in your country is available under
www.home-connect.com in the Help & Support area.
1. Contact Customer Service.
2. Confirm the start of Customer Service access in the
app.
During Customer Service access the
symbol CS appears on the control panel.
3. As soon as Customer Service has obtained the
necessary data, they end access.
Note
You can interrupt remote diagnosis early by
switching off Customer Service access in the Home
Connect app.

en
47
Information on data protection
When your Home Connect refrigerator is connected for
the first time to a WLAN network that is connected to
the Internet, your appliance transmits the following
categories of data to the Home Connect server (initial
registration):
■ Unique appliance identification (consisting of
appliance codes as well as the MAC address of the
installed Wi-Fi communication module).
■ Security certificate of the Wi-Fi communication
module (to ensure a secure IT connection).
■ The current software and hardware version of your
domestic appliance.
■ Status of any previous resetting to factory settings.
This initial registration prepares the Home Connect
functions for use and is required only when you want to
use Home Connect for the first time.
Note
Note that the Home Connect functions can be used
only in conjunction with the Home Connect app.
Information on data protection can be accessed in the
Home Connect app.
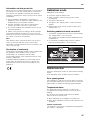
Declaration of conformity
Robert Bosch Hausgeräte GmbH hereby declares that
the appliance which features Home Connect
functionality is in accordance with the basic
requirements and the other relevant provisions of the
directive 1999/5/EC.
A detailed R&TTE Declaration of Conformity can be
found online at www.bosch-home.com among the
additional documents on the product page for your
appliance.
Sabbatical mode
Sabbatical mode settings:
■ Accoustic signal is switched off.
■ Super cooling or super freezing is then ended
(if activated).
■ The light is switched off.
■ The light on the display panel is reduced to basic
lighting.
■ Buttons are locked (except “options” button and
setting button +).
Switching sabbatical mode on and off
1. To activate, simultaneously press the Options button
and setting button + for 5 seconds.
The display field indicates that the sabbatical mode
is switched on.
2. To deactivate, simultaneously press the Options
button and setting button + for 5 seconds.
Alarm function
Press the “alarm/lock” button to switch off the warning
signal.
In the following cases an alarm may be actuated:
Door opening alarm
If the appliance is left open for longer than one minute,
the door alarm switches on. Close the door or press the
Alarm button to switch the warning signal off again.
Temperature alarm
The temperature alarm switches on if the freezer
compartment is too warm and the food is at risk of
thawing.
The acoustic and optical signal may be actuated
without risk to the frozen food:
■ When switching on the appliance for initial use.
■ When large quantities of fresh food are placed in the
appliance.
Freezer compartment
“AL” flashes on the freezer compartment display panel
and “alarm” is displayed.

en
48
The temperature display indicates for 10 seconds
the warmest temperature which was reached
in the freezer compartment. Then the set temperature is
displayed again.
The alarm display goes out as soon as the set
temperature has been reached again.
Note
Do not refreeze thawing or thawed food. Only ready
meals (boiled or fried) may be refrozen.
No longer store the frozen produce for the max.
storage period.
Refrigerator compartment
m Caution
If the refrigerator compartment has become too warm,
cook warmed refrigerated food before consumption. If
in doubt, do not use raw food.
Usable capacity
Information on the usable capacity can be found inside
your appliance on the rating plate (see diagram at
chapter “Customer service”).
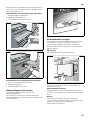
Fully utilising the freezer volume
To place the maximum amount of food in the freezer,
the top frozen food container can be taken out of
the appliance. The food can then be placed directly on
the shelves and stacked in the lower frozen food
container.
Freezer compartment
Use the freezer compartment
■ To store deep-frozen food.
■ To make ice cubes.
■ To freeze food.
Note
Ensure that the freezer compartment door has been
closed properly. If the door is open, the frozen food will
thaw. The freezer compartment will become covered in
thick ice. Also: waste of energy due to high power
consumption!
When the freezer compartment door is closed, a low
pressure occurs, causing a sucking noise. Wait two
to three minutes until the low pressure has adjusted
itself.
We recommend leaving the ice cube container
in the appliance. This ensures optimum temperature
distribution in the freezer compartment.
Purchasing frozen food
■ Packaging must not be damaged.
■ Use by the “use by” date.
■ Temperature in the supermarket freezer must be
-18 °C or lower.
■ If possible, transport deep-frozen food in an
insulated bag and place quickly in the freezer
compartment.
Freezing capacity
Information about the freezing capacity can be found
on the rating plate (see diagram in chapter “Customer
Service”)

en
49
Freezing fresh food
Freeze fresh and undamaged food only.
To retain the best possible nutritional value, flavour and
colour, vegetables should be blanched before freezing.
Aubergines, peppers, zucchini and asparagus do not
require blanching.
Literature on freezing and blanching can be found
in bookshops.
Note
Keep food which is to be frozen away from food which
is already frozen.
■ The following foods are suitable for freezing:
Cakes and pastries, fish and seafood, meat, game,
poultry, vegetables, fruit, herbs, eggs without shells,
dairy products such as cheese, butter and quark,
ready meals and leftovers such as soups, stews,
cooked meat and fish, potato dishes, soufflés and
desserts.
■ The following foods are not suitable for freezing:
Types of vegetables, which are usually consumed
raw, such as lettuce or radishes, eggs in shells,
grapes, whole apples, pears and peaches, hard-
boiled eggs, yoghurt, soured milk, sour cream,
crème fraîche and mayonnaise.
Packing frozen food
To prevent food from losing its flavour or drying out,
place in airtight containers.
1. Place food in packaging.
2. Remove air.
3. Seal the wrapping.
4. Label packaging with contents and date of freezing.
Suitable packaging:
Cling wrap, tubular film made of polyethylene,
aluminium foil, freezer containers.
These products are available from specialist outlets.
Unsuitable packaging:
Wrapping paper, greaseproof paper, cellophane, bin
liners and used shopping bags.
Items suitable for sealing packaged food:
Rubber bands, plastic clips, string, cold-resistant
adhesive tape, etc.
Bags and tubular film made of polyethylene (PE) can
be sealed with a film heat sealer.
Shelf life of frozen food
Storage duration depends on the type of food.
At a temperature of -18 °C:
■ Fish, sausage, ready meals and cakes and pastries:
up to 6 months
■ Cheese, poultry and meat:
up to 8 months
■ Vegetables and fruit:
up to 12 months
Super freezing
Food should be frozen solid as quickly as possible
in order to retain vitamins, nutritional value, appearance
and flavour.
Several hours before placing fresh food in the freezer
compartment, switch on super freezing to prevent
an unwanted temperature rise.
As a rule, 4–6 hours is adequate.
This appliance runs constantly and the freezer
compartment drops to a very low temperature.
If the max. freezing capacity is to be used, super
freezing must be switched on for 24 hours before the
fresh produce is placed in the freezer compartment.
You can freeze smaller quantities of food (up to 2 kg)
without fast freezing.
Note
When super freezing is switched on, increased
operating noises may occur.
Switching on super freezing
1. Keep pressing the “select” button until the freezer
compartment climate zone is marked with an arrow.
2. Press “super” button.
If “super freezing” is switched on, “SU” and “super” are
indicated on the display panel.
Switching off super freezing
1. Keep pressing the “select” button until the freezer
compartment climate zone is marked with an arrow.
2. Press “super” button.
If super freezing is switched off, the “SU” and “super”
displays go out on the display panel.
Note
Super freezing automatically switches off after approx.
2^ days.

en
50
Thawing frozen food
Depending on the type and application, select one
of the following options:
■ at room temperature
■ in the refrigerator
■ in an electric oven, with/without fan assisted hot-air
■ in the microwave
m Caution
Do not refreeze thawing or thawed food. Only ready
meals (boiled or fried) may be refrozen.
No longer store the frozen produce for the max.
storage period.
Refrigerator compartment
The refrigerator compartment is the ideal storage
location for meat, sausage, fish, dairy products, eggs,
ready meals and pastries.
Storing food
■ Store fresh, undamaged food. The quality and
freshness will then be retained for longer.
■ In the case of ready-made products and bottled
goods, observe the best-before date or use-by date
specified by the manufacturer.
■ To retain aroma, colour and freshness, pack
or cover food well before placing in the appliance.
This will prevent the transfer of flavours and the
discolouration of plastic parts in the refrigerator
compartment.
■ Allow warm food and drinks to cool down before
placing in the appliance.
Note
Avoid contact between food and rear panel. Otherwise
the air circulation will be impaired.
Food or packaging could freeze to the rear panel.
Note the chill zones in the refrigerator
compartment
The air circulation in the refrigerator compartment
creates different chill zones:
■ Coldest zone is between the vegetable container and
the glass shelf situated above.
Note
Store perishable food (e.g. fish, sausage, meat)
in the coldest zone above the vegetable container.
■ Warmest zone is at the very top of the door.
Note
Store e.g. hard cheese and butter in the warmest
zone. Cheese can then continue to release its flavour
and the butter will still be easy to spread.
“Cool-fresh” container
Foods suitable for “cool-fresh” container:
In principle all foods which are fresh and are to remain
fresh for even longer, such as: fish, seafood, meat
and sausage, dairy products, and ready meals.
Foods not suitable for the “cool-fresh” drawer:
Fruit and vegetables sensitive to cold (e.g.: tropical fruit
such as pineapples, bananas, papaya, citrus fruits,
melons as well as tomatoes, aubergines, zucchini,
capsicums, cucumbers, potatoes).
The ideal storage location for these foods is
the refrigerator compartment.
Vegetable container with humidity
controller
To create the optimum storage climate for fruit and
vegetables, you can set the air humidity in the
vegetable container depending on the quantity stored:
■ smaller quantities of fruit and vegetables – high air
humidity
■ large quantities of fruit and vegetables – low air
humidity

en
51
Notes
■ Fruit sensitive to cold (e.g. pineapple, banana,
papaya and citrus fruit) and vegetables sensitive
to cold (e.g. aubergines, cucumbers, zucchini,
peppers, tomatoes and potatoes) should be stored
outside the refrigerator at temperatures of approx.
+8 °C to +12 °C for optimum preservation of quality
and flavour.
■ Condensation may form in the vegetable container
depending on the type and quantity of products
stored. Remove condensation with a dry cloth and
adjust air humidity in the vegetable container with
the humidity controller.
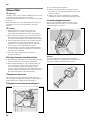
Camera
Every time the door is closed, the cameras take a
photo of the interior and the door shelves. With Home
Connect you can call up the photos from your mobile
device.
Note
Blurred pictures are an indication that the door was
closed too quickly. Always close the door slowly to
ensure satisfactory image quality. Damage to the anti-
mist film may cause blurred images.
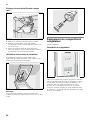
Replacing the anti-mist film
1. Remove the damaged anti-mist film.
2. Detach a new anti-mist film from the backing paper.
Note
Make sure you don't touch the adhesive side. This
will impair the quality of the photos. Hold the anti-
mist film carefully by the edge.
3. Stick the anti-mist film in the centre of the camera
lens.
4. Remove the outer protective foil of the anti-mist film.
Super cooling
Super cooling sets the refrigerator temperature
to the coldest temperature setting for approx. 6 hours.
Then the appliance automatically switches
to the temperature set prior to super cooling mode.
Switch on super cooling mode, e.g.
■ before placing large quantities of food
in the refrigerator compartment.
■ for the fast cooling of drinks.
Note
When super cooling is switched on, increased
operating noises may occur.
Switching on super cooling
1. Keep pressing the “select” button until the
refrigerator compartment climate zone is marked
with an arrow.
2. Press “super” button.
If “super cooling” is switched on, “SU” and “super” are
indicated on the display panel.
Switching off super cooling
1. Keep pressing the “select” button until the
refrigerator compartment climate zone is marked
with an arrow.
2. Press “super” button.
If super cooling is switched off, the “SU” and “super”
displays go out on the display panel.
Page is loading ...
Page is loading ...
Page is loading ...
Page is loading ...
Page is loading ...
Page is loading ...
Page is loading ...
Page is loading ...
Page is loading ...
Page is loading ...
Page is loading ...
Page is loading ...
Page is loading ...
Page is loading ...
Page is loading ...
Page is loading ...
Page is loading ...
Page is loading ...
Page is loading ...
Page is loading ...
Page is loading ...
Page is loading ...
Page is loading ...
Page is loading ...
Page is loading ...
Page is loading ...
Page is loading ...
Page is loading ...
Page is loading ...
Page is loading ...
Page is loading ...
Page is loading ...
Page is loading ...
Page is loading ...
Page is loading ...
Page is loading ...
Page is loading ...
Page is loading ...
Page is loading ...
Page is loading ...
Page is loading ...
Page is loading ...
Page is loading ...
Page is loading ...
Page is loading ...
Page is loading ...
Page is loading ...
Page is loading ...
Page is loading ...
Page is loading ...
Page is loading ...
Page is loading ...
Page is loading ...
Page is loading ...
Page is loading ...
Page is loading ...
Page is loading ...
Page is loading ...
Page is loading ...
Page is loading ...
Page is loading ...
Page is loading ...
Page is loading ...
Page is loading ...
Page is loading ...
Page is loading ...
Page is loading ...
Page is loading ...
Page is loading ...
Page is loading ...
Page is loading ...
Page is loading ...
Page is loading ...
Page is loading ...
Page is loading ...
Page is loading ...
Page is loading ...
Page is loading ...
Page is loading ...
Page is loading ...
Page is loading ...
Page is loading ...
Page is loading ...
Page is loading ...
Page is loading ...
Page is loading ...
Page is loading ...
Page is loading ...
Page is loading ...
Page is loading ...
Page is loading ...
Page is loading ...
Page is loading ...
Page is loading ...
Page is loading ...
Page is loading ...
Page is loading ...
Page is loading ...
Page is loading ...
Page is loading ...
-
 1
1
-
 2
2
-
 3
3
-
 4
4
-
 5
5
-
 6
6
-
 7
7
-
 8
8
-
 9
9
-
 10
10
-
 11
11
-
 12
12
-
 13
13
-
 14
14
-
 15
15
-
 16
16
-
 17
17
-
 18
18
-
 19
19
-
 20
20
-
 21
21
-
 22
22
-
 23
23
-
 24
24
-
 25
25
-
 26
26
-
 27
27
-
 28
28
-
 29
29
-
 30
30
-
 31
31
-
 32
32
-
 33
33
-
 34
34
-
 35
35
-
 36
36
-
 37
37
-
 38
38
-
 39
39
-
 40
40
-
 41
41
-
 42
42
-
 43
43
-
 44
44
-
 45
45
-
 46
46
-
 47
47
-
 48
48
-
 49
49
-
 50
50
-
 51
51
-
 52
52
-
 53
53
-
 54
54
-
 55
55
-
 56
56
-
 57
57
-
 58
58
-
 59
59
-
 60
60
-
 61
61
-
 62
62
-
 63
63
-
 64
64
-
 65
65
-
 66
66
-
 67
67
-
 68
68
-
 69
69
-
 70
70
-
 71
71
-
 72
72
-
 73
73
-
 74
74
-
 75
75
-
 76
76
-
 77
77
-
 78
78
-
 79
79
-
 80
80
-
 81
81
-
 82
82
-
 83
83
-
 84
84
-
 85
85
-
 86
86
-
 87
87
-
 88
88
-
 89
89
-
 90
90
-
 91
91
-
 92
92
-
 93
93
-
 94
94
-
 95
95
-
 96
96
-
 97
97
-
 98
98
-
 99
99
-
 100
100
-
 101
101
-
 102
102
-
 103
103
-
 104
104
-
 105
105
-
 106
106
-
 107
107
-
 108
108
-
 109
109
-
 110
110
-
 111
111
-
 112
112
-
 113
113
-
 114
114
-
 115
115
-
 116
116
-
 117
117
-
 118
118
-
 119
119
-
 120
120
-
 121
121
-
 122
122
-
 123
123
-
 124
124
-
 125
125
-
 126
126
-
 127
127
-
 128
128
-
 129
129
-
 130
130
-
 131
131
-
 132
132
-
 133
133
-
 134
134
-
 135
135
-
 136
136
-
 137
137
-
 138
138
-
 139
139
-
 140
140
-
 141
141
-
 142
142
-
 143
143
-
 144
144
-
 145
145
-
 146
146
-
 147
147
-
 148
148
-
 149
149
-
 150
150
-
 151
151


Bosch KAD92HI31/06 User guide
- Category
- Fridge-freezers
- Type
- User guide
- This manual is also suitable for
Ask a question and I''ll find the answer in the document
Finding information in a document is now easier with AI
in other languages
- italiano: Bosch KAD92HI31/06 Guida utente
- français: Bosch KAD92HI31/06 Mode d'emploi
- Deutsch: Bosch KAD92HI31/06 Benutzerhandbuch
- Nederlands: Bosch KAD92HI31/06 Gebruikershandleiding
Related papers
-
Bosch KAD Serie User guide
-
Bosch KAD92SB30 Owner's manual
-
-
Bosch KIR 18 V 20 FF Owner's manual
-
Bosch KAD62V00/04 Operating instructions
-
Bosch Side-by-side fridge-freezer Operating instructions
-
-
-
Bosch KAG90AI204/03 Installation guide
-
Other documents
-
Siemens KA62DS21/01 User manual
-
Siemens KA92DHXFP User manual
-
-
Siemens KA92DHB31/02 User manual
-
Siemens KA92DVI25/02 User manual
-
Siemens KM40FAI20 Owner's manual
-
-
-
-