Canton AKTIVSUBWOOFER Owner's manual
- Category
- Subwoofers
- Type
- Owner's manual
Page is loading ...
Page is loading ...
Page is loading ...
Page is loading ...
Page is loading ...
Page is loading ...
Page is loading ...
Page is loading ...
Page is loading ...
Page is loading ...
Page is loading ...
Page is loading ...
Page is loading ...
Page is loading ...
Page is loading ...

16
ENG
Contents
Safety advice ................................ Page 19
Positioning in room
...................... Page 21
Setup and installation
................... Page 22
Canton subwoofer modules
.......... Page 23
Connection
................................... Page 24
Operation
..................................... Page 28
Breaking in
................................... Page 33
Troubleshooting
........................... Page 34
Guarantee .................................... Page 47
ENG
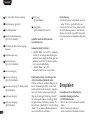
Welcome to the world of pure music
We are delighted that you have chosen a Canton loudspeaker. Our products combine high
quality components with many years of development experience and meticulous production
methods. In order to get the best out of your loudspeaker you need to observe a few points,
as detailed in the Operating Instructions.
We hope you enjoy listening to pure music!
The user is responsible for
ensuring that the loudspeaker
is correctly positioned and con-
nected. Canton cannot accept
any responsibility for damages
or accidents caused by inappro-
priate positioning or connection.
Page is loading ...
Page is loading ...

19
ENG
Do not use aggressive, alcohol-based or abrasive cleaning agents
FRA
Ne pas utiliser des produits agressifs, abrasifs ou contenant de l‘alcool
ESP
No utilice agentes agresivos de base alcohólica ni abrasivos para su limpieza
ITA
Per la pulizia non utilizzare sostanze detergenti aggressive, contenenti alcool o abrasive
RUS
SWE
Använd inga aggressiva, alkoholhaltiga eller skurande rengöringsmedel
NED
Voor de reiniging geen agressieve, alcoholhoudende of schurende middelen inzetten
POL
Do pielęgnacji nie należy używać środków korodujących, z zawartością alkoholu lub do szorowania
ENG
Choose a level surface
FRA
Choisir une surface plane
ESP
Colóquelos sobre una superficie lisa
ITA
Scegliere una superficie piana
RUS
SWE
Välj ett jämnt underlag
NED
Kies een effen ondergrond
POL
Należy wybrać równe podłoże
ENG
Avoid moisture
FRA
Eviter toute exposition à l‘humidité
ESP
Evite la humedad
ITA
Evitare l’umidità
RUS
SWE
Undvik fuktighet
NED
Vochtigheid vermijden
POL
Należy unikać wilgoci
ENG
Avoid vibrations
FRA
Eviter tout secousse
ESP
Evite vibraciones
ITA
Evitare gli urti
RUS
SWE
Undvik vibrationer
NED
Trillingen vermijden
POL
Należy unikać wstrząsów
ENG
Keep away from heat sources
FRA
Placer à distance des sources de chaleur
ESP
Manténgalos alejados de cualquier fuente de calor
ITA
Tenere lontano dalle fonti di calore
RUS
SWE
Håll avstånd från värmekällor
NED
Afstand t.o.v. warmtebronnen
POL
Należy zachować odpowiedni odstęp od wszelkich źródeł ciepła
ENG
Do not open housing
FRA
Ne pas ouvrir le coffret
ESP
No abra la carcasa
ITA
Non aprire il l‘alloggiamento
RUS
SWE
Öppna inte höljet
NED
Huis niet openen
POL
Nie należy otwierać obudowy
ENG
Avoid direct sunlight
FRA
Eviter toute exposition directe au soleil
ESP
Evite la luz solar directa
ITA
Evitare l’esposizione diretta ai raggi solari
RUS
SWE
Undvik direkt solljus
NED
Directe bezonning vermijden
POL
Należy unikać bezpośredniego oddziaływania promieni słonecznych
FRA
Consignes de sécurité
Prière de respecter les consignes de sécurité pour le
choix de l‘emplacement de votre subwoofer, ainsi
que lors de son utilisation et de son entretien!
RUS
Указания по технике
безопасности
ESP
Precauciones de seguridad
Para ubicar correctamente su subwoofer, así como
para el cuidado y manejo del mismo, observe las
precauciones de seguridad.
SWE
Säkerhetsanvisningar
Observera säkerhetsanvisningarna när du väljer
rätt plats för din subwoofer och när det gäller
rengöring och betjäning av den!
ITA
Avvertenze di sicurezza
Osservare le presenti avvertenze di sicurezza nella
scelta della posizione giusta del subwoofer, nella
sua cura e gestione!
POL
Wskazówki dotyczące
bezpieczeństwa
Przy doborze odpowiedniego miejsca oraz odpowiedniej
pielęgnacji i obsługi Państwa subwoofera należy prze-
strzegać wskazówek dotyczących bezpieczeństwa!
NED
Veiligheidsaanwijzingen
Let a.u.b. op de veiligheidsaanwijzingen bij de
keuze van de juiste plaats voor uw subwoofer en
diens verzorging en bediening!
ENG
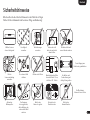
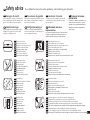
Safety advice Please follow the safety advice when positioning and maintaining your subwoofer.
ENG
Protect against extreme cold
FRA
Ne pas exposer à de basses températures
ESP
Protéjalos del frío extremo
ITA
Proteggere da temperature estremamente basse
RUS
SWE
Skyddas mot extrem kyla
NED
Tegen extreme koude beveiligen
POL
Należy chronić przed ekstremalnie niskimi temperaturami

20
ENG
Safety advice
FRA
Consignes de sécurité
SWE
Säkerhetsanvisningar
RUS
Указания по технике
безопасности
ESP
Precauciones de seguridad
NED
Veiligheidsaanwijzingen
ITA
Avvertenze di sicurezza
POL
Wskazówki dotyczące
bezpieczeństwa
ENG
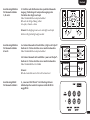
Maintain a minimum distance of 10cm from walls and furniture and 1m from tube TV sets
FRA
Distance minimum des murs et meubles: 10 cm, des téléviseurs à tubes: 1 mètre
ESP
Distancia mínima a la pared y los muebles: 10 cm; a televisores de tubo (CRT): 1 metro
ITA
Distanza minima da pareti e mobili: 10 cm, dai televisori a tubo catodico: 1 metro
RUS
SWE
Minsta avstånd till väggar och möbler: 10 cm, till rör-TV: 1 meter
NED
Minimumafstand tegenover muren en meubels: 10 cm, tegenover buistelevisie: 1 meter
POL
Minimalna odległość od ścian i mebli: 10 cm, od telewizora kineskopowego: 1 metr
ENG
Do not reach inside the subwoofer
FRA
Ne pas introduire la main dans le subwoofer
ESP
No toque el subwoofer
ITA
Non toccare le parti sensibili del subwoofer
RUS
SWE
Grip inte in i subwoofern
NED
Niet in de subwoofer grijpen
POL
Nie należy dotykać membrany subwoofera
ENG
Unplug device during thunderstorms
FRA
Débrancher la prise secteur en cas d‘orage
ESP
En caso de tormenta desconecte la clavija del enchufe
ITA
Sconnettere la spina in caso di temporale
RUS
SWE
Dra ut stickkontakten vid åskväder
NED
Netstekker bij onweer uittrekken
POL
Podczas burzy wtyczkę należy wyciągnąć z gniazda sieciowego
ENG
Never touch the power cable with wet hands
FRA
Ne pas toucher le câble secteur avec les mains mouillées
ESP
No toque el cable de alimentación con las manos mojadas
ITA
Non toccare il cavo con le mani bagnate
RUS
SWE
Ta inte i nätkabeln med våta händer
NED
Netkabel niet met natte handen vastnemen
POL
Kabla zasilającego nie należy dotykać mokrymi dłońmi
ENG
Ensure correct polarity for battery and remote operation
FRA
Respecter la polarité de piles dans la télécommande
ESP
Compruebe que las polaridades en la pila y el mando a distancia son correctas
ITA
Selezionare la polarità giusta di batteria e telecomando
RUS
SWE
Beakta polariteten hos batterierna i fjärrkontrollen
NED
Bij batterij en afstandsbediening op de juiste polariteit letten
POL
W przypadku baterii i pilota należy zwrócić uwagę na podłączenie do
odpowiednich biegunów
ENG
Do not discard in household rubbish
FRA
Ne pas jeter dans les ordures ménagères
ESP
No tirar a la basura doméstica
ITA
Non gettare tra i rifiuti domestici
RUS
SWE
Får inte kastas i hushållssoporna
NED
Niet bij het huisvuil gooien
POL
Nie należy wyrzucać do pojemników ze zwykłymi odpadami
ENG
Do not cover the subwoofer or place anything on it
FRA
Ne pas couvrir le subwoofer et ne rien poser dessus
ESP
No cubra ni ponga objetos sobre el subwoofer
ITA
Non porre oggetti sul subwoofer, né coprirlo
RUS
SWE
Täck inte över subwoofern och ställ inget på den
NED
De subwoofer niet afdekken en niets erop stellen
POL
Subwoofera nie należy przykrywać ani niczego na nim stawiać
ENG
In case of overload reduce the volume of the subwoofer
FRA
En cas de surcharge, baisser le volume du subwoofer
ESP
En caso de sobrecarga reduzca el volumen del subwoofer
ITA
In caso di sovraccarico abbassare il subwoofer
RUS
SWE
Dra ner subwooferns volym vid överbelastning
NED
Bij overbelasting de subwoofer zachter draaien
POL
W przypadku przeciążenia należy zmniejszyć poziom głośności
subwoofera
ENG
Ensure easy access to the mains plug
FRA
Assurer le libre accès à la prise secteur
ESP
Asegúrese un fácil acceso al enchufe
ITA
Garantire il libero accesso alla spina
RUS
SWE
Se till att stickkontakten är åtkomlig
NED
Vrije toegang tot de netstekker garanderen
POL
Należy umożliwić dostęp do wtyczki sieciowej

21
ENG
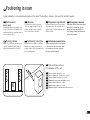
Positioning in room
FRA
Positionnement
dans la pièce
Les subwoofers Canton peuvent être pla-
cés en tout point du local d‘audition. Leur
emplacement idéal est cependant entre les
deux enceintes frontales.
RUS
Размещение в комнате
ESP
Ubicación
Los subwoofer de Canton se pueden
colocar en cualquier lugar de la sala de
audición, aunque lo ideal es ubicarlos
entre los dos altavoces frontales.
SWE
Placering i rummet
Subwoofers från Canton kan placeras var
som helst i rummet. En plats mellan de
båda fronthögtalarna är dock idealisk.
ITA
Disposizione negli ambienti
I subwoofer Canton possono essere dispo-
sti a proprio piacimento negli ambienti. La
posizione ideale è tuttavia quella tra i due
diffusori frontali.
NED
Positionering in de ruimte
Canton-subwoofers kunnen op willekeu-
rige wijze in de ruimte gepositioneerd
worden. Ideaal is echter een plaats tussen
beide frontluidsprekers.
POL
Ustawienie w pomieszczeniu
Subwoofery rmy Canton można ustawić w
pomieszczeniu w sposób dowolny. Idealne
jest jednakże umiejscowienie pomiędzy
dwoma głośnikami przednimi.
ENG
Optimal distance between
the subwoofer and the wall
FRA
Distance optimale subwoofer – mur
ESP
Distancia óptima entre el subwoofer y la pared
ITA
Distanza ottimale tra subwoofer e parete
RUS
SWE
Optimalt avstånd subwoofer – vägg
NED
Optimale afstand subwoofer – wand
POL
Optymalna odległość pomiędzy subwooferem i ścianą
Canton subwoofers can be positioned anywhere in the room. The ideal place, however, is between the two front speakers.

22
ENG
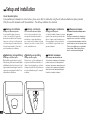
Setup and installation
Use of absorbers/spikes
If you position your subwoofer on a hard surface, please ensure that it is isolated by using the self-adhesive absorbers or spikes provided
(Only for use with subwoofers with threaded holes.). This will keep vibrations to a minimum.
FRA
Montage et installation
Montage des absorbeurs/pointes
Si vous installez le subwoofer sur un
sol dur, il est conseillé de l‘équiper des
absorbeurs auto-adhésifs ou des pointes
fournis avec celui-ci pour le découpler du
sol (seulement pour les subwoofers dotés
de trous borgnes taraudés). Vous évitez
ainsi la transmission des vibrations.
ESP
Montaje e instalación
Colocación de absorbedores/Spikes
Si desea colocar su subwoofer sobre
una superficie dura deberá montar los
absorbedores o spikes autoadhesivos
que se incluyen en el embalaje (sólo para
subwoofer con orificios roscados). De este
modo, evitará vibraciones.
ITA
Montaggio e installazione
Montaggio absorber/punte
Se si intende installare il subwoofer su una
super ficie dura, montare gli absorber auto-
adesivi o le punte forniti in dotazione per
il disaccoppiamento (solo per subwoofer
con fori filettati). In questo modo non si
generano vibrazioni.
POL
Montaż i ustawienie
Zastosowanie absorberów/kolców
Jeśli subwoofer ustawiany jest na twardym
podłożu, należy w celu odsprzężenia za-
montować dostarczone samoprzylepne ab-
sorbery lub kolce (wyłącznie w przypadku
subwooferów z otworami gwintowanymi).
Pozwoli to na uniknięcie wibracji.
RUS
Сборка и установка
Установка поглотителей/подставок
на ножках
SWE
Montering och uppställning
Montering av absorbers/spikes
Om du ställer upp din subwoofer på ett
hårt underlag ska du montera medföljande
självhäftande absorbers eller spikes för att
skapa avstånd från underlaget (endast för
subwoofers med gängade borrhål). På så
sätt undviker du vibrationer.
NED
Montage en opstelling
Montage absorbers/spikes
Monteer a.u.b. voor het ontkoppelen de
meegeleverde zelfklevende absorbers of
spikes als u uw luidsprekers op een harde
ondergrond opstelt (alleen bij subwoofers
met schroefdraadboringen). Zo vermijdt
u vibraties.

23
ESP
Módulos de subwoofer
Canton
Los subwoofer de Canton están equipados con
distintos módulos amplificadores. Compruebe a
través de las imágenes cuál es el módulo que lleva
incorporado su subwoofer.
FRA
Modules de subwoofer
Canton
Les subwoofers Canton sont équipés de divers
modules d‘amplification. Prière de vérifier à
l‘aide des schémas ci-dessous quel est le module
d‘amplification de votre subwoofer.
ITA
Moduli dei subwoofer
Canton
I subwoofer Canton sono provvisti di diversi
moduli amplificatori. Verificare con l’aiuto delle
immagini quale modulo è integrato nel subwoofer
acquistato.
RUS
Модули сабвуферов
Canton
SWE
Canton subwoofermoduler
Cantons subwoofers är utrustade med olika för-
stärkarmoduler. Kontrollera med hjälp av bilderna
vilken modul som är inbyggd i din subwoofer.
NED
Canton-subwoofermodules
Canton-subwoofers zijn uitgerust met verschil-
lende versterkermodules. Controleer a.u.b. aan de
hand van de afbeeldingen welke module in uw
subwoofer gemonteerd is.
POL
Moduły subwoofera rmy
Canton
Subwoofery rmy Canton wyposażone są w
różnego rodzaju moduły wzmacniaczy. Prosimy o
sprawdzenie na podstawie ilustracji, który moduł
wbudowany jest w Państwa subwooferze.
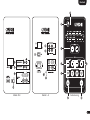
ENG
Canton subwoofer modules
Canton subwoofers are equipped with various amplifier modules. Please use the illustrations provided to check which module is installed in
your subwoofer.
ENG
Module
FRA
Module
ESP
Módulo
ITA
Modulo
RUS
SWE
Modul
NED
Module
POL
Moduł
S M L M-R L-R

24
ENG
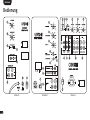
Connection
Connection options for sub-
woofer modules S, M and L:
1. Amplifier or AV receiver
with “Pre-Out” or special
stereo subwoofer outlet (LFE):
connect via Low Level Input
(ill.
1
)
Cable: standard cinch cable
2. Amplifier or AV receiver
with mono subwoofer outlet
socket: connect via Mono
Low Level Input
(ill.
2
)
Cable: standard cinch cable
Connection options for sub-
woofer modules S, M and L:
3. Amplifier or AV receiver
without special subwoofer
outlet: connect with loud-
speaker outlets on amplifier
via High Level Input
(ill.
3
)
Cable: standard speaker cable
Ensure correct polarity:
red = plus, black = minus
Note:
The Low Level and High Level
Inputs may not be used at the
same time!
Connection options for sub-
woofer modules M and L:
4 a. Canton subwoofer with
additional “High Level Output”.
Input jacks e. g. for connecting a
second subwoofer.
(ill.
4
a)
Cable: standard speaker cable
4 b. Canton subwoofer with
additional “Low Level Output”.
Input jacks e. g. for connecting a
second subwoofer.
(ill.
4
b)
Cable: standard cinch cable
Note:
Do not confuse the left and right
sides!
Connection option for sub-
woofer module L:
5. “Low Level Out Filtered”:
to reduce the load on smaller
active loudspeakers frequencies
below 80 Hz are filtered out.
(ill.
5
)
Please ensure that all electrical components are switched off before connecting your subwoofer. Depending on the make and model of your
amplifier or receiver, there are various connection options for your Canton subwoofer.
Page is loading ...
Page is loading ...
Page is loading ...
Page is loading ...
Page is loading ...

30
ENG
1 On/Off power switch
FRA
1 Interrupteur ON-OFF alimentation secteur
ESP
1 Interruptor de alimentación
ITA
1 Interruttore alimentazione elettrica
RUS
1
SWE
1 Till/Från-brytare ström
NED
1 In-/uitschakelaar stroomvoorziening
POL
1
Włącznik/wyłącznik zasilania prądem
ENG
2 Operating mode display (green/red)
FRA
2 Témoin de fonctionnement (vert/rouge)
ESP
2 Indicador de funcionamiento (verde/rojo)
ITA
2 Segnalatore funzionamento (verde/rosso)
RUS
2
SWE
2 Driftlampa (grön/röd)
NED
2 Bedrijfsdisplay (groen/rood)
POL
2
Wskaźnik trybu (zielony/czerwony)
ENG
3 Automatic “on” switch
FRA
3 Mise en circuit automatique
ESP
3 Activación automática
ITA
3 Accensione automatica
RUS
3
SWE
3 Inkopplingsautomatik
NED
3 Inschakelautomaat
POL
3
Funkcja automatycznego włączania
ENG
4 Acoustic room compensation
(does not apply to module S)
FRA
4 Adaptation aux conditions acoustiques du local
d‘audition (pas valable pour module S)
ESP
4 Adaptación acústica a la sala de audición
(no aplicable al módulo S)
ITA
4 Compensazione ambiente
(non vale per il modulo S)
RUS
4
SWE
4 Akustisk rumsanpassning
(gäller inte för modul S)
NED
4 Akoestische ruimteaanpassing
(geldt niet voor module S)
POL
4 Akustyczne dopasowanie do pomieszczenia
(nie dotyczy modułu S)
ENG
5 Adjusting the upper transmission frequency
FRA
5 Réglage de la marge supérieure de la gamme des fréquences
ESP
5 Ajuste de la frecuencia superior de transmisión
ITA
5 Impostazione della frequenza di trasmissione superiore
RUS
5
SWE
5 Inställning av den övre delningsfrekvensen
NED
5 Instelling van de bovenste overdrachtfrequentie
POL
5
Ustawienie górnej częstotliwości przejściowej
ENG
6 Volume adjustment
FRA
6 Adaptation du volume
ESP
6 Ajuste del volumen
ITA
6 Regolazione volume
RUS
6
SWE
6 Volymanpassning
NED
6 Aanpassing van de geluidssterkte
POL
6
Dopasowanie głośności
ENG
7 Phase adjustment (does not apply to module S)
FRA
7 Accord de phase (pas valable pour module S)
ESP
7 Ajuste de fase (no aplicable al módulo S)
ITA
7 Regolazione fasi (non vale per il modulo S)
RUS
7
SWE
7 Fasanpassning (gäller inte för modul S)
NED
7 Faseaanpassing (geldt niet voor module S)
POL
7
Dopasowanie fazowe (nie dotyczy modułu S)
ENG
8 Low Level Input
FRA
8 Entrée low level
ESP
8 Entrada Low Level
ITA
8 Ingresso Low Level Input
RUS
8
SWE
8 Low-Level-ingång
NED
8 Low-level-ingang
POL
8
Wejście low-level
ENG
9 Low Level Output (does not apply to module S)
FRA
9 Sortie low-level (pas valable pour module S)
ESP
9 Salida Low Level (no aplicable al módulo S)
ITA
9 Uscita Low Level Output (non vale per il modulo S)
RUS
9
SWE
9 Low-Level-utgång (gäller inte för modul S)
NED
9 Low-level-uitgang (geldt niet voor module S)
POL
9
Wyjście low-level (nie dotyczy modułu S)
ENG
10 Low Level Output, filtered up to 80 Hz
(applies to module L)
FRA
10 Sortie low level, filtrée jusqu‘à 80 Hz
(valable pour module L)
ESP
10 Salida Low Level, filtración de frecuencias de
hasta 80 Hz (aplicable al módulo L)
ITA
10 Uscita Low Level Output, con filtro fino a 80 Hz
(vale per il modulo L)
RUS
10
SWE
10 Low-Level-utgång, filtrerad till 80 Hz
(gäller för modul L)
NED
10 Low-level-uitgang tot 80 Hz gefilterd
(geldt voor module L)
POL
10
Wyjście low-level, ltrowanie do 80 Hz
(dotyczy modułu L)
ENG
11 High Level Input
FRA
11 Entrée high level
ESP
11 Entrada High Level
ITA
11 Ingresso High Level Input
RUS
11
SWE
11 High-Level-ingång
NED
11 High-level-ingang
POL
11
Wejście high-level
ENG
12 High Level Output (applies to module L)
FRA
12 Sortie high level (valable pour module L)
ESP
12 Salida High Level (aplicable al módulo L)
ITA
12 Uscita High Level Output (vale per il modulo L)
RUS
12
SWE
12 High-Level-utgång (gäller för modul L)
NED
12 High-level-uitgang (geldt voor module L)
POL
12
Wyjście high-level (dotyczy modułu L)
ENG
13 Locking feature (applies to module S)
FRA
13 Fusible (valable pour module S)
ESP
13 Protección por fusible (aplicable al módulo S)
ITA
13 Fusibile (vale per il modulo S)
RUS
13
SWE
13 Säkring (gäller för modul S)
NED
13 Zekering (geldt voor module S)
POL
13
Bezpiecznik (dotyczy modułu S)

31
ENG
14 Setup Mode (applies to modules M-R and L-R)
FRA
14 Sortie high level (valable pour Module M-R et L-R)
ESP
14 Modo Setup (aplicable a los módulos M-R y L-R)
ITA
14 Setup mode (vale per i moduli M-R e L-R)
RUS
14
SWE
14 Setup Mode (gäller för modul M-R och L-R)
NED
14 Setup Mode (geldt voor module M-R en L-R)
POL
14
Setup Mode (dotyczy modułu M-R i L-R)
Amplifier mode has two optional operating modes
Sub woofer modules S, M and L:
• “Amplier Mode” on “AUTO”:
Subwoofer switches on automatically when it
receives a music signal; when the music stops the
subwoofer automatically goes
into standby mode after 5 to 15 minutes.
• “Amplier Mode” on “ON”:
Subwoofer stays switched on permanently
Room Compensation – Adjustments on initial
installation (Modules M and L)
Select the switch setting that gives the best quality
reproduction so that the subwoofer performs at
the optimal level for the acoustic properties of the
room. The following basic rules apply: set it to
“Normal” for regular sized rooms; set it to “Wide”
for large rooms; set it to “Narrow” for small rooms.
(Modules M-R / L-R) “Boost” setting for a richer
musical sound at low and medium volume.
Remote Control
To activate the Setup mode press and hold the
“Setup” button for 2 seconds. Press the “Setup”
button again to return from remote operation to
normal mode. When the subwoofer is turned off
the most recently activated mode will be stored.
ENG
Operation
FRA
Utilisation
Mode d‘amplification pour choisir entre
deux types de fonctionnement Modules
subwoofer S, M et L:
• AMPLIFIER MODE sur AUTO:
Le subwoofer est automatiquement mis
en circuit à la réception du signal musi-
cal; si la musique s‘arrête, le subwoofer
se met en mode standby au bout de 5 à
15 minutes.
• AMPLIFIER MODE sur ON:
Le subwoofer demeure toujours en
circuit.
Room Compensation – Réglage pour
l‘installation initiale (modules M et L)
Choisissez la position de l‘interrupteur qui
apporte la meilleure restitution du son
afin d‘adapter le subwoofer de manière
optimale aux conditions acoustiques du
local d‘audition. S‘orienter sur le principe
de base suivant: réglage sur NORMAL
pour les locaux de dimensions normales,
réglage sur WIDE pour des locaux de
vastes dimensions, réglage sur NARROW
pour des locaux de dimensions restreintes.
(Module M-R / L-R) Réglage sur „Boost“
pour une sonorité plus pleine à des volu-
mes faibles à moyens.
Télécommande
Appuyer 2 secondes sur la touche „Setup“
pour activer le mode Setup. Appuyer une
nouvelle fois sur la touche „Setup“ pour
remettre la télécommande en mode nor-
mal. Le dernier Setup réglé est mémorisé
lorsque le subwoofer est mis hors circuit.
Page is loading ...
Page is loading ...

34
SWE
Felsökning
Nedan finner du en översikt över de
problem som oftast förekommer. Om du
har fler frågor vänd dig till din Canton-
återförsäljare, kontakta vår Service hotline
på tel + 49 (0) 6083 / 287-57 eller skicka
ett e-mail till [email protected].
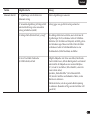
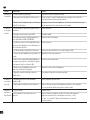
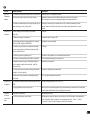
Problem Possible cause Solution
Sound
reproduction
too soft
1. Volume of subwoofer set too low Increase the volume using the volume control
2. Only for High Level input: inputs reverse-poled Check the poles: the red outlet, or the outlet marked with + on the amplifier, must be
connected with the red input jack of the subwoofer
3. Outlet level on amplifier set too low for the subwoofer
outlet (cinch outlet)
Increase the volume level on the amplifier. If the level of the subwoofer outlet cannot go
any higher, reduce the level of the other outlets to the same level
ENG
FRA
Diagnostic des défauts
Vous trouverez ici un tableau synoptique
des problèmes les plus fréquents. Si vous
avez de plus amples questions, adressez-
vous à votre revendeur Canton, contactez
notre hotline au n° +49 (0) 6083 / 287-57
ou envoyez un e-mail à [email protected].
ESP
Detección de fallos
A continuación se adjunta una lista de los
problemas más habituales que pueden
presentarse. En caso de duda, diríjase a su
comercio especializado Canton, contacte
con nuestro servicio Service Hotline en el
Tel. +49 (0) 6083 / 287-57 o envíenos un
correo electrónico a [email protected].
ITA
Individuazione degli errori
Di seguito è riportata una panoramica
degli inconvenienti più frequenti. Qualora
abbiate altre domande, vi preghiamo di
rivolgervi al vostro rivenditore specia-
lizzato Canton, di contattare il nostro
servizio di assistenza telefonica al numero
+49 (0) 6083 / 287-57 o di inviarci una
e-mail all’indirizzo [email protected].
RUS
Поиск неисправностей
NED
Foutopsporing
Ingesloten vindt u een overzicht van de
problemen die het vaakst optreden. U
hebt nog meer vragen? Wend u zich
dan a.u.b. tot uw Canton-specialist,
contacteer onze service hotline onder
tel.: +49 (0) 6083 / 287-57 of zend een
e-mail naar [email protected].
POL
Rozwiązywanie problemów
Poniżej przedstawiamy listę najczęściej
występujących problemów. W razie
dodatkowych pytań, prosimy o kontakt
ze sklepem specjalistycznym Cantona,
naszą infolinią pod numerem telefonu
+49 (0) 6083 / 287-57, lub o przesłanie
e-maila na adres inf[email protected].
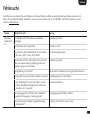
ENG
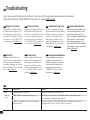
Troubleshooting
Here is an overview of the most common problems. If you have any further questions please contact your Canton dealer,
call our Service Hotline on +49 (0) 6083 / 287 57 or send us an e-mail at [email protected].

35
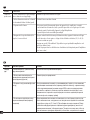
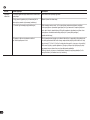
Problem Possible cause Solution
Subwoofer
does not turn
on
1. The power cable is not connected from the socket to the
subwoofer
Check connection
2. The power has not been turned on Switch to “ON”
3. The switch for automatic switching on is not in the “ON”
position or the “AUTO” or “AUTO HIGH” positions
Check switch setting
4. The subwoofer is not connected with the amplifier (re-
ceiver) through its speaker outlet (High Level) or subwoofer
outlet (cinch) cable
Check connection
5. Defective signal line (cinch) Test with another cinch cable and change cable if necessary
6. The volume of the amplifier has been set too low
Increase volume level to test
7. With a “Dolby Digital” receiver (amplier): the receiver is
not set for subwoofer operation (operating method “Small”
or “ActiveSub = On”)
Check operating mode
8. The outlet level on the amplifier is set too low for the
subwoofer outlet (cinch outlet)
Increase the outlet level of the amplifier
9. The microfuse in the subwoofer has blown (fused) Get a specialist to change the microfuse
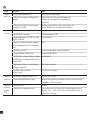
Subwoofer
does not
switch off
1. Switch for automatic switching on (Standby) set to “ON” Switch to “Auto” or “OFF”
2. Constant humming at inlet of subwoofer
Use a shorter signal line from the amplifier to the subwoofer or remove any possible sources of
interference (see “Subwoofer hums”)
Subwoofer
hums
1. Signal line from amplifier to subwoofer too long
Use shorter signal line
2. Signal line used is not fault-protected or the protection
has been damaged (defective)
Change signal line for a fault-protected line
3. Ground loop (ripple pickup) generated A ground loop can be generated when two or more devices connected via a signal line (cinch)
are plugged into separate sockets (e. g. amplifier and computer). All devices connected to the
amplifier should be plugged into the same multiple socket outlet
4. Another piece of equipment on the same circuit has no
interference suppression (e. g. fridge)
Switch off possible sources of interference to test; unplug the device concerned to see if the
humming noise disappears or connect the source of interference to a different circuit (L1, L2
or L3). (Where necessary take advice from your electrician.) Insert a special “ferrite common
mode lter” (available from specialist retailers) between the amplier and the subwoofer to
eliminate the humming. Disconnect and rotate the mains plug to reduce the so-called ripple
voltage. (Particularly important if the amplifier is not earthed)
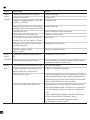
Subwoofer
does not
respond to
remote control
1. The battery is flat Change the battery
2. The remote control is not registered on the subwoofer Turn the subwoofer off, wait for 30 seconds then turn it back on. Activate the remote control
and press the “- Phase”, “+ Phase” and “Power/Auto” buttons in quick succession. The sub-
woofer and the remote control are now synchronised
ENG
Page is loading ...
Page is loading ...
Page is loading ...
Page is loading ...
Page is loading ...
Page is loading ...
Page is loading ...
Page is loading ...
Page is loading ...
Page is loading ...
Page is loading ...
Page is loading ...
Page is loading ...
-
 1
1
-
 2
2
-
 3
3
-
 4
4
-
 5
5
-
 6
6
-
 7
7
-
 8
8
-
 9
9
-
 10
10
-
 11
11
-
 12
12
-
 13
13
-
 14
14
-
 15
15
-
 16
16
-
 17
17
-
 18
18
-
 19
19
-
 20
20
-
 21
21
-
 22
22
-
 23
23
-
 24
24
-
 25
25
-
 26
26
-
 27
27
-
 28
28
-
 29
29
-
 30
30
-
 31
31
-
 32
32
-
 33
33
-
 34
34
-
 35
35
-
 36
36
-
 37
37
-
 38
38
-
 39
39
-
 40
40
-
 41
41
-
 42
42
-
 43
43
-
 44
44
-
 45
45
-
 46
46
-
 47
47
-
 48
48


Canton AKTIVSUBWOOFER Owner's manual
- Category
- Subwoofers
- Type
- Owner's manual
Ask a question and I''ll find the answer in the document
Finding information in a document is now easier with AI
in other languages
- italiano: Canton AKTIVSUBWOOFER Manuale del proprietario
- français: Canton AKTIVSUBWOOFER Le manuel du propriétaire
- español: Canton AKTIVSUBWOOFER El manual del propietario
- Deutsch: Canton AKTIVSUBWOOFER Bedienungsanleitung
- русский: Canton AKTIVSUBWOOFER Инструкция по применению
- Nederlands: Canton AKTIVSUBWOOFER de handleiding
- polski: Canton AKTIVSUBWOOFER Instrukcja obsługi
- svenska: Canton AKTIVSUBWOOFER Bruksanvisning
Related papers
-
Canton AKTIVSUBWOOFER Owner's manual
-
Canton GLE 496.2 Owner's manual
-
Canton Movie 260 Operating instructions
-
Canton Atelier 500 Owner's manual
-
Canton 03000 User manual
-
-
Canton DM 8.2 Operating instructions
-
-
Canton Movie 60 CX Owner's manual
-
Canton PLUS MEDIA 3 Datasheet
Other documents
-
Heco Music Style Sub 25 A User manual
-
 Magnat Audio Alpha RS 12 Owner's manual
-
MAC Audio Ice Cube 108F Owner's manual
-
Blaupunkt MPA 4 Owner's manual
-
-
Magnat Omega Sub 250 A LTD Owner's manual
-
 Car audio systems SE 480 Owner's manual
-
-
-
Heco Victa Prime Sub 252 User manual

