Sony Nav-U NV-U51 Owner's manual

Category
Navigators
Type
Owner's manual
Bitte kreuzen Sie zunächst die genaue
Modellbezeichnung in dem dafür vorgesehenen Feld
an.
Tragen Sie danach die Seriennummer (SERIAL NO.) in
dem reservierten Feld ein. Sie finden diese auf einem
Aufkleber, der auf dem Gerätegehäuse angebracht ist.
Nehmen Sie den ausgefüllten Geräte-Pass
anschließend unbedingt aus der Bedienungsanleitung
heraus, falls Sie diese im Fahrzeug aufbewahren
möchten. Bitte bewahren Sie den Geräte-Pass an
einem sicheren Ort auf. Er kann im Falle eines
Diebstahls zur ldentifikation lhres Eigentums dienen.
caraudio
Geräte-Pass
Dieser Geräte-Pass dient als Eigentumsnachweis
für Ihr caraudio-Gerät im Falle eines Diebstahls.
Wir empfehlen, den Geräte-Pass nicht im
Fahrzeug aufzubewahren, um Missbrauch zu
verhindern.
Modellbezeichnung
sNV-U71T
sNV-U51
Seriennummer (SERIAL NO.)
Guida rapida all’uso
2-886-305-22 (1)
Quick Start Guide
Anleitung zur schnellen
Inbetriebnahme
Guide de démarrage
rapide
Beknopte handleiding
Guía de inicio rápido
Snabbstartguide
Guia de iniciação rápida
GBGB
DE
FR
NL
ES
SE
PT
Navigation Homepage
If you have any questions or for the latest support
information on navigation, visit the website below:
http://support.sony-europe.com/Navigation/
Sony Corporation Printed in Thailand
IT
NV-U71T
NV-U51
Personal Navigation System
Quick Start Guide
Personal Navigation System
© 2006 Sony Corporation
How to use this manual
When reading this manual, keep the control
layout illustration (on the rear of this page)
open for quick reference from any page.
Hinweis zu dieser
Bedienungsanleitung
Wenn Sie diese Bedienungsanleitung lesen,
klappen Sie die Abbildung mit den
Bedienelementen (auf der Rückseite dieser
Seite) auf. So haben Sie sie beim Lesen immer
im Blick.
Comment utiliser ce manuel
Lorsque vous lisez ce manuel, gardez le rabat
des illustrations des commandes (au verso de
cette page) ouvert pour pouvoir vous y référer
rapidement à partir de n’importe quelle page.
Deze handleiding gebruiken
Wanneer u deze handleiding doorleest, houdt u
de illustratie met de onderdelen van het
apparaat (aan de achterzijde van deze pagina)
geopend zodat u deze vanaf elke pagina snel
kunt raadplegen.
Uso del presente manuale
Durante la lettura del manuale, utilizzare le
illustrazioni sul retro di questa pagina come
riferimento rapido.
Cómo utilizar este manual
Al leer el manual, tenga a la vista la ilustración
de la distribución de los controles (en el
reverso de esta página) para poder consultarla
rápidamente desde cualquier página.
Hur du använder den här
bruksanvisningen
När du läser den här bruksanvisningen bör du
ha bilden över kontrollerna (på baksidan av
den här sidan) öppen för snabb referens från
sidan du är på.
Como utilizar este manual
Quando ler este manual, mantenha aberta a
ilustração do esquema de controlo (no verso
desta página) para possibilitar uma consulta
rápida a partir de qualquer página.
2
3
2
On trademarks
Microsoft and Windows are registered trademarks
of Microsoft Corporation.
All other trademarks are trademarks of their
respective owners.
© 1993 NAVTEQ. All Rights Reserved.
Ausw/Italy © 1994
Austria © 1996
Belgium © 1995
Benelux © 1993
Central Europe © 1993
Czech Republic © 2002
Denmark © 1997
Finland © 2001
France © 1993
Germany © 1993
Great Britain © 1993
Italy © 1994
Luxembourg © 1996
Mediterranean Coast © 1993
Norway © 2001
Portugal © 1997
Spain © 1997
Sweden © 1994
Switzerland © 1996
The Netherlands © 1993
Austria
© Bundesamt für Eich- und Vermessungswesen
Belgium
Traffic Information is provided by the Ministerie
van de Vlaamse Gemeenschap and the Ministèrie de
l’Equipement et des Transports.
Croatia, Estonia, Latvia, Lithuania, Poland,
Slovenia
© EuroGeographics
France
source: Géoroute® IGN France & BD Carto® IGN
France
Germany
Die Grundlagendaten wurden mit Genehmigung der
zuständigen Behörden entnommen
Great Britain
Based upon Crown Copyright material.
Greece
Copyright Geomatics Ltd.
Hungary
Copyright © 2003; Top-Map Ltd.
Italy
La Banca Dati Italiana è stata prodotta usando quale
riferimento anche cartografia numerica ed al tratto
prodotta e fornita dalla Regione Toscana.
Norway
Copyright © 2000; Norwegian Mapping Authority
Portugal
Source: IgeoE – Portugal
Spain
Información geográfica propiedad del CNIG
Sweden
Based upon electronic data © National Land Survey
Sweden.
Switzerland
Topografische Grundlage: © Bundesamt für
Landestopographie.
V-Trafic Information in France is
provided by Mediamobile
company.
Traffic Information in the UK is
provided by ITIS Holdings Plc.
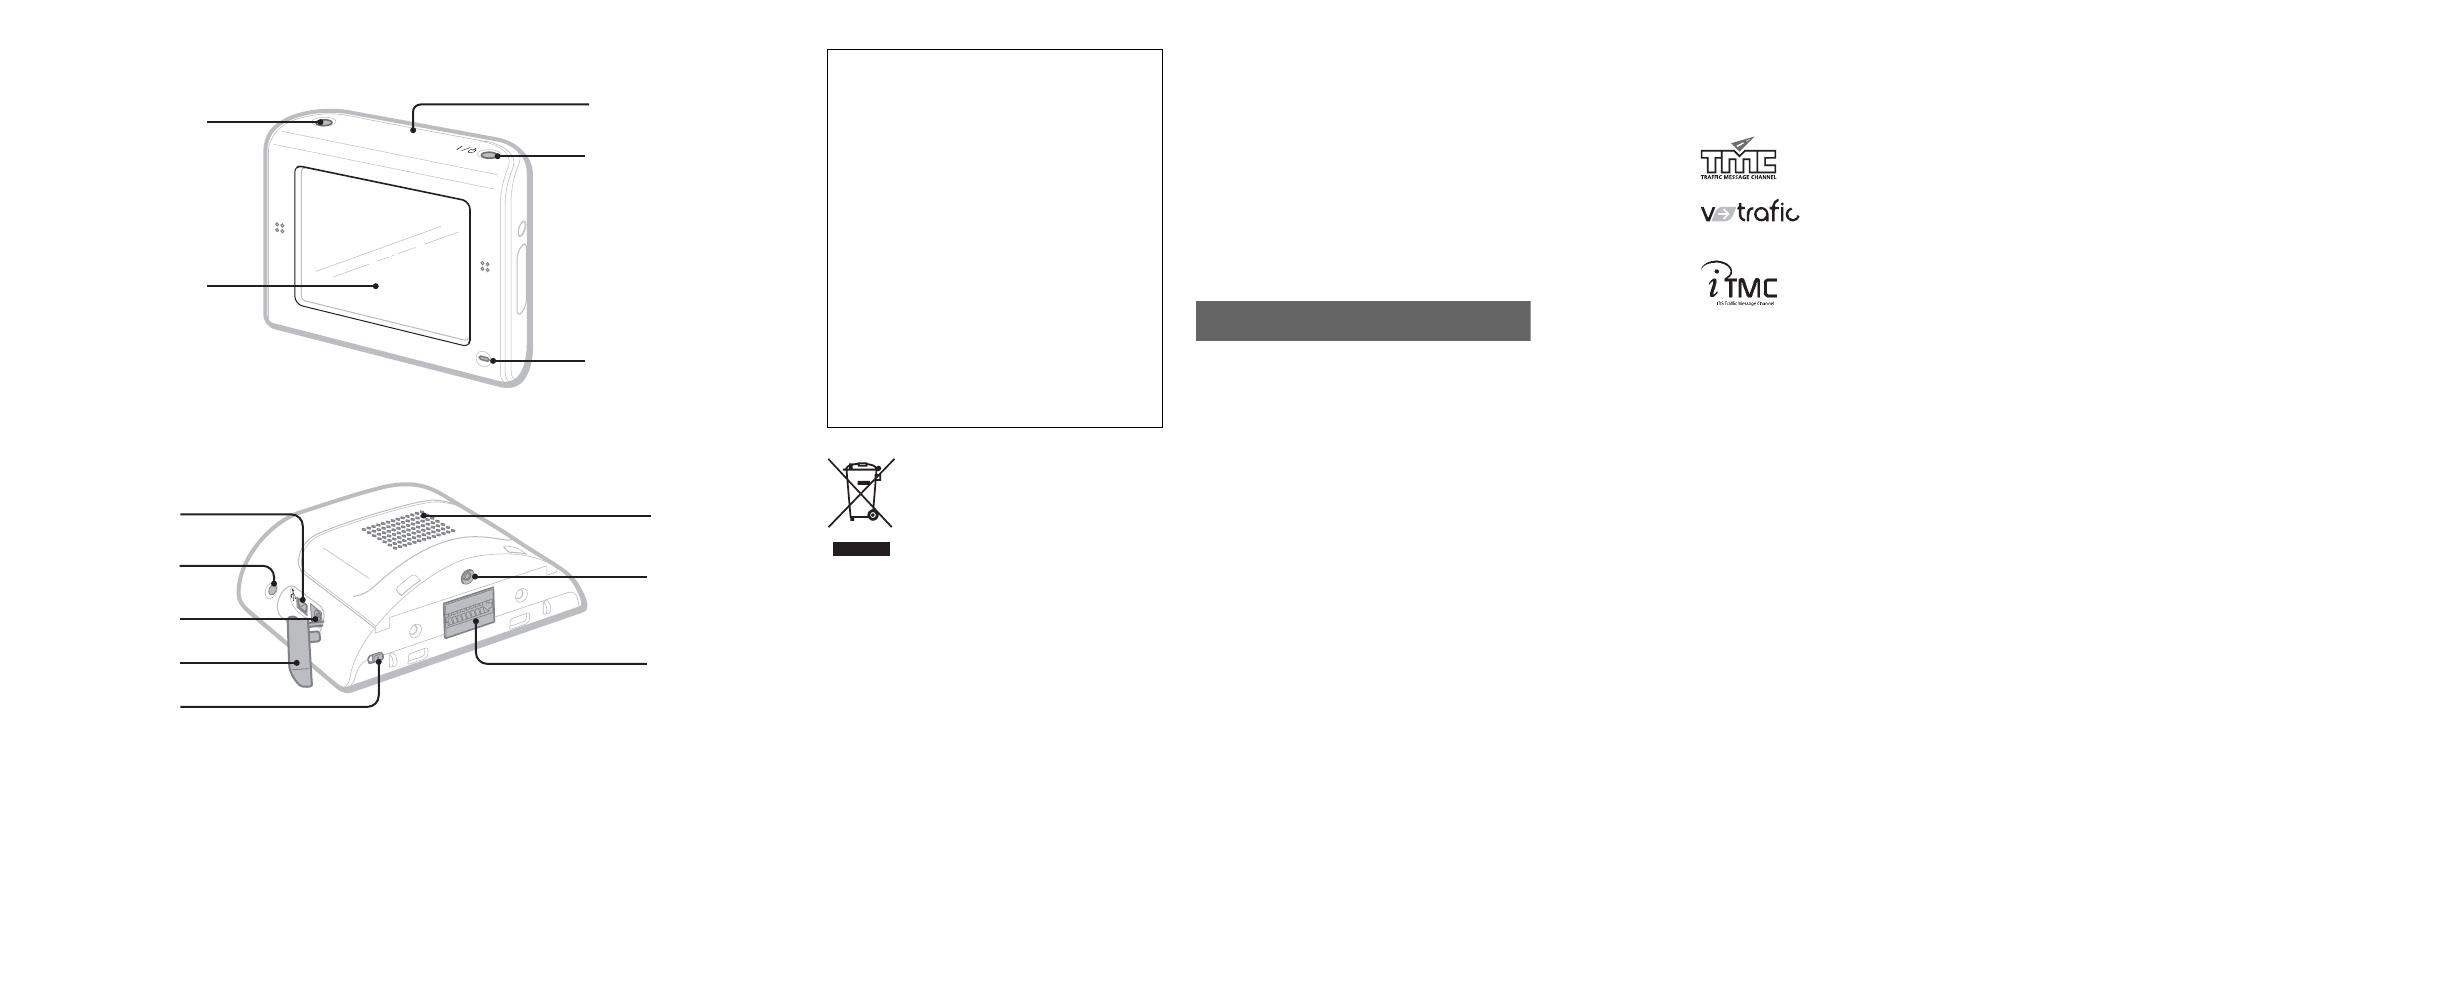
V
O
I
C
E
/
P
O
S
IT
I
O
N
C
H
G
1
2
5
4
3
P
O
W
E
R
O
F
F
O
N
D
C
IN
5V
6
8
7
0
qa
9
qd
qs
No guarantee for lost data or
damaged data
Sony does not provide any guarantee for lost or
damaged data.
Caution
IN NO EVENT SHALL SONY BE LIABLE
FOR ANY INCIDENTAL, INDIRECT OR
CONSEQUENTIAL DAMAGES OR OTHER
DAMAGES INCLUDING WITHOUT
LIMITATION LOSS OF PROFITS, LOSS OF
REVENUE, LOSS OF DATA, LOSS OF USE
OF THE PRODUCT OR ANY ASSOCIATED
EQUIPMENT, DOWNTIME, AND
PURCHASER’S TIME RELATED TO OR
ARISING OUT OF THE USE OF THIS
PRODUCT, ITS HARDWARE AND/OR ITS
SOFTWARE.
Welcome !
Thank you for purchasing this Sony Personal
Navigation System. Before operating this
system, read this manual thoroughly and retain it
for future reference.
FEATURING:
Plug & Play capability
Pre-installed European map (NV-U71T)
Pre-installed regional map (NV-U51)
18 languages selectable for voice guidance and
17 languages selectable for on-screen display
3.5-inch high quality display with touch screen
Advanced 12ch parallel GPS receiver
High-quality speaker
RDS-TMC (Traffic Message Channel)
compatible*
Battery operation
Auto dimmer function
Gesture Command operation
* Optional accessory required for NV-U51.
About this manual
This Quick Start Guide contains instructions
for basic operations.
For more information, see the PDF manual
on the supplied Application Disc (CD-
ROM). For details on installation and
connections, see the supplied “Read This
First” (Installation Manual).
Contents of this manual are written for users
with knowledge of using the Microsoft®
Windows® operating system. For details
about computer operation, see the manual
for your computer.
Illustrations in this manual may differ from
the actual device.
Before operating this system, read this
manual and “Read This First” thoroughly.
Retain this manual and “Read This First” in
a place where you can refer to them at any
future time.
Disposal of Old Electrical &
Electronic Equipment (Applicable in
the European Union and other
European countries with separate
collection systems)
This symbol on the product or on its
packaging indicates that this product shall not be treated
as household waste. Instead it shall be handed over to the
applicable collection point for the recycling of electrical
and electronic equipment. By ensuring this product is
disposed of correctly, you will help prevent potential
negative consequences for the environment and human
health, which could otherwise be caused by inappropriate
waste handling of this product. The recycling of materials
will help to conserve natural resources. For more detailed
information about recycling of this product, please contact
your local Civic Office, your household waste disposal
service or the shop where you purchased the product.
Applicable accessories: Car battery adapter/AC power
adapter
3
Table of Contents
Warning . . . . . . . . . . . . . . . . . . . . . . . . . . . . . . . 4
Location of controls. . . . . . . . . . . . . . . . . . . . . . 5
Turning the unit on . . . . . . . . . . . . . . . . . . . . . . 6
Performing initial setup . . . . . . . . . . . . . . . . . . . 6
Receiving GPS signals . . . . . . . . . . . . . . . . . . . 6
Basic Operations 7
Menu operation . . . . . . . . . . . . . . . . . . . . . . . . . 7
Gesture Command operation. . . . . . . . . . . . . . . 8
Keyboard operation . . . . . . . . . . . . . . . . . . . . . . 8
Route Searching 9
Setting the destination and
starting guidance. . . . . . . . . . . . . . . . . . . . . . 9
Setting the destination in other ways. . . . . . . . 10
Guidance displays . . . . . . . . . . . . . . . . . . . . . . 10
System Settings 12
Using the Supplied Software 13
Contents . . . . . . . . . . . . . . . . . . . . . . . . . . . 13
Connecting to your computer. . . . . . . . . . . 13
Additional Information 14
Precautions . . . . . . . . . . . . . . . . . . . . . . . . . . . 14
Note on LCD panel. . . . . . . . . . . . . . . . . . . . . 14
Maintenance . . . . . . . . . . . . . . . . . . . . . . . . . . 14
Cleaning the suction cup . . . . . . . . . . . . . . 14
Fuse replacement . . . . . . . . . . . . . . . . . . . . 15
Notes on unit disposal. . . . . . . . . . . . . . . . . . . 15
Specifications . . . . . . . . . . . . . . . . . . . . . . . . . 16
Troubleshooting . . . . . . . . . . . . . . . . . . . . . . . 16
Resetting the unit . . . . . . . . . . . . . . . . . . . . 17
4
Warning
PLEASE READ THIS MANUAL AND THE
SUPPLIED READ THIS FIRST (INSTALLATION
MANUAL) COMPLETELY BEFORE
INSTALLING OR OPERATING YOUR
PERSONAL NAVIGATION SYSTEM.
IMPROPER INSTALLATION OR USE OF THIS
DEVICE MAY CAUSE ACCIDENT, INJURY OR
DEATH.
On safety
•Be sure to:
install the navigation system in a safe place
where it does not obstruct the driver’s view.
not install the unit above an airbag.
place the cables and cradle where they do not
obstruct driving.
attach the unit to the cradle properly, otherwise
the unit may fall.
clean the surface of the suction cup and
attachment surface before attaching. When
installing on the dashboard, clean the surface on
which the supplied sheet will be attached. Also,
confirm that the suction cup is securely attached
after installation. Otherwise, the unit or cradle
may fall.
Failure to do so may result in unsafe driving
conditions.
Do not apply excessive force to the unit or cradle
as it may fall.
Comply with local traffic rules, laws and
regulations.
Do not continuously watch the unit while driving.
It is dangerous and may cause a traffic accident.
If you need to operate the navigation system while
driving, be sure to stop the car in a safe place
before operating.
Do not modify the unit.
Do not disassemble the unit except when
disposing of it.
When using the unit indoors
Do not use the AC power adapter placed in a
narrow space, such as between a wall and
furniture.
Use this product near an outlet. This is to ensure
that the power plug can be immediately unplugged
from the outlet to power off if some abnormality
occurs during use.
Be sure that nothing metallic comes into contact
with the metal parts of the product or connecting
cable. If it does, a short may occur and the product
may be damaged.
Always keep the metal contacts clean.
On handling
Do not let foreign objects get inside the cradle
connector (qd) of the unit, as it may cause a
malfunction.
Turn the unit off by pressing ?/1 (4), take it out
of the cradle, then disconnect the car battery
adapter, otherwise it may drain the car battery.
Note the following.
If your car’s cigarette lighter socket is not
connected to ACC on your ignition switch, power
will continue to be supplied to the unit’s built-in
power supply even when the ignition is off or the
unit is not in use.
Do not connect any accessory (car battery adapter,
AC power adapter, etc.) other than those supplied
or optional.
Do not expose the unit to fire or water, as it may
cause a malfunction.
Be sure to remove the unit out of the car when
leaving your car to prevent theft or high
temperature damage inside the car.
Note that the built-in battery cannot be charged
outside the temperature range 5 – 45 ºC (41 –
113 ºF).
Do not leave the unit in high ambient temperature
as the built-in battery capacity will deteriorate, or
it will become unchargeable.
On GPS
GPS (Global Positioning System) satellites
continuously emit signals for positioning anywhere
on the earth. As a GPS aerial receives these signals,
users can be informed of their location (latitude,
longitude and altitude). Information must be
received from 3 satellites in order to obtain two-
dimensional fixes (latitude and longitude), and 4
satellites are required for three-dimensional
positioning (latitude, longitude and altitude). As
GPS satellites are controlled by the U.S. Department
of Defense, a deliberate margin of error between a
few metres (a few feet) and 10 metres (32.8 feet)
exists. As a result, the GPS navigation system may
include an error of between 10 metres (32.8 feet)
and about 200 metres (656.2 feet), depending on the
circumstances.
5
As GPS information is obtained using signal from
satellites, it may be impossible or difficult to obtain
the information in the following locations:
Tunnel or underground
Under a highway
Between high buildings
Between tall trees with dense foliage
After the initial installation, park your car in a safe,
open place (no high buildings, etc.) for up to 20
minutes to allow for GPS signals to be received
before using the navigation system.
Note
It takes time to receive a GPS signal when switching
the unit ON after switching OFF the main power, after
the built-in battery is fully discharged, or after resetting
the unit.
On the software
Read the “END-USER LICENSE AGREEMENT”
carefully before use.
Location of controls
Refer to the pages listed for details.
a VOICE/POSITION button 7, 9
During route guidance:
To hear the next voice guidance.
In the menu display:
To show the map.
In the map display:
To show your current car position.
b Display window/touch screen
c Built-in GPS aerial
d ?/1 (on/standby) button 6
To turn the unit on/off.
e CHG (battery charge) indicator
Lights up in red while charging.
f USB jack 13
To connect to a computer with the USB
cable.
g Auto dimmer sensor
Detects ambient light and automatically
adjusts the display brightness.
h DC IN 5V jack
To connect to the AC power adapter.
i Jack cover
Note
If you pull off the jack cover by accident, use a
pointed object to push it back in.
j POWER switch 6, 17
To turn the main power on/off; reset the unit.
k Speaker
Outputs guidance and warnings.
l External GPS antenna (aerial)* jack
To connect the external GPS aerial to the
cradle.
m Cradle connector
* Optional accessory
6
Turning the unit on
When using for the first time, switch on the main
power by sliding the POWER switch to the ON
position.
Thereafter, you can turn the unit on/off by
pressing
?/1
on the top right of the unit.
To turn the unit off
Press ?/1.
The unit enters standby mode for minimum
power consumption.
Notes
Do not switch off the main power unless the unit is
not to be used for more than 3 months.
If you switch off the main power, it may take time to
receive GPS signals when switching on again.
Be sure to take the unit out of the cradle and
disconnect the car battery adapter when the unit is
not in use to prevent car battery drain.
Performing initial setup
The following can be configured at Startup
Configuration Wizard.
Language for on-screen display and voice
guidance
Distance format (miles/kilometres)
Display brightness
24/12-hour indication
Your home address
Follow the on-screen instructions to perform the
setup.
The above can then be further configured in the
setting menu at any time (page 12).
Receiving GPS signals
After the initial installation, park your car in a
safe, open place (no high buildings, etc.) for up
to 20 minutes to allow for GPS signals to be
received before using the navigation system. The
system requires signals from a minimum of 3
GPS satellites to calculate the current car
position properly.
* The icon shows the GPS signal reception condition.
The indicator lights up in red when the signal
cannot be received.
POWER
ONOFF
C
H
G
P
O
W
E
R
O
F
F
O
N
GPS status indicator*
7
Basic Operations
Common procedures to operate the system are
explained.
General operations can be performed on the
touch screen. Touch the displayed icons with
your finger gently.
Note
Do not press the display with excessive force, or use
any sharp article, such as a pen, etc., to tap on the
display.
Menu operation
The top menu appears when turning on the unit
by pressing ?/1 (except during route guidance, in
which case the map appears).
To show the top menu from the map display,
touch the map.
To return to the top menu from any menu display,
press VOICE/POSITION, then touch the map.
You can set items in the menu by the following
procedures.
1 Show the top menu.
2 Touch “More...
3 Touch “Settings.
The list of setting categories appears.
4 Touch a desired setting category,
setting item, then make the desired
setting.
To scroll the list, touch v/V.
Procedure example: setting the default map
view
Select “General Settingsc “Navigation
View c “2D” or “3D.
During menu operation:
To return to the previous display, touch or
.
To cancel the menu selection, press VOICE/
POSITION (the current car position display
appears).
Note
The items on the menu and setting operations differ
depending on the selected menu item.
8
Gesture Command operation
In map displays (except in map scrolling mode),
by assigning a screen finger stroke such as line,
etc., frequently-used operations can be
performed easily. This is called Gesture
Command operation.
* For details on Quick Links, see page 10 and 12.
Keyboard operation
The keyboard display appears when you need to
enter text.
You need only enter characters in upper case, as
the system automatically converts them to
appropriate characters. You can enter special
characters when necessary.
* The candidate list automatically appears when
candidates are narrowed down as you continue
inputting characters.
To Draw
start navigation to
your home
a circumflex.
start navigation to the
nearest POI stored on
Quick Links*
Quick Link 1
horizontal line
(left to right).
Quick Link 2
vertical line
(downwards).
Quick Link 3
horizontal line
(right to left).
To Touch
enter an alphabetical
character
the desired character
key.
enter a special
character
“ÂÄÁ” to switch to the
special character
keyboard, then the
desired character; and
ABC” to switch back.
enter a number “123” to switch to the
numeric keyboard, then
the desired number key;
and “ABC” to switch
back.
enter a space
delete a character
select a candidate or the candidate in
the list.
show the candidate
list*
“List”
Candidate/entry field
Number of candidates
9
Route Searching
The system searches for routes automatically
after setting the destination.
Before starting, check that GPS signals are
sufficient for navigation (page 6).
Setting the destination and
starting guidance
The procedure for searching for the route and
starting route guidance is explained.
As an example, setting the destination by the
address is introduced here.
For details on setting the destination in other
ways, see “Setting the destination in other ways”
on page 10.
For your safety, park your car in a safe place,
then enter the destination information before
starting a journey.
1 Show the top menu.
In the map display, touch the map.
In the menu display, press VOICE/
POSITION, then touch the map.
2 Select “Navigate.
3 Select “Address Input, then input the
address details.
Input the items in the order below, and touch
or the candidate in the list to proceed.
For details on how to input characters, see
“Keyboard operation” on page 8.
1 “Country”
2 “Town / Postal Code”
If it is possible to pinpoint the destination
by the selected postal code*
1
, the address
confirmation display appears. Select
“Calculate Route.
3 “Street / Destination”
4 “No.” or “Intersection”*
2
The address confirmation display appears.
*1 Available only in the UK and Netherlands.
*2 Selectable only if existent in the selected
street.
4 Select “Calculate Route.
The route is calculated, and route guidance
starts.
To fine adjust the destination point
You can jump from the address confirmation
display to the map scrolling mode, and fine
adjust the destination point.
1 Touch to switch to the map scrolling mode.
2 Drag the screen to adjust the destination point.
3 Touch to show the map scrolling mode
menu, then select “Navigate to Here.
For details on operations in the map scrolling
mode, see “Map scrolling mode” on page 12.
10
Setting the destination in other
ways
You can also set the destination and search for
routes by the following methods.
From the top menu, select the items in the
following order, then “Calculate Route” (if
necessary).
For details, see the supplied PDF manual.
Guidance displays
Once a route has been calculated, visual
guidance navigates you to the destination along
with audio guidance.
Information on map tool menu
1 To view detailed TMC information.*
1
2 To adjust the volume.*
2
3 To show option menu.
4 To switch to map scrolling mode.
*1 When the supplied (or optional) TMC cradle is
used, this appears only when the route that has
been found is congested.
*2 When the unit is powered by the built-in battery,
volume may slightly decrease.
2D Map display
Straight-ahead driving (during route guidance)
Search Nearby
Searches for routes to a POI, such as restaurant,
hotel, etc., near the current car position.
Select “Search Nearby,” then any of the
following options.
“Quick Link 1 - 3”
Searches for routes to the nearest POI of the
category stored on Quick Links. Categories on
Quick Links can be customized in the setting
menu (page 12).
“Search by Name
Enter the name of the POI directly.
“Search by Category”
Select the desired POI category from the list.
Go Home
Searches for routes to your home when it is
registered.
Navigate
Select “Navigate,” then any of the following
options.
“POI Search Nationwide”
Searches for routes to a POI, such as airport,
etc., within the specified country.
“POI Search Town”
Searches for routes to a POI, such as restaurant,
hotel, etc., within the specified town.
“Address Book”
Searches for routes to a saved destination point.
“Recent Destinations”
Searches for routes to recently searched
destinations.
2
3 4
1
E GF
A B C
D
11
Straight-ahead driving (in other cases)
Approaching an intersection
Approaching an intersection (closer)
A Current time/GPS status/Battery condition/
TMC status
For details, see the supplied PDF manual.
B Distance/ETA (Estimated Time of Arrival) to
destination
C Current position
D Distance to next turn
E Current street name
F Next street name
G North indicator
H Current direction/Current speed
I Next turn instruction
J Bar indicator of the distance to next turn
K Instruction after next
3D Map display
You can set the 3D map display in the setting
menu (page 12).
Dynamic Route Information
This display shows the distance to the
destination, POI information, etc.
To view, from map display, select “Options” c
“Dynamic Route Info.
For details, see the supplied PDF manual.
Route display
You can view the entire route to the destination.
To view, from map display, select “Options” c
“Show Route.
H
I
J K
continue to next page t
12
Map scrolling mode
You can switch to map scrolling mode from map
display by touching , whether during route
guidance or not.
In map scrolling mode, the crosshair is displayed
on the map, and you can drag the screen to scroll
the map.
Touch / to adjust map scale.
Place the intersection of the crosshair on a
desired point, then touch to show the map
scrolling mode menu, where you can set the
point as a destination, etc.
Touch to return to the current car position
display.
System Settings
Various settings related to the system and
memory are configurable.
From the top menu, select “More...c “Settings”
c the desired category c the desired item below
to make each setting.
Several representative setting items in each
category are introduced here as examples.
For details, see the supplied PDF manual.
General Settings
Map Settings
POI Settings
Route Profile
Note
Warnings given according to map information may not
always be correct due to road works, etc. Traffic
situations and road regulations take absolute
precedence over information given by the navigation
system.
Navigation View (to select the default map
view (2D or 3D)), Show Distance/ETA to
Destination (to show/hide distance to
destination and ETA (Estimated Time of
Arrival)), etc.
Current Map (to select a map stored in the
unit).
Show POIs (to show/hide each POI), Quick
Link 1-3 (to store 3 frequently-used POI
categories, any of which can be used as a
shortcut when setting the destination).
Type of Route (to select the route search
preference), Motorways (to allow/avoid/forbid
motorways/highways), etc.
13
Using the Supplied Software
The major functions of the software on the
supplied CD-ROM are introduced below.
If you insert the CD-ROM into your computer,
the screen appears automatically. Follow the on-
screen instructions.
System requirements
OS: Windows 2000/XP
CD-ROM/DVD-ROM drive
USB port
150 MHz CPU speed minimum
Contents
Connecting to your computer
Before connecting to your computer, install the
PC connection software (ActiveSync) to your
computer.
1 Connect the unit to an outlet using the
AC power adapter and the AC power
cable.
2 Connect the unit to your computer
with the USB cable.
Connect the small connector of the USB
cable to the USB jack on the unit, then the
large connector to a USB port on your
computer.
Notes when transferring data
During transfer, do not
– disconnect the USB cable or the AC power adapter.
– turn off the main power of the unit, enter unit standby
mode, or reset the unit.
– shut down the computer, enter computer standby
mode, or restart the computer.
If you want to cancel transferring mid-way, click the
cancel button on the computer screen.
Install PC Connection Software
PC connection software (ActiveSync) can be
installed.
Language Manager
Language data for on-screen display and voice
guidance can be added to the unit, and
unnecessary language data can be deleted from
the unit.
Read the Manual
You can read the PDF manual which contains
further information on operations available.
Support Link
Easy access to the Sony navigation support site is
available.
Visit this site for technical support, such as
software updates, FAQs, etc.
14
Additional Information
Precautions
If your car has been parked in direct sunlight,
allow the unit to cool off before operating it.
Moisture condensation
On a rainy day or in a very damp area, moisture
condensation may occur inside the display of the
unit. Should this occur, the unit will not operate
properly. In such a case, slide the POWER switch
on the bottom right of the unit to OFF position,
then wait for about an hour until the moisture has
evaporated.
Note on LCD panel
Some stationary blue, red or green dots may
appear on the monitor. These are called “bright
spots,” and can happen with any LCD. The LCD
panel is precision-manufactured with more than
99.99 % of its segments functional. However, it
is possible that a small percentage (typically 0.01
%) of the segments may not light up properly.
This will not, however, interfere with your
viewing.
Maintenance
Cleaning the suction cup
Wash and clean the surface of the suction cup if it
becomes dirty and attachment strength weakens.
Before washing, be sure to detach the suction cup
part from the cradle following the steps below.
1 Holding the left knob, loosen the right
knob, then remove both knobs.
2 Detach the suction cup part.
3 Wash the surface of the suction cup
with water.
Clean and dry the suction cup before
reattaching.
To reattach, install the suction cup, then the left
and right knobs, and tighten the right knob.
Warning
Never wash the suction cup without detaching
it from the cradle, as doing so may damage the
cradle.
Do not use a cleaning solution, wash only with
water.
Be sure to dry the suction cup before
reattaching.
15
Notes
If the suction cup leaves a trace on the windscreen,
wipe with water.
The dashboard may leave an impression on the
surface of the suction cup, however, it does not
affect the attachment strength.
Fuse replacement
When replacing the fuse in the car battery
adapter, be sure to use one matching the
amperage rating stated on the original fuse. If the
fuse blows, check the power connection and
replace the fuse. If the fuse blows again after
replacement, there may be an internal
malfunction. In such a case, consult your nearest
Sony dealer.
Warning
Never use a fuse with an amperage rating
exceeding the one supplied with the unit as this
could damage the unit.
Notes on unit disposal
Remove the built-in lithium-ion battery when
disposing of the unit, and return the battery to a
recycling location.
The procedure for removing the battery is
explained below.
Note
Never disassemble the unit except when disposing of
it.
1 Switch off the main power by sliding
the POWER switch to the OFF
position.
2 Remove the jack cover 9 (page 5).
3 Remove the 2 screws on the underside
of the unit using a screwdriver.
4 Slide the rear cover, then lift to open.
5 Remove the battery.
6 Insulate the connector terminal by
wrapping with a tape.
Fuse (2.5 A)
To tighten
To remove
continue to next page t
1
2
16
Notes on the lithium-ion battery
Keep the battery out of the reach of children.
Do not hold the battery with metallic tweezers,
otherwise a short-circuit may occur.
Specifications
Main unit
Operating temperature: 5 – 45 ºC (41 – 113 ºF)
Power requirements: DC 5 V
(from supplied AC power adapter)
Connection terminals:
Cradle connector
DC IN 5V jack
USB jack
External GPS antenna (aerial) jack
Speaker: 20 × 40 mm (0.8 × 1.6 in) oval speaker
Consumption current: Approx. 0.5 A
Dimensions: Approx. 103.8 × 87.6 × 32.8 mm
(4.1 × 3.5 × 1.3 in)
(w × h × d, protruding parts excluded)
Mass: Approx. 280 g (9.9 oz)
Monitor
System: Transmissive liquid crystal display
Drive system: a-Si TFT active matrix system
Dimensions: 3.5 in (4:3)
Approx. 70.1 × 52.6, 87.6 mm
(2.8 × 2.1, 3.5 in) (h × v, d)
Segment: 230,400 (960 × 240) dots
Cradle
Operating temperature: 5 – 45 ºC (41 – 113 ºF)
Power requirements: DC 5.2 V
(from supplied 12 V car battery adapter (negative
earth))
Connection terminals:
Unit connector
DC IN 5.2V jack
TMC aerial jack (NV-U71T only)
Reception frequency: 87.5 – 108.0 MHz
(NV-U71T only)
Built-in battery charging time/usage
time
Charging time
With the supplied car battery adapter/AC power
adapter: Approx. 4.5 hours (with unit turned on),
or 2.5 hours (in standby mode)
Usage time
Up to 6.5 hours (depending on usage)
Optional accessories
External GPS Antenna: VCA-41
TMC Car Cradle Kit: NVA-CU4T
Car Install Kit: XA-49FM
Design and specifications are subject to change
without notice.
Troubleshooting
The following checklist will help you remedy
problems you may encounter with your unit.
Before going through the checklist below, check the
connection and operating procedures.
WARNING
Battery may explode if mistreated.
Do not recharge, disassemble, or dispose of
in fire.
The operation icons on the display do not
function.
An operation may take time while a map is displayed.
The unit does not turn on.
t Check that the POWER switch on the bottom right
of the unit is in the ON position.
t Charge the built-in battery.
t Check that the unit is securely attached to the
cradle. For details on installation, see the supplied
“Read This First” (Installation Manual).
Halogenated flame retardants are not used in the
certain printed wiring boards.
Use of rechargeable lithium ion batteries.
Corrugated cardboard is used for the packaging
cushions.
VOC (Volatile Organic Compound)-free vegetable
oil based ink is used for printing the carton.
17
Resetting the unit
If the navigation software freezes, try resetting
the unit.
Switch off the main power by sliding the
POWER switch to the OFF position, then switch
on again after approximately 10 seconds.
Note
After you switch off the main power, it may take time to
receive GPS signals when switching on again.
The built-in battery cannot be charged.
t Check that the POWER switch on the bottom right
of the unit is in the ON position.
t If the AC power adapter is being used, disconnect it
from the outlet, then reconnect.
t The built-in lithium-ion battery can be charged at
temperatures between 5 – 45 ºC (41 – 113 ºF). The
battery may not be charged if the temperature
inside the unit increases because of direct sunlight
exposure, etc. This is not a malfunction.
GPS signal cannot be received.
Firstly, read the GPS overview (page 4), then check the
GPS status by selecting “More…” in the top menu c
“GPS Status.
The system cannot receive GPS signals due to an
obstruction.
t Move your car to a place where signals can be
received clearly.
GPS signal reception is low.
t The optional External GPS Antenna VCA-41
may be required for a heated or heat reflective
windscreen.
• There is an obstacle in front of the GPS aerial.
t Install the unit where the signal is not interrupted
by the body of the car, etc.
Signal may not be received if a window film is
attached.
t Use the optional External GPS Antenna VCA-41.
The car position on the map does not match
the current road.
The error margin of the signal from the GPS satellites
is too large. A maximum error margin of a few
hundred metres can exist.
Voice guidance cannot be heard.
The volume is set too low.
t Raise the volume (page 10).
When the unit is powered by the built-in battery,
volume may slightly decrease.
The LCD is not displayed normally.
• In high temperatures, the LCD may darken and not
display clearly. In low temperatures, afterimage may
occur on the LCD. These are not malfunctions, and
the LCD will return to normal when the temperature
returns to within the specified operating range.
The LCD is dark.
t The auto dimmer function may be activated
because its sensor 7 (page 5) is covered by a
hand, etc.
The cradle comes off the attachment surface.
Attachment strength weakens if the surface of the
suction cup or attachment surface becomes dirty.
t Wash and clean the suction cup and the attachment
surface (page 14).
The demonstration mode starts automatically
even if no operation is performed.
t Turn off the auto demonstration mode by selecting
“More…” in the top menu c “Settings” c “General
Settings” c “Demo Mode.” Then, confirm that
“Demo Mode” is set to off.
C
H
G
P
O
W
E
R
O
F
F
O
N
POWER
ONOFF
  • Page 1 1
  • Page 2 2
  • Page 3 3
  • Page 4 4
  • Page 5 5
  • Page 6 6
  • Page 7 7
  • Page 8 8
  • Page 9 9
  • Page 10 10
  • Page 11 11
  • Page 12 12
  • Page 13 13
  • Page 14 14
  • Page 15 15
  • Page 16 16
  • Page 17 17
  • Page 18 18
  • Page 19 19
  • Page 20 20
  • Page 21 21
  • Page 22 22
  • Page 23 23
  • Page 24 24
  • Page 25 25
  • Page 26 26
  • Page 27 27
  • Page 28 28
  • Page 29 29
  • Page 30 30
  • Page 31 31
  • Page 32 32
  • Page 33 33
  • Page 34 34
  • Page 35 35
  • Page 36 36
  • Page 37 37
  • Page 38 38
  • Page 39 39
  • Page 40 40
  • Page 41 41
  • Page 42 42
  • Page 43 43
  • Page 44 44
  • Page 45 45
  • Page 46 46
  • Page 47 47
  • Page 48 48
  • Page 49 49
  • Page 50 50
  • Page 51 51
  • Page 52 52
  • Page 53 53
  • Page 54 54
  • Page 55 55
  • Page 56 56
  • Page 57 57
  • Page 58 58
  • Page 59 59
  • Page 60 60
  • Page 61 61
  • Page 62 62
  • Page 63 63
  • Page 64 64
  • Page 65 65
  • Page 66 66
  • Page 67 67
  • Page 68 68
  • Page 69 69
  • Page 70 70
  • Page 71 71
  • Page 72 72
  • Page 73 73
  • Page 74 74
  • Page 75 75
  • Page 76 76
  • Page 77 77
  • Page 78 78
  • Page 79 79
  • Page 80 80
  • Page 81 81
  • Page 82 82
  • Page 83 83
  • Page 84 84
  • Page 85 85
  • Page 86 86
  • Page 87 87
  • Page 88 88
  • Page 89 89
  • Page 90 90
  • Page 91 91
  • Page 92 92
  • Page 93 93
  • Page 94 94
  • Page 95 95
  • Page 96 96
  • Page 97 97
  • Page 98 98
  • Page 99 99
  • Page 100 100
  • Page 101 101
  • Page 102 102
  • Page 103 103
  • Page 104 104
  • Page 105 105
  • Page 106 106
  • Page 107 107
  • Page 108 108
  • Page 109 109
  • Page 110 110
  • Page 111 111
  • Page 112 112
  • Page 113 113
  • Page 114 114
  • Page 115 115
  • Page 116 116
  • Page 117 117
  • Page 118 118
  • Page 119 119
  • Page 120 120
  • Page 121 121
  • Page 122 122
  • Page 123 123
  • Page 124 124
  • Page 125 125
  • Page 126 126
  • Page 127 127
  • Page 128 128
  • Page 129 129
  • Page 130 130
  • Page 131 131
  • Page 132 132
  • Page 133 133
  • Page 134 134
  • Page 135 135
  • Page 136 136
  • Page 137 137
  • Page 138 138
  • Page 139 139
  • Page 140 140
  • Page 141 141
  • Page 142 142
  • Page 143 143
  • Page 144 144
  • Page 145 145
  • Page 146 146
  • Page 147 147
  • Page 148 148

Sony Nav-U NV-U51 Owner's manual

Category
Navigators
Type
Owner's manual

Ask a question and I''ll find the answer in the document

Finding information in a document is now easier with AI