Saeco CA6805/47 User manual
- Category
- Kitchen & houseware accessories
- Type
- User manual
This manual is also suitable for

Page is loading ...
Page is loading ...
Page is loading ...

5
Table of contents
1 IMPORTANT SAFEGUARDS 6
2 General description 7
3 About grinding coffee 7
4 Beforerstuse 7
5 Using the coffee grinder 7
6 Maintenance 9
7 Disposal 9
8 Troubleshooting 10
9 Assistance and service 10
10 Contact information 10
ENGLISH

6
10
hot gas or electric ring or in a heated oven.
11 To disconnect the appliance, remove the plug
from the electrical outlet. To remove the plug,
grip the plug body and pull it from the outlet.
Never yank or twist the cord to unplug.
12 Only use the appliance for its intended
purpose as described in these in instructions.
Never chop herbs, ice, nuts or sugar in the
appliance.
13 Check the grinding chamber for the presence
of foreign objects before use.
14 Check if the voltage indicated on the
appliance corresponds to the local mains
voltage before you connect the appliance.
15 To reduce the risk of electric shock, do not
disassemble this appliance.
16 The use of attachments not recommended
electric shock or injury.
17 Avoid moving parts.
18
not use extension cords.
B Warning:
SAVE THESE
INSTRUCTIONS
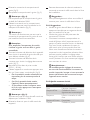
1.0.1 Polarized plug
This appliance has a polarized plug (one blade
is wider than the other). As a safety feature,
this plug
electrician. Do not attempt to defeat this
safety feature.
1
4 mm
IMPORTANT
SAFEGUARDS
Read all instructions in this user manual carefully
before you use the appliance and save it for
future reference.
B Warning:
READ ALL
INSTRUCTIONS
BEFORE USE
When using electrical appliances, basic
safety precautions should always be
followed including the following:
1 To reduce the risk of electric shock:
Do not immerse cord, plug or appliance in
water or other liquids.
2 Close supervison is necessary when any
appliance is used by or near children.
3 Do not remove the lid of the bean hopper
until the burr has stopped completely. The
burr stops within 2 to 3 seconds after you
have pressed the on/off switch to switch off
the appliance.
4 Unplug from the outlet when not in use,
before putting on or taking off parts, and
before cleaning.
5 Do not operate any appliance with a
damaged cord or plug or after the appliance
malfunctions, or is dropped in any manner.
Return appliance to the nearest authorized
service facility for examination, repair or
electrical or mechanical adjustment.
6 Do not let the cord hang over the edge of a
table or counter where it can be pulled on by
children or can be tripped over unintentionally.
7 Do not let the cord touch hot surfaces.
8
This appliance is intended for householduse only.
9 Do not use the appliance outdoors.
1.9 mm 1.6 mm

7
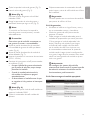
4 Beforerstuse
1 Wipe the housing and the bean hopper
with a clean damp cloth.
B
Warning:
Never immerse the appliance, the cord and
the plug in water or any other liquid or rinse
them under running water.
2 Clean the lid of the bean hopper, the ground
coffee container and the lid of the ground
coffee container in warm soapy water. Then
rinse them with running water and dry them.
5 Using the coffee
grinder
B Warning:
Make sure the appliance is unplugged.
1 Place the lid on the ground coffee container
and slide the ground coffee container into
the appliance.
D
Note:
Make sure that the lid is placed on the ground
coffee container correctly and the ground
coffee container is placed in the appliance
correctly. The grinder does not work if this is
not the case.
2 Remove the lid of the bean hopper (Fig. 2).
3 Fill the bean hopper (Fig. 3).
D
Note: (Fig. 4)
Do not ll the bean hopper beyond the MAX
indication.
4 Place the lid on the bean hopper and press it
down until it closes with a click (Fig. 5).
D
Note:
The grinder does not work if the lid of the
bean hopper is not placed correctly and
closed properly.
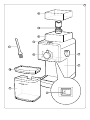
2 General
description (Fig. 1)
1 Lid of bean hopper
2 Removable upper burr
3 Bean hopper
4 On/off switch
5 Quantity selection knob
6 Grind selection knob
7 Housing of the coffee grinder
8 Ground coffee dispenser
9 Ground coffee container
10 Lid of ground coffee container
11 Cleaning brush
3 About grinding
coffee
The proper grind guarantees the most avorful
cup of coffee. The grind to be selected depends
on the brewing method. That is why coffee ground
to be used in an espresso machine is much ner
than coffee to be used in a drip-lter coffeemaker.
If a too ne grind is used, for instance if espresso
grind is used in a drip-lter coffeemaker, this will
result in overextraction and bitter, pungent tasting
coffee. If a too coarse grind is used for a particular
brewing method, this will result in underextraction
and weak, watery coffee. If the correct grind is
used, adding more coffee simply makes the coffee
stronger without making it bitter.
Besides offering a number of grind settings, this
coffee grinder also guarantees a consistent grind.
This is important to ensure the extraction is always
consistent across all of the ground coffee particles.
ENGLISH

8
5.0.1 Tips
• Store coffee beans in a cool, dry place in an
opaque, airtight container.
• Grind the coffee beans just before you start
brewing coffee.
• Choose the grind that is appropriate for the
brewing method you use (see ‘Choosing the
appropriate grind’ below). The faster the water
ows through the ground coffee, the ner the
grind should be. For rst use, we advise you to
select the medium grind setting. Next, adjust
the setting to your taste. When you have used
the grinder a few times, you will know which
grind setting best suits your taste.
B
Warning:
Do not adjust the grind setting while the
grinder is working. If you turn the grind
selection knob while the grinder is working,
the motor of the grinder may jam.
5.0.2 Choosing the appropriate grind
Grind Brewing method
Fine Espresso machine
Medium/Fine Automatic drip-lter
coffeemaker
Medium Manual pour-on lter
brewing
Medium/Coarse Percolator
Coarse French press
5.0.3 How much coffee to use
Brewing method Quantity
Espresso machine 1 tablespoon for each 1oz
shot of espresso
Drip-lter, manual
lter, percolator,
French press
1-2 tablespoons for each
5oz cup of coffee
C Caution:
To prevent the grinder from jamming, do not
use unroasted or caramelized beans.
5 Turn the quantity selection knob to choose
the quantity of coffee beans you want to grind
coffee (Fig. 6).
6 Turn the grind selection knob to choose the
required grind setting (Fig. 7).
7 Insert the plug into an electrical outlet (120
V - 60 Hz).
8 Press the on/off switch to switch on the
appliance (Fig. 8).
• The larger the quantity you selected with
the quantity selection knob, the longer the
grinder will run.
• When the selected quantity has been
ground the appliance switches off
automatically.
• If you want to stop grinding before the
grinding cycle is completed, press the on/
off switch.
D
Note: (Fig. 9)
Make sure that the ground coffee level does
not exceed the MAX indication.
9 Remove the ground coffee container from the
appliance.
10 Tap the ground coffee container gently,
remove the lid and pour the ground coffee
into the lter of the coffeemaker.
E
Tip:
You can also use a measuring spoon to
transfer the ground coffee to the lter.

9
6 Clean the upper burr with the cleaning
brush supplied (Fig. 12).
D
Note:
Do not clean the removable upper burr in
or with water.
7 Carefully clean the inside of the bean hopper
with a damp cloth.
8 To reinsert the upper burr, set the grind
selection knob to the coarse grind
setting (Fig. 13).
9 Insert the upper burr (1) and turn
counterclockwise once (2) (Fig. 14).
10 Carefully clean the ground coffee dispenser
with a damp cloth to prevent ground coffee
residues from blocking the dispenser (Fig. 15).
11 Clean the housing with a damp cloth.
7 Disposal
• Do not throw away the appliance with the
normal household waste at the end of its life,
but hand it in at an ofcial collection point for
recycling. By doing this, you help to preserve
the environment (Fig. 16).
• If you have any recycling questions, contact
your local waste management ofce.
6 Maintenance
Regular cleaning and proper maintenance ensure
optimal results and a long life for the appliance.
B
Warning:
Always unplug the appliance before you clean it.
B
Warning:
Never immerse the appliance, the cord and the
plug in water or any other liquid or rinse them
with running water.
B
Warning:
Do not use any corrosive detergents and
abrasive pads or cloths to clean the appliance.
D
Note:
Regular cleaning of the removable upper burr is
necessary to ensure proper working.
1 Remove the ground coffee container from the
appliance and empty it.
D
Note:
To preserve the ground coffee’s aroma, empty
the ground coffee container into a lter for
direct use or into an airtight container for
storage immediately after grinding.
2 Remove the lid from the bean hopper.
3 Clean the lid of the bean hopper, the ground
coffee container and the lid of the ground
coffee container in warm soapy water or in
the top rack of a dishwasher.
4 To remove the upper burr, set the
grind selection knob to the ne grind
setting (Fig. 10).
5 Grasp the top of the upper burr, turn
clockwise (1) and pull upward vertically (2) to
remove it from the bean hopper (Fig. 11).
ENGLISH

10
My drip-lter coffee tastes too strong.
• Select a coarser grind or use fewer
coffee beans.
The lter is blocked or overows.
•
Select a coarser grind or use fewer coffee beans.
Small coffee particles end up in my drip-lter coffee.
• Select a coarser grind and stop using a
permanent lter.
My drip-lter coffee tastes too mild.
• Select a ner grind or use more coffee beans.
After brewing, part of the coffee grounds is
still dry.
• Select a ner grind or use more coffee beans.
The coffee ow of my espresso machine is
dripping or there is no ow of coffee at all,
during brewing.
• Select a coarser grind.
9
Assistance and service
For assistance and service, please visit our website
at www.philips.com/saeco.
8 Troubleshooting
This chapter summarizes the most common
problems you could encounter with this
coffee grinder.
The appliance does not work.
• Make sure that the plug is inserted correctly
and the electrical outlet works properly.
• Check if the lid of the bean hopper is placed
correctly and closed properly.
• Check if the ground coffee container is
positioned correctly and if the lid of the
ground coffee container is placed correctly
on the container.
The appliance stops during operation.
• The appliance overheated. The resettable
thermal fuse of the motor was activated.
To reset the thermal fuse, allow the appliance
to cool down for approx. 30 minutes.
To avoid overheating, do not exceed the
MAX indications of the bean hopper and
the coffee bean container.
The grind selection knob does not work.
• Check if the upper burr is correctly
positioned in the bean hopper
(see chapter ‘Maintenance’ ).
My drip-lter coffee tastes too bitter.
• Select a coarser grind.
Page is loading ...
Page is loading ...
Page is loading ...
Page is loading ...
Page is loading ...
Page is loading ...
Page is loading ...
Page is loading ...
Page is loading ...
Page is loading ...
Page is loading ...
Page is loading ...
Page is loading ...
Page is loading ...
Page is loading ...
Page is loading ...
Page is loading ...

© 2012 Koninklijke Philips Electronics N.V.
All rights reserved.
4222.200.0610.1
-
 1
1
-
 2
2
-
 3
3
-
 4
4
-
 5
5
-
 6
6
-
 7
7
-
 8
8
-
 9
9
-
 10
10
-
 11
11
-
 12
12
-
 13
13
-
 14
14
-
 15
15
-
 16
16
-
 17
17
-
 18
18
-
 19
19
-
 20
20
-
 21
21
-
 22
22
-
 23
23
-
 24
24
-
 25
25
-
 26
26
-
 27
27
-
 28
28


Saeco CA6805/47 User manual
- Category
- Kitchen & houseware accessories
- Type
- User manual
- This manual is also suitable for
Ask a question and I''ll find the answer in the document
Finding information in a document is now easier with AI
in other languages
- français: Saeco CA6805/47 Manuel utilisateur
- español: Saeco CA6805/47 Manual de usuario
Related papers
Other documents
-
Philips Saeco CA6805 User manual
-
Saeco Coffee Makers Titan User manual
-
Windmere togo GC-6000 User guide
-
Krups GX610050 User manual
-
-
Breville the Smart Grinder Pro User manual
-
Krups GX500050 User manual
-
-
Philips HD5072/01 Datasheet
-
Thulos TH-MC55GR Owner's manual